
How to Organize Power Tools in a Small Workshop
This post contains affiliate links. As an Amazon Associate, we earn from qualifying purchases.
Organizing power tools in a small workshop starts with planning your workflow, not buying shelves. Divide your space into activity zones, mount tools vertically on walls using systems like French cleats or pegboard, and keep everyday items within arm’s reach of your primary workbench. A 10×10 space can accommodate a complete setup if you treat the bench as a workspace, not a storage surface.
Most advice tells you where to put things. That’s backward. You end up with a tidy shop where you still waste ten minutes walking back and forth because the sander is across the room from the sandpaper. The real goal is a layout that lets you work without leaving your station, not just storage. A key part of this is knowing how to organize power tools in a small workshop.
What follows is a system. We’ll map your shop by task, choose storage that fits the tools you actually use, and lock in a cleanup routine simple enough to follow when you’re tired. This works for a one-car garage corner or a dedicated 10×10 shed, which is the classic scenario for how to organize power tools in a small workshop.
Key Takeaways
- Use the zone system, designate areas for bench work, power tool operation, and storage, before you hang a single hook.
- Vertical storage beats horizontal; pegboards, French cleats, and wall cabinets free up critical floor and bench space.
- Mount heavy wall organizers by anchoring into at least 2 wall studs with a minimum of 2 screws per stud.
- Organize by frequency of use; tools you grab every session should be reachable without moving another item.
- Perform a quick reset after every work session and a deeper inspection every few months to maintain the system.
The Zone System: Start Here, Not With Shelves
You sit down to drill a hole. The drill is on the wall behind you. The bit is in a drawer to your left. The clamp is across the room. That’s a zone problem.
The most practical framework for a small space is the zone system, which is the core answer to how to organize power tools in a small workshop: divide the shop by activity, arrange each zone for that activity, and minimize movement between them. According to Work IQ Tools, a functional one-person workshop can fit in 100–150 square feet with this kind of planning. A 10×10 space without full-sheet stationary tools can handle a complete hand and power tool bench setup.
Designate areas for bench work, power tool operation, finishing, and storage. Optimize the bench zone first, everything you use regularly should be within arm’s reach of your vise or primary work position.
Your bench is Zone 1. This is your command center. The tools you use every session, screwdrivers, a mallet, your most-used drill, must be reachable from here without taking a step. A pegboard or French cleat wall directly behind the bench makes this possible. Zone 2 is for power tool operation: the table saw, miter saw, or drill press. Plan clear infeed and outfeed space. A separate zone is for storage, organized by how often you need it.
This isn’t just moving furniture. It’s designing a flow. The vise position is fixed, organize everything else in Zone 1 relative to it. Most-used tools on your dominant side, less-used tools within reach but out of the way. The bench surface is a workspace, not a storage surface. When you finish using a tool, it goes back on the wall, not on the bench.
Vertical Storage Beats Horizontal
Floor space is your most valuable real estate. A tool on the floor is a tripping hazard and a waste of square footage. Vertical storage, using your walls, is the essential rule for a small shop.
Pegboards, French cleats, magnetic bars, and wall cabinets all work. Each has a trade-off. French cleats are incredibly strong and reconfigurable but require some woodworking to build. Magnetic bars can hold steel tools like wrenches and drill bits.
In a small shop, floor space is more valuable than wall space. Pegboards, French cleats, magnetic bars, and wall cabinets free up bench and floor area for actual work.
If your wall is drywall, you can’t just screw anywhere. For a heavy wall organizer, you must anchor into the studs. The Homemade by Huseman blog specifies mounting into at least 2 wall studs using a minimum of 2 screws per stud. They recommend GRK RSS Structural 3” Screws for heavy applications. For a wall to hang tools, Popular Woodworking suggests adding a layer of 3/8″ or 1/2″ thick plywood over drywall if the wall is drywall. This gives you a solid backing to put a nail or screw anywhere.
Here’s a quick comparison to help you choose:
| Storage Type | Best For | Load Consideration |
|---|---|---|
| Pegboard | Frequently rearranged lighter tools (screwdrivers, pliers, hammers) | Use pegboard hooks rated for the tool weight; secure board to studs. |
| French Cleat | Heavy power tools (circular saws, routers), customizable shop cabinets | Incredibly strong; cleat must be securely screwed into wall studs. |
| Magnetic Bar | Steel tools, bits, small metal accessories | Holds less weight; keep away from cordless tool batteries. |
| Wall Cabinet | Dust-sensitive items, consumables (sandpaper, finishes) | Must be securely anchored; doors protect contents. |
The goal is to get every tool off the bench and the floor. Your future self will thank you when you can actually walk to the table saw without an obstacle course.
How to Build Storage That Fits Your Actual Tools
A storage plan made from memory usually fails. It overlooks the bulky corded sander or the fact that you own five different drill bits. Before you build or buy anything, take every portable power tool out of its current hiding place. Lay them all on the floor.
Now, sort them by frequency:
- Frequently used: Reachable without moving another item.
- Occasionally used: Can live higher, lower, or farther from the main bench.
- Heavy or awkward: Require a stable shelf, cart, or dedicated base.
- To be removed: Broken tools or duplicates you never use. Empty space is a functional part of your system.
Where this goes sideways: Building a shelf with fixed slots before measuring your tools. A jigsaw handle is wider than a drill. That beautiful custom shelf is useless if your tools don’t fit.
When building a custom cordless tool shelf, the Homemade by Huseman blog advises maintaining at least 1.5″ of space between tool slots for structural support. You can adjust slot widths for your specific tools, but that spacing is the minimum for strength.
For a simple, inexpensive DIY project, consider a PVC pipe organizer. The Heathered Nest blog uses 4″ and 3″ PVC pipe cut into 12″ long sections mounted on a 6′ wire shelf. This leaves room for future tools. It’s a quick solution that gets drills, impacts, and grinders up off the bench and clearly visible.
The Critical Battery and Charger Station
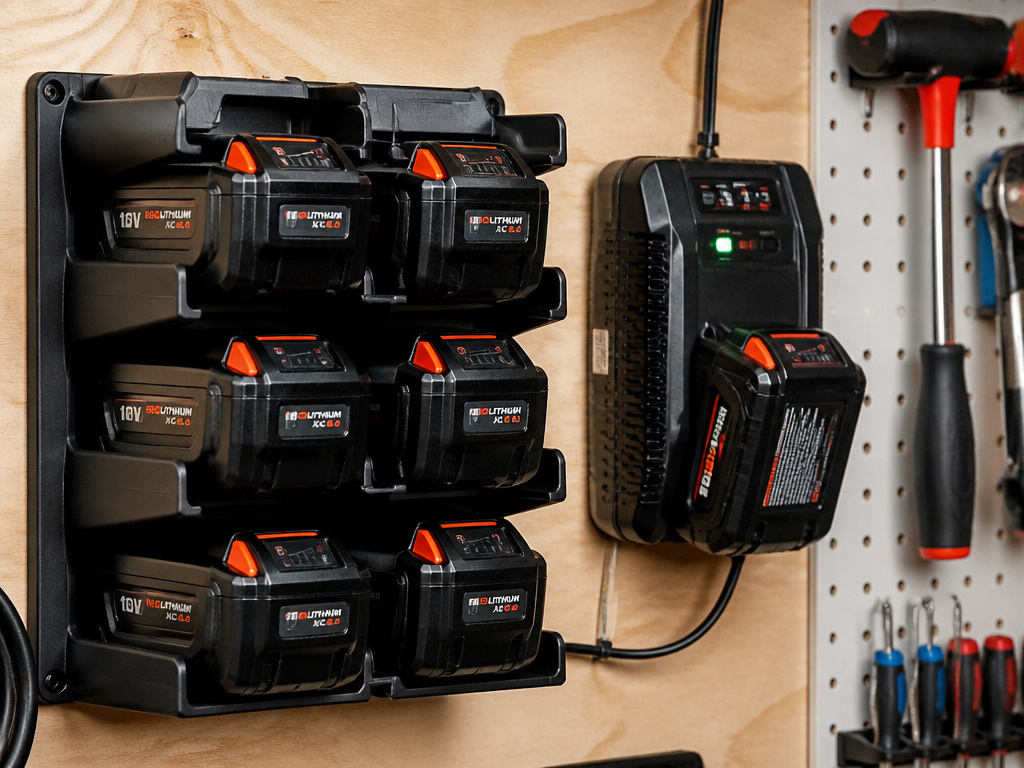
Cordless tools are only as good as their charged batteries. A haphazard charging station is a safety risk and a source of frustration. This isn’t just another shelf.
First, safety. A battery station should be easy to inspect during cleanup. If sanding dust coats the batteries and charger, you have a problem. According to diywoodhaven.com, damaged, swollen, unusually hot, or wet batteries require isolation and proper disposal, they don’t belong in routine storage. Never force an incompatible battery pack into a holder.
Treat chargers as active electrical equipment, not ordinary shelf clutter. Cabinets are not substitutes for following battery and charger instructions; ventilation may be needed around chargers.
Mount chargers only if they are designed for it and the fasteners won’t damage the housing. Assign a specific, well-ventilated spot for charging. A wall-mounted battery holder, like one designed for Makita 18V packs, keeps packs organized and visible. The key is creating a dedicated “home” for each battery so you can see at a glance what’s charged and what’s not. This is a core part of knowing how to store power tool batteries properly.
Accessory Control: The Secret to a Functional Shop
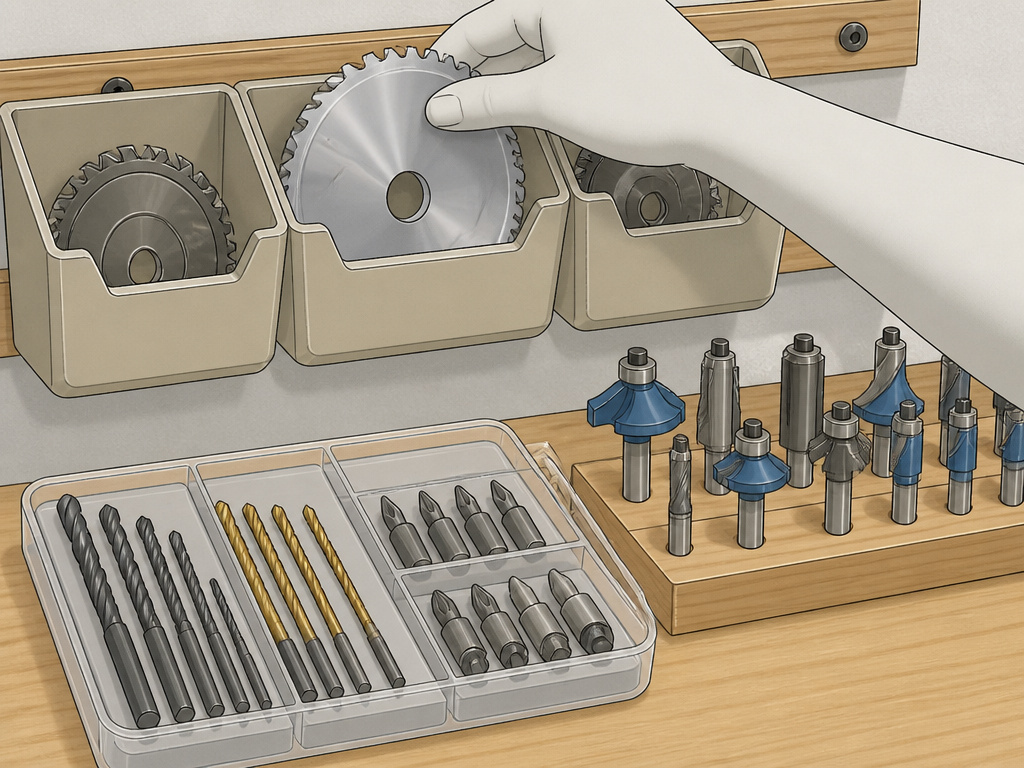
A power tool is useless without its bit, blade, or key. Accessories create more clutter than the tools themselves because they’re small and numerous. Defeat this by assigning accessories to the tool, task, or a size-based system.
Don’t mix drill bits with router bits. Keep the circular saw blade with the saw, or at least in a labeled bin on the shelf directly above it. For small items like driver bits or sandpaper, use clear bins or drawer organizers. The principle from diywoodhaven.com is clear: assign accessories to the tool, task, or size system that makes retrieval obvious.
Select storage by actual use, not a clever Amazon search phrase. That “dentist burr organizer” might look like a perfect drill bit holder, but is it the right size and material for a workshop? Probably not.
Mobile Solutions and Flexible Layouts
Your needs will change. A mobile cart or a modular bench is your best friend for adaptability. Popular Woodworking highlights a modular rolling bench design that is 21 3/4″ high with a 6′-long bench top that spans two rolling boxes. This can be a workbench, a tool cart, or a base for a drill press.
Mobile storage allows you to reconfigure your zones as needed. A rolling cabinet dedicated to sanding supplies can be tucked into storage (Zone 4) and rolled right up to your bench (Zone 1) when it’s time for finish work. This flexibility is crucial in a tight space and complements a solid plan for storing power tools in a garage where space is often shared.
The Maintenance Routine That Keeps It Working
A perfect system decays without a routine. The goal is a reset so simple you’ll do it even when you’re tired after a project.
Diywoodhaven.com prescribes a quick reset after every work session: return tools to their homes, sweep major debris, and put accessories away. Then, perform a deeper inspection every few months. This is when you look for problems: is a tool always left out because its home is inconvenient? Has dust invaded the battery station? This is also the time for deeper tool maintenance, like cleaning air filters or checking for corrosion.
Reorganize when a tool is repeatedly left out, a new tool enters the shop, or a storage location creates a lifting or access problem. This ongoing tweaking based on real use beats an annual, overwhelming overhaul.
How to store power tools in original cases
Original tool bags and boxes are designed for the specific tool, making them a logical first step for organization. They protect tools during transport and keep accessories together. However, in a small shop, stacking these cases can waste vertical space and make tools hard to access quickly. The key is to integrate them into your system. Place the cases for tools you use less often on higher shelves or under a bench. For tools you reach for every session, consider emptying the case and using wall storage so the tool is reachable from your work position without moving another item. Always assign the tool’s accessories to the same case or a nearby spot.
Are commercial storage systems good for small shops
Commercial storage systems offer a clean, integrated look and can be effective if they match your actual workflow. When selecting one, choose storage by actual use rather than a search phrase. Look for systems that support vertical storage, which beats horizontal storage in a small shop by freeing up floor space. Ensure the system can handle the weight of your tools; heavy or awkward tools require a stable shelf or dedicated base. Mount any wall-mounted components securely by anchoring into wall studs. Remember that cabinets are not substitutes for following battery and charger instructions, as ventilation may be needed.
Frequently Asked Questions
How do I organize power tools in a tiny garage?
Use the zone system first. Maximize every inch of wall height with vertical storage like French cleats. Prioritize mobile storage (carts, rolling cabinets) so you can clear the floor when needed. Focus on workflow, keep the tools for a single task together and within reach of where you use them.
What is the best wall system for heavy power tools?
French cleats are the strongest and most flexible DIY option for heavy tools. Ensure the cleat is screwed securely into wall studs. For a pre-made system, look for heavy-duty steel slatwall panels designed for workshop use, but always verify their weight rating.
Is it okay to store power tools in an unheated shed?
Yes, but you must manage moisture to prevent rust. Use a dehumidifier or moisture-absorbing products like silica gel packs in sealed toolboxes. Never store damp tools, and consider bringing cordless tool batteries indoors during extreme cold, as it can permanently damage them.
How can I organize tools cheaply?
PVC pipe organizers, plywood French cleats, and repurposed bookshelves are highly effective low-cost solutions. The most important step, sorting tools by frequency and workflow, costs nothing and informs everything else you build or buy.
The Bottom Line
Organizing a small workshop is an active process, not a one-time event. Start by mapping your zones on paper, bench work here, power tools there, storage in the back. Get every tool you can up onto the wall, using the studs for support. Your bench is sacred workspace; keep it clear.
The rule that changes most plans: if a tool is consistently left out of its assigned home, the home is wrong. Move the hook, rebuild the shelf, or admit you need that tool closer. That’s the system working. It’s not about perfection. It’s about spending your time building, not searching.
