
How to Replace a Power Tool Cord: With Key Safety Steps
This post contains affiliate links. As an Amazon Associate, we earn from qualifying purchases.
To replace a power tool cord, you must match three specifics: the tool’s internal wiring pattern, the correct wire gauge and jacket type for the replacement, and the manufacturer’s explicit safety instructions. This requires a screwdriver, wire strippers, a utility knife, and a new cord rated for the tool’s amperage.
The gauge of the new cord matters. A tool drawing 6 amps needs a 16 AWG cord at 50 feet according to one guide, but another says 18 AWG is fine at 25 feet. That 2-gauge difference decides whether the motor overheats inside ten minutes or runs cool for years. Understanding how to replace a power tool cord begins with selecting the correct wire gauge.
What follows is a straight comparison of what the manuals say you must do versus what experienced owners actually do when you compare a how to replace a power tool cord, the exact contents of factory replacement kits, and the one test that proves your repair worked before you plug it in.
Key Takeaways
- Unplug the tool and wait five minutes for stored power to dissipate, a specific step from Graco’s sprayer manual that prevents arcing when you disconnect internal wires.
- Use wire strippers, not a knife, to remove insulation; eReplacementParts.com notes a knife can nick the copper strands, reducing current flow to the motor.
- Match the internal wiring route exactly from the old cord to avoid pinching the new wires when you reassemble the housing, which can cause a short.
- Check manufacturer manuals first—Harbor Freight and Lowes state cord replacement must be done by a qualified technician, while eReplacementParts.com provides a detailed DIY guide.
- Test for continuity with a multimeter after reassembly but before plugging in; a reading of 0-1 ohms across the plug and switch confirms a solid connection.
The “Pro-Only” Stance vs. The DIY Reality
The first thing you need isn’t a tool. It’s a decision. Open a Harbor Freight manual (like for model 63804) and it reads, “If the supply cord of this power tool is damaged, it must be replaced only by a qualified service technician.” Lowes says the same for its 15″ electric string trimmer: servicing “should be performed only by a qualified service technician” and to return it to an authorized center.
Where this goes sideways: Ignoring the “qualified technician” clause. If you proceed with a DIY repair on a tool with a double-insulated or UL-listed system, you permanently void its safety certification and any remaining warranty. The next owner has no guarantee the tool won’t fail catastrophically.
But open eReplacementParts.com, and you get a detailed, step-by-step owner’s guide. So who’s right? It’s not a mystery. The manufacturers are covering liability. The parts site is providing a practical path for a competent owner. Your call hinges on one question: is this a disposable tool, or a keeper? For an inexpensive, rarely used tool, a professional repair may cost more than the tool. For a professional-grade tool, sending it in may be the best way to preserve its value and safety rating.
Tools and Materials You Actually Need
Grab a screwdriver set first. Tool housings use various fasteners; some professional models, like certain Graco sprayers, require a Torx tool. Some Graco XT sprayer power cord kits, such as 20B416, include a T-20 Torx tool because the housing screws demand it.
You’ll also need:
- Wire strippers (automatic or manual, with gauge markings)
- Lineman’s pliers for twisting wire ends
- Utility knife for scoring the outer cord jacket
- Multimeter for continuity testing
- New power cord (the correct replacement)
Choosing the new cord is where most DIY guides on how to replace a power tool cord stop. Don’t just match length. Match the wire gauge (AWG) and the jacket type. A cord for a workshop saw needs a thick, abrasion-resistant rubber jacket suitable for the tool’s environment, not a thin vinyl one.
| Tool Amperage (at full load) | Cord Length | Minimum Wire Gauge (AWG) |
|---|---|---|
| 0–6 A | 25 ft | 18 (per Harbor Freight) |
| 0–6 A | 50 ft | 16 (per Lowes) |
| 6.1–10 A | 50 ft | 16 |
| 6.1–10 A | 150 ft | 12 |
The conflict between the 0–6A, 50-foot ratings (18 vs. 16 AWG) is real. Lowes’ 16 AWG floor is conservative; Harbor Freight’s 18 AWG assumes perfect conditions. Go with the heavier gauge—it’s cheap insurance against voltage drop.
Disassembly: Finding the Hidden Screws
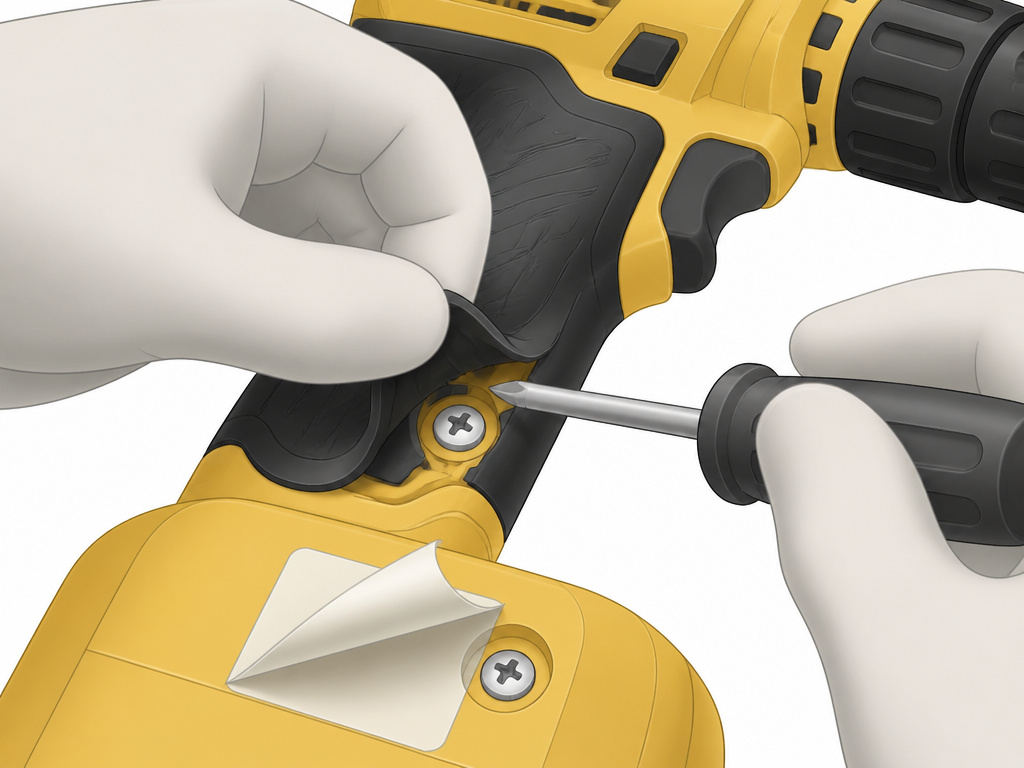
Every tool hides its secrets. Some tools may require removing multiple screws from a plastic plate. Some tools tuck screws under labels or rubber grips. Others, like many drill handles, require you to pop off a battery tray or trigger cover first.
Common mistake: Forcing a cover that won’t budge. You’ve missed a screw. It’s almost always under a warranty sticker or inside the cord strain relief cavity. Pry gently; if it resists, stop and look again.
The pattern is universal: remove all fasteners connecting the two halves of the handle or motor housing. As the cover comes off, note exactly how the old cord routes into the body. Does it loop around a post? Does it sit in a specific channel? A mental snapshot here prevents a world of pinching and grinding later when you try to close it up.
Internal Connections: Color Codes and Terminal Types
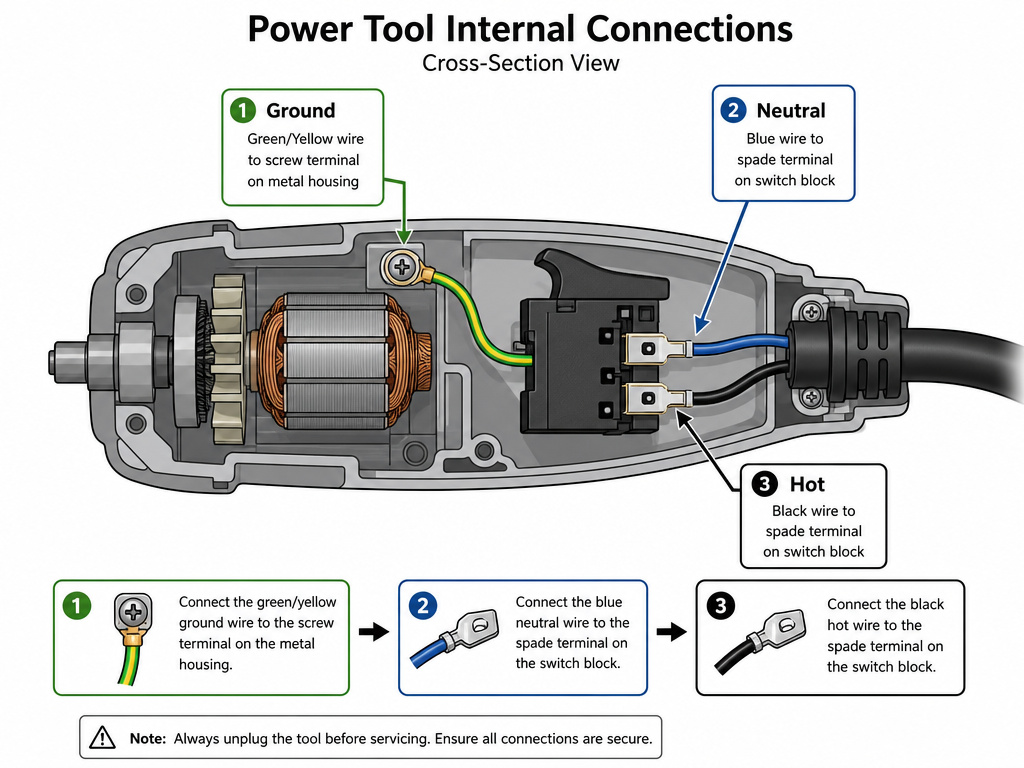
Inside, you’ll see wires connected to a switch or directly to motor terminals. Modern tools use quick-connect spade terminals. Older or industrial tools use screw terminals.
- Green or green/yellow: Ground wire (attaches to the metal tool housing)
- White or blue: Neutral wire (goes to the switch or motor)
- Black or brown: Hot wire (goes to the switch)
If your tool has only two wires (hot and neutral), it’s double-insulated and lacks a ground. Don’t add one. The Graco manual shows a specific sequence: after waiting five minutes post-unplug, you disconnect the power cord leads and a ground screw (73), then loosen four more screws to slide a shroud back. That level of specificity is why OEM instructions beat generic guides.
The eReplacementParts.com guide advises twisting the stripped wire ends with lineman’s pliers for a better connection before attaching them to terminals. A loose twist leaves strands splayed, which can miss the terminal clamp and cause a high-resistance point that gets hot.
Preparing and Installing the New Cord
With the old cord out, line up the new one. Use the utility knife to score the outer jacket at the same length as the old cord, then bend and pull it off. This is the moment you must use wire strippers.
Never use a knife to strip inner insulation. The eReplacementParts.com article is explicit: a knife can damage the wires, reducing power to the motor. Strip away ½ inch of insulation using the correct gauge slot on your strippers.
Slide any strain reliefs or cable clamps onto the new cord before connecting the wires. Then, replicate the old cord’s wiring path exactly. Secure the wires to their terminals, tug gently to ensure they’re clamped, and then tighten the strain relief. Reassemble the housing in reverse order, ensuring no wires are trapped between the halves.
Testing and Troubleshooting the Repair
Don’t plug it in yet. Set your multimeter to continuity (the diode symbol). Touch one probe to the hot prong on the plug and the other to the terminal where the hot wire connects inside the tool. You should hear a beep or see a reading near 0 ohms. Repeat for the neutral prong and its terminal. For a three-prong cord, also test from the ground prong to the tool’s metal housing.
If you get no continuity, you have a break. Check that the wire is fully seated under its terminal screw and that your stripper didn’t sever strands. If the tool hums but doesn’t spin when you finally plug it in, the wiring might be reversed at the switch. Unplug, swap the hot and neutral connections at the terminals, and test again.
Worth knowing before you start: Wear ANSI-approved safety glasses and a NIOSH-approved dust mask if you’re blowing out dust during disassembly, as Harbor Freight recommends. That dust contains carbon and metal particles you don’t want in your lungs.
When a Full Replacement Isn’t the Answer
Sometimes the damage is right at the plug or a small section of the cord. A professional splice with solder and dual-layer heat shrink can be safer and faster than a full cord replacement, especially on expensive, molded-cord tools. Some professional splices use a strain relief over a soldered joint to restore the cord’s flexibility and durability at the break point.
However, if the damage is near the tool housing or the cord jacket is cracked along its length, replace the entire cord. A patch near the strain point will fail again under the bending stress.
When to Splice a Cord Versus Replacing It
Some manufacturer instructions, like those from Harbor Freight and Lowes, state a damaged power cord must be replaced by a qualified technician. Harbor Freight and Lowes both state that a damaged supply cord on a power tool must be replaced only by a qualified service technician or authorized center. Splicing a cord introduces a point of failure that may not be properly insulated or strain-relieved, creating a shock or fire hazard. Factory replacement kits, like those for Graco sprayers, contain a complete new cord and specific tools for installation. A temporary field repair with electrical tape is not a safe, permanent solution. Lowes states to always use original factory replacement parts when servicing a double-insulated tool.
Frequently Asked Questions
Can I use any extension cord while I wait for a replacement?
Only if it meets the gauge requirements for your tool’s amperage and length. Using an extension cord that does not meet the minimum gauge recommendations for your tool’s amperage and length can cause voltage drop, overheating, and may damage the tool’s motor. Refer to the gauge table in the body of this article.
What if I can’t find an exact replacement cord for my tool model?
Select a cord with the same wire gauge (AWG), jacket type (rubber vs. Vinyl), and length. The plug and connector end can be changed if you have the skill, but matching the internal wiring specifications is essential for safety.
Does replacing the cord myself void the tool’s warranty?
Almost certainly. Manufacturer manuals like those from Harbor Freight and Lowes explicitly state that service must be performed by an authorized technician to maintain the warranty. A DIY repair, even if perfect, is a detectable modification that nullifies their coverage.
How do I know if my tool is double-insulated?
Look for the “double square” symbol (a square inside another square) on the tool’s nameplate. These tools have no ground wire and use a two-prong plug. Their internal insulation is designed to protect without a ground path, so you must never add a three-prong cord.
Why does my tool spark at the brushes after I replaced the cord?
Some sparking at the carbon brushes is normal in brushed motors. If it’s excessive, your cord repair might be unrelated. Check our article on power tool sparking causes like worn brushes or a dirty commutator.
The Bottom Line
Replacing a power tool cord sits in a gray zone between a straightforward mechanical job and a legally fraught electrical modification. The steps are simple: unplug, disassemble, note the wiring, strip carefully, connect, reassemble, test. The stakes are not. Using the wrong gauge wire or ignoring a manufacturer’s “pro-only” directive can turn a $20 repair into a house fire or a voided warranty on a $500 tool.
If you proceed, do it with the manual in one hand and a multimeter in the other. Match every spec, follow every twist in the wire path, and verify continuity at every step. For complex tools like Graco sprayers that require specific kits (20B416 for 120V, 20B418 for 240V), buying the factory kit isn’t an upsell—it’s the only way to get the specialized strain relief bracket and T-20 Torx tool the job demands. Otherwise, the job is less about skill and more about patience. Get the details right, and the tool runs for another decade. Miss one, and you’re back at square one with a new problem.
