
How to Change a Band Saw Blade: A Step-by-Step Guide
This post contains affiliate links. As an Amazon Associate, we earn from qualifying purchases.
To change a band saw blade, start by unplugging the saw and wearing gloves. Release the blade tension, remove the guards and old blade, then thread the new blade onto the wheels with the teeth pointing down and forward. Re-tension, adjust tracking so the blade runs centered on the wheels, and reset the blade guides before a test run. The exact steps vary between vertical, horizontal, and portable saws, but that core sequence is universal.
That’s the 60-second version. The manuals assume you know which lever is which and where the safety switch hides. They don’t mention that a 1/8-inch blade needs a specific gauge to track, or that a red guard isn’t a suggestion, it’s a hard stop that prevents the saw from starting. This is why knowing how to change a band saw blade correctly matters. Miss one of those details and you’re either wrestling a blade that won’t stay on or standing there wondering why the power switch does nothing.
What follows is a walkthrough for the three main saw types you’ll encounter, the model-specific quirks the manuals bury on page 28, and the one adjustment that decides whether your next cut is clean or crooked when you compare a how to change a band saw blade process.
Key Takeaways
- Unplug the saw first. Every manual states this, and the safety interlock switch on models like the Baileigh BS-350SA will physically prevent startup if the blade guard isn’t engaged correctly.
- JPW Industries advises releasing tension or removing the blade for long-term storage, and Rikon also advises releasing the tension lever to prolong blade life during extended non-use.
- Match at least three teeth to your workpiece. A blade with teeth too far apart can straddle the material, causing severe damage to both the blade and your stock.
- For 1/8-inch blades, gauge matters. The Rikon 10-3061M2 manual specifies a 0.018” to 0.020” gauge for 1/8-inch width to prevent the tracking issues common with that size.
- Dispose of the old blade immediately. Coil it tightly, wrap it heavily in cardboard or tape, and label it “SHARP METAL” before putting it in the trash. Leaving it loose is asking for a trip to the ER.
Before You Start: The Non-Negotiable Safety Run-Through
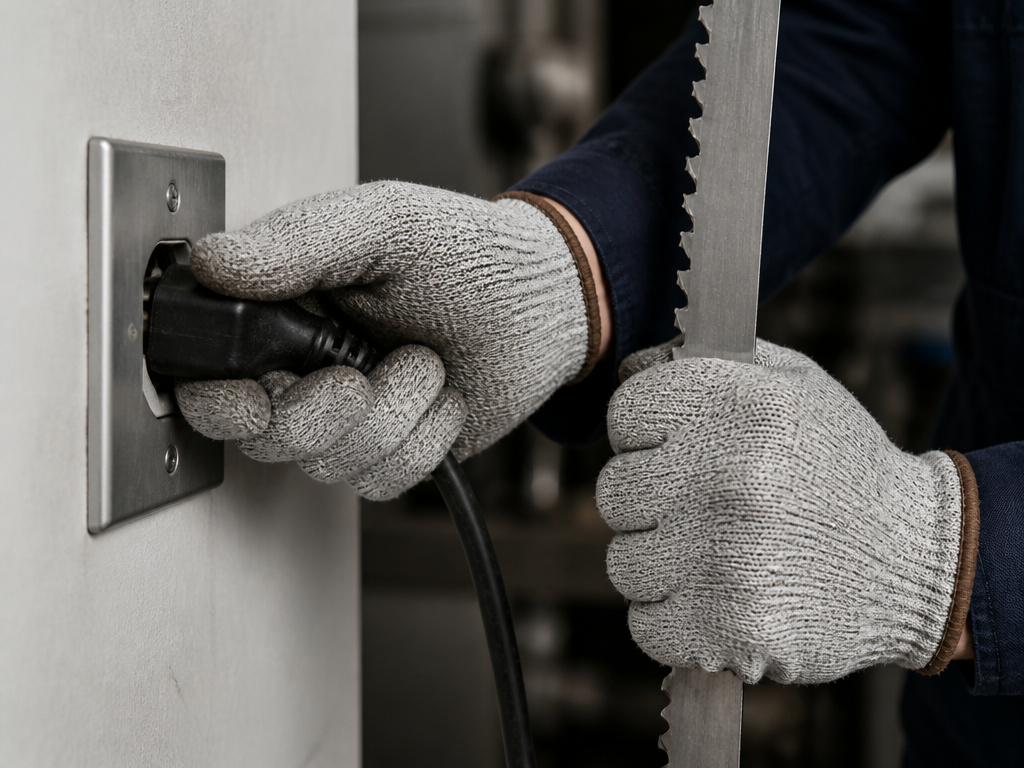
Before you start: The blade is under high tension and the teeth are sharp. Wear cut-resistant gloves. Unplug the saw from the wall, not just switch it off. If your saw has a hydraulic cylinder like the Baileigh BS-712M, you must raise and lock the saw bow vertically before touching the blade.
Safety here isn’t abstract. It’s about following the sequence that keeps your fingers attached. A critical safety step during a blade change is disconnecting power. On many modern saws, like those from JPW Industries, a safety interlock switch is built into the blade guard. If that guard isn’t seated perfectly when you’re done, the saw won’t start. That’s a feature, not a bug.
Gloves are not optional. The JPW Industries manual for the BS-350SA states it plainly: “Wear gloves when handling the saw blade.” A new blade has teeth like tiny razors, and the old one might have micro-fractures you can’t see. Your hands will be inside the machine, guiding the blade around wheels and through slots. A slip without gloves turns a routine task into a bloody mess.
Vertical vs. Horizontal vs. Portable: Your Saw Type Changes the Game
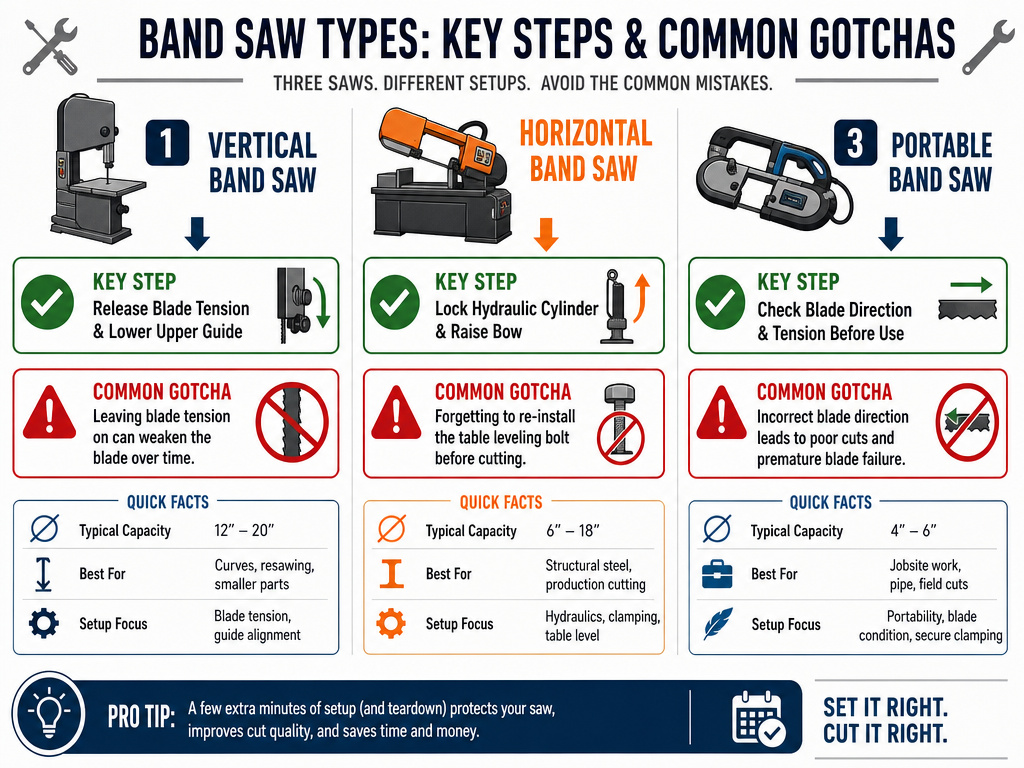
The core principle of how to change a band saw blade is the same, but the execution isn’t. Getting this wrong wastes time and risks damage.
A vertical band saw (like the Rikon 10-324) is what most woodworkers picture. You’ll be working through doors in the cabinet, retracting upper and lower blade guides, and often removing a table insert. The blade path is relatively accessible.
A horizontal band saw (like the Baileigh BS-712M) is often used for metal cutting. The blade runs in a fixed horizontal plane, and the head or the workpiece moves. Here, you might have to deal with a hydraulic cylinder lock and a completely different guard system. The manual for the BS-712M is explicit: “The saw bow must be raised to a vertical position and locked in place by turning the hydraulic cylinder off before blade removal.” Skip that, and you can’t even get the blade out.
| Saw Type | Key Differentiating Step | Common Gotcha |
|---|---|---|
| Vertical (Rikon 10-324) | Retract upper/lower guides, remove table insert/leveling bolt. | Forgetting to re-install the table leveling bolt causes table flex and inaccurate cuts. |
| Horizontal (Baileigh BS-712M) | Lock hydraulic cylinder, raise saw bow. | Not locking the bow creates dangerous blade tension and prevents removal. |
| Portable (Milwaukee M18) | Release single tension lever, feed blade between side guides. | The blade must sit between the side guides. If it’s outside them, it derails instantly on startup. |
The 7-Step Bump-Feed Replacement (and the One Step Nobody Skips)
This is the universal sequence, adaptable to your saw type. I’ll note the variations as we go.
1. Kill the Power and Gear Up
Unplug the saw. If it’s cordless, remove the battery. Put on your safety glasses and a pair of cut-resistant gloves. Clear the work area around the saw. This seems basic until you’re trying to maneuver a 111-inch blade and knock a coffee cup onto the floor.
2. Open Access and Release Tension
Open any cabinet doors or covers. For vertical saws, this usually means upper and lower doors. Now, release the blade tension. This is typically a lever or a handwheel. Turn it until the blade is visibly slack. You should be able to push the blade sideways with light finger pressure.
Where this goes sideways: Cranking the tension lever the wrong way. Most increase tension clockwise, but not all. If the blade gets tighter, stop and go the other way. Forcing it can strip the mechanism.
3. Remove Guards and the Old Blade
Retract all blade guides, both the side supports and the rear thrust bearing. Move them completely out of the blade’s path. On vertical saws, you’ll also remove the throat plate (table insert) and, on models like the Rikon 10-3061M2, a table leveling bolt from the slot.
Now, carefully lift the blade off the wheels. You’ll need to twist it to navigate it out of the table slot and any guide assemblies. Coil it up as you go to control it.
Here’s the step everyone skips: inspect the tires. While the blade is off, look at the rubber or urethane tires on the upper and lower wheels. Are they clean? Glazed with pitch or packed with dust? That gunk makes the blade slip and track poorly. Clean them with a stiff brush or plastic scraper. Manuals warn against solvents that can degrade the rubber.
4. Thread and Track the New Blade
Uncoil your new blade. Check the tooth direction: they should point down toward the table on a vertical saw, and forward in the direction of cut on a horizontal saw.
Start by looping the blade over the top wheel, then work it around the bottom wheel, feeding it through the table slot and any guide assemblies. Make sure it’s seated squarely in the center of the wheel tires.
Now, apply light tension, just enough to keep the blade from falling off. Here is blade tracking. Slowly rotate the upper wheel by hand (never power it on yet). Observe the blade on the wheel. Use the tracking adjustment knob (usually near the upper wheel) to tilt the wheel until the blade runs centered on the tire’s crown. It should not drift toward the front or back of the wheel. Do this for several rotations.
5. Apply Final Tension
With the blade tracking correctly, bring it up to operating tension. Don’t crank it to “max.” Overtensioning can damage the blade and saw. Many saws have a tension scale; use the setting for your blade width. A practical check: with guides still retracted, you should be able to deflect the blade sideways with moderate finger pressure.
6. Reset the Blade Guides
This is the most critical adjustment for cut quality. Bring the guide blocks or bearings in from the sides. They should be just behind the gullets (the curved space behind the teeth), not touching the teeth themselves. Adjust them so they lightly kiss the side of the blade without pushing it out of alignment. You should see no gap, but the blade shouldn’t be flexed.
Then, set the rear thrust bearing. Position it just behind the blade. Its job is to stop the blade from being pushed backward during a cut.
7. Reassemble and Test
Re-install the throat plate, table leveling bolt, and all guards. For the Baileigh BA1-375, installing the red blade guard is mandatory. The manual states failure to do so “may cause serious injury.”
Close all doors. Plug the saw back in. Stand clear, turn it on, and let it run for a minute. Listen for vibration or a rhythmic clicking. Watch the blade through the windows to ensure it tracks steadily. If anything sounds or looks off, turn it off, unplug it, and re-check your tracking and guide settings.
Which Way Do the Teeth Go? (And 3 Other Setup Details)
You got the blade on and the saw runs. But will it cut right? That depends on these final settings.
Tooth Direction: This is the most common FAQ. The teeth must point in the direction of cut. On a vertical saw, the wheel spins so the blade moves downward at the front, near the table. Therefore, teeth point down. On a horizontal or portable saw, the blade moves forward, so teeth point forward. Installing it backward results in a blade that won’t cut, it just burnishes the material.
Guide Alignment: We set them laterally, but are they square? The side guides should be perpendicular to the blade. If they’re tilted, they’ll wear the blade unevenly. Use a small square to check.
Table Squareness: Is your table at 90 degrees to the blade? After a blade change, it’s worth checking. Place a reliable square against the blade’s body (not the teeth) and the table. Adjust the table trunnion if needed. The Rikon 10-324 manual has a specific procedure for this using micro-adjustment screws on the trunnion.
Common mistake: Squaring the table to the teeth. The teeth are not a reliable reference for squaring. Always use the flat body of the blade.
The 3-Tooth Rule: This is a pre-cut check. Before you make a cut, ensure at least three blade teeth are in contact with the thickness of your material. The Baileigh manual warns that if the teeth are too far apart and “straddle” the work, “severe damage to workpiece and blade can result.” For thin stock, you need a blade with more teeth per inch (TPI).
What to Do With the Old Blade (Don’t Just Toss It)
A used band saw blade is a spring-loaded hazard. Throwing it loosely into a trash bag is a hazard to you, your family, and sanitation workers.
- Coil it tightly. Wear your gloves. Step on one end and carefully coil it into a loop.
- Wrap and secure it. Use several layers of cardboard or heavy tape to encase the entire coil. The goal is to cover every inch of sharp edge.
- Label it clearly. Write “SHARP METAL – CAUTION” on the bundle with a marker.
- Dispose of it properly. Place it in your metal recycling if possible, or securely in a rigid trash container. Never leave it on a shelf or in a corner of the shop.
Troubleshooting: Why Does My Saw Vibrate/Wander Now?
Sometimes, even after a careful change, the saw doesn’t behave. Here’s the shortlist of culprits.
| Symptom | Likely Cause | The Fix |
|---|---|---|
| Severe Vibration | Blade not tracking on wheel crown; damaged wheel tire; improper blade weld. | Re-check tracking with light tension. Inspect tires for flat spots. Check for an uneven weld joint. |
| Cut Wanders (Blade Drift) | Blade guides too tight or misaligned; dull blade; incorrect TPI for material. | Re-adjust guides so they barely touch. Try a fresh blade. Ensure you’re using a blade with enough teeth engaged in the cut. |
| Blade Twists or Snaps | Guides are misaligned and twisting blade; extreme over-tensioning; forcing a cut. | Completely reset guide alignment. Reduce tension. Feed stock appropriately. |
| Saw Won’t Start | Safety interlock not engaged; blade guard not installed. | On models like Baileigh/JPW saws, ensure the blade cover is fully seated so its tongue engages the safety switch. |
If you’ve checked all this and problems persist, the issue might be with the saw itself, worn wheel bearings, a bent axle, or an out-of-balance wheel.
How to clean your band saw when changing the blade
With the old blade off and the power disconnected, you have clear access to the wheel housings and guides. This is the best time for a quick clean. Use a brush or a rag to clear out the accumulated sawdust and pitch from the guide blocks, the blade tracking path on the wheels, and inside the lower housing. Removing this debris prevents it from interfering with the new blade’s tracking and helps the guides function properly. Wear gloves during this cleanup, as the old blade may have left behind burrs or sharp edges on the machine. Once the area is clean, you can proceed with installing the new blade without contaminating it.
Frequently Asked Questions
What direction do the teeth go on a bandsaw blade?
On a vertical band saw, the teeth point down toward the table. On a horizontal or portable band saw, the teeth point forward in the direction the blade moves. The teeth should always bite into the workpiece as the blade moves.
How do I install a new bandsaw blade after removing the old one?
After removing the old blade, thread the new one onto the wheels, ensuring it’s seated in the wheel grooves and passes correctly through the blade guides. Apply light tension, adjust the tracking so the blade runs centered on the upper wheel, then apply full operating tension. Finally, reset the blade guides and thrust bearing before testing.
How do I properly set up a bandsaw blade?
Proper setup involves four checks: correct tracking (blade centered on wheel), proper tension (not over-tightened), precise guide alignment (side guides just touching blade, thrust bearing close behind), and ensuring the table is square to the blade’s body. Skipping any step compromises cut quality and safety.
Should I release band saw blade tension when not in use?
Manufacturers disagree. Rikon Tools advises releasing the tension lever to prolong blade life during extended non-use. JPW Industries suggests releasing tension or removing the blade for long-term inactivity. For daily use, leaving it tensioned is fine; for storage over weeks, releasing tension is the safer consensus to prevent metal fatigue.
The Bottom Line
Changing a band saw blade is a core maintenance skill. It’s not about brute force, it’s about patience and precision. The difference between a clean, quiet cut and a wandering, vibrating mess comes down to tracking and guide alignment. Those two adjustments take five minutes but decide everything.
Keep this in mind: if your new blade has tracking issues from the start, especially a narrow 1/8-inch blade, check its gauge. That specification, straight from the Rikon manual, solves more problems than any tension tweak. And always, always coil and wrap the old one. The few seconds it takes prevent the one accident you’ll never see coming.
