
How to Use an Air Ratchet: Step-by-Step Guide
This post contains affiliate links. As an Amazon Associate, we earn from qualifying purchases.
To use an air ratchet, connect it to a clean, dry air supply set to 90 PSI, attach the correct impact socket, set the direction switch, and depress the trigger. It’s a speed tool for running nuts on and off, not for applying final torque, that still requires a hand torque wrench.
That 90 PSI figure is the ceiling printed in every manual from Harbor Freight to Sealey. Go over it, and you’re not getting more power, you’re wearing out seals and risking a burst hose. Understanding how to use an air ratchet correctly means respecting this limit. The air ratchet lives in the gap between a slow hand ratchet and a brutal impact wrench. Its job is to save your forearm on the twentieth bolt of the day, not to break loose a rusted suspension nut.
What follows: the non-negotiable setup for your air supply, the right way to handle the tool so it doesn’t kick back, a clear comparison to its cordless cousins, and the maintenance ritual that keeps it running for years instead of months, all central to how to use an air ratchet. By the end, you’ll know exactly when to pull it off the rack and, more importantly, when to put it down.
Key Takeaways
- Always set your air compressor regulator to 90 PSI maximum; higher pressure damages the tool’s internal seals without increasing usable torque.
- Use only impact-rated sockets; standard chrome sockets can shatter under the ratchet’s hammering action and send shrapnel flying.
- Hand-start every fastener before using the air ratchet to prevent cross-threading, which the tool’s speed can make permanent in a fraction of a second.
- For final tightening on critical fasteners like lug nuts or cylinder head bolts, switch to a hand torque wrench; an air ratchet cannot accurately set torque.
- Lubricate the tool regularly by adding 4-6 drops of air tool oil into the air inlet while depressing the trigger to circulate oil through the motor. Manufacturers disagree on frequency: the Husky manual says to do this each time it is used, while the Sealey manual recommends daily lubrication.
Your Air Supply: The 90 PSI Rule and Why CFM Matters
Forget the tool for a second. The game is won or lost at the compressor. Every manual states the same operating pressure: 90 PSI. The Harbor Freight Model 47214, Husky, Kobalt Model 858976, and Sealey SA630.V3 all list it. This is your regulator’s target.
Where this goes sideways: Cranking the regulator to 120 PSI because “more air must mean more power.” It doesn’t. The ratchet’s internal vanes are designed for 90 PSI. Exceeding that strains the seals, can crack the housing, and introduces moisture-laden air that gums up the motor. You’ll lose power within a month, not gain it.
But PSI is only half the story. Your compressor must also deliver enough air volume, measured in Cubic Feet per Minute (CFM). This is where sources disagree, and it’s critical for choosing a compressor.
| Model | Rated CFM/SCFM @ 90 PSI | Free Speed (RPM) | Max Torque (ft-lbs) |
|---|---|---|---|
| Harbor Freight 47214 | 6 CFM | 130 RPM | 48 (CW) / 50 (CCW) |
| Husky 3/8” | 4.5 SCFM | Not Specified | 50 |
| Kobalt 858976 | 4.4 SCFM | 180 RPM | 50 |
| Sealey SA630.V3 | 3 CFM | 250 RPM | 25 |
The Harbor Freight model demands more air (6 CFM) to deliver its torque. If your compressor only outputs 4 CFM, the tool will stall. The rule is simple: your compressor’s CFM rating must meet or exceed your specific tool’s requirement. Check your tool’s manual, as requirements vary: for example, the Husky requires 4.5 SCFM, the Kobalt 4.4 SCFM, the Sealey 3 CFM, and the Harbor Freight model 6 CFM.
You’ll also need an adequately sized air hose; for example, the Husky manual recommends a 3/8″ hose, while Sealey specifies a minimum of 1/4″ internal diameter. A skinny 1/4-inch hose creates friction, dropping pressure and volume by the time air reaches the tool. The result is a sluggish ratchet that can’t finish the job. For a proper air compressor setup, start with the right hose.
The 5-Step Pre-Flight Check (Before You Pull the Trigger)
Ever grabbed a drill only to find the battery dead? An air ratchet has its own version of that, but the consequences are louder. Run through this list every time you connect the hose.
- Inspect the Hose and Fittings. Look for cracks, bulges, or worn couplers. A sudden hose rupture under pressure is dangerous and can cause injury. Tighten all connections.
- Drain the Compressor Tank. Water in the lines is a major cause of damage to pneumatic tools. It washes away lubricant and causes internal rust. Drain the tank daily, without fail.
- Set the Regulator to 90 PSI. Confirm this at the regulator gauge. Don’t guess.
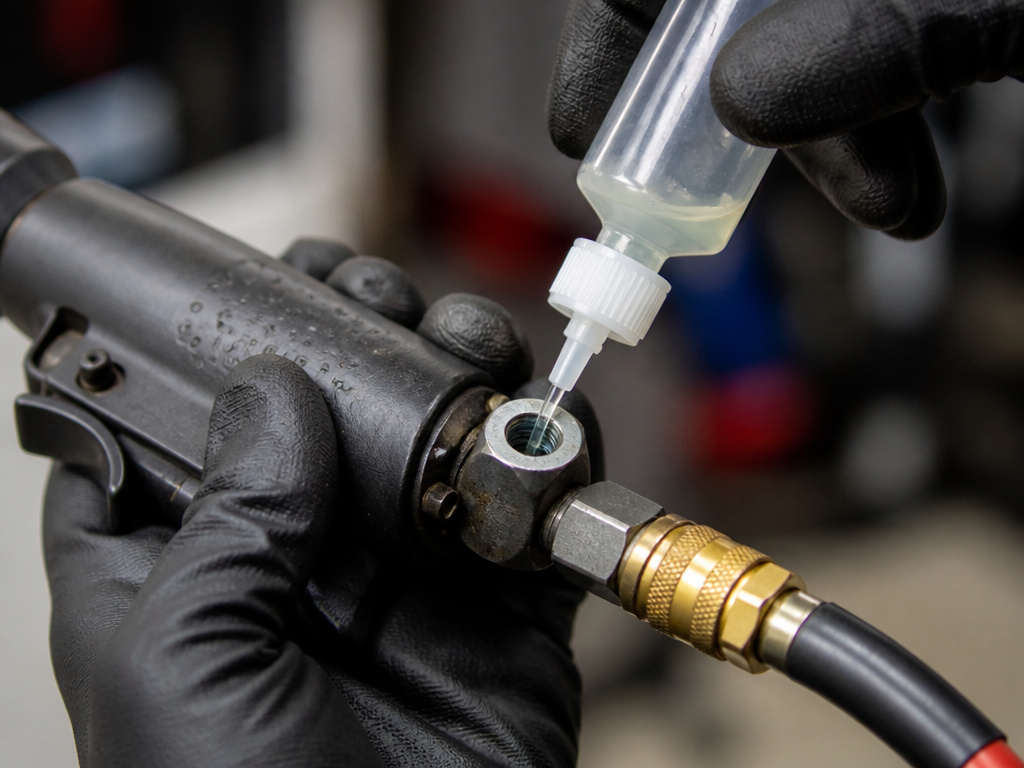
- Add Oil to the Air Inlet. Depress the trigger and add 4-6 drops of air tool oil or SAE10 non-detergent oil into the inlet port. The Husky manual mandates this each time it is used. The Sealey manual says daily. This is a point of manufacturer disagreement. For a tool used hard, many professionals recommend the stricter rule of lubricating every session. This is the single most underrated longevity move.
- Run the Tool for 30 Seconds. Point the exhaust away from yourself (and any clean work), cover it with a rag, and run the tool forward and reverse. This circulates the oil and blows out any residual moisture.
Skip step 4, and the drive end gets hot to the touch within minutes. You’ll feel the heat through the housing. That’s metal-on-metal friction grinding your tool’s life away.
Socket Selection and Handling: It’s Not a Hand Tool
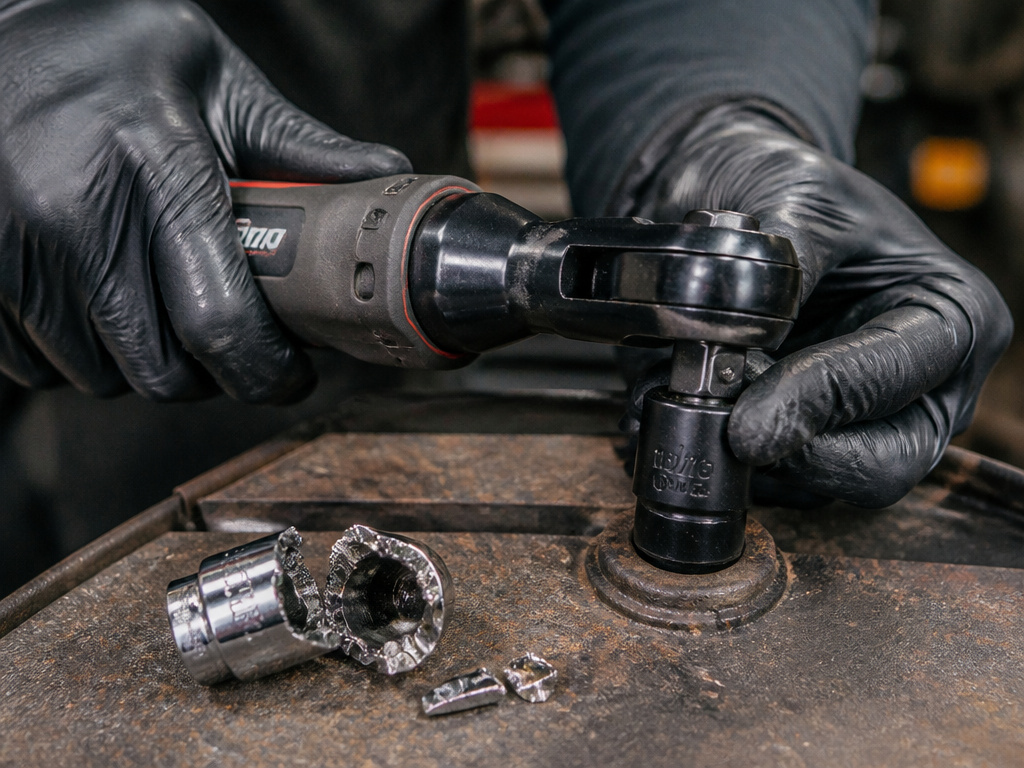
This is the part that changes everything. An air ratchet doesn’t turn smoothly; it uses a hammer mechanism inside the head to create its ratcheting action. That repeated, minor impact is why you need impact sockets.
Impact sockets are made from a softer, tougher alloy steel (usually chrome-molybdenum) that flexes slightly under shock instead of cracking. A standard chrome socket is hardened and brittle. Under the air ratchet’s hammering, it can shatter. A standard chrome socket can shatter under the air ratchet’s hammering action. The sound is a sharp ping, and shrapnel can be ejected with significant force.
Common mistake: Using a standard socket “just this once.” The risk isn’t worth the thirty seconds it takes to walk to the impact socket set.
Attach the socket directly to the drive if you can. If you need an extension, use a impact-rated extension and keep it as short as possible. Every inch of extension increases leverage, which can twist the tool in your hand if the socket binds. Grip the tool with both hands, one on the handle and one supporting the head or hose connection. Let the tool do the work, don’t muscle it.
Forward vs. Reverse: The Direction Switch and How to Not Cross-Thread
On the head of the ratchet, you’ll find a directional switch. Slide it one way for tightening (usually clockwise), the other for loosening. It seems obvious. The real skill is knowing when not to use it at all.
Always, always hand-thread the fastener first. Spin the nut or bolt on by hand for at least three full turns. An air ratchet spins fast. If the threads are even slightly misaligned, the tool will power the fastener in cross-threaded before you can react. The repair can be complex and time-consuming.
For removing a stubborn fastener, the Husky manual gives a clear rule: “If the nut does not start to move in three to five seconds, use a larger size air ratchet wrench.” In plain English: if your 3/8-inch ratchet is stalling, you need a 1/2-inch model or a dedicated pneumatic impact wrench. Don’t just hold the trigger down and hope. You’ll overheat the motor.
Air Ratchet vs. Cordless Electric: When Does Air Still Win?
The big question now, beyond just how to use an air ratchet, is why bother with hoses and compressors at all. Modern cordless electric ratchets are quiet, convenient, and powerful. So when does air still hold an edge?
The answer comes down to three things: duty cycle, repairability, and consistent power. In a professional shop with continuous use, air tools can offer consistent performance without battery-related power drain. Its motor is simpler, just a rotor and vanes, and when it wears out, it can often be rebuilt with a kit. Repairing a burnt-out electric motor can be more difficult or costly.
An air ratchet delivers the same power on the first bolt as the hundredth, as long as the compressor keeps up. A cordless tool’s output dips as the battery drains.
But for the home gamer working on one car at a time? The convenience of cordless is hard to beat. You’re not running air lines or listening to a compressor. The trade-off can include higher upfront cost. For a deeper dive on this choice, our electric vs air ratchet comparison lays it all out.
Bottom line: If you already have a robust air compressor in your shop and you work in long sessions, air is the more durable, professional choice. If you’re doing light maintenance in the driveway, a cordless model probably makes more sense.
Troubleshooting: Why Your Ratchet is Slow, Hot, or Weak
The tool was working yesterday. Today it’s sluggish. Before you declare it dead, run through this diagnostic table.
| Symptom | Most Likely Cause | Immediate Fix |
|---|---|---|
| Tool runs slowly or stalls | Low air pressure / volume | Check regulator is at 90 PSI. Verify compressor CFM meets tool needs. |
| Loss of power, erratic action | Moisture or grit in tool | Disconnect, add a generous amount of a solvent like WD-40 to the inlet, run tool to flush. Re-lubricate. |
| Drive end is hot to the touch | Lack of lubrication | Add 4-6 drops of oil to the drive end (between yoke and housing) per Husky manual. |
| Air leaking from coupler or hose | Worn O-ring or cracked hose | Replace the O-ring in the quick-connect or cut and re-clamp the hose end. |
| Socket won’t stay on drive | Worn detent ball or spring | Replace the detent ball and spring kit (a common, cheap repair). |
If you’ve checked air supply and lubrication and the tool is still weak, the internal vanes may be worn or the hammer mechanism gummed up. This is where the air ratchet’s repairability shines. Some brands sell rebuild kits for their air ratchets. Compare that to the cost of a new air impact wrench or other tools for air compressor to see the value.
Workflow: Where the Air Ratchet Fits in a Job
The air ratchet is part of a team of tools. Here’s how it integrates into a real job, like changing a car’s alternator.
- Break Loose: Use a breaker bar or your stronger pneumatic impact wrench on the main mounting bolt if it’s rusted or over-torqued.
- Run Fasteners Off: Switch to the air ratchet. Zip off the loosened bolt, the tensioner bolt, and the electrical bracket nuts. Its speed and lower profile can save time.
- Hand-Thread & Snug: After installing the new alternator, hand-thread all bolts. Use the air ratchet in short bursts to run them down until they are snug, not tight.
- Final Torque: Put the air ratchet down. Pick up your torque wrench and set the final specification for each bolt. This is non-negotiable for anything critical.
This sequence respects the limits of each tool. The impact wrench breaks things loose, the air ratchet saves time, and the torque wrench ensures nothing comes loose later.
Choosing the right drive size (1/4″, 3/8″, 1/2″)
The drive size determines the tool’s power and the socket it accepts. A smaller drive size, like a quarter-inch, is for lighter work in tight spaces, while a larger half-inch drive is for heavier, high-torque applications. The common three-eighths-inch drive is a versatile middle ground for many automotive and mechanical tasks. Your choice should match the fastener sizes you typically work with and the space you have to work in. If a nut does not start to move after a few seconds of applying the tool, a larger size air ratchet may be required. Using the correct drive size ensures you have enough force for the job without overloading a smaller tool.
Frequently Asked Questions
What’s the difference between an air ratchet and an impact wrench?
An air ratchet has a smaller, faster hammer mechanism for speed in confined spaces, with lower torque (typically 25-50 ft-lbs). An impact wrench has a massive hammer and anvil design for sheer breaking power, with torque ranging from 150 to over 1000 ft-lbs. Use the ratchet for assembly/disassembly; use the impact for stubborn, high-torque fasteners.
Can I use any air compressor with an air ratchet?
No. You must check two specs: PSI and CFM. The compressor must reliably output 90 PSI and its CFM rating must meet or exceed your specific ratchet’s requirement (e.g., 4.5 SCFM for a Husky). An undersized compressor will cause the tool to stall. Our guide on air compressor size explains how to match them.
How often should I add oil to my air ratchet?
Manufacturers disagree. The Husky 3/8” manual says “each time it is used.” The Sealey manual says “daily.” For practical, long-life use, follow the stricter rule: add 4-6 drops of air tool oil into the air inlet every time you connect the tool for a work session. If you’re using an in-line oiler, check and fill it weekly.
Why won’t my socket stay on the drive?
The likely culprit is a worn or gummed-up detent ball and spring inside the drive head. Dirt and lack of lubrication cause this. You can often fix it by cleaning the drive with a solvent and adding a drop of oil, or by replacing the inexpensive detent ball kit available for most models.
Is an air ratchet powerful enough to remove lug nuts?
Generally, no. Most 3/8-inch air ratchets max out at 50 ft-lbs, and lug nuts are typically torqued to 80-100 ft-lbs. You need a 1/2-inch impact wrench for that job. Using an air ratchet on lugs will likely stall the tool and is a way to round off the nut.
Before You Go
The air ratchet’s real value is endurance and speed in the middle of a long job. Keep its air clean and dry, its guts oiled, and respect its torque limits. With proper maintenance, it can have a long service life.
One final, non-negotiable line: if you’re working on anything where a loose bolt means catastrophe, engine internals, brake calipers, suspension components, your last tool must always be a hand torque wrench. The air ratchet gets you there fast. The torque wrench makes sure it stays.
