
How to USE an HVLP SPRAY GUN With an Air Compressor
This post contains affiliate links. As an Amazon Associate, we earn from qualifying purchases.
To use an HVLP spray gun with an air compressor, you need a compressor that can deliver enough continuous air, a clean and regulated air supply, and the correct pressure setting for your material. Connect an appropriately sized air hose (e.g., ¼” or as specified by your gun’s manual) from the compressor’s regulated outlet to the gun’s inlet, set the pressure to the value specified in your gun’s manual (which varies by model), then test your pattern on cardboard before spraying your project.
That pressure range is the hard split between what different gun manufacturers print in their manuals. A Harbor Freight gun wants 14-28 PSI at the inlet. An Apollo 7700 wants 6-23 PSI for thin to thick material. A Graco 3M PPS gun runs at a steady 29 PSI. Picking the wrong number here doesn’t just change the finish, it changes how much paint you waste and how often you stop to let the compressor catch up. Learning how to use an HVLP spray gun with an air compressor starts with these specific pressure settings.
What follows: the compressor math that actually matters, the three essential accessories every setup needs, and the step-by-step walk from a dry gun to a wet panel that defines how to use an hvlp spray gun with an air compressor. We’ll also cover the fixes for the three most common spray defects, because seeing the problem is easier than describing it.
Key Takeaways
- Match your air compressor’s CFM output to your spray gun’s air consumption; a 3hp compressor with a 20-gallon tank is the typical minimum for continuous spraying.
- Always install an in-line filter and regulator on your air hose to stop moisture and dirt from ruining your finish and to precisely control pressure.
- Test your spray pattern on cardboard before aiming at your project; a proper pattern is an even, elliptical football shape, not a round blob or a distorted crescent.
- Clean your gun immediately after every use with the appropriate solvent; letting material dry inside the fluid passages is the most common cause of permanent clogs.
The Non-Negotiable Compressor Specs
Forget horsepower for a second. The number that actually decides if your spray gun will work is CFM, or cubic feet per minute. It’s the volume of air your compressor can deliver. Your gun’s manual lists its air consumption, like 12.4 CFM for the Harbor Freight Model 56152 or 14.12 CFM for the Sealey HVLP05. If your compressor can’t meet that CFM demand at the required pressure, the gun will starve. The motor will run constantly, the tank pressure will plummet, and your spray pattern will sputter.
The consistent recommendation across multiple manufacturer manuals for how to use an hvlp spray gun with an air compressor is a 3hp compressor with a 20-gallon (75 liter) tank or larger. This size, according to the Apollo 7700 manual, will generally maintain the continuous air supply needed. A smaller compressor might let you spray for 30 seconds before you’re waiting a minute for the tank to refill. That’s fine for touching up a mailbox. It’s maddening for painting a cabinet.
A larger compressor might be necessary if spraying high viscosity materials at higher PSI.
That’s the official word, but here’s the truth. I’ve sprayed entire pieces of furniture with a modest 4-gallon pancake compressor. The gun sputtered. The compressor never stopped running. It was hot to the touch after twenty minutes. It worked, but it was the mechanical equivalent of holding your breath. For a one-off project, you can push a small unit. For anything resembling steady work, the 20-gallon minimum marks the line between finishing a job and fighting your tools.
Essential Accessories You Can’t Skip
Your air hose is the delivery system for clean, dry, controlled air. Screwing the gun directly to the compressor’s outlet is a guaranteed way to get a bad finish. You need three things in line before the gun.
First, a moisture trap and filter. Compressed air holds water, and that water will mix with your paint or finish, causing fisheyes and blushing. A filter screws into your compressor’s outlet and pulls that moisture out. Second, a pressure regulator with a gauge. The regulator on your compressor tank is too coarse. You need a second, finer regulator right near the gun to dial in the exact PSI. Third, a quality air hose. A cheap, narrow hose creates friction, which drops pressure between the compressor and the gun. The Graco 3M PPS manual specifically recommends a 7.9 mm (5/16″) I.D. Air hose to minimize pressure drop for their guns.
| Accessory | Purpose | What Happens Without It |
|---|---|---|
| In-line Filter / Moisture Trap | Removes water and dirt from the air supply. | Water causes fisheyes (small craters) in the finish; dirt creates bumps and rough texture. |
| Secondary Pressure Regulator | Allows precise control of air pressure at the gun. | Inconsistent pressure leads to uneven material delivery and pattern distortion. |
| Adequate Air Hose (¼” ID min) | Delivers sufficient air volume with minimal pressure drop. | Gun starves for air, pattern sputters, and compressor cycles excessively. |
Don’t use an automatic oiler in this line. The Harbor Freight manual is explicit: oil will contaminate the material. Also, never install a female quick coupler on the gun itself. If it retains air after disconnection, the gun can fire unexpectedly.
Decoding the Confusing World of PSI Settings
Here’s where most guides gloss over the messy truth. There is no universal “HVLP PSI.” Ask five manufacturers, and you’ll get five different answers. The table below is pulled verbatim from the instruction manuals in the fact sheet.
| Spray Gun Model | Recommended Inlet Air Pressure | Source |
|---|---|---|
| Apollo 7700 AtomiZer | 6-12 PSI (thin fluids), 13-23 PSI (med/high viscosity) | HVLP.com A7700 Manual |
| Graco 3M PPS (HVLP/Compliant) | 29 PSI (200 kPa, 2.0 bar) | Graco.com 3M PPS Manual |
| Sealey HVLP05 | 29-32 PSI | Vinnybyrne.com HVLP05 Manual |
| Harbor Freight Model 56152 | 14-28 PSI (Max) | HarborFreight.com Manual |
Why the wild spread? It comes down to gun design and compliance standards. Some HVLP guns, like the Graco 3M PPS, must not exceed 10 PSI at the atomizing air cap to be ‘HVLP compliant’. But the pressure at the gun’s inlet is higher because of internal resistance. So a gun like the Graco runs at 29 PSI inbound to achieve that compliant 10 PSI or less at the cap.
Your job is to find your gun’s manual and use its number as a starting point. The Harbor Freight manual adds a critical tip: measure this pressure with the trigger fully depressed. This gives you the dynamic working pressure, not the static line pressure.
Common mistake: Setting pressure without pulling the trigger. You’re reading the air available to the gun, not the air actually flowing through it. The real working pressure will be lower.
Start at the middle of your gun’s range. Then adjust based on the result you see on your test cardboard.
The 6-Step Setup and Spray Process (and the One Step Nobody Skips)
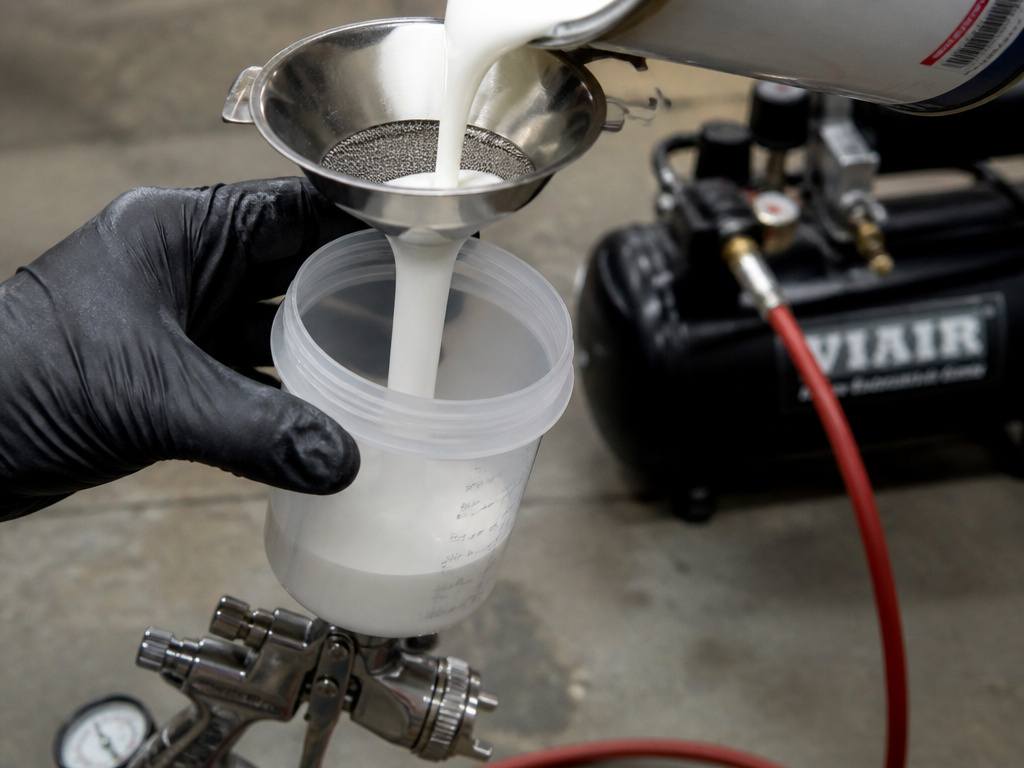
This is the core sequence. Rushing any step here shows up in the finish.
- Prepare Your Material. Strain your paint or finish through a filter funnel into the gun’s cup. Even “new” paint can have skins or debris. If you skip this, a chunk can jam the fluid nozzle and create a streak in the pattern, which you might not see until it’s on your workpiece.
- Assemble the Air System. Connect your hose to the compressor’s regulated outlet. Attach the filter, then the regulator, then the hose. Before connecting to the gun, blow out the hose by briefly opening the valve to clear any dust. Connect the hose to the gun’s ¼” NPS air inlet. A little thread tape on the fittings ensures a clean seal without over-tightening.
- Set Initial Gun Controls. Open the fluid control knob (usually on the back) 2 full turns. Open the fan pattern knob (usually on the side) all the way. Open the air control knob (if present) all the way. You start wide open and adjust down, not the other way around.
- Set Air Pressure and Test Pattern. Turn on the compressor and let it fill. With the gun pointed into a spray booth or at a large piece of cardboard, pull the trigger and set your regulator to the target PSI. Test your pattern on cardboard held vertically. You’re looking for a tall, even, elliptical shape. If it’s round, open the fan control more. If it’s heavy in the middle, increase air pressure slightly. If it’s split or crescent-shaped, your air cap is clogged or not seated properly.
- Spray Using Proper Technique. Hold the gun 6-8 inches from the surface. Keep it perpendicular and move your entire arm, not just your wrist, at a steady, moderate pace. Start your motion before the trigger, and release the trigger after passing the edge. Overlap each pass by 50%. The sound of a proper pass is a consistent hiss, not a sputtering puff-puff-puff.
- Clean the Gun Immediately. This is the step people skip. They set the gun down “for just a minute” that becomes an hour. By then, material has started to cure in the fluid passages. Pour unused material out, fill the cup halfway with appropriate solvent (not chlorinated for metal guns!), and spray it through until it runs clear. Disassemble the fluid tip and air cap and wipe them clean with a soft brush. Never use a metal pick.
Troubleshooting Common Spray Defects
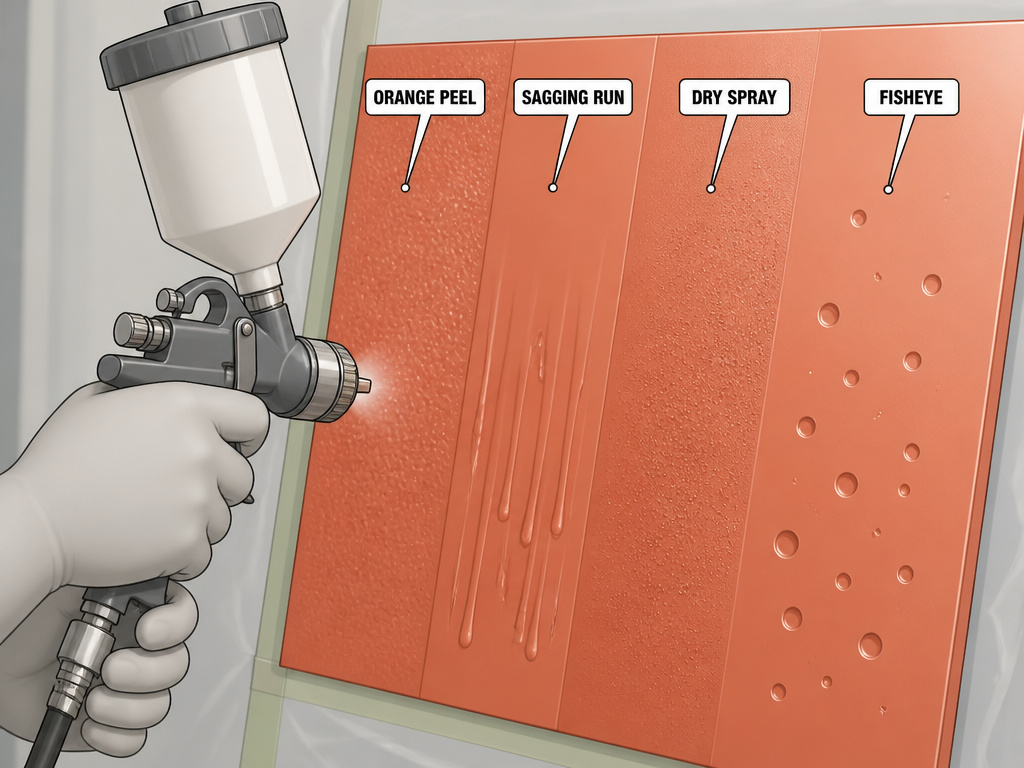
You can follow every step and still get a bad finish. Here’s how to read what went wrong.
- Orange Peel (textured, bumpy surface): The paint dried before it could flow out. The fix is usually thinning your material slightly or moving the gun closer to increase wetness. It can also mean your air pressure is too high, breaking the material into too-fine a mist that dries mid-air.
- Runs and Sags: Too much material applied too quickly. Increase your travel speed, reduce fluid flow with the control knob, or hold the gun farther away. Don’t just lower the pressure, that can cause other issues.
- Dry Spray (gritty, sandy texture): The paint is partially drying before it hits the surface. Reduce the distance between the gun and the workpiece, or add a slower-evaporating retarder to your material. This often happens in hot, low-humidity conditions.
- Fisheyes (small, crater-like holes): Contamination on the surface or in your air line. Wipe the surface with a wax and grease remover. Ensure your air filter is working and that no lubricant is in the air line.
If your pattern is distorted, heavy on one side, split, or tailing, you have a clog. Turn off the air, unscrew the air cap, and soak it in solvent. Use a soft-bristle brush, never a wire or needle, to clean the ports. A damaged air cap or fluid nozzle must be replaced.
What About a Pressure Pot?
You’ll be refilling constantly. This is where a pressure pot shines, it’s a remote tank that holds a quart to several gallons of material, fed to the gun via a hose.
The principle is simple: you pressurize the pot with air; for example, the Apollo 7700 manual states 5 PSI is adequate for most average viscosity fluids. The main air supply still goes to the gun for atomization. This setup means you can spray longer without stopping and maintain a perfectly consistent fluid flow, which is critical for metallic or pearl paints.
Setting one up adds steps: connecting the fluid hose, pressurizing the pot separately, and purging the line to get material to the gun tip. But for production work, it’s the only way to fly. It turns a capable DIY tool into a semi-professional system.
Frequently Asked Questions
Can I use a small 6-gallon air compressor?
You can, but you’ll be limited. It will run continuously and may overheat. It’s only suitable for very small, intermittent projects like a picture frame or a chair leg. For anything larger, the compressor will struggle to maintain pressure, causing an uneven finish. It’s a classic case of the right tool for the job.
What is the difference between HVLP and LVLP spray guns?
HVLP (High Volume Low Pressure) guns use a high volume of air at low pressure (under 10 PSI at the cap) for high transfer efficiency and minimal overspray. They typically require a larger air compressor. LVLP (Low Volume Low Pressure) guns use less air overall, making them more compatible with smaller compressors, but they can sometimes sacrifice a bit of finish quality for that convenience. The choice often comes down to your compressor’s capacity.
Why is my spray gun sputtering?
Sputtering is almost always a sign of inconsistent fluid delivery. The causes, in order of likelihood: your material is too thick and needs thinning, the fluid nozzle is partially clogged, there’s a leak in the fluid seal (like a worn needle packing), or your compressor can’t maintain the required CFM. Start by straining and thinning your material, then clean the fluid tip thoroughly.
Can I spray latex paint with an HVLP gun?
Most conventional HVLP spray guns designed for compressors are not recommended for latex paint. The Harbor Freight manual explicitly says “DO NOT USE LATEX PAINT IN THIS SPRAY GUN.” Latex dries quickly and is prone to clogging the small passages. The Harbor Freight manual explicitly says “DO NOT USE LATEX PAINT IN THIS SPRAY GUN.”
How do I choose the right needle and nozzle size?
The nozzle size (e.g., 1.3mm, 1.5mm) should match your material’s viscosity. Always use the matched needle and air cap set designed for your specific gun model.
Before You Go
The single biggest variable in your success is the air preparation. Installing a filter and regulator is a one-time cost that pays off in every project after. Without them, you’re fighting moisture and pressure swings before you even pull the trigger.
If you’re buying your first setup, start with a middle-of-the-road gun like the Apollo 7700 or an import model. Match it to at least a 20-gallon compressor. Practice your technique on scrap until you can lay down a wet, even coat without runs. The learning curve is steep but short. Once you hear that consistent hiss and see the smooth finish flow out, you’ll never want to use a brush on a large surface again. I can confirm this from experience.
