
How to Carve Wood With a Rotary Tool: Step-by-Step Guide
This post contains affiliate links. As an Amazon Associate, we earn from qualifying purchases.
Carving wood with a rotary tool requires matching three things: the right bit for the job, the correct speed setting, and a light, controlled touch. A basic tool with a few essential bits can shape, detail, and finish a project, but forcing the tool or using the wrong speed burns wood and wears bits out prematurely.
The difference between a clean carve and a burnt, torn mess often comes down to listening to the motor. A high-pitched whine means you’re pressing too hard; a steady hum means the tool is doing the work. Most beginner frustration stems from ignoring that sound, which is a core principle of how to carve wood with a rotary tool.
What follows is a breakdown of the four essential bits, the specific RPM ranges for different woods, and a step-by-step process for how to carve wood with a rotary tool that moves from rough shaping to fine detail. You’ll also find the common pitfalls that stall projects and the simple fixes that keep you carving.
Key Takeaways
- Start with four basic bits: two sanding drum sizes, a cone-shaped high-speed steel cutter, and a flame-shaped high-speed steel cutter.
- Let speed do the work; a light touch prevents burn marks and gives you control, especially when the tool’s pitch rises.
- Secure small pieces in a vise or with double-sided tape, the tool can skip toward your hand if it hits a sudden density change.
- Match bit material to wood hardness: high-speed steel for softwoods like basswood and pine; tungsten carbide for hardwoods like oak and maple.
- Always wear safety glasses and a dust mask; wood chips and fine dust travel at high speed and can cause injury or respiratory issues.
The 4 Essential Bits to Start With
You don’t need a drawer full of specialty bits to begin. The Scroll Saw Woodworking & Crafts article recommends four bits that cover 90% of beginner carving work. Buying a full set before you know what the shapes do is like getting a full knife block when you only need a chef’s knife and a paring knife.
The first two are sanding drums. Think of these as your rough shaping tools. They come in different grits, coarse for fast wood removal, fine for slower, smoother work. Common sizes are 1/2-inch (13mm) and 1/4-inch (6mm) diameter. The larger drum handles open areas, while the smaller one gets into tight crevices. You’ll find you use the corner of the drum more than the middle.
The other two are high-speed steel cutters: one cone-shaped, one flame-shaped. These actually cut the wood rather than sand it. They’re more aggressive and require a firmer grip, but they let you carve textures and reach the tightest spots. With heavy use, these steel bits usually last a month before dulling and starting to burn the wood. They’re inexpensive enough to replace rather than sharpen.
For a beginner’s first project, buy four bits: sanding drums in two sizes and cone-shaped and flame-shaped high-speed steel cutters. You can carve and shape most projects with just these bits.
This minimal kit for how to carve wood with a rotary tool keeps cost down and forces you to learn what each profile can do. As your skills grow, you can explore specialized shapes like inverted cones for texturing or diamond burs for fine detail. Our guide on types of rotary tool bits breaks down the full range of profiles and their uses.
Rotary Tool Speed Settings: The RPM Rules
Speed is not a matter of personal preference alone; it’s dictated by the bit material and the wood you’re carving. Run a steel cutter too fast in hardwood and it will glow red and burn the wood. Run a diamond bur too slow and it will grab and tear the grain.
The Dental Bur blog provides specific, sourced RPM ranges that serve as your baseline. These aren’t suggestions, they’re the conditions under which the bits are designed to work safely and effectively.
| Bit Type | Recommended RPM Range | Best For |
|---|---|---|
| High-Speed Steel Cutters | 20,000–30,000 RPM | Softwoods like basswood, pine, butternut |
| Tungsten Carbide Cutters | 15,000–25,000 RPM | Hardwoods like oak, walnut, maple, cherry |
| Diamond Burs | 15,000–25,000 RPM | Detail work on all species |
| Sanding Drums | 10,000–15,000 RPM | All species, final shaping and smoothing |
| Engraving Cutters | 10,000–20,000 RPM | Fine detail, lettering (Dremel 191 works well around 15,000 RPM on dry wood) |
The Foredom manual adds a crucial layer: “Generally, slower speeds are used when greater control over the accessory is required for precise, delicate work. Higher speeds are used for carving (shaping and stock removal).” This is the control vs. Power trade-off. You might rough out a spoon bowl at 25,000 RPM with a carbide bit, then drop to 15,000 RPM for refining the curve of the handle.
Where sources disagree is on the universal “slow down for details” rule. One carver in the Scroll Sawer article says they seldom turn the speed down below the halfway mark, using higher speeds for quick removal and only slightly slower for detail. The takeaway is to start within the recommended range, then adjust based on feel and control. Our dedicated rotary tool speed settings guide explores this balance in more depth.
Safety Before You Spin Up
This is the essential section. A rotary tool can spin a bit at speeds exceeding 30,000 revolutions per minute. The Foredom manual states the obvious but critical rule: “Wearing safety glasses or a face shield is the most important safety precaution for power carving.”
The secondary rules are just as important because they address the less obvious hazards.
- Secure your workpiece. If the piece is small, secure it in a vise or use a leather glove or finger protectors to hold it. The tool can skip towards your holding hand if it hits an area where wood density changes abruptly.
- Control dust. A dust collection system and/or a respirator should be used to prevent inhalation of fine dust. This isn’t just about lung health; it keeps your workspace clean and visible.
- Check accessory ratings. Always check the speed rating of the accessory you plan to use to be sure it is safe to use up to the RPM of your tool.
- Remove loose items. Do not wear neck ties, necklaces, or bracelets. Tie back long hair.
- Let the tool breathe. The motor should not be enclosed or confined so as to restrict air circulation. It’s designed to get hot, but it needs airflow to manage that heat.
Common mistake: Holding a small carving piece in your bare hand for “better control.” The first time the bit catches a knot and jumps, you’ll understand why a vise or a leather glove is the actual control.
These rules exist because people get hurt when they break them. They are not suggestions. For a full primer on safe operation, review our article on using a rotary tool from the ground up.
Step-by-Step Carving Process
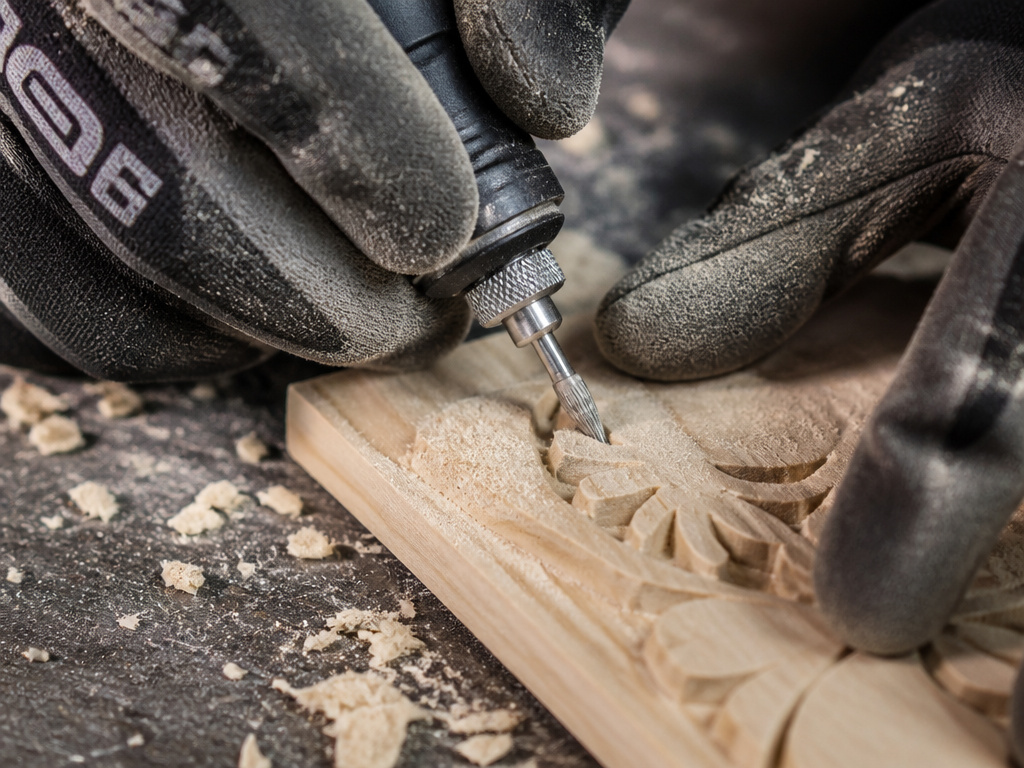
Step 1: Prepare Your Design and Workspace
Draw your design directly onto the wood with a pencil. For a symmetrical piece, you can fold the paper pattern and trace it. Basswood, pine, or butternut are ideal beginner woods, they’re soft and carve predictably. Cut your rough blank with a saw, leaving a little extra material around your lines.
Clamp the workpiece securely to your bench. If it’s too small to clamp effectively, mount it to a larger scrap block using double-sided tape. This is the moment to double-check your safety gear: glasses on, mask secure, loose sleeves rolled up.
Step 2: Rough Shaping and Stock Removal
Start with your coarse-grit sanding drum or an aggressive cutter like a carbide bur. Set your speed within the recommended high range for that bit. The goal here is to remove bulk, not to achieve final detail.
Hold the tool with both hands if possible. Use a light touch and move the tool across the wood, not forcing it into the surface. Listen to the motor. If the pitch rises sharply, you’re pushing too hard, ease up. Carve from right to left; this helps prevent the bit from grabbing and running along the grain.
Let the speed of the tool do the work. A light touch is always advised. Applying excessive side pressure may cause the shank or shaft of any accessory to bend or break.
Remove material until you’re within about 1/8-inch of your final lines. This stage is messy and loud. Don’t rush it. For large stock removal, using a flex shaft attachment can make the tool more maneuverable and reduce fatigue.
Step 3: Carving the Details
Switch to a finer-grit sanding drum or a smaller, finer cutter. This is where you might lower the speed slightly for better control, as the Foredom manual suggests, though some carvers prefer to stay within the higher end of a bit’s recommended range for detail work. Define the major shapes and begin to carve contours. The cone-shaped or flame-shaped steel cutters are excellent here.
Work systematically. Refine one area before moving to the next. For detail work, the Rotary Detail Carver manual offers a specific grip: “For the best control in close work, grip the tool like a pencil.” This gives you precision for features like eyes, feathers, or leaf veins.
Where this goes sideways: Switching bits without ensuring the collet is clean and the shank is fully inserted. A loose bit vibrates, ruins detail, and is dangerous. Always follow the proper steps for changing the collet to secure the accessory.
Step 4: Sanding and Finishing
Once the carving is complete, use your sanding drums progressively, moving from medium to fine grit. Sand with the grain whenever possible, even though power carving often ignores grain direction. The Scroll Sawer article notes that “cross-grain scratches from sanding will show up when a finish is applied.”
After power sanding, you may hand-sand with fine paper to remove any remaining scratch marks. Then apply your chosen finish, oil, wax, or paint. The sanding phase is what transforms a rough carving into a polished piece.
Common Beginner Mistakes and Fixes
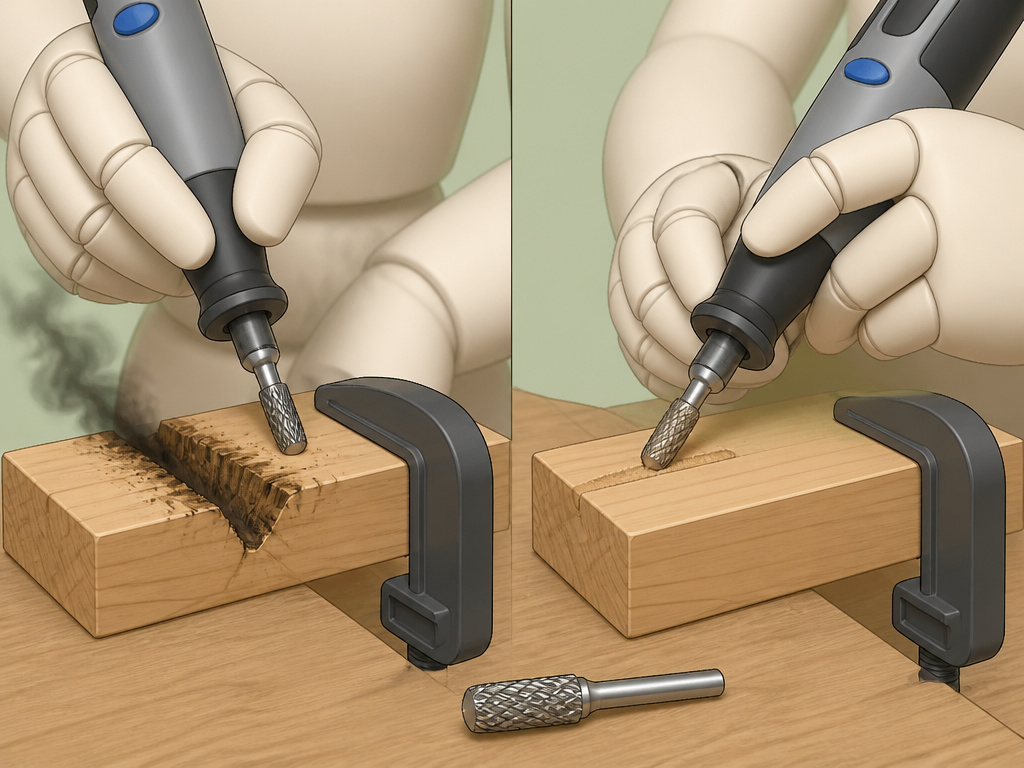
Mistake 1: Forcing the Tool. You’re impatient, so you lean into the work. The motor whines, the wood smokes, and you get a rough, burnt surface.
- Fix: Trust the speed. Apply gentle pressure and let the bit’s rotation do the cutting. If you need to remove material faster, switch to a more aggressive bit or a coarser grit, don’t use more muscle.
Mistake 2: Wrong Bit for the Wood. Using a high-speed steel cutter on dense oak or walnut. It dulls almost immediately and burns.
- Fix: Match the bit to the material. For hardwoods, use tungsten carbide bits. They hold an edge longer and resist heat better. The Dental Bur blog is clear: they “outperform steel cutters significantly” in dense hardwoods.
Mistake 3: Ignoring Tool Skip. You’re holding a small piece freehand. The bit hits a hard knot or a change in grain density and jerks toward your fingers.
- Fix: Always secure small workpieces. Use a vise, a clamp, or double-sided tape mounted to a larger block. A leather glove is the bare minimum for freehand holding.
Mistake 4: Incorrect Collet Use. Overtightening an empty collet or inserting a bit with a shank that’s too small or too large.
- Fix: This can damage the collet permanently. Always pair the shank size (1/8″, 3/32″, or 1/16″) with the correct collet. Insert the bit fully before tightening.
Maintaining Your Rotary Tool and Bits
Maintenance is simple but critical. After each use, blow out the collet and motor vents with compressed air to remove dust. For flexible shaft tools like the Foredom, avoid sharp bends in the shaft, as this accelerates wear. The manual states that under normal conditions, “a flexible shaft machine may require several replacement shafts and sheaths during its lifetime.”
Bit care is straightforward. Clean resin buildup off cutters and burs with a brass brush. Store bits in an organized case to prevent them from knocking against each other and dulling the edges. When a high-speed steel cutter starts burning wood despite correct speed and pressure, it’s dull. Replace it. Trying to sharpen these tiny cutters is rarely worth the effort.
Frequently Asked Questions
What type of wood is best for carving with a Dremel?
Soft, close-grained woods are best for beginners. Basswood, pine, and butternut are top choices. They carve easily, produce less dust, and are forgiving when you make a slight error. Hardwoods like oak, walnut, and maple are beautiful but require sharper, harder bits (like tungsten carbide) and more patience.
Which Dremel bit is best for carving wood?
There is no single “best” bit; it depends on the stage of work. For rough shaping, a coarse sanding drum or a carbide bur is best. For general carving and shaping, high-speed steel cutters (cone or flame) are versatile. For fine detail and texturing, diamond burs or specialized shapes like inverted cones excel. Start with the basic four-bit kit.
How do I carve wood with a rotary tool without burning it?
Burning is caused by excessive friction, which comes from three main sources: too high a speed for the bit/wood combo, too much pressure (forcing the tool), or a dull bit. To avoid it, use the recommended RPM range, apply a light touch, and ensure your bits are sharp. If you see burn marks, lower the speed, ease up on pressure, or check your bit.
What is the rule of three in wood carving?
The “rule of three” in traditional carving often refers to working in three distinct stages: roughing out the basic form, shaping the secondary forms and contours, and finally carving the fine details. In rotary tool carving, this translates directly: use an aggressive bit for bulk removal, a medium-grit or finer bit for shaping, and a detail bit for final features.
Is a flex shaft attachment worth it for carving?
For prolonged sessions or detailed work, yes. A flex shaft attaches to your rotary tool motor, turning the handpiece into a lightweight, pen-like tool. It reduces arm fatigue and greatly improves control and precision for intricate work. It’s especially valuable for projects like jewelry, small figurines, or detailed relief carving.
The Bottom Line
Carving wood with a rotary tool is about finesse, not force. The tool’s speed is your primary asset; your job is to guide it with a steady, light hand. Start with a minimal kit of bits, clamp your work down, and always, always, wear eye and lung protection.
If you remember one thing, let it be this: listen to the tool. A change in sound is your first clue that something is wrong, you’re pressing too hard, the bit is dull, or the speed is off. That feedback loop is what separates a controlled carve from a frustrating mess.
For your first project, pick a simple shape in basswood and follow the three-stage process. Once you’ve completed that, you’ll have the foundational skills to explore more complex carvings and a wider array of bits. Now, go make some sawdust.
