
How to Use a Router Table: Step-by-Step (Without Damage)
This post contains affiliate links. As an Amazon Associate, we earn from qualifying purchases.
To use a router table, mount your router upside-down under the table, secure the fence parallel to the bit, and always feed the workpiece from right to left against the bit’s counterclockwise rotation. Start with a shallow cut of about 1/4 inch, use push sticks and featherboards, and never let the majority of the workpiece get trapped between the fence and the bit, a hazardous “fence trap.”
That feed direction isn’t a suggestion; it’s the difference between a controlled cut and the workpiece being snatched from your hands. The bit’s rotation does half the work, pulling the stock firmly against your guide. Reverse it, and you’re climb-cutting, a guaranteed way to ruin the edge and risk injury. Understanding this principle is fundamental to learning how to use a router table.
What follows is the setup and sequence for how to use a router table that turns a loud, intimidating tool into a precision instrument. We’ll walk through mounting the router, leveling the insert, setting depth, and the operations, like edge profiling, grooves, and joinery, that a table makes possible. The rules come straight from the OEM manuals; the stumbles are the ones every woodworker makes once.
Key Takeaways
- Always feed the workpiece from right to left against the bit’s rotation; feeding with the rotation (climb cutting) causes loss of control and kickback.
- Make shallow initial passes of about 1/4 inch depth, especially in hardwoods, to avoid burning the wood and overloading the motor.
- Use push sticks and featherboards for every cut where your hands would come near the bit; featherboards aid but cannot solely hold the workpiece.
- The router’s power cord connection varies by brand: plug into the table’s switch box (Bosch) or plug the table’s power cord into a dedicated 15A outlet (Harbor Freight).
- For wide dadoes that exceed your fence’s range, use a miter gauge with an auxiliary fence clamped to it for support and to prevent tear-out.
The Feed Direction Rule That Prevents Kickback
Get this wrong once and you’ll never forget it. The bit in a router table spins counterclockwise as viewed from above. That rotation wants to pull the workpiece in a specific direction. Your job is to feed the wood against that pull.
Feed the workpiece only against the rotation of the bit. Do not “back feed” the workpiece into the bit. “Back feeding” will cause the workpiece to “climb” up on the bit, pulling the workpiece and possibly your hands into the rotating bit. . Bosch RA1171 Router Table Manual
In practice, this means you almost always feed stock from right to left along the fence. The force generated by the bit helps drive the work against your guide, be it a fence or a starting pin. Do it backwards, and you’re climb-cutting. The workpiece gets pushed away from the fence, the cut turns ragged, and in a flash, the bit can grab the wood and throw it.
I learned this the hard way on a simple edge round-over. I was distracted, fed left-to-right for just two inches, and felt the board lurch. It didn’t fly, but the edge was gouged and scalloped, a total loss. The sound changed from a smooth hum to a chattering snarl. That’s your warning.
Why does direction matter so much? When you feed against the rotation, the cutting force pushes the workpiece down onto the table and tight against the fence. You’re working with the tool’s physics. Feeding with the rotation lifts the workpiece, reduces control, and turns the cutter into a grabbing, throwing machine.
Setting Up Your Router Table
Before you touch a switch, the table needs to be right. A router vibrating loose mid-cut isn’t a surprise; it’s a predictable outcome of skipping setup.
First, mount the router. Remove the plastic subbase from your router, as the Bosch manual specifies. Align your router’s base with the holes in the table’s mounting plate. The Bosch RA1171 manual states: “Do not plug router motor power cord into standard wall outlet. Always plug router cord into the router table switch box.” The Harbor Freight manual, however, instructs: “Plug Table’s Power Cord into a dedicated 15A, grounded 120VAC outlet.” Follow your specific table’s manual. Follow your specific table’s manual: Bosch says to plug the router cord into the table’s switch box, while Harbor Freight says to plug the table’s cord into a dedicated outlet.
Second, level the insert. An insert sitting even a millimeter above or below the table surface will catch your workpiece. Commercial router tables are equipped with set screws to level the insert with the table, per Woodcraft. For shop-made tables, masking tape or metal shims under the insert corners can get you there. Drag a straightedge across the gap; you shouldn’t feel a lip.
Finally, orient the controls. The Bosch manual is explicit: “Make sure that the depth adjustment controls on the router face the front of the mounting plate.” You’ll be making fine height adjustments constantly; if you have to reach under the table blindly, you’ll guess instead of measure.
The Tools You Actually Need
You don’t need a shop full of jigs on day one. These four will cover 95% of operations:
- A pair of push sticks. One for pushing, one for keeping the workpiece down. Shop-made ones from 1/2″ plywood are fine.
- A featherboard. This spring-loaded device applies sideways pressure against the fence, keeping the workpiece tight. Remember the Bosch warning: “Featherboards aid in holding the workpiece… They are not intended to hold the workpiece in place alone when the workpiece is in contact with the bit.”
- A combination square. For setting fence distance from the bit and checking that the fence is parallel.
- A commercially built router table like the Bosch RA1171 or a Harbor Freight Benchtop model can be a stable starting point. If you’re buying new, our guide to the best router tables compares top models.
Adjusting Depth and Fence for the Cut
Depth of cut and fence position are your two primary variables. They’re interdependent, and getting them wrong leads to burn marks, tear-out, or a stalled motor.
For depth, start shallow. The Home Depot guide suggests adjusting the bit so it’s cutting somewhere around 1/4-inch deep for groove cutting. This is a safe starting point for most woods and bit profiles. On very hard wood or for large cuts, the Harbor Freight manual notes it may be necessary to make more than one pass at progressive depth settings.
The process on a table is the reverse of a handheld router. A handheld router needs the bit lowered for deeper cuts. Raise the bit on a table router. Use a height gauge or even a block of known thickness set next to the bit to set the exact protrusion.
For the fence, parallelism is king. A fence that’s not parallel to the bit creates a widening or narrowing gap, which can pinch the workpiece or cause an uneven cut. Use your combination square to measure from the bit to the fence at the front and back of the bit’s path. They must match.
Where this goes sideways: Setting the fence by eye. Even a 1-degree skew will cause the back of the workpiece to bind against the bit after it clears the fence, resulting in a burn mark that runs the length of the cut and a noticeable increase in motor strain.
Sometimes, you won’t use a fence at all. For operations like edge-profiling with a bearing-guided bit, the bearing rides along the workpiece edge itself. For wide dadoes that exceed your fence’s range, Woodcraft advises using a miter gauge with an auxiliary fence.
Common Router Table Operations
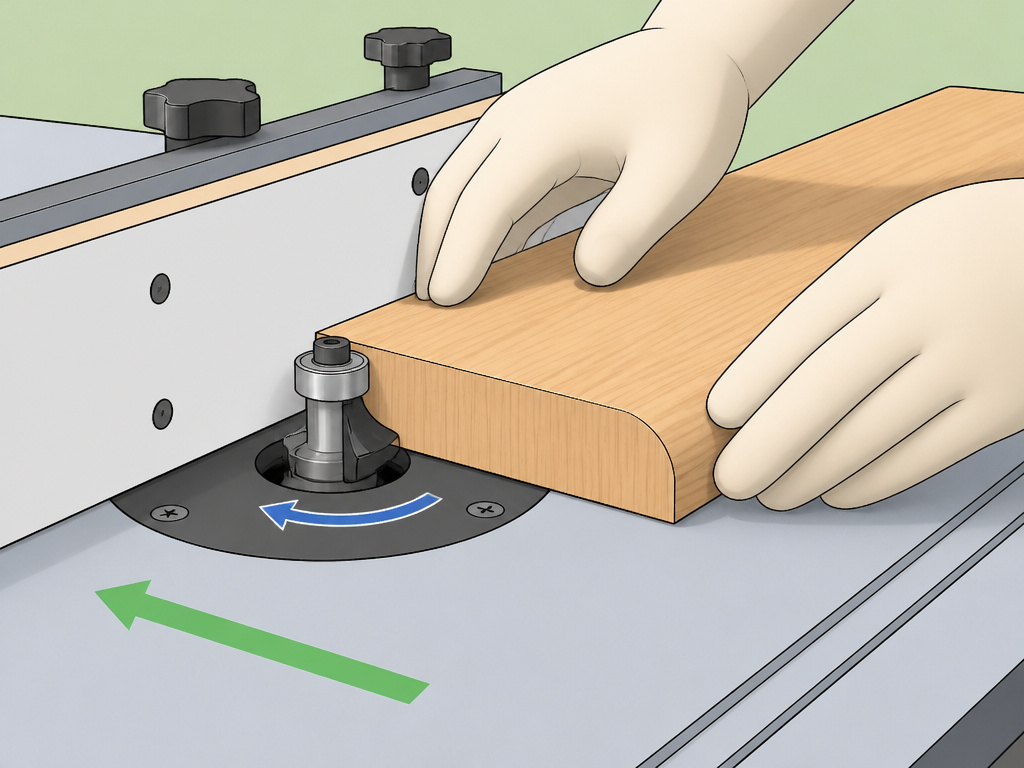
A router table excels at three fundamental tasks: profiling edges, cutting grooves (dadoes/rabbets), and joinery like mortising. The setup changes, but the core safety rules do not.
Edge Profiling is the easiest place to start. Use a bearing-guided bit (a “pilot bit”). The workpiece feeds along the fence, or if the bearing is the correct diameter, the fence can be removed and the bearing rides the uncut edge. Always feed against the rotation.
Cutting Grooves and Dadoes requires a fence. Use a straight “unpiloted” bit. As the Home Depot guide states: “Always use a router guide, or fence, when using unpiloted bits.” For a groove across the width of a panel (a through dado), a miter gauge with an auxiliary fence clamped to it provides the necessary support and prevents tear-out at the end of the cut.
Template and Pattern Routing uses a guide bushing or a bearing that follows a template attached to the workpiece. This is an advanced technique that requires a specific router edge guide setup and zero-clearance inserts to prevent chip-out.
| Operation | Best Bit Type | Primary Guide | Key Risk |
|---|---|---|---|
| Edge Profiling | Bearing-Guided (Pilot) | Fence or Bearing | Climb-cutting if feed direction reverses |
| Grooves/Dadoes | Straight (Unpiloted) | Fence | Fence trap if workpiece is between fence & bit |
| Joinery (Mortises) | Spiral Up-Cut | Fence & Stops | Kickback on exit if workpiece is not supported |
| Pattern Routing | Pattern Bit or Guide Bushing | Template | Workpiece lifting if not securely fastened |
Safety Protocols You Cannot Skip
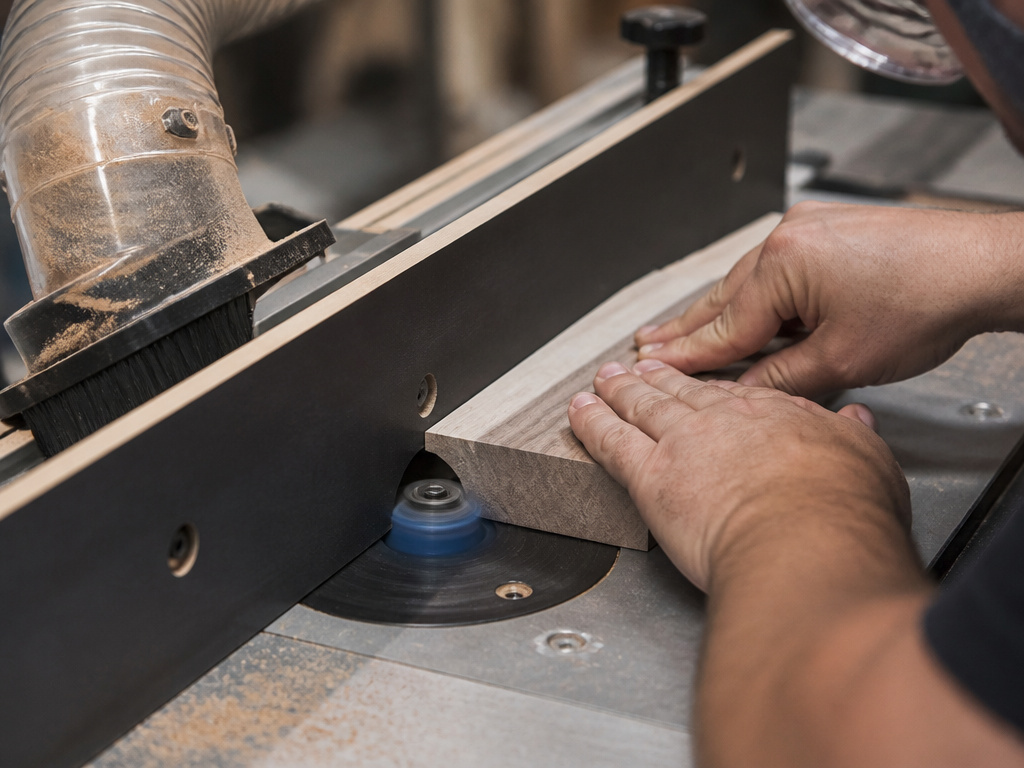
Router tables demand respect. The combination of high RPMs, sharp cutters, and the need to feed material by hand creates multiple pinch points and kickback risks.
Personal Protective Equipment (PPE) is mandatory. The Home Depot guide mandates: “Always wear safety glasses and ear protection.” Cut-resistant work gloves are also recommended when you’re learning, but note the disagreement: Harbor Freight recommends gloves to reduce vibration, while the Bosch instruction to “Hold the power tool by insulated gripping surfaces only” implies gloves can reduce grip and control. Sources disagree on glove use: Harbor Freight recommends gloves to reduce vibration, while Bosch’s instruction to ‘Hold the power tool by insulated gripping surfaces only’ implies gloves can reduce grip and control.
Secure the workpiece and your stance. The Harbor Freight manual says to “use clamps or another practical way to secure and support the workpiece to a stable platform.” For long stock, use auxiliary infeed and outfeed supports. Stand to the side of the potential kickback path, never directly behind the workpiece.
Never create a “fence trap.” The Bosch manual defines this: “Do not feed the workpiece where the majority of the workpiece is between the fence and the bit.” If the bit is exposed in that gap, the workpiece can twist, climb-cut, and be thrown.
Dust collection isn’t just for cleanliness. Some dust created by woodworking contains chemicals known to cause cancer, birth defects, or other reproductive harm, as stated in the Bosch manual. Connect your table’s dust port to a shop vac. It keeps the line of cut visible and protects your lungs.
Troubleshooting Common Problems
Even with perfect setup, things go wrong. Here’s how to diagnose and fix the most common router table issues.
Burn Marks on the Workpiece
This is almost always a feed-rate issue. You’re either feeding too slowly, allowing the bit to friction-burn the wood, or the bit is dull. It can also happen if the fence isn’t parallel, causing the workpiece to rub after the cut. Solution: Check fence alignment, ensure your bit is sharp, and maintain a steady, consistent feed rate, not too fast, not too slow.
Tear-Out or Chipping at the End of a Cut
This is common when routing across the grain (as in a dado). The Woodcraft solution is to use a miter gauge with an auxiliary fence and to clamp the stock to the fence. The auxiliary fence supports the wood fibers right up to the point where the bit exits, preventing them from splintering.
The Router Loses Power Mid-Cut
If your router table loses power, the Harbor Freight manual has a specific procedure: “push Power Switch down. Remove workpiece. Press Reset Button, then lift Power Switch.” This usually indicates an overload; your cut may be too deep or you’re feeding too fast.
Vibration and Loud Noise
Router motor vibration can loosen the router’s mounting fasteners during use. Periodically check that the router is still tightly secured to the mounting plate. Also ensure the router bit is tightly locked in the collet and is not damaged.
Choosing and Changing Router Bits
Bit selection dictates your setup. The two main categories are pilot bits (with a guide bearing) and unpiloted bits (no bearing).
- Pilot Bits: As the Home Depot guide explains, “Pilot bits work in handheld or table mounted routers. You can use them with or without a fence.” The bearing guides the cut. These are ideal for edge work.
- Unpiloted Bits: “Always use a router guide, or fence, when using unpiloted bits.” These include straight bits, rabbeting bits, and joinery bits. They require a fence, miter gauge, or template to guide the cut.
Changing a bit on a table-mounted router is different than on a handheld. You need to lock the router’s spindle. Most routers have a spindle lock button, depress it while using the wrench to loosen the collet nut. Always unplug the table from power first. For frequent bit changes, a router lift system is a worthy upgrade, allowing you to raise and lower the router from above the table.
When selecting bits, our breakdown of router bit types details which profile is used for which operation, from simple round-overs to complex ogees.
Frequently Asked Questions
Which way do you feed wood on a router table?
You almost always feed wood from right to left, against the counterclockwise rotation of the bit. This ensures the cutting forces push the workpiece against the fence and down onto the table, maintaining control.
Can you use a router table as a jointer?
Yes, with a specific setup. You use a straight bit and precisely align the infeed and outfeed sides of a jointing fence to take a very shallow shaving off the edge of a board. It’s effective for small shops but doesn’t replace a dedicated jointer for milling rough lumber.
What can I make with a router table?
Router table is incredibly versatile. You can make picture frames (using a rabbeting bit for the glass groove), cabinet doors (with rail-and-stile bits), drawer boxes (dadoes for the bottom), decorative moldings, and signs. It’s the key tool for any repeatable edge profile or groove. For a classic first project, learn how to round over edges with a router.
How do I prevent kickback on a router table?
The primary prevention is correct feed direction (right to left). Secondary measures include using push sticks and featherboards, avoiding the “fence trap,” taking shallow passes, and ensuring the workpiece is stable and supported. Never stand in the direct line of potential kickback.
Do I need a special router for a router table?
While most routers can be mounted, some are better suited than others. A router with a flat base (not a rounded “D-handle” style) and easy through-table height adjustment is ideal. Fixed-base routers are often preferred over plunge bases for table use. We’ve compared the best routers for a router table to help you choose.
What’s the difference between a router table and using a router by hand?
Router table provides superior stability and control for many operations, especially those involving narrow or long stock, repeatable profiles, and joinery. It holds the router fixed, allowing you to use both hands to control the workpiece. A handheld router is better for large panels, template work, and tasks where you need to move the tool across stationary material.
Before You Go
Be realistic. A router table is a power multiplier, but it’s not a tool you master in an afternoon. When first learning how to use a router table, focus solely on the fundamentals: mount the router securely, level the insert, set a shallow depth, and drill the right feed direction into your muscle memory. Everything else, fancy joinery, complex profiles, builds from that.
If you take away one thing, let it be this: your router table’s manual is not a pamphlet to toss. The Bosch, Harbor Freight, and SKIL manuals contain specific, essential warnings, like the “fence trap”, that generic online guides gloss over. Print yours. Keep it by the table. And if a procedure in any guide contradicts your specific tool’s manual, follow the manual. Your wood router is a versatile tool, but its safety rules are absolute.
Finally, know when to walk away. If you feel rushed, tired, or frustrated, that’s when the tool bites. Clean up, switch off the light, and come back when the shop is a place of focus again. The wood will wait.
