
Can You Use a Finish Nailer on Hardie Siding?
This post contains affiliate links. As an Amazon Associate, we earn from qualifying purchases.
Sources disagree on using a finish nailer on HardiePlank lap siding. One James Hardie guide states finish nailers should be used for HardieTrim boards only, while another states James Hardie products can be hand nailed or fastened with a pneumatic tool and pneumatic fastening is highly recommended.
That’s the rule straight from the manufacturer. It’s not a suggestion. The difference depends on physics and a piece of paper called ICC-ES ESR-2290. The siding nailer’s job is to drive a nail with a head wide enough to hold against the specific wind loads your house is rated for. A finish nailer’s narrow head simply isn’t on that list, which is why you should ask, can you use a finish nailer on hardie siding? The answer is no.
What follows is a breakdown of why that rule exists, what happens if you ignore it, and the exact tools and techniques that keep your installation solid for decades. This includes the nailer specs that matter, the fastener chemistry that prevents rust stains, and the one adjustment that solves 90% of pneumatic nailer problems on this job.
Key Takeaways
- Finish nailers are approved only for HardieTrim, using one on siding planks voids the warranty and risks blow-off.
- Approved siding nailers must drive 0.113-inch to 0.131-inch head diameter nails to meet the ICC-ES ESR-2290 wind load tables.
- Hot-dipped galvanized or stainless steel nails are mandatory; electro-galvanized nails corrode prematurely, especially near coastlines.
- The preferred installation method is blind nailing, with nails placed 3/4 to 1 inch from the top edge and hidden by the course above.
- If setting depth is difficult, choose a tool setting that under-drives the nail and hand-set it flush; over-driving requires removal and a new nail.
The Official Verdict on Finish Nailers for Hardie Siding
James Hardie’s installation documents are unambiguous. One guide states, “Finish nailers should be used for HardieTrim boards only.” Another reinforces that “James Hardie products can be hand nailed or fastened with a pneumatic tool,” with pneumatic fastening “highly recommended.” This isn’t a case of the manufacturer being overly cautious. It’s about matching the tool to a published engineering standard.
The siding isn’t just nailed on; it’s engineered as a system. The fastener schedule, nail type, size, spacing, and placement, is designed to resist specific wind loads, verified in a report called ICC-ES ESR-2290. The nails listed in that report have head diameters ranging from 0.113 to 0.131 inches. A standard finish nail has a smaller head diameter than the approved siding nails. That smaller head has less holding surface, which translates directly to lower pull-out resistance. The finish nailer isn’t on the approved list because its fasteners don’t meet the tested capacity for the can you use a finish nailer on hardie siding scenario.
The wind load tables in ICC-ES ESR-2290 dictate the exact nail head diameter, shank type, and spacing for HardiePlank lap siding. A finish nailer’s smaller-gauge nails are not included in these certified tables, meaning their use is not recognized as complying with the product’s tested performance.
I’ve seen the aftermath of using the wrong nailer, especially when you compare a can you use a finish nailer on hardie siding approach to the correct method. It’s not always an immediate blow-off in a storm. More often, it’s a gradual loosening over a few seasons. The plank starts to rattle in the wind, the butt joints open up, and you get callbacks. That’s a professional problem. For a DIYer, it risks improper installation which may not meet the manufacturer’s specifications.
Why Nail Choice Matters More Than the Tool
You could have the world’s best siding nailer, but if you feed it the wrong nails, you’ve lost. James Hardie specifies that fasteners “must be corrosion resistant, galvanized, or stainless steel.” This is where most off-the-shelf options fail.
Electro-galvanized nails are common in big-box stores. The manufacturer says they’re “acceptable but may exhibit premature corrosion.” That’s a polite way of saying they will rust, and that rust will streak down your freshly painted siding within a few years in a damp climate. The official recommendation is for “quality, hot-dipped galvanized nails.” For coastal or very humid areas, the guide is even more direct: “Stainless steel fasteners are recommended.”
The chemistry matters. Hot-dipping coats the nail in a thick, uneven layer of zinc that acts as a sacrificial anode. Electro-galvanizing applies a thin, smooth layer through plating. When that thin layer is scratched during installation or worn by seasonal expansion and contraction, the underlying steel is exposed and rusts. Stainless steel, while more expensive, contains chromium that forms a self-repairing oxide layer. It’s the only choice for longevity near saltwater.
| Fastener Type | Best For | Risk If Used Incorrectly |
|---|---|---|
| Hot-Dipped Galvanized | Most inland climates; cost-effective durability. | Thick coating can sometimes affect drive consistency; still the default recommendation. |
| Stainless Steel | Coastal zones, high humidity, salt-air environments. | Higher upfront cost; essential where other nails will corrode and stain. |
| Electro-Galvanized | Short-term, dry interior climates only (not recommended). | Premature corrosion and rust streaking within 2–5 years in exterior applications. |
Common mistake: Using bright steel or aluminum nails. Both are explicitly prohibited in James Hardie’s documents. Aluminum reacts with the cement. Bright steel rusts almost immediately.
The Right Nailer for the Job
Since a finish nailer is out, what should you use? The approved tools are siding nailers and roofing nailers. These are designed to drive the larger-headed, ring-shank or screw-shank nails that provide the required grip.
A siding nailer is typically a coil-fed tool that holds a long strip of nails, which is efficient for long runs. A roofing nailer is often a stick-fed tool. Both are acceptable as long as they can drive the correct nail specification. You’ll want to use a pneumatic tool with a flush mount attachment and adjustable drive depth. James Hardie advises: “Set air pressure so that the fastener is driven snug with the surface of the siding. A flush mount attachment on the pneumatic tool is recommended.”
That last part about the flush mount attachment is critical. It’s a simple plastic or metal sleeve that fits over the nailer’s nose, ensuring the tool sits flat on the siding surface. This prevents the nose from digging into the material and gives you consistent depth control. Without it, you’re much more likely to over-drive or under-drive.
Where this goes sideways: Cranking up the air pressure to sink a stubborn nail. On wood framing, an over-driven nail must be removed, the hole filled, and a new nail added nearby. On steel framing, you must remove and replace it, countersinking and filling isn’t an option.
If you’re looking at cordless options, the same rules apply. A cordless siding nailer must be capable of driving nails with the approved head diameter (e.g., 0.113 to 0.131 inches). Don’t assume a cordless “roofing nailer” is the same, check its spec sheet against the ICC-ES report.
Nailing Technique: Blind, Face, and Pin-Backs
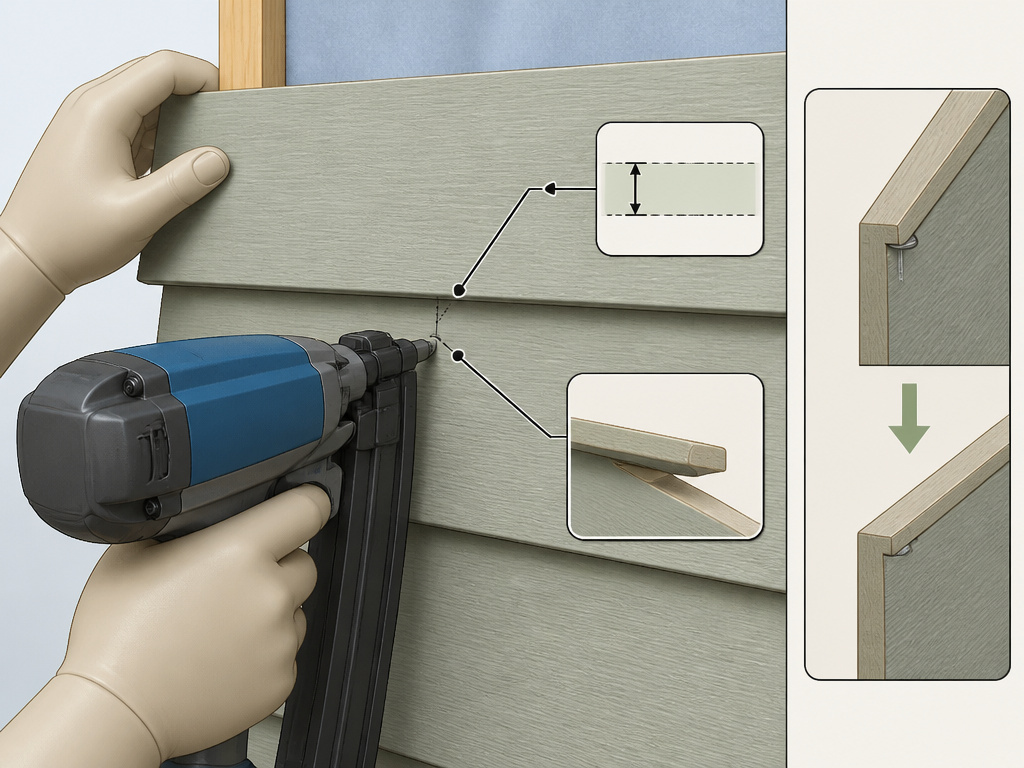
James Hardie prefers and recommends blind nailing. This hides the fastener under the overlapping course above, giving a clean appearance. The specs are precise: nails must be installed between 3/4 inch and 1 inch from the top edge of the plank, and no closer than 3/8 inch from the ends.
Face nailing is also acceptable but less common. It involves nailing through the face of the plank, typically at the bottom where it will be covered by the next course’s overlap. The same fastener and depth rules apply.
Then there’s the concept of “pin-backs.” This is not a primary fastening method. The technical bulletin is clear: “Pin backs are not a substitute for proper blind nailing or face nailing, they will not improve wind load resistance.” Pin-backs are for aesthetics only, to correct a slightly lifted plank or tighten a butt joint. For this, finish nails are actually recommended. They must be placed no closer than 1 inch from plank ends and 3/4 inch from the plank edge, driven flush (not countersunk).
| Technique | Purpose | Key Measurement |
|---|---|---|
| Blind Nailing (Preferred) | Primary attachment, hidden fastener. | Nail 3/4″ to 1″ from top edge; >3/8″ from ends. |
| Face Nailing | Primary attachment, used when blind nailing isn’t feasible. | Follow same fastener specs; typically at bottom overlap. |
| Pin-Backs (Finish Nails) | Aesthetic correction only; does not add strength. | Place >1″ from ends, >3/4″ from edge; drive flush. |
The most common technique error is “high nailing”, placing the blind nail too high on the plank, outside the 3/4-to-1-inch zone. This reduces the amount of material the nail grips from the course below, weakening the hold. Use a small story stick or a marked nail as a guide.
Troubleshooting Common Fastening Problems
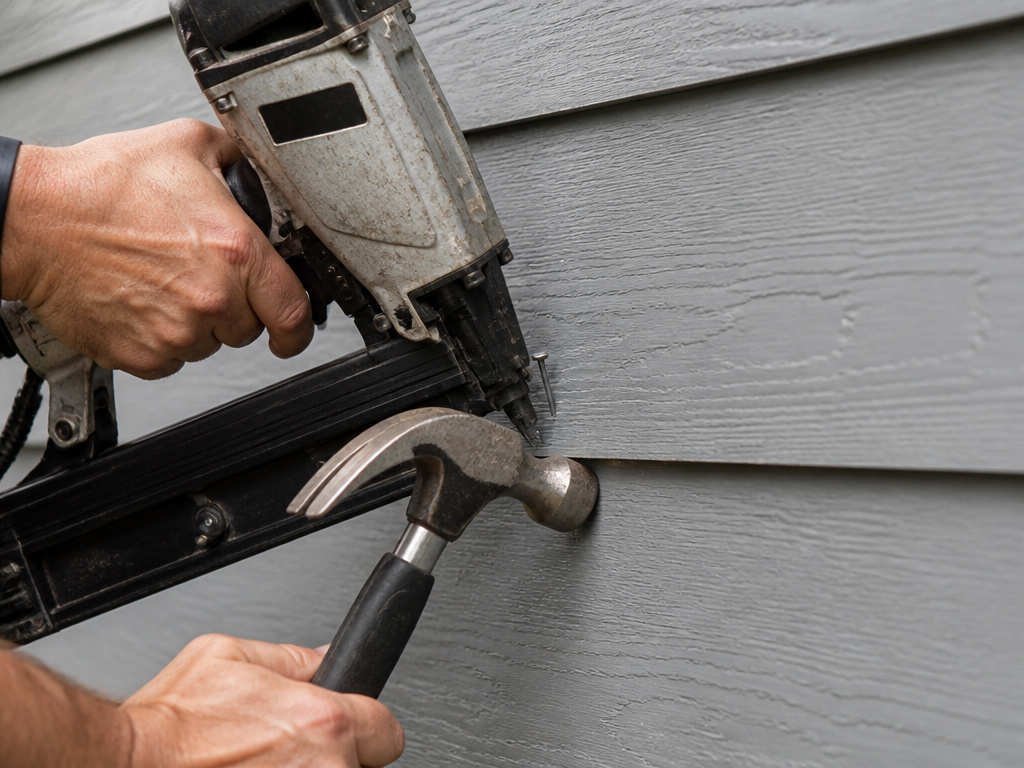
Even with the right tool, things can go wrong. Here’s how to handle the three most frequent issues, according to the manufacturer’s own “If, Then” guides.
Problem: Under-driven nail (head sits proud).
- For wood framing: One James Hardie guide states to “drive under driven nails snug with a smooth faced hammer,” while another states “under driven nails should be hit flush to the plank with a hammer.”
- For steel framing: This hammer-set method “does not apply.” You must remove the nail and replace it. The steel can deform the nail shank, making it unsafe to simply drive further.
Problem: Over-driven nail (head is countersunk).
- For any framing: “If nail is countersunk, caulk nail hole and add a nail.” The original nail no longer provides proper clamp. You must fill the old hole with a paintable caulk and drive a new nail nearby, at the correct depth.
Problem: Difficulty setting consistent depth.
- The fix: “If setting the nail depth proves difficult, choose a setting that under drives the nail.” It’s easier to hand-set a few proud nails flush than to repair dozens of over-driven ones. This is a key piece of practical advice from the manual. Dial your compressor or tool setting back until nails are consistently sitting just above the surface, then hand-finish them.
Frequently Asked Questions
What nail gun is best for Hardie board siding?
Coil-fed siding nailer or a roofing nailer that can drive nails with a head diameter of 0.113 to 0.131 inches is best. Use a siding or roofing nailer with a depth-of-drive adjustment and a flush mount attachment. Use a siding or roofing nailer capable of driving the approved nails.
What is the best way to nail Hardie board siding?
The best way is the blind nailing technique using an approved siding nailer and hot-dipped galvanized or stainless steel nails. Place nails 3/4 to 1 inch from the top edge of the plank, spaced according to the wind load requirements, so they are hidden by the course above. Always follow the specific fastening details in ICC-ES ESR-2290 for your region.
What size nail should I use for Hardie Board siding?
You should use a nail that meets the specifications in ICC-ES ESR-2290. This typically means a 1-1/4 to 2-1/2 inch nail with a ring or screw shank and a head diameter between 0.113 and 0.131 inches. The exact length depends on your sheathing thickness; nails must penetrate sufficiently into the structural member.
Can I use a finish nail gun for siding?
You can use a finish nail gun for HardieTrim boards, which is explicitly approved. You cannot use it for HardiePlank lap siding, as the nails it fires do not have the head size or holding power certified for the siding’s wind load resistance. Using one on the siding voids the product warranty.
Before You Go
The rule is simple because the stakes are high. A finish nailer on Hardie siding is a shortcut that compromises the entire system’s engineering. Your takeaway isn’t just “don’t do it,” but “here’s exactly what to do instead.”
Rent or buy a pneumatic siding nailer. Spend the extra on a box of hot-dipped galvanized or stainless steel nails. Set your depth to slightly under-drive, and keep a smooth-faced hammer in your belt for the final tap. That sequence, right tool, right fastener, conservative setting, is what turns a code-compliant installation into a durable, worry-free one.
Everything above assumes standard wood framing. If you’re fastening to steel studs, the rules tighten: every over- or under-driven nail must be pulled and replaced, no exceptions. That’s a different level of precision, and it’s why pros working on commercial jobs have dedicated tools for steel. For the rest of us, on a wood-framed house, the path is clear. Follow the manufacturer’s print. It’s the only map that leads to a result that lasts.
