
How to Countersink Nails With a Nail Gun: Step-by-Step
This post contains affiliate links. As an Amazon Associate, we earn from qualifying purchases.
To countersink a nail with a nail gun, first use the tool’s depth adjustment wheel or air pressure regulator to set the drive depth for future nails. For nails already driven proud, you must manually set them using a nail set and hammer, then fill the hole with wood filler.
That adjustment wheel is your first line of defense. It’s the difference between a clean, flush finish and a row of shiny nail heads you have to beat back down by hand. Most finish and brad nailers have one, like the depth control adjustment wheel (K) on the DeWalt DWFP71917. Turn it one way and the nail head sits proud; turn it the other and it buries itself. This is the core of how to countersink nails with a nail gun.
What follows is the full sequence: how to set your gun correctly, the manual backup method for when the gun settings aren’t enough, and how to troubleshoot when nails stubbornly refuse to sink, which is central to the topic of how to countersink nails with a nail gun. By the end, you’ll be able to read the nail head’s position like a gauge and know whether to reach for the adjustment dial or the nail set.
Key Takeaways
- Use the depth adjustment wheel on your nail gun first, it’s designed to control drive depth from flush to deep countersink.
- For nails already driven proud, a nail set and hammer is the only reliable fix; choose a set with a concave tip to prevent slipping.
- Always test on scrap wood first, adjusting pressure or depth without a test run risks splitting your finished workpiece.
- Fill countersunk holes with a stainable wood filler after setting; sanding flush hides the repair completely.
- If nails won’t sink, check for low air pressure (below 70 psi), hitting wood knots, or using the wrong nail gauge for your tool.
The First Move: Adjusting Your Nail Gun’s Depth
Modern pneumatic nail guns don’t just fire nails, they control how deep they go. Your primary tool for countersinking is built into the gun itself. On models like the DeWalt DWFP71917 16-gauge finish nailer, this is a depth control adjustment wheel. Rotating it changes how far the driver blade travels, letting you dial in a flush, shallow, or deep countersink.
The process is straightforward, but skipping the critical first step in how to countersink nails with a nail gun is how projects get damaged. You must disconnect the air supply and remove all fasteners from the magazine before making any adjustments. This is a safety instruction from the DeWalt manual. Once the tool is safe, locate the wheel, usually near the trigger or nosepiece, and give it a quarter-turn. Then, reconnect your air, load a strip of nails into a piece of scrap wood identical to your workpiece, and fire a test nail.
Common mistake: Adjusting the depth setting on your actual project. The difference between a perfect countersink and a nail driven completely through the back of your trim is about two clicks of that wheel. Test on scrap every single time.
You’ll hear the difference when it’s right. A nail driven flush makes a solid thump. A nail driven too deep has a sharper, harsher crack as it punches through the back layer. Start shallow and adjust deeper. It’s easier to sink a slightly proud nail by hand than to pull out a nail head buried a quarter-inch too deep.
The 3-Step Manual Countersink Method
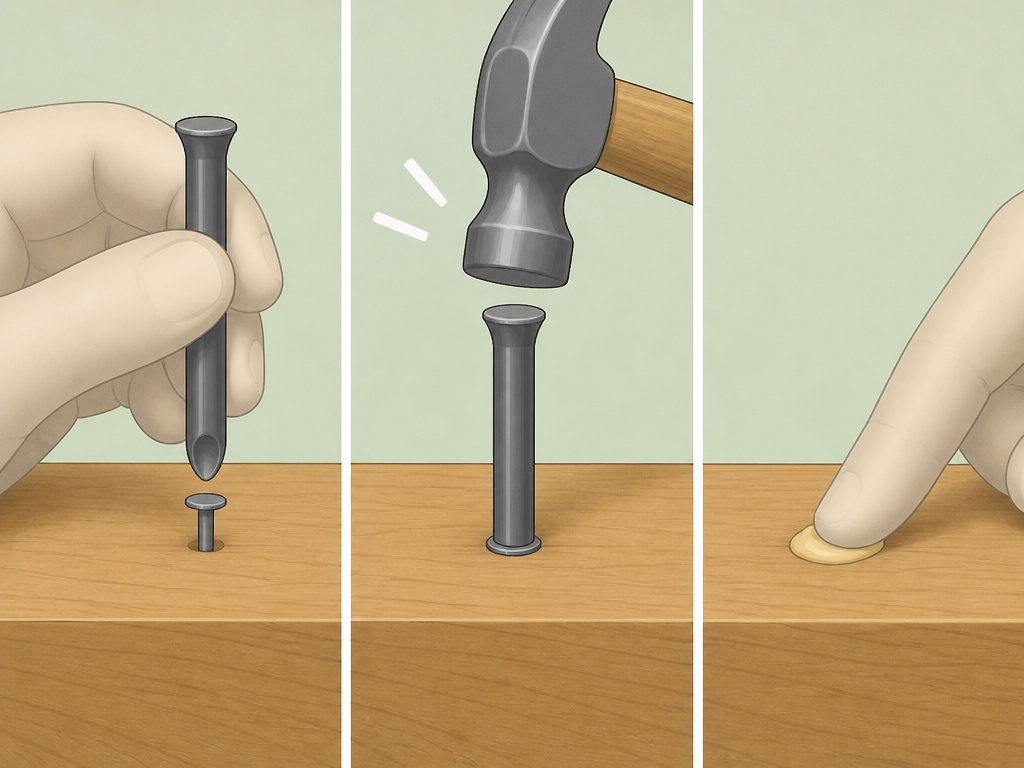
Sometimes the gun’s settings aren’t enough. Maybe you’re working with uneven material, hit a knot, or are fixing an old project. This is where the manual method takes over. It’s a three-step physical process: set, fill, sand.
Step 1: Select and Position the Nail Set.
A nail set is a short, hardened steel punch with a concave tip designed to cup a nail head. The concave tip is essential; a flat punch will slip, marring the wood and possibly bending the nail. Place the set’s tip directly over the center of the proud nail head. Hold it perfectly perpendicular to the workpiece. Any angle, and the set will skate off, leaving a nasty dent called a “shiner” in the wood.
Step on a piece of scrap first. You need to feel how much force it takes to move the nail without the set slipping. One sharp, controlled tap is better than a dozen tentative ones.
Step 2: Drive the Nail with Controlled Force.
Using a hammer, strike the nail set with a firm, direct blow. The goal is to drive the nail head just below the wood surface, creating a small, clean divot, not to blast it through the other side. For finish nails, you’re aiming to drive the nail head just below the wood surface.
Where this goes sideways: Using excessive force or multiple off-center hits. This enlarges the hole, compresses and damages the wood fibers around it, and makes the filler step much harder. If the nail doesn’t move after two solid, centered hits, stop. The nail is likely hitting a knot or metal behind the workpiece, and pounding on it will only make things worse.
Step 3: Fill and Finish the Hole.
Once the nail is set, you have a small, neat hole. Press a stainable wood filler firmly into this hole, overfilling it slightly. Let the filler dry completely according to the product’s instructions. Then, sand the area flush with the surrounding wood using 120-grit then 220-grit sandpaper. The repair should disappear visually and to the touch.
| Step | Tool Needed | Key Action | Risk If Skipped |
|---|---|---|---|
| 1. Select & Position | Nail Set, Hammer | Center concave tip on nail head | Set slips, denting wood (“shiner”) |
| 2. Drive Nail | Hammer | Single firm, perpendicular strike | Enlarged hole, damaged wood fibers |
| 3. Fill & Sand | Wood Filler, Sandpaper | Overfill hole, sand flush when dry | Hole remains visible, finish looks unprofessional |
When to Adjust the Gun vs. Grab the Nail Set
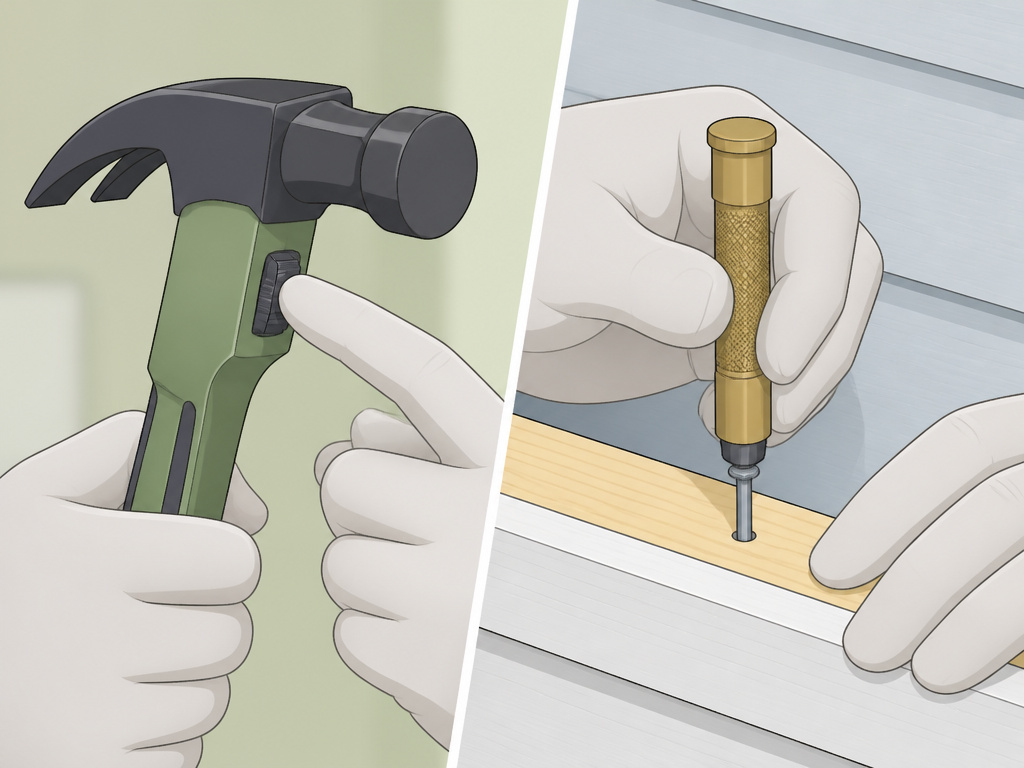
This is the decision flowchart most guides omit. Your choice depends on one thing: are you about to drive the nail, or are you fixing one that’s already in place?
Adjust the nail gun’s depth when:
- You are starting a new run of nailing (e.g., installing trim, assembling a cabinet).
- You have consistent material thickness.
- You want efficiency and a uniform appearance across many nails.
Grab the nail set when:
- You are repairing a single proud nail in an existing piece.
- The wood is uneven or you hit a hidden knot (the gun’s setting can’t compensate for density changes mid-nail).
- You are working in a tight corner where you can’t hold the nail gun perfectly perpendicular.
Think of the depth adjustment as your production setting and the nail set as your precision repair tool. One sets the stage, the other cleans up the exceptions.
Troubleshooting: Why Your Nail Gun Isn’t Sinking Nails
Your gun is set to deep countersink, but the nails are still sitting there, smiling back at you. Before you blame the tool, run through this list. The cause is usually simple, but the consequence of ignoring it is a jam or tool damage.
Low Air Pressure (Below 70 psi).
This is the most common culprit. The DeWalt DWFP12233 has an operating pressure range of 70–120 psi, while other models like those from Powernail Co. Operate at 70-110 psi. If your compressor can’t maintain at least 70 psi at the tool while firing, the driver blade doesn’t have enough force to fully seat the nail. Check your compressor’s gauge and the regulator at the tool. Listen for the motor cycling on too frequently, that’s a telltale sign of insufficient air volume.
Hitting a Knot or Nail.
Wood density isn’t uniform. A nail tip hitting a hard knot or a hidden metal object (like an old nail in reclaimed lumber) will stop dead. The gun’s mechanism fires, but the nail goes nowhere, or worse, bends. If you suspect a knot, pre-drill a pilot hole. It adds a step but saves nails, your workpiece, and your sanity.
Using the Wrong Nail Gauge or Length.
Nail guns are designed for specific fasteners. For example, the DeWalt DWFP71917 uses 16 Gauge fasteners, while the DeWalt DWFP12233 uses 18 Gauge fasteners. Trying to sink a nail that’s too thick for the guide channel, or too long for the material, will cause jams and shallow drives. The Powernail PowerPalm manual even specifies that for exotic & dense wood, 1-1/2” length nails work best, using a longer nail in dense material often prevents full penetration.
Worn Driver Blade or Dirty Mechanism.
Internal wear happens. A worn driver blade can’t transfer the full force of the piston. Similarly, a tool gummed up with sawdust and dried lubricant, what the DeWalt manual calls “debris”, robs power. For a dirty mechanism, maintenance such as blowing dirt and dust out of all air vents with clean, dry air at least once a week, as DeWalt instructs, can help. For a worn blade, the tool needs service.
| Symptom | Likely Cause | Immediate Fix | Long-Term Solution |
|---|---|---|---|
| Nail head sits slightly proud | Depth setting too shallow | Turn adjustment wheel for deeper drive | Always test on scrap first |
| Nail doesn’t move, bends | Hitting knot/metal, wrong nail | Pre-drill pilot hole | Use metal detector on reclaimed wood |
| Inconsistent depth, weak drives | Low air pressure (<70 psi) | Check compressor, increase pressure | Ensure compressor meets tool’s CFM requirement (e.g., 2.0 CFM @ 80 psi for DWFP71917) |
| Tool cycles but nail sticks out | Worn driver blade, internal jam | Clear jam, inspect blade | Annual professional service |
Safety and Setup: Non-Negotiables Before You Fire
A nail gun is not a hammer. It’s a piston-driven tool operating at high pressure, and respecting that is the first step to using it correctly, and safely. OSHA regulation 29 CFR 1926.302(b)(3) states that pneumatically driven nailers operating at more than 100 psi must have a safety device on the muzzle to prevent accidental firing. This highlights the inherent power you’re handling.
Personal Protective Equipment (PPE) is Mandatory.
This isn’t optional gear for beginners. The Powernail PowerPalm manual explicitly states: “Always use approved SAFETY GLASSES and EAR PROTECTION when operating this Nailer.” DeWalt specifies ANSI Z87.1 eye protection and ANSI S12.6 hearing protection. Flying debris and ricochet nails are real risks, and a nail gun’s noise rating, like the PowerPalm’s LPA-1sd=90.6, necessitates hearing protection.
Air System Setup Matters.
Your compressor and hose aren’t just accessories; they’re part of the tool system. Paslode recommends installing a filter/regulator/lubricator unit within ten feet of the tool and using a hose with a minimum 3/8 inch ID (switching to 1/2 inch ID for runs over 25 feet). This ensures clean, dry, regulated air reaches the tool. DeWalt adds a critical daily step: drain compressor tanks and hoses daily to purge moisture.
Before you start: Disconnect the air supply before loading nails, clearing jams, or making adjustments. An accidental trigger pull with air connected can cause serious injury. Both Powernail and DeWalt manuals instruct users to disconnect the air supply before such actions.
How to remove a nail that won’t countersink
When a nail gun leaves a proud nail, first disconnect the air supply for safety. Check the sub-floor; if it isn’t solid, the nail can’t set correctly. If the wood is dense or exotic, the nail may be hitting material too hard to penetrate fully. For a nail that is already driven but sitting high, you will need to use a manual nail set and hammer. Place the nail set’s tip squarely on the head of the protruding nail and tap it down until it is flush or slightly below the surface. This is the reliable backup method when your tool’s depth adjustment can’t finish the job.
How to choose the correct nail length
Selecting the proper nail length is critical for a secure hold and a clean countersink. The nail must be long enough to penetrate through the material you are fastening and bite securely into the sub-floor or backing beneath it. For standard materials, choose a length that allows for sufficient embedment without risking a blow-through on the other side. The Powernail Co. Manual specifies that for exotic & dense wood, 1-1/2” length nails work best. Always match the nail length to both the top material thickness and the backing material’s density.
How to hold a nail gun for full depth
Proper technique ensures the nail gun can use its full power to drive the fastener. Before pulling the trigger, you must firmly depress the work contact element against the work surface. Hold the tool steady and perpendicular to the material; angling the gun can cause the nail to deflect or not drive straight. Maintain this firm, even pressure throughout the firing cycle. After the nail is driven, completely release the trigger and then lift the tool from the surface. This sequence guarantees the driver blade completes its full travel, allowing the depth adjustment setting to work as intended.
Frequently Asked Questions
What’s the difference between a nail set and a punch?
Nail set has a concave tip to cup the nail head and prevent slipping. A punch typically has a flat tip and is used for driving pins or pushing out metal bearings. Using a punch on a nail head will almost certainly slip and damage the wood surface.
Can I hammer a nail gun nail deeper?
You should not hammer directly on the nail head with a hammer. You will flatten the head, making it wider and harder to countersink neatly, and you risk damaging the wood. Always use a nail set as an intermediary tool to transfer the force cleanly.
Why won’t my brad nail sink even on the deepest setting?
First, check your air pressure is at least 70 psi. If pressure is good, you may be hitting a knot or the nail is too long for the material thickness. For very hard woods, pre-drilling a small pilot hole is often necessary, even with a nail gun.
How deep should a countersunk nail be?
Aim for the nail head to be just below the wood surface. This creates enough of a pocket for wood filler to grip without weakening the wood structure around the nail. Driving it deeper than 1/8 inch can split thin trim.
Can I use any nails in my nail gun?
No. Manufacturers explicitly warn against this. Powernail states: “Do not use any nails other than Powernail Powercleats Nails.” Paslode says to “use only fasteners that meet Paslode specifications.” Using incorrect nails causes jams, poor performance, and can void your warranty.
Is a manual nail set better than adjusting the gun?
It’s not “better,” it’s different. The gun’s adjustment is for proactive, uniform depth control. The nail set is for reactive, precise repair of individual nails. You need both methods in your workflow.
Before You Go
Countersinking is what separates a rough assembly from a finished piece. The goal isn’t to hide your work but to prepare it for a seamless finish.
If you only remember one thing, let it be this: always test on scrap first. That thirty-second ritual is the cheapest insurance you can buy against ruined trim, split wood, and the particular frustration of pulling out a dozen over-driven nails. The difference between the minimum and maximum pressure on your regulator, or a few clicks on the depth wheel, is everything.
And when you inevitably hit a knot or have a nail stand proud, reach for the nail set without hesitation. It’s not a step backward; it’s the sign of a craftsman who knows how to clean up a problem rather than pretend it doesn’t exist. Fill the hole, sand it smooth, and move on. That’s the real trick, not avoiding the hiccups, but knowing exactly how to fix them so they disappear.
