
How to Cut Drywall With an Oscillating Tool: Step-by-Step
This post contains affiliate links. As an Amazon Associate, we earn from qualifying purchases.
To cut drywall with an oscillating tool, you need a wood-and-drywall blade, ANSI Z87.1 eye protection, and a two-step plunge technique. Start with the blade centered in the tool head, not at a 90° angle. Push the spinning blade tip straight into your marked line, let it cut through, then guide it along your pattern. The tool vibrates, it doesn’t spin, so you control the depth and avoid hitting hidden pipes or wires.
The oscillation angle (e.g., 3.2° on the Radley, 2.8° on the Ryobi, 4.0° on the Bosch) is what makes this possible, the blade moves side-to-side just enough to grind through gypsum without grabbing. That tiny arc is the difference between a clean pocket for an outlet and a ragged hole you have to patch. This principle is key when you learn how to cut drywall with an oscillating tool.
What follows: the exact blade specs from four tool manuals, the manufacturer debate on blade angle, a seven-step cut sequence, and the one mistake that turns a five-minute job into a half-hour dust storm.
Key Takeaways
- Use a half-circle or plunge blade marked for wood and drywall; these have finer teeth that slice cleanly instead of chewing.
- Always wear ANSI Z87.1 safety glasses and a dust mask, drywall dust is a fine powder that hangs in the air and irritates lungs.
- For plunge cuts, center the blade in the tool head, not at the 90° position. The Radley manual explicitly warns against the 90° setup for cutting a hole for an electrical outlet box, while the Ryobi manual instructs to plunge the blade and complete the cut without a specific warning about the 90° position for this task.
- Set the speed to maximum (18,000–21,000 OPM) for drywall according to Radley and Benchmark manuals; however, Bosch advises letting the accessory do the work and avoiding excessive pressure.
- Let the tool do the work, excessive pressure causes violent shaking, wears the blade fast, and can crack the drywall face.
The Right Blade for the Job
Not all oscillating blades are equal for drywall. A blade designed for metal will gum up instantly. A coarse wood blade will tear the paper face.
The manuals are specific. The Ryobi oscillating tool includes a half round wood & drywall saw blade. The Benchmark 20V Max manual directs you to use a half circle blade at maximum speed for cutting drywall. These blades share a common design: shorter, tighter teeth than a standard wood blade. They slice the gypsum core instead of chipping it.
A half-circle or plunge-cut blade with fine teeth is the default for drywall. The teeth are set for a shearing action on soft material, which preserves the paper face on the other side of the cut.
You will see “HCS” (High Carbon Steel) on many general-purpose blades. That’s fine for drywall. For a project with many cuts, a bi-metal blade lasts longer because its cutting edge is harder, but it isn’t essential. The real trap is using a dull blade. A dull blade forces the motor, overheats, and makes the tool shake violently in your hand. You will feel the difference in the first inch of cut.
Bi-metal is my default for any blade that will see mixed use. But for a one-off drywall patch, a basic HCS blade is perfect. If you’re installing a dozen outlets, step up to a more durable, drywall-specific blade.
Gearing Up: Non-Negotiable Safety
Drywall work seems safe until you get a face full of powder or a blade fragment in your eye. The manuals don’t mince words.
Every manual cited. Radley, Ryobi, Bosch, Benchmark, mandates eye protection that complies with ANSI Z87.1. Prescription glasses are not substitutes. The Benchmark manual adds a critical warning: construction dust can contain silica, lead, or arsenic. Their instruction is to work in a well-ventilated area and use a dust mask designed to filter microscopic particles.
Hearing protection is advised for extended use. For a few cuts, the high-pitched whine is annoying. For extended use, hearing protection is advised as the high-pitched whine can be damaging.
The Ryobi Drywall Cut-Out Tool manual adds a specific battery warning: if battery liquid gets in your eyes, flush with clean water for at least 10 minutes and seek medical attention. Cordless tools are convenient, but their power sources have unique hazards.
| Safety Gear | Purpose | Consequence If Skipped |
|---|---|---|
| ANSI Z87.1 Glasses/Goggles | Stops flying blade fragments and drywall chips. | Permanent eye injury from a shattered blade or high-velocity debris. |
| NIOSH-Approved Dust Mask (N95+) | Filters fine gypsum and silica dust. | Respiratory irritation, long-term lung damage from crystalline silica exposure. |
| Hearing Protection | Dampens high-frequency motor whine (often 90+ dB). | Tinnitus or hearing loss after prolonged or repeated use. |
| Work Gloves | Improves grip, reduces vibration transfer to hands. | Blisters, numbness, and reduced control from sustained high-frequency vibration. |
Before you start: Unplug corded tools or remove the battery before changing blades. Secure loose drywall sheets with clamps or a helper. Always assume there is a wire or pipe behind the wall until you verify otherwise with a stud finder.
How Your Oscillating Tool Actually Cuts
It doesn’t saw. It doesn’t rotate. It oscillates. The blade holder moves side-to-side through a small arc, 3.2° on the Radley, 2.8° on the Ryobi, 4.0° on the Bosch GOP18V-40. This arc creates a grinding, abrasive action.
That grinding action is why it’s safe near hidden wires. A spinning saw blade grabs and wraps wires. An oscillating blade can nick a wire if you force it, but it won’t snag and pull. The same principle applies to cutting drywall that’s already installed. You can plunge into a wall without cutting the stud behind it because the cutting depth is limited to the blade’s exposure.
The speed of this oscillation is measured in OPM (Oscillations Per Minute). Drywall cuts best at high speed. The Benchmark tool adjusts from 8,000 to 18,000 OPM. The Ryobi Oscillating Multi-Tool runs at a fixed 21,000 OPM. Higher speed means faster cutting and a smoother edge. Lower speed is for sanding or cutting metal where you want less heat.
Step-by-Step: The Drywall Plunge Cut
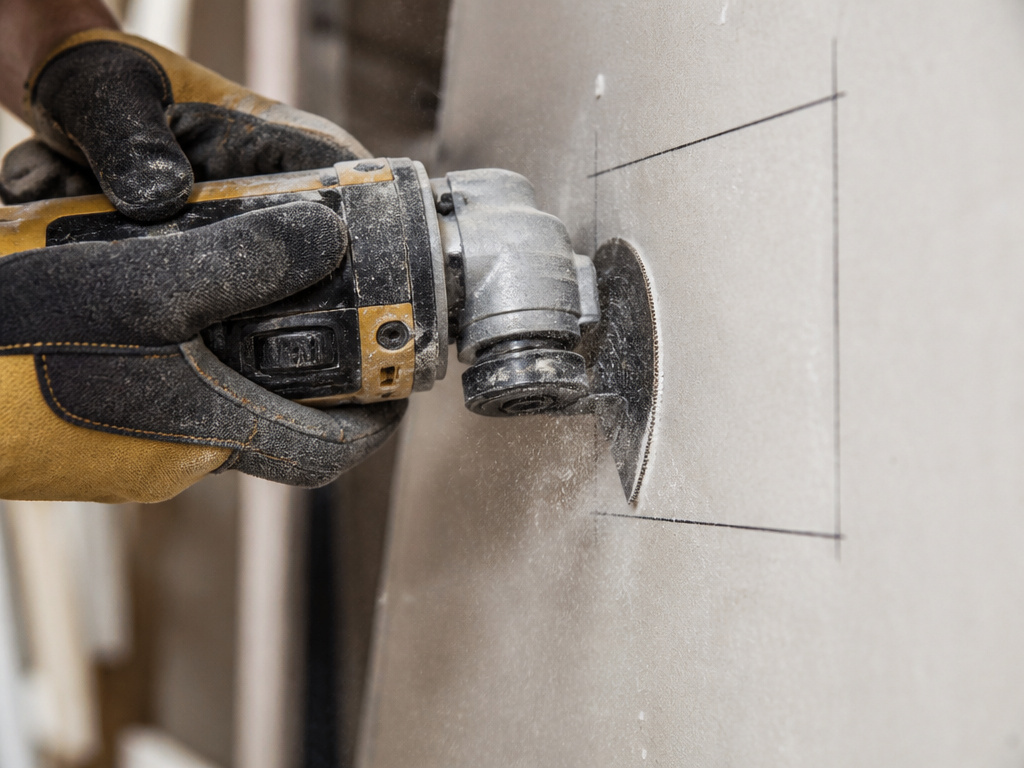
This is the core technique for cutting outlet holes, vent openings, or access panels. The goal is a clean rectangle without overcutting the corners.
- Mark Your Cut. Use a pencil and a level or square. For an electrical box, trace the box directly. Mark clearly.
- Install the Blade. Use a half-circle or plunge blade. For this cut, the Radley and Ryobi manuals state: The blade should be centered on the tool housing and NOT installed in the 90° position. The centered position gives the blade tip the most oscillation for the initial plunge.
- Set the Speed. Dial the tool to its maximum speed setting. For the Benchmark, the maximum speed is 18,000 OPM. High speed keeps the cut clean.
- Start the Plunge. Hold the tool firmly with both hands. Position the blade tip just outside your pencil line, angled slightly so the teeth touch the drywall. Turn the tool on, let it reach full speed, then gently push the tip straight into the wall. You will feel a slight drop in sound pitch as it bites. Don’t force it.
- Complete the First Side. Once the blade is fully plunged, guide it slowly along your marked line to the corner. Ease off pressure as you approach the corner to avoid overcutting.
- Repeat for Remaining Sides. Retract the blade, reposition at the next side, and plunge again. Work your way around the rectangle.
- Knock Out the Piece. After cutting all four sides, the drywall piece should be loose. Give it a gentle tap from the back to pop it out.
Where this goes sideways: Plunging with the blade at 90°. The blade has less effective cutting surface in this position, so you lean on the tool. This causes excessive vibration, cracks the drywall face, and can break the blade. Center it.
The Ryobi manual adds a useful tip: after plunging, complete the cut to the corner. Don’t try to turn the blade mid-cut, it will bend and snap. Plunge, cut to the corner, retract, and reposition.
Flush Cutting and Managing Dust
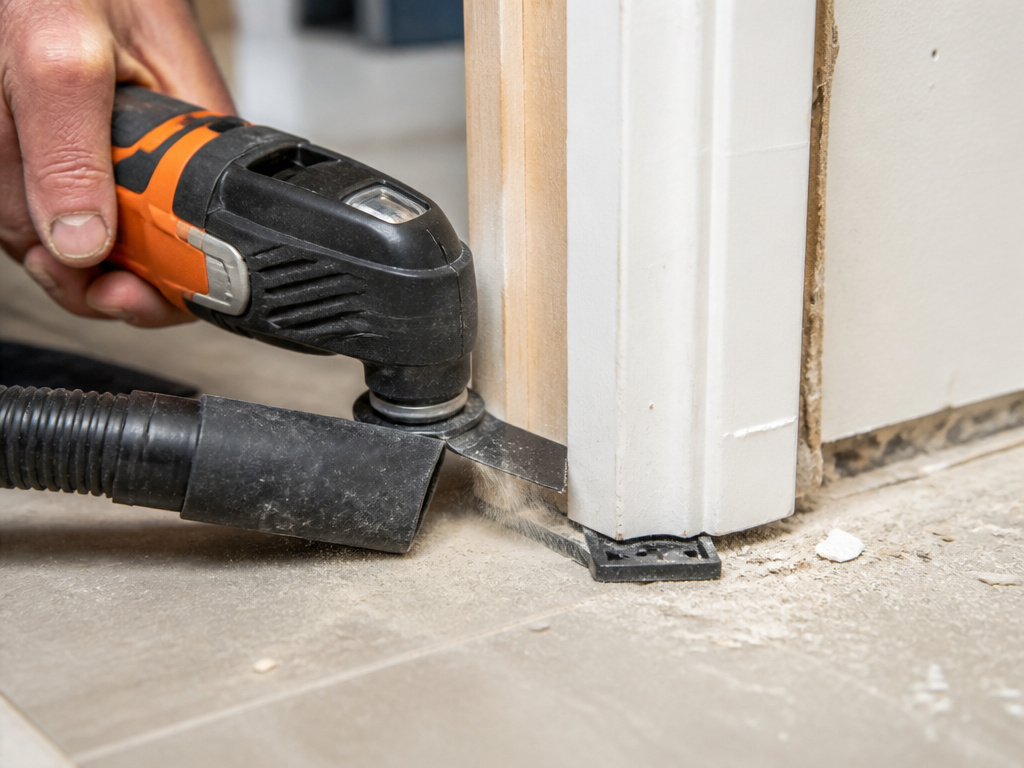
Cutting a door jamb to slide flooring underneath is a classic oscillating tool job. The technique is similar but uses a spacer.
The Radley manual details the process: place a scrap piece of floor tile about 1/2″ (12.5 mm) from the door jamb as a guide. Rest the tool’s shoe on the tile, and let the blade cut the jamb flush. The spacer ensures a perfect, consistent gap.
Dust is the silent enemy of any indoor cutting job. It gets everywhere. The Benchmark manual explicitly warns that construction dust may contain hazardous chemicals and to use approved safety equipment. Beyond the mask, take control.
- Use a vacuum. Many oscillating tools have a dust port for a shop vacuum hose. Connect it. The difference is dramatic.
- Make a catch. Hold a vacuum hose nozzle right next to the cut with your free hand. A helper is ideal for this.
- Seal the room. Close HVAC vents and doors to other parts of the house. Use painter’s tape over door gaps.
- Clean as you go. Don’t let dust pile up on the floor. It will get kicked around and become airborne again.
A shop vacuum can help capture dust at the source. For a DIYer, using a vacuum helps tremendously. The goal is to capture dust at the source, not after it has clouded the room.
Common Oscillating Tool Mistakes (And How to Avoid Them)
Owners report the same frustrations. They aren’t tool failures; they are technique errors.
Mistake 1: Using a Dull or Wrong Blade. A blade worn from cutting wood with nails will struggle with drywall. You’ll smell a burnt, dusty odor and see brown burn marks on the cut edge. The cut slows to a crawl. Swap the blade. A fresh blade should cut with light pressure.
Mistake 2: Forcing the Tool. The Bosch manual is clear: “Be careful not to apply too much pressure. Allow the accessory to do the work.” If the tool is shaking violently and the motor sound is straining, you’re pushing. Ease up. Let the speed and sharp teeth do the cutting.
Mistake 3: Ignoring Vibration. These tools generate high-frequency vibration. The Bosch manual recommends using thick, cushioned gloves and taking frequent rest periods during long use. Numbness is a sign to take a break. Your control degrades with fatigue.
Mistake 4: Neglecting the Tool’s Shoe. The metal base plate (shoe) is a stability tool. Keep it flat against the work surface when possible. For plunge cuts, it provides a pivot point. If the shoe is loose or damaged, the tool will wobble.
| Mistake | What Happens | The Fix |
|---|---|---|
| Dull Blade | Slow cutting, burning smell, rough edges, excessive motor heat. | Replace blade. Keep a dedicated sharp blade for drywall. |
| Excessive Pressure | Violent shaking, loss of control, premature blade wear, cracked drywall. | Relax your grip. Let the tool’s weight and oscillation provide the cutting force. |
| Incorrect Speed | Bogging down (too slow) or excessive chattering (too high for the material). | For drywall, use max speed. Adjust down only if the cut is too aggressive. |
| Poor Dust Management | Cloud of fine dust, clogged motor vents, respiratory irritation, messy cleanup. | Connect a vacuum, wear a proper mask, and contain the work area. |
Oscillating Tool vs. Other Drywall Tools
Is it the best tool? It depends on the job.
For cutting full sheets before installation, a utility knife is faster and dust-free. Score and snap. For long, straight cuts on installed walls (like trimming the bottom of a sheet), a rotary tool with a drywall cutting bit is cleaner and quicker.
The oscillating tool wins in three specific scenarios:
- Plunge cuts in the middle of a sheet or wall (outlets, vents).
- Flush cuts against another surface (door jambs, countertops).
- Correcting mistakes or making small, complex cutouts where a drywall saw would be unwieldy.
It’s a specialist, not a generalist. That’s why a complete set of tools for drywall includes a knife, a saw, and an oscillating multi-tool. For saw options, see this guide on the best saws to cut drywall. Each has its moment.
Maintaining Your Tool and Blades
Drywall is abrasive. It will wear blades and can clog your tool’s air vents with fine dust.
After a drywall project, blow out the tool’s vents with compressed air. Check the blade clamp mechanism for dust buildup, it can prevent the blade from locking securely. For cordless tools, the Bosch GOP18V-40 manual advises to replace battery packs when decreased tool performance is noticed. A weak battery makes the tool sluggish, which leads to forcing and poor cuts.
Blade life is determined by sound and feel. A sharp blade cuts with a steady, high-pitched hum. A dull blade labors, and the sound drops in pitch. Visually, the teeth will appear rounded and polished, not sharp. For drywall, replace the blade when cuts start to look ragged or require noticeable effort.
Frequently Asked Questions
Can any oscillating tool cut drywall?
Yes, if it accepts standard blades. Corded models like the Radley provide constant power. Cordless models like the Bosch GOP18V-40 offer portability. The key is using the correct blade and running the tool at a high enough speed (ideally above 15,000 OPM for drywall).
What if I hit a nail or screw?
Stop immediately. You’ve likely ruined the blade’s teeth for drywall cutting. Inspect the blade for damage or dulling. Switch to a fresh blade to continue. This is why checking for obstructions beforehand is a mandatory step in every manual.
Why does my cut look torn and ragged?
This is usually a combination of a dull blade and too-slow speed. The blade is crushing the gypsum instead of shearing it. Swap to a new half-circle blade, set the speed to maximum, and let the tool work without heavy pressure.
How do I cut a perfect circle in drywall?
Use a half-circle blade. Plunge at the center of your marked circle. Make a series of short, overlapping straight cuts radiating from the center toward the circumference, like cutting a pie. Then, clean up the circle by connecting these cuts with a gentle guiding motion. Don’t try to steer the blade in a continuous curve.
Is a drywall cut-out tool better than an oscillating tool?
Dedicated drywall cut-out tool, like the Ryobi model that spins at 28,000 RPM, is faster for cutting many outlet holes. However, it only does that one job. An oscillating tool is slower but far more versatile, it can also sand, scrape, and cut other materials. For most DIYers, the multi-tool is the more practical choice. For recommendations, see this list of the best oscillating tools.
Before You Go
Drywall is forgiving. A bad cut can be patched. But doing it right the first time saves compound, sanding, and frustration.
The manufacturer specs aren’t suggestions. Center the blade for plunge cuts. Run at max speed. Wear the mask. The difference between a clean pocket for an outlet and a jagged mess is about three minutes of reading and following those direct instructions.
If you’re new to the tool, practice the plunge technique on a scrap piece first. Get a feel for the pressure, or lack thereof, required. That practice scrap costs less than a single patch kit. Once you master the light touch, you’ll find yourself reaching for the oscillating tool for every drywall modification, from simple holes to complex repairs. It’s the right tool for this particular job.
