
How to Reupholster a Chair With a Staple Gun: Step-by-Step
This post contains affiliate links. As an Amazon Associate, we earn from qualifying purchases.
To reupholster a chair with a staple gun, you remove the old fabric and staples, use the old fabric as a cutting template, add new padding if needed, and staple the new fabric to the chair frame, pulling it taut and working from the center out. You need a staple gun, upholstery staples (sources recommend various leg lengths, such as 1/4″ to 1/2″ for pneumatic guns or 1/4-inch to 3/8-inch for general staple guns), fabric, and a staple remover. The process takes 1-2 hours for a dining chair seat, and doing it yourself costs about $25-$40 for materials if you already own the staple gun, versus $150-$600 for professional reupholstery.
That’s the direct answer. But the difference between a job that lasts a season and one that lasts a decade lives in three things: the staple size you pick for your chair’s frame, the order you pull tension, and how you handle corners. A key part of the process is learning how to reupholster a chair with a staple gun. Get those right and the chair looks factory-finished. Get them wrong and you’ll be picking at loose fabric within a month.
What follows is the full walkthrough, the tools, the fabric math, and the stapling sequence that doesn’t rely on luck for the how to reupholster a chair with a staple gun. We’ll also clear up the disagreement over manual versus pneumatic guns, so you know exactly what to borrow or buy.
Key Takeaways
- Use a Wyzenbeek rating of 10,000-30,000+ rubs when choosing fabric for living room chairs; it’s a measure of abrasion resistance that predicts lifespan.
- Sources disagree on staple spacing: HGTV recommends staples approximately 1/2″ apart, while pro upholsterer Gary Alger recommends placing staples about 1 inch apart and an inch from the edge.
- For DIY, an electric or heavy-duty manual staple gun can work, but a pneumatic upholstery staple gun is the professional’s tool for speed and power.
- Never pre-wash upholstery-grade fabric; the factory-applied stain resistance will wash out and the fabric may shrink or pucker.
- Label every piece of old fabric you remove with a permanent marker; it’s your only map for reassembly.
Tools and Materials You’ll Need
Don’t overthink the how to reupholster a chair with a staple gun. You can start with a basic kit and upgrade as needed. The chair itself dictates half of your shopping list.
You’ll need a staple gun. This is where sources disagree. HGTV’s guide flatly says not to use an electric or manual staple gun for chair upholstery, calling them too bulky and underpowered. They recommend a pneumatic upholstery staple gun. A local pro interviewed by The Bulletin, Gary Alger of Jack’s Upholstery, implies an electric model is fine by factoring its use into a DIY cost estimate. My take? For a one-off dining chair seat, a heavy-duty manual gun like an Arrow T50 or a borrowed electric model will work if you have the hand strength. For an armchair or anything with thick wood, rent or borrow a pneumatic gun. The difference in effort is night and day.
The staples themselves matter more than the gun. The leg length must be long enough to grip the wood but not so long they poke through. Sources disagree on staple size: HGTV recommends 1/4″ to 1/2″ staples for pneumatic guns, while The Bulletin (Gary Alger) recommends 1/4-inch to 3/8-inch for general staple guns. Pneumatic guns often use 1/4-inch to 1/2-inch staples. Hardwood frames can take the longer leg; for plywood or particle board seats, stick to 1/4-inch to avoid blow-out on the other side.
Common mistake: Using staples that are too long for the material. The points protrude, creating a safety hazard and a weak hold that works loose with vibration.
Your fabric choice is about more than pattern. For a chair that gets daily use, you want a medium- to heavy-duty upholstery fabric. Look for the Wyzenbeek rating, a manufacturer-administered rub count. A rating of 10,000-30,000+ rubs is the target for living room furniture. One yard of fabric can cover two standard dining chair seats. One general guideline is to order enough fabric to overlap the seat size by about 4-6 inches on each side for gripping and stapling.
Other essentials: a staple remover or needle-nose pliers for demolition, a screwdriver, sharp scissors, and a measuring tape. If you’re replacing padding, have high-density foam (1- or 2-inch thick) and polyester batting on hand. Have a hot glue gun ready if you plan to finish seams with gimp trim.
Step 1: Remove the Old Fabric and Staples
This is archaeology. Your goal is to strip the chair down to its frame while preserving a perfect record of how it was built. Start by flipping the chair over. If the seat is attached with screws, remove them and lift the seat cushion off the frame. If it’s glued or tacked in place, you’ll need to carefully pry it up with a flathead screwdriver.
Now, turn the seat cushion over. You’ll see the old fabric stapled to the underside of the frame. Wear gloves, staple ends are sharp. Use your staple remover or the claw of a hammer to pry up the first staple. Needle-nose pliers are perfect for pulling them the rest of the way out. Work methodically around the entire perimeter until the old fabric is free. Don’t rip it; you need this piece.
Where this goes sideways: Rushing and tearing the old fabric. That torn piece was your only template. If it happens, lay the seat cushion top-down on your new fabric and trace its outline with an extra 4-6 inches of border.
As you remove each piece of fabric, especially on a multi-panel armchair, immediately label it with a permanent marker. Write “inside back,” “front arm,” “seat” directly on the old fabric. Take photos with your phone. This seems obsessive until you’re holding four oddly shaped fabric pieces with no idea which way they face. This step alone saves an hour of confused trial-and-error later.
Once the fabric is off, remove any old batting or crumbly foam. Scrape the frame clean. This is also the time to make minor repairs. Tighten loose joints, sand rough spots, and wipe away dust. A solid, clean frame is essential.
Step 2: Prepare the New Fabric and Padding
Lay your old fabric pieces on the new material. If there’s a pattern or nap, make sure everything is facing the same direction. Trace around each piece with chalk or a fabric pen, adding that 4-6 inch border all around for your stapling margin. Cut carefully.
If the old padding is flat or smelly, replace it. For seat cushions, sources recommend using 1- or 2-inch thick high-density foam. Cut it using the bare wooden seat as a template, trace and cut with a sharp knife. Sources disagree: The Spruce recommends cutting batting at least 4 inches larger (all around) than the area, while BHG recommends cutting a 1/2-inch-thick piece of batting to fit over the chair back and seat. For a plush look on a dining seat, using the method of cutting batting at least 4 inches larger all around than the area you want to cover can help wrap the edges. It allows you to wrap the batting over the edges and staple it underneath, preventing a sharp foam edge from showing through the final fabric.
Attach the new foam to the wood seat with a light spray adhesive. Then, center the batting over the top, pull it snugly over the edges, and staple it to the underside of the seat frame. Start with one staple in the middle of each side, then work outwards, folding the corners neatly like wrapping a present. Trim the excess.
The Core Technique: How to Staple Fabric Tightly
This is the moment. You have your new fabric piece, patterned side down, on your work surface. Place the padded seat cushion frame face-down on top of it, centered. Flip the whole assembly over. The fabric should now be on top, with plenty of overhang on all sides.
Reach for your staple gun. A common loading mistake is forcing in too many staples or not aligning the strip correctly, which leads to a jammed staple gun mid-project.
Start on the side of the seat that will be the front or back, pick one. Find the center point of that edge. Pull the fabric overhang up and over the frame, pulling it hand-tight. You’re not trying to tear the fabric, but there should be no visible slack. Fire your first staple squarely into the center of that edge.
Move directly to the opposite edge. Pull the fabric towards you, creating even tension across the whole seat, and staple the center of that side. You now have two anchor points. Repeat for the two remaining sides, always pulling the fabric taut perpendicular to the frame. You should see the fabric starting to smooth itself over the cushion.
The Staple Spacing Debate | Source | Recommendation | Best For | |————|——————-|————–| | HGTV | Staples 1/2 inch apart | General upholstery, even hold | | Gary Alger (Pro Upholsterer) | Staples about 1 inch apart, 1 inch from edge | Softer woods, prevents splitting |
For hardwood, follow HGTV’s tighter spacing. For pine or plywood, use Alger’s wider spacing to avoid weakening the frame.
Now, work from your center staples outwards toward the corners, adding staples every 1/2 inch to 1 inch, always pulling the fabric tight before firing. Alternate sides occasionally to keep tension even. If you see a wrinkle, pull the staple (needle-nose pliers again) and re-tension.
How to Handle Corners and Curves
Corners make or break the job. A bulky, wrinkled corner screams DIY. A crisp, flat corner looks professional. The method depends on your cushion’s shape.
For a square seat cushion, you’ll create a pleat. Once you’ve stapled to within about 2 inches of a corner, stop. Lift the loose fabric at the corner and pull it straight up towards the center of the seat. This creates a triangle of excess material. Place one staple at the apex of that triangle to hold the “pull.” Now, fold one side of the leftover fabric over the corner neatly, like folding a hospital bed sheet, and staple it down. Repeat for the other side. The goal is a flat, pleated finish with no puckers. Count on about three staples per corner to secure everything.
For a rounded corner, you’ll make a series of small, radial pleats. Pull the fabric over the curve and place a staple at the center of the curve’s apex. Work outwards to each side, making small snips in the fabric allowance (not through the visible part!) to allow it to lay flat, and stapling as you go. The YouTube pros call this “dividing and conquering” the excess material.
On a curved chair back, the same radial pleating technique applies. The key is to support the curve from behind. Seat backs should always be supported with burlap, cardboard or webbing and padding as HGTV notes. If your chair lacks this, add a layer of sturdy fabric or cardstock before the final fabric to keep the curve from sagging.
I learned this on a mid-century modern chair with gentle curves. Going slightly across the grain of the wood with my staple pattern was the only way to get the vinyl to lay flat without bubbles. The situation dictated the method.
Finishing Touches: Trims and Dust Covers
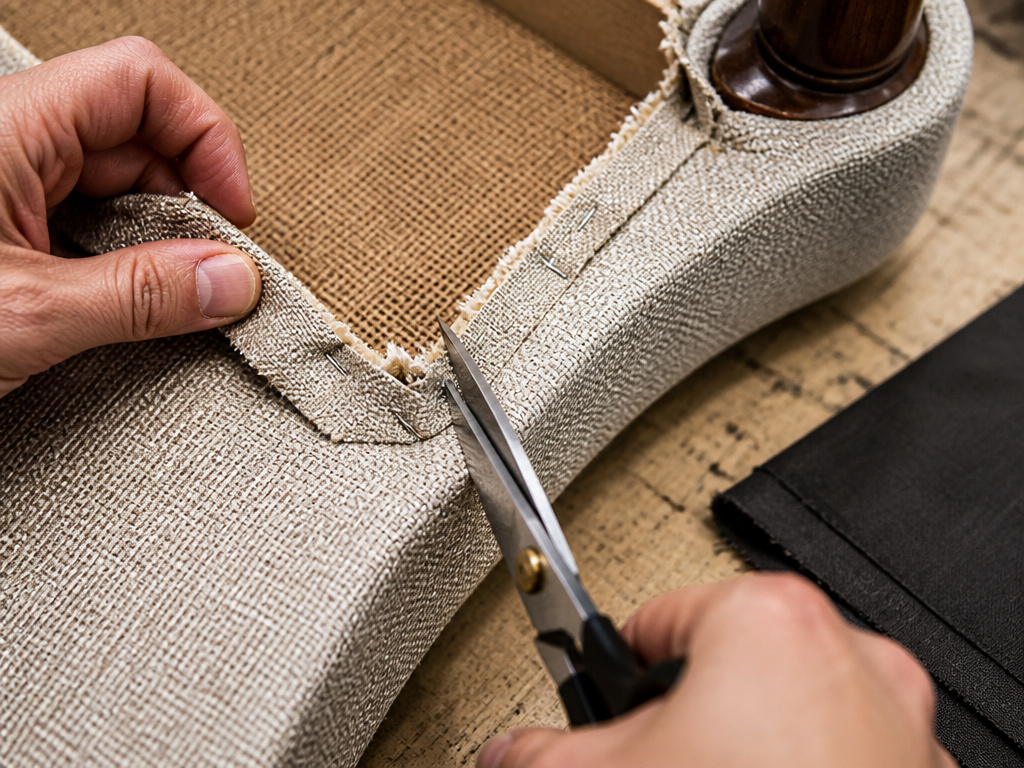
Once all fabric is secured, flip the seat over and look at the underside. It’s a mess of raw edges and staple ends. You have two options: leave it, or finish it.
For a finished look, trim the excess fabric to about 1/2 inch from the staple line with sharp scissors. Then, cut a piece of lightweight black cambric or non-woven fabric to fit the underside. This dust cover keeps debris out of the padding and looks sharp. Staple it over the raw edges, folding the cambric’s own edges under as you go.
If your chair has visible staple lines on the outside (like on an armchair’s back), you’ll cover them with gimp trim or decorative cord. Apply gimp trim with hot glue in small 6″-8″ sections, pressing it firmly over the staple line. Where two ends meet, cut the trim at a 45-degree angle and butt them together neatly.
Staple Gun Showdown: Manual vs. Electric vs. Pneumatic
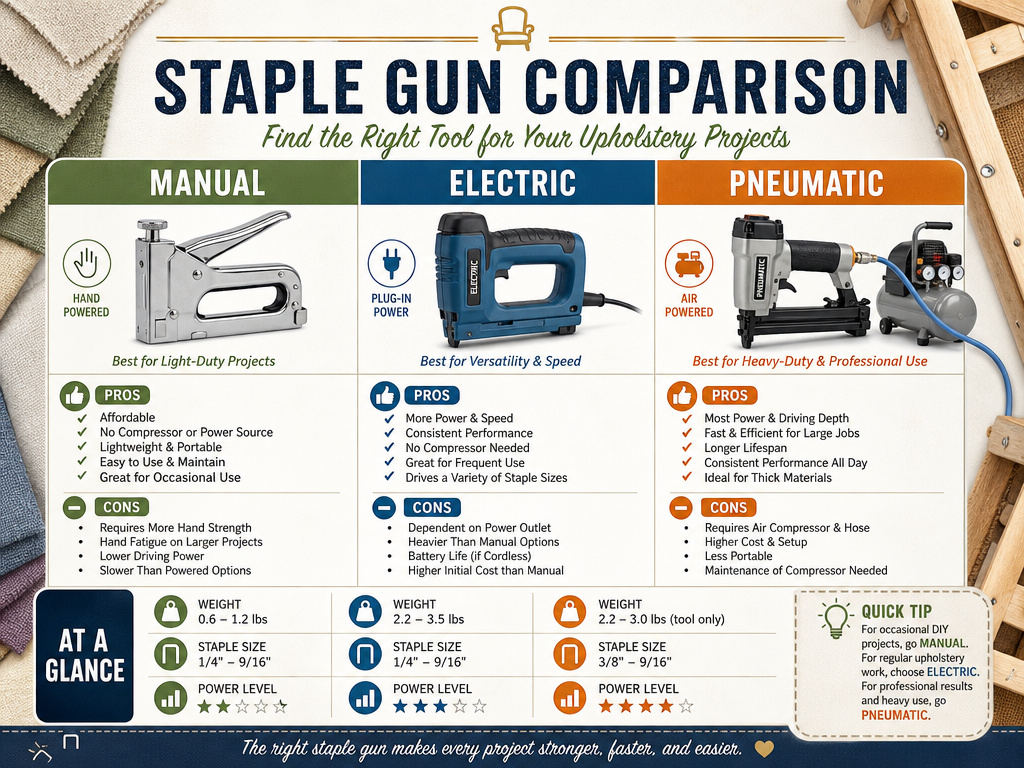
Should you buy, rent, or borrow? The tool you use changes the experience.
| Gun Type | Power Source | Best For | Drawbacks |
|---|---|---|---|
| Manual | Hand pressure | Low-volume DIY, thin fabrics | Requires significant hand strength, slow |
| Electric | Battery or Cord | Moderate DIY, avoids compressor | Heavy, batteries die, less power than pneumatic |
| Pneumatic | Air Compressor | Professional results, high volume | Requires compressor, more expensive upfront |
Manual heavy-duty staple guns like the Arrow T50 are affordable and never run out of battery. They’re reliable, but your hand will ache after 50 staples on a hard oak frame. Electric staplers are convenient but often lack the driving power for deep upholstery work. My stance is that for frequent use, a pneumatic upholstery stapler is worth the investment in an air compressor. It drives staples flush every time with a light trigger pull. For a one-time dining chair project, a manual gun you already own is the right tool for the job.
Cost Analysis: DIY vs. Professional Reupholstery
The main reason to do this yourself is to save money. The main reason to do this yourself is to save money. How much you save depends on your chair and your fabric choice.
Sources disagree on professional reupholstery cost: The Bulletin (Gary Alger, Jack’s Upholstery) estimates $35-$55 per chair, The Spruce estimates a range from $60 to $2,000 with an average of about $650, and BHG estimates approximately $150-$600 for a dining room chair. More recent aggregated guides paint a broader picture: $150-$600 for a dining chair, and $300-$1,200 for an armchair. The wide range accounts for fabric cost, which runs from $5 per yard for remnants to $100 per yard for designer textiles, with an average of $7-$35.
Sources provide different DIY cost estimates: The Bulletin (Gary Alger) states a DIY cost of about $25-$40 if you own or can borrow an electric staple gun, while BHG notes DIY costs include fabric (2 to 8 yards at approximately $20-$70 per yard) and other materials. One yard of upholstery fabric can cover two dining chair seats; fabric costs range from $5 to $100 per yard, with an average of $7-$35. If you need to buy a staple gun, prices will vary depending on the type (manual, electric, or pneumatic).
The math is simple. For a set of four dining chairs, DIY costs will depend on fabric choice and materials, with one source estimating about $25-$40 per chair if you own the staple gun. Professional work starts at $600 and climbs rapidly. The break-even point is one chair. If you have more than one, the savings buy the tools.
Frequently Asked Questions
What kind of staple gun do I need to reupholster a chair?
You need an upholstery staple gun. A heavy-duty manual model like an Arrow T50 can work for small projects like dining chair seats. For larger chairs, thick fabric, or hardwood frames, a pneumatic upholstery staple gun powered by an air compressor is the professional standard for its consistent driving power. Electric models are an option but are often underpowered for deep driving.
Can you use a regular staple gun for upholstery?
Yes and no. A standard office-style staple gun lacks the power and staple size for upholstery. You need a heavy-duty staple gun designed for upholstery or construction, which uses wider-crown staples (1/4-inch or 1/2-inch) with longer legs (1/4-inch to 1/2-inch) to grip the wood frame securely. Using a regular stapler will result in poorly seated staples and loose fabric.
What is the easiest way to reupholster a chair?
The easiest chair to reupholster is a dining chair with a removable, flat seat cushion. You unscrew the seat, remove the old fabric, trace it onto new material, and staple the new fabric to the underside. Chairs with multiple panels are also easier than single-paneled chairs because you tackle one small section at a time.
Is there a difference between a regular staple gun and an upholstery staple gun?
Yes. An upholstery staple gun is designed to drive wider-crown staples with longer legs deep into dense wood. It has a more powerful spring mechanism (or pneumatic power) and often uses a specific staple size (like 1/4-inch crown, 1/2-inch leg). A regular staple gun is for paper, cardboard, or very light fastening and won’t provide enough holding power for fabric under tension.
Before You Go
Reupholstering a chair with a staple gun isn’t a mystery. It’s a sequence: strip, template, pad, stretch, and staple. The real secret isn’t a secret at all, it’s pulling the fabric tight enough that the final staple line looks effortless.
If your chair’s wooden frame is solid, this project pays for itself on the first seat you finish. If the frame is wobbly or the springs are shot, stop. No amount of new fabric will fix a broken foundation, and that’s when calling a pro becomes the smarter investment.
Grab that staple gun. Start with the seat from a forgotten dining chair in the basement. Follow the grain, watch the corners, and pull until your knuckles turn white. When you flip it over and see a perfect, tight face staring back, you’ll know the difference between following steps and knowing why they work. That’s the whole point.
