
How to Staple Insulation With a Staple Gun: Step-by-Step
This post contains affiliate links. As an Amazon Associate, we earn from qualifying purchases.
To staple insulation with a staple gun, you need the right staple size (typically 1/4″, 5/16″, or 3/8″ for manual guns), you must staple the flange to the face of the stud every 4-8 inches, and you must pull the insulation taut across the cavity to avoid compression, which reduces R-value. The specific technique differs between brands like FI-FOIL® and Johns Manville, but the goal is a complete fill with no gaps.
The 4-8 inch spacing is the mechanical threshold where a loose flange starts to sag and pull away from the stud, creating an air gap that defeats the vapor barrier. A key part of the process is knowing how to staple insulation with a staple gun correctly (see our guide on how to use a staple gun). That gap is invisible behind drywall, but you’ll feel it as a cold spot on the wall next winter.
What follows: the two main stapling methods from the manufacturer guides, the exact tools they call for, and what to do when your cavity doesn’t match the standard 16 or 24-inch width. We’ll also cover the edge cases that break the standard rules, like tall walls, floor joists, and what to do when you hit a wire.
Key Takeaways
- Use a heavy-duty manual staple gun like a Bostitch or Arrow with 1/4″, 5/16″, or 3/8″ staples for faced fiberglass batts, pneumatic guns risk tearing the paper.
- Staple flanges to the face of the stud, not the side, spacing staples every 4 to 8 inches to keep the insulation taut and in substantial contact with the framing.
- Pull the insulation firmly across the cavity before stapling the opposite side to prevent compression and maintain the full R-value.
- For cavities taller than 9 feet, you need supplemental support like horizontal blocking or stapling tabs at 9-foot intervals to prevent sagging.
- Tape any tears in the kraft paper facing immediately with construction-grade tape to preserve the vapor barrier.
The Two Stapling Methods: FI-FOIL® vs. Traditional
You have two proven paths, and they come from the installation guides themselves. One is for reflective barrier systems, the other for standard kraft-faced batts. Using the wrong one for your product is how you end up with a floppy install.
The FI-FOIL® guide tells you to start at the top. Align the tab along one side of the framing and install 1-2 staples to anchor it on the face. Then, pull firmly across the cavity to expand the insulation layers and install 1-2 staples on the face of the adjacent framing. You continue alternately with a few staples on each side, keeping the edges square and pulled firmly along the entire cavity.
Begin stapling at top framing member. Align and anchor insulation tab along one side of framing by installing 1-2 staples to attach on face of framing, then pull firmly across the cavity to expand insulation layer(s) and Install 1-2 staples to attach on face of adjacent framing. Continue installing alternately with a few staples on each side, keeping insulation edges squarely aligned and pulled firmly while attaching to face of framing along entire length of cavity.
The traditional method, from Johns Manville, is different. You hold the flange along one side of the cavity, over the facing surface of the stud, and apply staples. The flange on the other side is fastened later, when you install the batt in the adjacent cavity and lap its flange over the first one. Both flanges are then secured at the same time. This method ensures a continuous seal at the shared stud but requires you to work in sequence.
Which one should you use? Match the method to your product when you compare a how to staple insulation with a staple gun. If you’re installing a reflective foil barrier like FI-FOIL®, follow their pull-and-alternate method. For standard kraft-faced fiberglass from Johns Manville, the lap-and-staple method is intended, while FI-FOIL® recommends an alternating pull-and-staple method. Mixing them leads to gaps or wrinkles.
The Correct Staple Spacing and Pattern
Staple spacing is about maintaining tension. A flange that’s only tacked at the top and bottom will belly out in the middle, losing contact with the stud. That lost contact is a thermal bridge.
FI-FOIL® states staples should be installed at approximately 100mm/4″-200mm/8″ intervals. That’s a range, not a target.
Where this goes sideways: Stapling only at the top and bottom. The center of the flange pulls away from the stud within a week, creating a void that cuts the effective R-value of that bay by up to 20%.
The pattern matters as much as the spacing. Don’t staple straight down one side and then cross to the other. You’ll create a wrinkle. Use the alternating method from the FI-FOIL® guide even for traditional batts: a couple of staples on the left, pull tight, a couple on the right, pull tight. This keeps the tension even and the facing smooth. A wrinkled facing is a weak point where the paper can tear when the drywall goes up.
| Staple Spacing Guideline | Minimum Spacing | Maximum Spacing | Consequence of Exceeding Max |
|---|---|---|---|
| FI-FOIL® Reflective Barriers | 4 inches (100mm) | 8 inches (200mm) | Facing sags, loses contact, violates installation spec |
| Kraft-Faced Fiberglass Batts | Follow manufacturer spacing | 8 inches (per FI-FOIL®) | Flange may billow, creating an air gap behind drywall |
Tools and Staples: What the Manuals Actually Say

Your tool choice decides the how to staple insulation with a staple gun question of whether you fight the material or work with it. A flimsy, light-duty stapler will bend staples or fail to penetrate the stud, leaving you hammering them in by hand.
Johns Manville explicitly recommends a Bostitch, Arrow, or similar manual staple gun (see our picks for the best staplers for insulation). They call for 1/4″, 5/16″, or 3/8″ staples. The leg length must be long enough to bite into the stud but not so long they protrude. It penetrates the 1.5-inch stud just enough to hold securely.
Pneumatic staplers are overkill for DIY insulation (compare all types of staple guns). They drive staples with such force they often tear through the fragile kraft paper facing, especially if you’re not perfectly perpendicular. The rapid fire also encourages bad spacing. A manual gun gives you control. You feel the resistance as the staple enters the wood, and you can stop if it starts to tear.
It’s not glamorous, but the heft is right, and it never jams on the kind of schedule a DIY day demands, especially if you know how to load a staple gun properly.
Dealing with Obstacles: Boxes, Wires, and Pipes
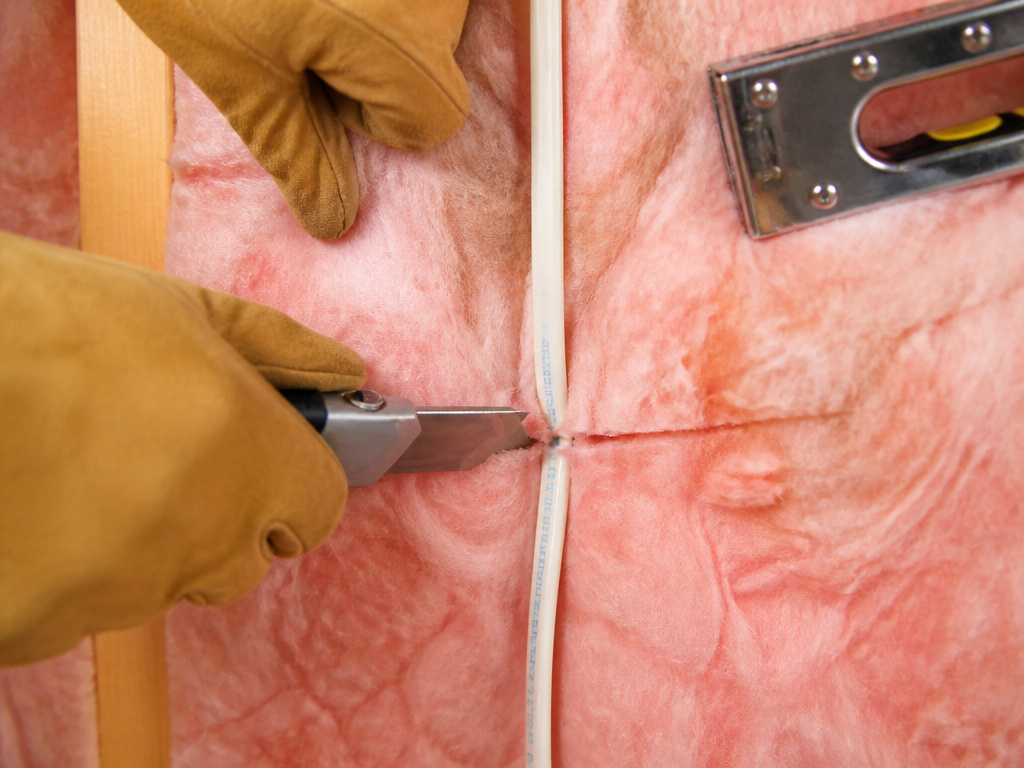
No cavity is empty. Electrical boxes, wiring, and plumbing pipes turn a simple rectangle into a puzzle. The rule from every manufacturer is the same: the cavity must be completely filled around the obstruction.
For an electrical box, Owens Corning says to cut a piece out of the batt. The piece should be slightly smaller than the dimensions of the box so the insulation fits snugly around it without bulging or buckling. Don’t just tuck the whole batt behind the box, that leaves a void along the entire height of the box. Cut the notch, and press the insulation around the sides. The small gap behind the box can be filled with a scrap of insulation or a dab of foam sealant.
For wiring or plumbing that runs through the cavity, vertically or horizontally, the blanket insulation must be either split or slit so that it fits around the obstruction and still fills the cavity.
That’s the official line. Use a sharp utility knife to cut a clean split from the edge of the batt to the wire, then slide the wire into the split. The two halves should come back together neatly. RESNET’s Grade I installation standard requires insulation to fit tightly around wiring and other services. A loose fit is a failure point.
When the Cavity Isn’t Standard
Framing isn’t always perfect. You’ll find bays narrower than 16 inches, wider than 24 inches, or taller than the 8-foot batt. Each has a prescribed fix.
If a cavity is wider than 24 inches on-center, the FI-FOIL® guide says to install another framing member to fit the width of the insulation material. If it’s between 16 and 24 inches wide, use the wider 600mm/24″ width material. For narrow cavities, excess material can be trimmed or overlapped onto the next bay on the drywall side.
Height is the bigger issue. For wall cavities with a continuous height greater than 9 feet, Owens Corning states supplemental support is required. You have two options: staple both tabs at the top and at intervals no more than 9 feet down, or install horizontal blocking at those same intervals. Without this, the weight of the insulation will pull the top staples loose over time, and the batt will slump.
Floors are a different beast. When insulating between floor joists from below, and there’s no finish material (like a basement ceiling), you need to support the insulation. If the insulation is thinner than the cavity depth, use insulation support wires (tiger teeth) installed at intervals no greater than 2 feet. If the insulation fills the cavity, use wire or plastic mesh running perpendicular to the joists. This isn’t optional, a batt that falls out is worse than no insulation at all.
Repairing Tears and Finishing the Job
You will tear the facing. It’s inevitable. The thin kraft paper snags on a rough stud or a staple goes in crooked. The fix must be done right away and cannot be skipped.
FI-FOIL® says to tape any tears following local building code requirements. Owens Corning says to repair tears with Kraft or similar construction grade tape. Johns Manville recommends 3-inch wide, white vinyl patch tape over joints and stapled edges for a finished look. The common thread is tape designed for construction, not masking tape or duct tape.
After all batts are in, do a walk-through. Look for gaps at the top or bottom of cavities, compression around obstructions, and any flanges that aren’t flat against the studs. Press any bulges back in and add a staple if needed. This final check is what separates a RESNET Grade I installation from a passable one. They allow for 2% or less compression or incomplete fill, but only if empty spaces are less than 30% of the intended fill thickness. Your eye is the best gauge, if you see a gap, fix it.
How to prepare for stapling insulation
Before you pick up the staple gun, get the cavity ready. The space needs to be completely filled from top to bottom and side to side with no gaps or voids. Check for obstructions like wiring or plumbing; you’ll need to split or slit the insulation to fit snugly around them without compressing the material. For electrical boxes, cut a piece of insulation slightly smaller than the box so it fits around it tightly without bulging. Ensure the cavity is clear of debris and that any flammable paper or foil facing will be in substantial contact with an approved ignition barrier, as required by code.
How to maintain a staple gun for insulation
Keeping your tool in good shape prevents jams and misfires during a long project.
Frequently Asked Questions
Can I use any staple gun for insulation?
You can, but you shouldn’t. Light-duty craft or upholstery staplers lack the power to drive a staple through fiberglass and into a stud. Johns Manville recommends heavy-duty manual guns like Bostitch or Arrow specifically. Pneumatic guns work but are prone to tearing the facing.
Do you staple the top and bottom of insulation?
Yes, but that’s not enough. You must also staple along the vertical flanges to the stud faces. For top and bottom plates, FI-FOIL® recommends stapling at the same 4-8 inch intervals. This secures the batt fully and prevents it from falling out of the cavity.
What if I don’t have a staple gun?
Temporary alternatives exist, but they’re compromises.
How do I handle corners and inside corners?
The Bottom Line
Stapling insulation is a system, not a single action. The right gun, the right staples, the right spacing, and the right tension work together to lock the batt in place without compromising its R-value. The manufacturer guides are the blueprint for a thermal seal that lasts.
If you remember one thing, make it this: pull the insulation taut before you staple the second side. That single motion prevents compression, the most common hidden flaw in DIY insulation jobs. Everything else, the spacing, the repairs, the obstacle cuts, exists to support that tight, complete fill.
Now, go seal up those walls.
