
How to Use a Pneumatic Grease Gun: Step-by-Step
This post contains affiliate links. As an Amazon Associate, we earn from qualifying purchases.
To use a pneumatic grease gun, you load the grease cartridge or bulk grease into the barrel, connect the gun to a clean, regulated air supply between 40-120 PSI, prime the gun to expel air, and then press the trigger to dispense grease through the coupler onto the fitting. The critical detail most manuals bury is the 90 PSI working pressure, it’s the sweet spot that balances power and tool life across brands like Sealey and Matco.
That 90 PSI number isn’t a suggestion. It comes directly from the recommended working pressure listed in the manuals for the Sealey SA401.V3, Matco GG50C, and ESCO EA166DG-21. Set your regulator there first. Everything else, the loading, the priming, the troubleshooting, follows from getting that air pressure right.
What follows: a walk-through of the seven steps that actually work, how to tell if you have a single-shot or continuous-flow gun (it changes everything), the one maintenance task that prevents 80% of failures, and how to handle a frozen fitting without blowing a seal.
Key Takeaways
- Set your air compressor regulator to 90 PSI before connecting the gun; this is the manufacturer-recommended working pressure for consistent operation and long tool life.
- Lubricate the gun itself by adding a few drops of SAE 30 oil through the air inlet before each use to prevent internal seizure and slow cycling.
- Correctly identify your gun as single-shot or continuous-flow; single-shot guns (like the Matco GG50C) require you to press and release the trigger for each stroke, while continuous-flow models (like the Sealey SA401.V3) will pump as long as you hold the trigger.
- Always prime the gun after loading to expel air pockets; trapped air is the most common cause of a gun that pumps little or no grease.
- If the gun stalls against a blocked fitting, stop immediately; the pressure has hit its 6,000 PSI maximum, and forcing it can rupture a hose or damage the bearing.
Before You Start: The Non-Negotiables
Before you start: A pneumatic grease gun generates up to 6,000 PSI, enough pressure to inject grease through skin and cause a serious medical emergency. Always wear safety glasses. Hold the whip hose only by its spring guard. Never point the coupler at yourself or anyone else.
The manuals are unanimous on the big three. The Lincoln, Matco, and LD-801 manuals all state you must wear eye protection. The Lincoln manual specifically warns that fluid injection requires immediate emergency medical care. This isn’t scare talk. It’s the documented outcome when a high-pressure leak finds skin.
Your second essential requirement is air quality. These guns need clean, dry air. Water in the line washes away internal lubrication and leads to corrosion. That’s why the Sealey SA401.V3 manual tells you to drain your compressor tank daily. For consistent performance, a Filter-Regulator-Lubricator (FRL) unit in your air line is the standard shop setup. It’s the difference between a gun that lasts a season and one that lasts a decade.
The 7-Step Bump-Feed Replacement (and the One Step Nobody Skips)
Most guides give you a generic “unscrew the barrel and load it” sequence. They skip the nuance that makes the process clean and reliable. This sequence works for common cartridge-loading, bump-feed style pneumatic grease guns.
- Disconnect the air supply. People often skip this step, which can result in a face full of grease when the pressurized coupler releases. The LD-801 and Matco GG50C manuals explicitly state to disconnect the air line before any service.
- Retract and lock the plunger rod. Pull the handle at the barrel’s end all the way back until it clicks and locks. This compresses the internal spring and creates space for the new cartridge.
- Unscrew the head from the barrel. Hold the gun’s metal head firmly and turn the barrel counter-clockwise. The internal spring is under tension, so the barrel may spin off quickly if the plunger isn’t fully locked.
- Load the grease cartridge. Remove the plastic cap from the new cartridge. Insert it open-end-first into the barrel until the cartridge’s metal rim seats against the barrel’s end. Then, peel off the foil or pull-tab seal from the top of the cartridge.
- Re-thread the head, but leave it loose. Screw the head back onto the barrel by hand until it’s snug, then back it off about two full turns. This creates a vent for trapped air to escape during priming.
- Release the plunger and work the rod. Release the plunger rod lock and slowly push the rod forward until you feel resistance from the grease. Pump it in and out a few times. You’ll often hear a wet, sucking sound as air escapes past the loosely threaded head.
- Prime the gun on air, then tighten. Reconnect your air supply at 90 PSI. Point the coupler into a rag or waste container and press the trigger until a solid stream of grease, with no air bubbles, emerges. Now fully tighten the head onto the barrel. If you tighten first, trapped air has nowhere to go and the gun will never prime correctly.
Matching Your Air Supply: PSI, Hoses, and the 40:1 Rule
Your air compressor is the lungs of this tool. Get the pressure wrong, and nothing works as advertised.
The pressure ratio for pneumatic grease guns like the Sealey SA401.V3 and Matco GG50C is 40:1. This means the grease discharge pressure is forty times the inlet air pressure you supply. At the recommended 90 PSI inlet, the gun generates approximately 3,600 PSI at the coupler.
This math explains why air pressure is so critical when learning how to use a pneumatic grease gun. If you crank your regulator to 120 PSI (the maximum for many models), the gun’s output pressure increases significantly due to the 40:1 ratio. This approaches the 6,000 PSI maximum output of guns like the LD-801 and Lincoln 1162. Running at the max shortens the tool’s life and increases the risk of a hose failure.
| Specification | Sealey SA401.V3 / Matco GG50C | Lincoln 1162 | Kennedy PGC400 |
|---|---|---|---|
| Air Inlet Pressure Range | 40 – 120 PSI | 40 – 150 PSI | 30 – 150 PSI |
| Recommended Working Pressure | 90 PSI | Not specified | Not specified |
| Max Grease Output Pressure | Not explicitly stated (governed by 40:1 ratio) | 6,000 PSI | 6,000 PSI |
| Minimum Hose Size | 1/4” I.D. | Use Lincoln P/N 1218, 1224, 1230, or 1236 hoses | Not specified |
The table shows a key disagreement between sources: maximum inlet pressure. Models like the Sealey SA401.V3 and Matco GG50C cap at 120 PSI, but the Lincoln manual allows up to 150 PSI. Always consult the limit printed on your specific gun. If you’re running a long air hose, over 8 metres, per the Sealey manual, you need to increase the line pressure at the regulator to compensate for pressure drop over the distance. A proper air hose connection with the right fittings is part of this equation.
Single-Shot vs. Continuous Flow: Why Your Trigger Technique Matters
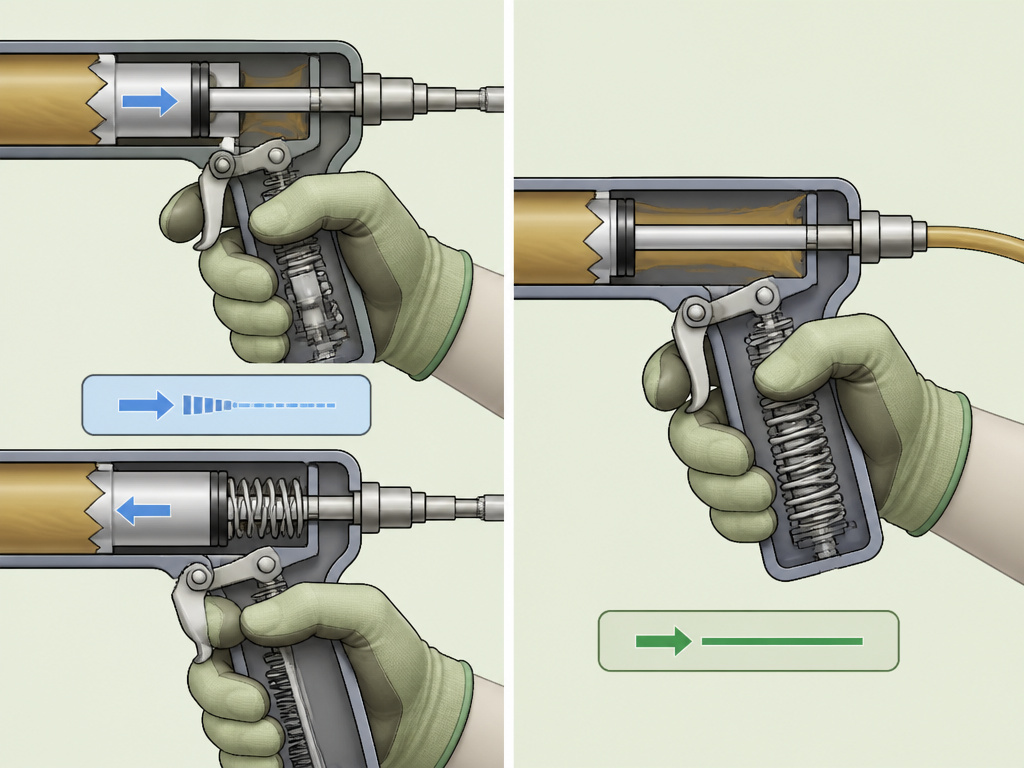
This is the operational fork in the road that causes the most confusion in how to use a pneumatic grease gun. You need to know which gun you have.
A single-shot gun, like the Matco Tools GG50C, delivers one measured amount of grease per complete trigger cycle. For example, the Lincoln model delivers about 0.62 cm³ per stroke. The Matco manual is explicit: “Do not keep the trigger pressed during operation. The trigger must be repeatedly pressed and released.” The piston inside needs to return fully before the next cycle. If you jab the trigger too fast, the gun will seem to lock up or cycle incompletely.
A continuous-flow gun, like the Sealey SA401.V3 according to its manual, will pump grease for as long as you hold the trigger down. In contrast, single-shot guns like the Matco GG50C require the trigger to be pressed and released for each stroke. The product name often gives it away, containing words like “continuous flow.” The trigger acts more like a valve.
If you use a single-shot technique on a continuous gun, you’ll just work slower. If you try to hold down the trigger on a single-shot gun, you’ll either get nothing or damage the internal mechanism. The sound is a giveaway: a single-shot gun goes CHUG-chink, CHUG-chink (piston forward, spring return). A continuous gun makes a steady, rapid CHUG-CHUG-CHUG.
The One Maintenance Task That Prevents Most Failures: Lubricating the Gun
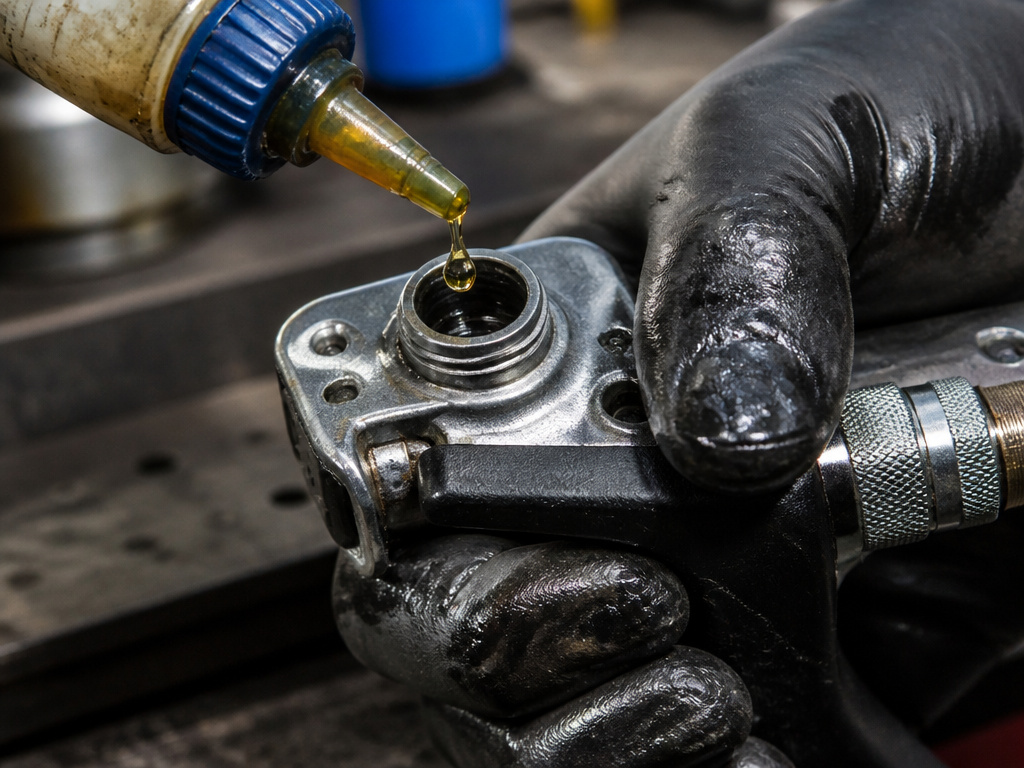
You’re lubricating bearings, but the tool itself needs lubrication, a key part of how to use a pneumatic grease gun correctly. This is the most overlooked step in the entire process.
Every manual. Sealey, Matco, ESCO, LD-801, says the same thing: add a few drops of oil through the air inlet. They recommend SAE 30 or higher viscosity oil. This isn’t optional. The gun’s internal piston and seals run on this micro-mist of oil. Without it, the O-rings dry out, the piston drags, and the gun cycles slowly or seizes entirely.
The procedure is simple. Before you connect the gun to the air line for the day, add a few drops of pneumatic tool oil directly into the female air inlet on the gun’s handle. Then connect your air hose and pull the trigger a few times without a coupler attached to draw the oil into the chamber. This five-second ritual adds years of life. For a deeper dive on this practice, our guide on how to oil pneumatic tools covers the why and how for your entire shop.
Troubleshooting: When the Grease Won’t Flow
Even with perfect setup, things go wrong. Here’s how to diagnose the common failures, straight from the manufacturer troubleshooting guides.
| Problem | Most Likely Cause | Specific Fix & Timeline |
|---|---|---|
| Gun pumps little or no grease | Trapped air pockets | Prime the gun with the head loose. If that fails, try holding the gun with the discharge hose pointing straight up while triggering to let air rise out. This shows up immediately after loading. |
| Gun pumps little or no grease | Grease is too cold/thick | Store the gun and grease above 50°F (10°C). The Lincoln manual specifies an operating range down to 0°F, but NLGI #2 grease stiffens significantly in the cold. The fix requires warming the grease and gun. |
| Gun cycles very slowly | Inadequate internal lubrication | Add several drops of SAE 30 oil through the air inlet as described above. The improvement is often noticeable quickly after adding oil. |
| Gun stalls or stops | Blocked grease fitting or line | Stop immediately. The Lincoln manual states the gun will stall when pressure hits maximum (6,000 PSI). Forcing it can rupture the hose or fitting. Clear the blockage before continuing. |
| Grease leaks from barrel seam | Loose barrel or damaged follower | Ensure the barrel is fully tightened. If the leak persists, the rubber follower is likely torn and the gun needs replacement, not repair. |
The stall condition is critical. A pneumatic gun is powerful enough to blow out a clogged grease zerking fitting. If you feel the gun stop dead against a fitting, don’t keep pulling the trigger. You need to clean or replace that fitting. This is where understanding your air compressor regulator helps, if you were running at a lower pressure, you’d have more warning before hitting that absolute stall point.
Pneumatic vs. Manual vs. Electric: Which Grease Gun Is Right for You?
This isn’t an abstract comparison. Each type has a specific job.
A pneumatic grease gun is the shop workhorse. It’s for the person with a fixed air supply, lubricating multiple fittings regularly. It offers the best power-to-weight ratio and, with proper maintenance like using an inline oiler, can outlast the others. The downside is the tether. You’re limited by your air hose length and compressor capacity (a minimum of 1 CFM, per the Matco and ESCO specs).
A manual grease gun is for the mobile mechanic or the DIYer with one or two fittings a year. It’s slow, requires significant hand effort for thick grease, but needs no power source. It’s a portable tool that requires no power source.
An electric grease gun (corded or battery) is for field service without air. It’s convenient but relies on a battery or cord for power. For a fleet vehicle maintenance bay without air lines, an electric gun may be the right choice.
The choice comes down to your shop’s infrastructure. If you have a robust air compressor setup, a pneumatic grease gun can be an effective tool. If you’re working remotely, electric wins. For occasional use, a manual grease gun may be sufficient.
Parts of a Pneumatic Grease Gun
A pneumatic grease gun uses compressed air to generate high pressure. The main body holds a grease reservoir or cartridge. An air inlet with standard threads connects to your air hose. Inside, a piston multiplies the inlet air pressure, often by a factor of forty, to create the force needed to push grease. A trigger controls the grease flow; some models discharge grease with each press and release, while others provide continuous flow when the trigger is held. A flexible hose with a spring guard connects to a coupler that attaches to grease fittings.
Storing and Maintaining Your Grease Gun
Always disconnect the air supply before any maintenance. Store the gun and grease away from extreme cold, as thick grease can cause problems; use a thinner grease if necessary. To keep the internal mechanism working smoothly, add a few drops of SAE 30 or higher viscosity oil through the air inlet periodically. Regularly inspect the air hose for kinks or damage and replace it at the first sign of wear. Before opening the gun to reload grease, ensure it is not under pressure and handle the barrel ends with caution due to the internal spring.
Frequently Asked Questions
Are pneumatic grease guns any good?
For shop use, they’re excellent. They provide consistent, high-pressure output with less user fatigue than a manual gun. Their simplicity, fewer moving parts than an electric motor, makes them durable and easy to maintain. They provide consistent, high-pressure output.
How does a pneumatic grease pump work?
It uses air pressure to drive a piston. When you pull the trigger, compressed air enters a chamber and pushes a piston forward. This piston is directly connected to a smaller plunger that pressurizes the grease. The 40:1 ratio is achieved through the difference in surface area between the large air piston and the small grease plunger. When the piston completes its stroke, a spring or redirected air returns it, readying the chamber for the next cycle.
Do you push the plunger in on a grease gun?
Yes, but only on specific models during loading. For cartridge-loading guns, you pull the plunger rod all the way back and lock it to load the cartridge. After loading and priming, you then push the plunger rod forward into the barrel. This isn’t to build pressure, the air does that, but to take up the empty space in the barrel so the gun is less cumbersome to handle.
My gun is brand new but won’t pump. What’s wrong?
It’s almost certainly an air pocket. New guns and new cartridges often have trapped air. Follow the priming procedure with the head loose. Also, ensure you’re using the correct grease consistency (NLGI #2 is standard) and that it’s not frozen.
Before You Go
One rule that reframes everything: if you can’t get grease into a fitting after two solid pulls of the trigger on a properly primed gun, stop. The fitting is blocked. Forcing it with a pneumatic gun is how you blow the seal on the bearing you’re trying to protect or burst a hose. Clean or replace the grease fitting first to prevent damage.
Everything above assumes a gun in good repair. If you’ve followed the pressure, lubrication, and priming steps and it still fails, the internal check valve or seals may be worn. Most guns, like the Sealey SA401.V3, carry a 12-month warranty. But that warranty, like all power tool guarantees, won’t cover damage from dry operation or water corrosion. A few drops of oil, every time, is the cheapest insurance you can buy.
