
How to Use an Air Blow Gun Safely: Step-by-Step
This post contains affiliate links. As an Amazon Associate, we earn from qualifying purchases.
You must follow OSHA’s 30 PSI dead-end pressure rule, wear ANSI-rated safety glasses, and never point the nozzle at yourself or others. The process hinges on a pre-use inspection, using the correct nozzle for the job, and understanding that supply pressure and dead-end pressure are not the same thing. A safety blow gun with a vented or pressure-limiting nozzle is required for compliance. This is the core of how to use an air blow gun safely.
That 30 PSI figure is the static pressure measured when you completely block the nozzle. Your shop air supply might be set to 90 PSI, but a safety nozzle compliant with OSHA 1910.242(b) will vent or restrict the flow so the pressure at the orifice can’t climb above that 30 PSI limit if it gets blocked. This is the mechanical fix central to how to use an air blow gun safely, separating a legal tool from a hazard.
What follows is a walkthrough of the rules, the gear, and the step-by-step routine that keeps you safe. By the end, you’ll know how to pick a safety blow gun certified to OSHA 1910.242(b), set it up, and run a pre-start check that catches the problems most people miss until something goes wrong, which is a core part of how to use an air blow gun safely.
Key Takeaways
- OSHA’s 30 PSI dead-end pressure limit is the single most important rule; a standard open-tube blowgun cannot comply, so you need a nozzle designed to vent or limit pressure.
- Always wear ANSI Z87.1 safety glasses with side shields; flying debris is the most common injury, and compressed air can inject particles into skin or eyes.
- Never use compressed air to clean clothing or skin; air can penetrate the skin and enter the bloodstream, causing a potentially fatal embolism.
- Match your nozzle and pressure to the task; a chip shield for metal debris, a silencer for noise-sensitive areas, and lower pressure for light drying.
- Depressurize the line before connecting or disconnecting the gun to prevent uncontrolled whipping of the hose, which can cause injury.
The 30 PSI Rule Explained
OSHA’s 29 CFR 1910.242(b) and the related Program Directive #100-1 state that “when dead-ending occurs, a static pressure at the main orifice shall not exceed 2 bar (30 psi).” Another instruction, STD 1-13.1, says compressed air must not be used for cleaning “except where reduced to less than 30 PSI and then only with effective chip guarding and personal protective equipment.”
The technical standard: When a blowgun nozzle is completely blocked (dead-ended), the static pressure measured directly at the orifice must not exceed 30 PSI (2 bar). This is a testable specification for the tool itself, not a recommendation for operating pressure.
This rule exists because air at higher pressures can break the skin. A Swedish labour magazine documented a case where a metal chip punctured a worker’s skin, allowing compressed air to enter her bloodstream. She suffered severe, lasting injuries. The air embolism risk is why cleaning your clothes with a blowgun is explicitly a high-risk activity.
Here is the critical distinction many shops get wrong: your supply pressure and dead-end pressure are different. Manufacturers like EXAIR design their Safety Air Guns to be supplied with normal shop air up to 100 PSIG, but the engineered nozzles limit the dead-end pressure to comply with OSHA 1910.242(b). You cannot achieve compliance by simply turning your regulator down to 30 PSI if you’re using an open-tube gun. The gun itself must be designed to pass the test.
Mandatory Personal Protective Equipment (PPE)
Your eyes and ears are the first line of defense. EXAIR’s safety checklist is blunt: “Always wear safety glasses with side shields when working with blowoff operations.” This isn’t optional. Flying chips, dust, and debris are the most predictable hazard.
Hearing protection depends on the gun’s noise output and your exposure time. OSHA 1910.95 sets an action level at an 8-hour time-weighted average of 85 dB(A), while the European Directive 2003/10/EC defines a lower exposure action value of 80 dB(A) and an upper exposure action value of 85 dB(A). EXAIR publishes specific exposure limits for its models: some allow 3 hours without protection, others only 30 minutes. If your gun doesn’t come with a noise rating, assume you need protection immediately. A CEJN silencer nozzle, for example, reduces noise to 82 dB(A).
For handling sharp metal debris, gloves are recommended, but they don’t replace chip guarding. The goal is to stop the hazard before it reaches you.
Choosing the Right Safety Blow Gun
Not all blow guns are created equal. A “safety” blow gun has a nozzle designed to meet the 30 PSI dead-end rule. You have three main types, and your job dictates which one you need.
| Nozzle Type | How It Works | Best For | Key Risk If Skipped |
|---|---|---|---|
| Bypass / Vented | Air escapes through side ports when the main orifice is blocked, keeping pressure below 30 PSI. | General cleaning, drying parts. | Using a standard open tube, which can dead-end at full supply pressure. |
| Chip Shield / Air Curtain | A physical barrier or air curtain deflects flying debris away from the operator. | Blowing off metal chips, grinding dust, wet parts. | Directing debris back toward your face or a coworker. |
| Silencer | Engineered baffles reduce high-frequency noise from the air stream. | Areas with other workers, indoor shops, noise-sensitive environments. | Long-term hearing damage that builds gradually over months. |
The brand you choose matters less than the certification. Look for a mention of OSHA 1910.242(b) compliance in the product specs. Brands like CEJN and EXAIR design their products explicitly for this. Standardize your shop fittings for universal compatibility, but the gun itself needs to be a dedicated safety model. A standard blowgun from the hardware store, even with a fancy rubber grip, is a liability.
For most workshop tasks, a gun with an interchangeable nozzle system is the most versatile. You can snap on a chip shield for cleaning the lathe and swap to a silencer for drying parts before assembly.
Your Pre-Use Inspection Checklist (The 7-Step Walk-Through)

Most accidents happen because someone skipped a check. Run through this list every time you pick up the gun, especially if it’s been sitting.
- Depressurize the air line. Before you connect or disconnect anything, shut off the air and trigger the gun to bleed the pressure. An unpredicted hose whip is a classic workshop injury.
- Inspect the hose and fittings. Look for cracks, cuts, or soft spots in the hose. Check that all connections are tight and that quick-connect couplers are fully seated. A leak isn’t just wasteful; it’s a sign of imminent failure.
- Check the gun body and trigger. Ensure the trigger moves smoothly and returns fully when released. Look for cracks in the gun’s body, especially near the threaded connections.
- Examine the nozzle. Make sure the correct safety nozzle is firmly attached. Check that the air passages are clear of debris. Even a small chip lodged inside can disrupt airflow and cause unpredictable spraying.
- Verify your air filter. Your compressed air supply should have a filter separator with at least 25-micron filtration, per EXAIR’s recommendation. Check that the filter bowl isn’t full of water or oil.
- Confirm regulator setting. Your shop air supply pressure may be set to a common level like 90 PSI, but you may need to adjust down for delicate tasks. Know your required pressure before you open the valve.
- Don your PPE. Safety glasses are on. Hearing protection is on if the job warrants it. This is the last step before you open the valve.
The whole process takes less than a minute. That minute is what stands between a routine job and a trip to the clinic.
How to Adjust Pressure for Specific Tasks
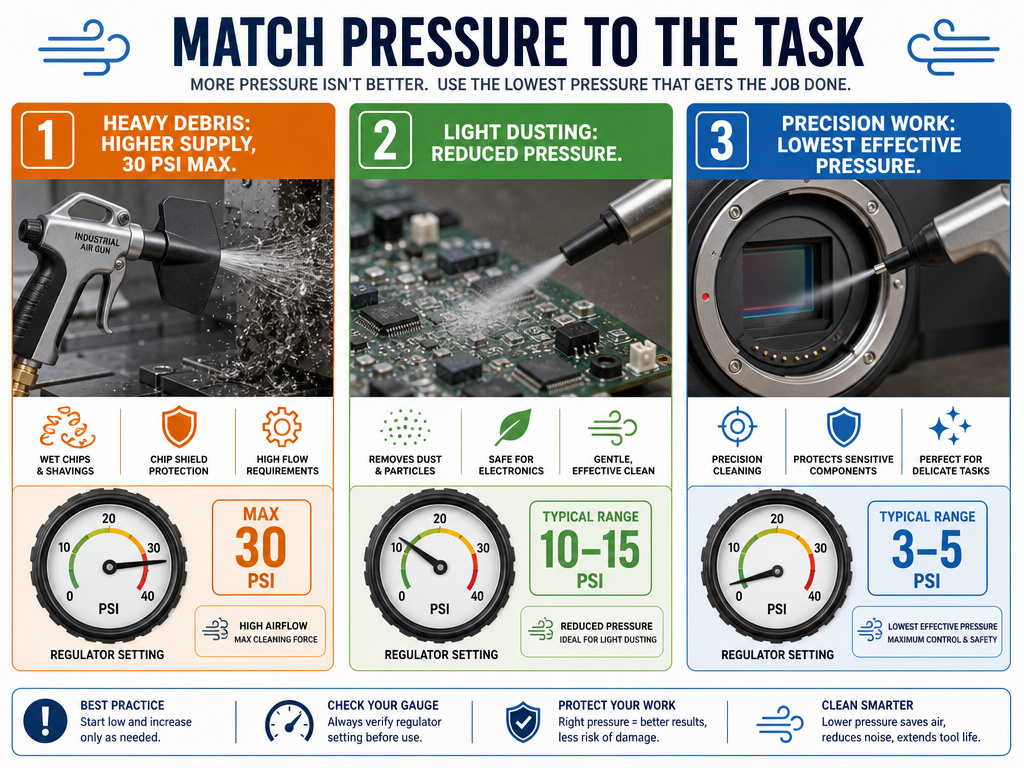
Running every job at full line pressure is lazy, loud, and wasteful. It also increases risk. Matching the force to the work is a mark of a practiced user.
- Heavy Debris Removal (e.g., wet chips, stuck sawdust): You may need a higher supply pressure, but the tool must still limit dead-end pressure to 30 PSI. This is when a chip shield nozzle is absolutely mandatory. The force is high, and the debris is substantial.
- Light Drying or Dusting (e.g., electronics, dried sawdust): You can often reduce the pressure using your regulator to use less air and create less noise. You’ll use less air, create less noise, and have more control. EXAIR notes that at lower pressures, “less compressed air is used and sound levels are lower.”
- Precision Blowoff (e.g., cleaning a sensor, directing a small part): Use the lowest pressure that gets the job done. Sometimes a low pressure is enough. The key is control, not brute force.
Where this goes sideways: Cranking the pressure to max for a light job because the gun “feels” weak. The weakness is often a clogged filter or a kinked hose, not insufficient pressure. Fix the restriction, don’t escalate the pressure.
Pressure ratings are a serious matter. While EXAIR designs its Super Blast Safety Air Guns for 100 PSIG supply, OSHA’s cleaning standard for dead-ended pressure remains 30 PSI. The tool’s maximum rating is for its structural integrity, not a license to ignore the safety rule for the task.
Never Do This: The Short List of Instant Hazards
Some mistakes have immediate, severe consequences. These aren’t just best practices; they are strict prohibitions.
- Never point the gun at yourself or anyone else. This includes using it to clean your clothes. Compressed air can penetrate fabric and skin.
- Never use compressed air to clean your clothing or dislodge particles from your skin. As the CEJN guide states, this is a “high-risk activity” for air embolism.
- Never engage in horseplay. A blast of air to the face can damage eyes or drive debris into them.
- Never use a damaged or modified gun. If the body is cracked, the trigger sticks, or someone has drilled out the nozzle, take it out of service immediately. Modifications void the safety engineering.
- Never bypass or remove the chip shield or safety nozzle. You’re removing the device that makes the tool compliant.
The evidence for these isn’t theoretical. The documented case of the Swedish worker, the explicit warnings in every manufacturer’s manual, and the wording of the OSHA standard all point to the same conclusion: the margin for error is zero.
Troubleshooting Common Air Blow Gun Problems
Even with a perfect setup, things can go wrong. Here’s how to diagnose the usual suspects before assuming you need a new gun.
| Problem | Likely Cause | Fix |
|---|---|---|
| Weak or pulsing airflow | Clogged inlet filter, kinked hose, undersized air line, or clogged nozzle. | Check and clean the filter. Inspect hose path. For runs over 25 ft, ensure you’re using at least 3/8″ pipe or 1/2″ hose as EXAIR recommends. Disassemble and clean the nozzle. |
| Air leak at connection | Worn or damaged quick-connect coupler, loose fitting, or missing O-ring. | Replace the coupler or O-ring. Ensure the connection is hand-tight plus a quarter-turn with a wrench—over-tightening can crack the housing. |
| Trigger sticks or doesn’t return | Dirt inside the trigger mechanism, worn spring, or damaged valve. | Disassemble (with line depressurized!), clean, and lubricate with a light pneumatic oil. Replace broken springs or seals. |
| Excessive noise | Missing or damaged silencer nozzle, pressure set too high for the task. | Install a silencer nozzle (e.g., CEJN’s 82 dB(A) model). Reduce operating pressure via the regulator. |
| Debris blows back toward operator | Missing or incorrectly installed chip shield, or using a vented nozzle where a physical shield is needed. | Install the correct chip shield or air curtain nozzle for the material being blown. |
A weak gun is often a starving gun. That pressure drop you feel over a 50-foot hose is real. EXAIR specifies that for runs up to 25 feet, use 3/8″ pipe or 1/2″ hose. For 50 feet, step up to 1/2″ pipe or 3/4″ hose. Ignoring this means you’re paying for compressed air you never deliver to the workpiece.
Ergonomic Design and User Comfort
Choosing a blow gun with a comfortable, ergonomic grip reduces hand fatigue during extended use. A well-balanced tool that fits your hand properly allows for better control, which directly contributes to safe operation by preventing slips or accidental pointing. While the primary focus is always on safety features like pressure regulation, a tool that is easier and less tiring to handle encourages proper technique and reduces the risk of repetitive strain injuries. Look for a design that feels natural in your grip and doesn’t force your wrist into an awkward angle during typical cleaning or blowing tasks.
Frequently Asked Questions
What’s the difference between an air blow gun and a blow dart or air rifle?
An industrial air blow gun is a pneumatic tool for cleaning, drying, and moving debris using shop-compressed air. It is governed by workplace safety regulations like OSHA 1910.242(b). A blow dart or air rifle is a recreational weapon or sport tool designed to propel a projectile, often using lung power or a low-pressure pump. They are not interchangeable, and using a shop air blow gun for any kind of projectile is extremely dangerous and illegal in a workplace.
Can I use a regular blowgun if I just turn the pressure down to 30 PSI?
No. OSHA’s 30 PSI rule is a dead-end pressure test, not an operating pressure suggestion. A standard open-tube blowgun, even with the supply regulator set to 30 PSI, can still dead-end at that full pressure if the outlet is blocked. Only a blowgun with an engineered safety nozzle (vented, pressure-limiting) is designed to prevent the static pressure from exceeding 30 PSI during a blockage.
What do you use an air blow gun for?
Its primary uses are cleaning chips and dust from machined parts, drying components after washing, clearing debris from work surfaces, and cooling items. It must always be used with the appropriate safety nozzle (chip shield for metals, silencer for noise) and never for cleaning clothing or people.
How do I know if my blow gun is OSHA-compliant?
Check the manufacturer’s specifications. Compliant guns will explicitly mention meeting OSHA 1910.242(b) or the 30 PSI dead-end pressure rule. They will have non-removable or clearly marked safety nozzles. Brands like EXAIR and CEJN design their products for this compliance. If the manual or product listing says nothing about OSHA, it likely isn’t compliant.
Is hearing protection always required?
Not always, but you must know your gun’s sound level and your exposure time. Per OSHA 1910.95, if the 8-hour time-weighted average exceeds 85 dB(A), a hearing conservation program is required. Many safety guns have published data; for example, some EXAIR models allow only 30 minutes of exposure per day without protection. When in doubt, or if the gun has no rating, wear hearing protection.
The Bottom Line
Your shop air system is a utility, not a toy. The rules—30 PSI dead-end, full PPE, no horseplay—exist because the consequences of getting it wrong are measured in permanent injury, not just a scolding. The right tool for this job is a purpose-built safety blow gun from a manufacturer that cites the standard. The tool that’s right in front of you, the unrated hardware-store special, is the one that fails the test you don’t want to take.
One threshold changes everything: if your blow gun doesn’t have the words “OSHA 1910.242(b) compliant” or “30 PSI dead-end pressure” in its specs, stop. It is not safe for cleaning. Everything discussed here assumes you’re starting with a compliant tool. Using a non-compliant gun turns every other precaution into a debate you’ve already lost.
