
How to Use an Angle Grinder: Step-by-Step
This post contains affiliate links. As an Amazon Associate, we earn from qualifying purchases.
To use an angle grinder safely, you must match three things: a securely installed wheel rated for your grinder’s RPM, the correct operating angle for the task (15° for grinding, perpendicular for cutting), and the discipline to let the wheel stop completely before setting the tool down. The Harbor Freight 64856 has a no-load speed of 11,000 RPM and requires wheels rated for at least 11,000 RPM.
That RPM number on your grinder’s nameplate isn’t marketing. It’s a ceiling. A wheel rated for 8,000 RPM on an 11,000 RPM grinder becomes shrapnel before you even touch the workpiece. This is where the manual’s spec sheet stops feeling like fine print and starts feeling like a life raft, which is why learning how to use an angle grinder safely is essential.
What follows is the straight talk most videos and blogs skip when covering how to use an angle grinder: the one-hand grip you use when the side handle is in the wrong spot, the smell of a burning disc before it snaps, and the step-by-step logic of changing a disc so you don’t fumble with a wrench when the tool is hot. By the end, you’ll know how to approach metal, stone, or rust not just safely, but with confidence.
Key Takeaways
- Always perform a “ring test” on a new abrasive wheel before use, a clear, bell-like ring means it’s intact; a dull thud means it’s cracked and must be discarded.
- Match the wheel’s maximum RPM rating to your grinder’s no-load speed (e.g., 11,000 RPM for the Harbor Freight 64856); a mismatched, under-rated wheel can explode.
- For grinding, hold the tool at an angle to the workpiece; sources recommend ranges from 5-15 degrees, with Makita suggesting about 15° and Skil suggesting 10° to 15°.
- Never remove the wheel guard. Manufacturers like Makita design it so the closed side points toward you when using a depressed center wheel, deflecting sparks and debris away from your body and hands.
- Let the wheel come to a complete stop before setting the grinder down. A spinning disc can catch on clothing, the workbench, or the cord, turning the tool into a wild, uncontrollable weapon.
Gearing Up: Your Non-Negotiable Safety Kit
You wouldn’t weld in shorts. Don’t grind without a full suit of armor. The debris field from a 4.5-inch wheel spinning at 11,000 RPM includes red-hot metal flakes, abrasive dust, and occasionally, larger chunks of the wheel itself.
Start with your eyes. The Harbor Freight manual mandates ANSI-approved eye protection. The Harbor Freight manual mandates ANSI-approved eye protection. For grinding, I prefer a full-face shield over goggles, it keeps grinding dust off your cheeks and provides a bigger debris barrier.
Your lungs are next. You need a NIOSH-approved respirator rated for particulate. You need a NIOSH-approved respirator rated for the specific hazards.
Gloves are controversial. Some argue they can get caught. They protect against heat and sharp edges, and the tight fit minimizes catch risk.
Finally, cover up. Wear a long-sleeved, non-synthetic shirt (cotton or flame-resistant material), heavy pants, and sturdy boots. Synthetic fabrics like polyester can melt onto skin if a spark lands just right.
Before you start: Secure your workpiece in a vise or with clamps. A piece that moves is a piece that can grab the wheel and hurl the grinder back at you. Keep bystanders, especially children and pets, well clear of the spark and debris zone.
The Anatomy of Control: Know Your Tool Before You Plug It In
Every angle grinder shares a common set of parts, but where they are and how they function varies by brand. We will go through them using the specifics from our sourced manuals.
The wheel guard is the most critical safety component. The Makita M9512 manual is emphatic: when using a depressed center wheel (the most common type), the guard must be fitted so its closed side always points toward the operator. This isn’t a suggestion, it’s a calculated deflection path for sparks and debris. You can usually loosen a screw and rotate the guard to suit your grip and the work angle, but it must never be removed.
The side handle provides crucial stability. It typically threads into one of three positions on the gear housing. Install it on the side that gives you the best control and keeps your hand clear of the guard and wheel path. For a right-handed person cutting, that often means the handle on the left side, so your right hand operates the trigger.
The spindle lock is a button or lever that, when depressed, locks the spindle (and the wheel) from turning. You’ll use this with the included wrench to loosen or tighten the lock nut that holds the wheel on. The Skil AG242001 has a 5/8″ (16mm) spindle thread, a common size. The Harbor Freight 64856 uses a 5/8″-11 UNC thread. This is the part most people fumble, more on the exact sequence next.
Finally, know your switch. Many grinders have a paddle switch with a safety lock. You must push a lever to release the lock before you can squeeze the paddle to start the tool. This prevents accidental startups.
| Grinder Part | Its Real Job | What Happens If You Ignore It |
|---|---|---|
| Wheel Guard | Deflects sparks, debris, and wheel fragments away from you. | Direct exposure to wheel explosion or debris causes severe lacerations or burns. |
| Side Handle | Provides a second point of control to resist kickback torque. | One-handed operation magnifies kickback, making the tool impossible to control. |
| Spindle Lock | Locks the spindle so you can safely tighten or loosen the lock nut. | The wrench slips, your hand hits the wheel, and you get a deep cut—every time. |
| Lock-Off Switch | Prevents the paddle switch from being accidentally pressed during handling. | The tool starts unexpectedly, often while you’re picking it up or adjusting the cord. |
Your First Cut: The Step-by-Step Sequence
Now, get the wheel on the spindle. This is the most error-prone part of the process, and doing it wrong can cause the wheel to loosen in use or be installed off-center, creating dangerous vibration.
- Unplug the tool. This is an absolute rule. Even with the switch off, a faulty switch or accidental bump can start the motor.
- Depress the spindle lock. Hold it down firmly. On some models, you may need to rotate the wheel by hand until the lock engages.
- Use the wrench to loosen the lock nut. It’s usually reverse-threaded (righty-loosey, lefty-tighty), but not always. Check your manual. If it’s stuck, a sharp tap on the wrench handle with a mallet can break it free. Never use an extended cheater bar.
- Remove the old wheel and outer flange. Notice the orientation of the flanges. The inner flange often has a raised lip that fits into the wheel’s arbor hole.
- Install the new wheel. Ensure it’s the correct type and size. The Harbor Freight 64856 requires wheels no larger than 4-1/2″ (115 mm) in diameter with a 7/8″ arbor hole and 1/4″ thick or less. Place the wheel on the inner flange, then thread on the lock nut by hand.
- Tighten the lock nut. Hold the spindle lock depressed and use the wrench to tighten the nut securely. Don’t over-torque it, snug is enough. The tool’s rotation during use will further tighten the nut.
Now, before you plug it in, do the ring test. Suspend the wheel by its arbor hole on a finger or a pencil. Tap it lightly with a non-metallic object, like a screwdriver handle. A clear, ringing sound means the wheel is intact. A dull thud means it’s cracked or damaged and must be thrown away immediately. Manuals, such as from Harbor Freight, warn against using wheels that have been dropped or exposed to humidity.
A 2024 study on tool force prediction in the International Journal of Industrial Ergonomics found that improper wheel installation was a primary contributor to unsafe vibration levels in handheld grinders, directly increasing user fatigue and loss of control risk.
With the wheel secure and the guard positioned, you’re ready for action. Plug in the grinder, stand in a stable stance, and hold the tool with both hands (one on the side handle, one on the main grip). Point the guard away from your body and any bystanders. Press the safety lock, squeeze the trigger, and let the grinder come to full speed before making contact with the workpiece. A slow wheel will bind and kick.
The Core Operating Angles (Grinding vs. Cutting)
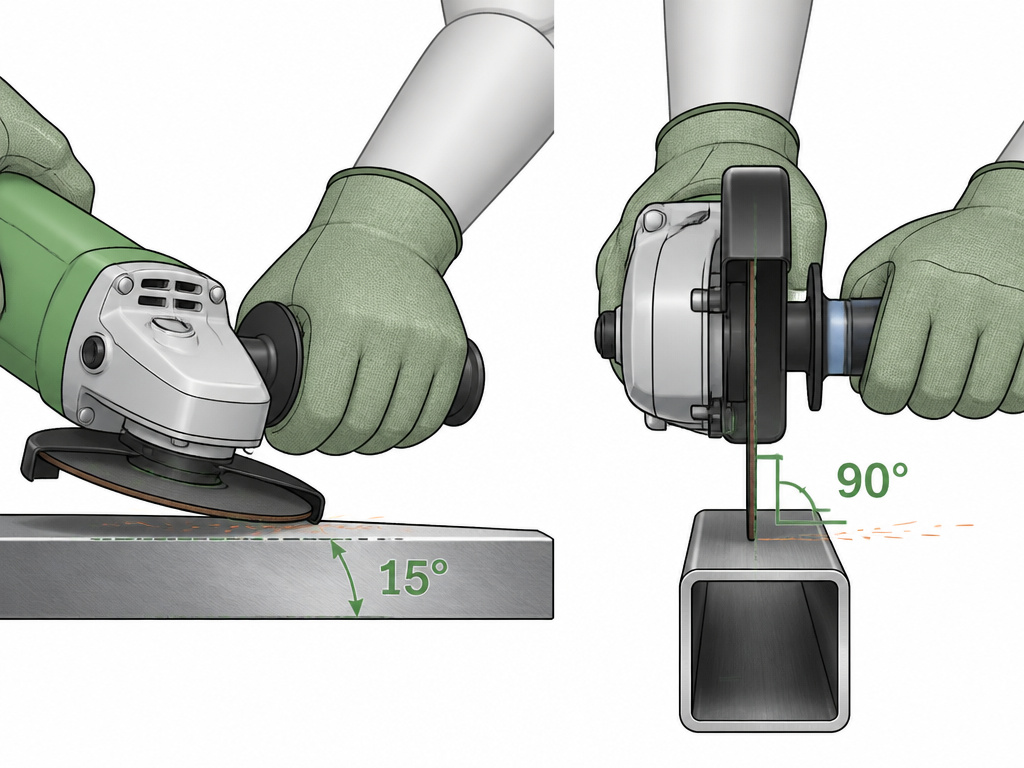
This is the moment that separates a controlled job from a dangerous one. The angle of attack isn’t a gentle suggestion, it’s physics.
For grinding or sanding, you want to use the flat face of the wheel, not its thin edge. Every manual we sourced agrees on a range. The Makita M9512 manual says to keep the edge at about 15° to the workpiece. The Skil AG242001 manual recommends 10° to 15°. The Northeastern Makerspaces guide suggests 5-15 degrees from flat.
So which is right? They all are. The 5-15° range accounts for different wheel wear and material. The key is to never go flat. A wheel held flat to the surface will grab, stall the motor, and kick back violently.
For cutting, the rule flips. You now use the thin edge of a cutting disc and hold the grinder perpendicular (90°) to the workpiece. You’re slicing through the material, not abrading it. Any side angle will flex the thin disc, causing it to bind, overheat, and shatter.
Here’s the pro grip shift nobody tells you. When grinding, you typically hold the side handle with your non-dominant hand and the trigger with your dominant hand. The sparks fly forward, away from you. When making a long cut, some experienced users swap: they hold the body with their dominant hand for steering and use their non-dominant hand on the side handle for stability. This directs the sparks behind you as you move forward. Whichever you choose, the stance is critical: feet planted, body balanced to the side of the spark path.
Wheel Wisdom: Choosing and Changing the Right Disc
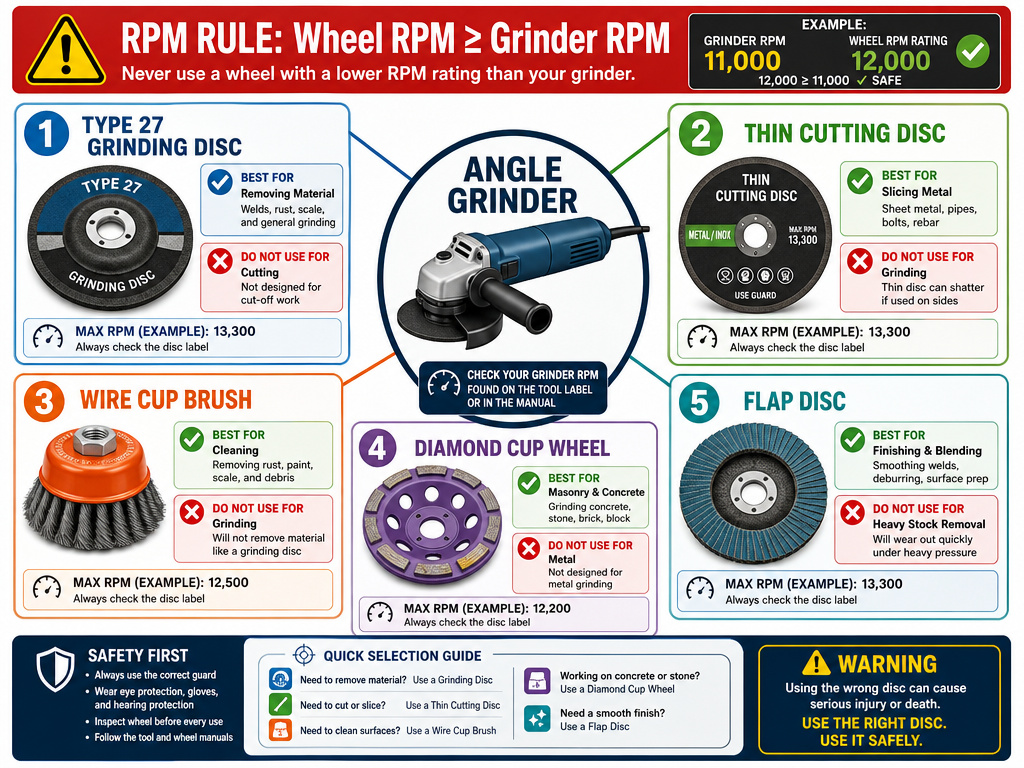
Your grinder is just a spinning motor. The wheel does the work. Using the wrong wheel is ineffective at best, catastrophic at worst.
First, the RPM rule. Your wheel’s maximum safe operating speed, printed on its label, must meet or exceed your grinder’s no-load speed. The Harbor Freight 64856 runs at 11,000 RPM. Putting an 8,000 RPM-rated wheel on it is asking for a centrifugal explosion. The Skil AG242001 has a rated speed of 12,000 RPM.
Second, type and material. The table below is your cheat sheet.
| Wheel Type | Best For | Critical Warning |
|---|---|---|
| Type 27 Grinding Disc | Removing material, smoothing welds, sharpening tools. | Do not use for cutting. Its thickness will bog down, overheat, and can shatter under side pressure. |
| Cutting Disc | Slicing through metal, stone, or masonry. | Do not use for grinding. Its thin design cannot withstand side-loading and will flex and break. |
| Wire Cup Brush | Removing rust, paint, and scale from flat surfaces. | Wear a leather apron. Wires will fly out—it’s normal, but you don’t want them in your skin. |
| Diamond Cup Wheel | Aggressive grinding of concrete or masonry. | Requires constant water feed for dust control unless used dry with a vacuum-rated shroud. |
| Flap Disc | A blend of grinding and sanding, good for finishing. | Let it do the work—pressing too hard wears out the flaps quickly without improving performance. |
Makita’s manual includes a stark, all-caps warning: NEVER use tool with wood cutting blades and other saw blades. This bears repeating. A toothed saw blade on a grinder will catch and kick back with terrifying speed and force, turning the tool into a lethal, uncontrollable chainsaw. It’s not just a bad idea; it’s a manufacturer-forbidden act that voids any claim to safety.
Changing wheels becomes routine. The key is letting the grinder cool down first. A hot lock nut expands and can be impossible to loosen, leading to rounded wrench flats and frustration.
The One Mistake That Ruins New Wheels
A brand-new grinding or cutting disc has sharp, square corners. If you take it straight to the workpiece and push forward, those corners dig in like a chisel. The tool jerks, the workpiece gouges, and you fight for control.
Both the Makita and Skil manuals advise pulling the tool backward during the break-in of a new wheel to round off its sharp edges. This uses the trailing edge of the wheel to gently round off those sharp corners. After the edge is slightly radiused, you can work in both directions. This simple technique prevents that terrifying “bite” and extends the life of your wheel.
The same principle applies to a new cutting disc. Make your first cut light and steady, letting the disc’s edge wear in gradually rather than forcing it through the material.
Beyond Metal: Working With Stone, Masonry, and More
While our sourced manuals from Makita and others specify the tool is for metal and stone materials without water, that leaves a lot of room for error.
For concrete or brick, a diamond cup wheel is the only sane choice. A standard abrasive masonry wheel will disappear in a cloud of dust in minutes, wasting money and loading the air with silica. The diamond wheel is an investment, but it grinds cooler and lasts orders of magnitude longer. You must use it with a shroud connected to a HEPA-filtered vacuum rated for concrete dust. This isn’t optional, silica dust is a permanent lung hazard.
What about wood? Don’t. Even if you find a “wood carving” disc, the risks outweigh the rewards. Wood grain is inconsistent, and the high speed of a grinder can cause the disc to catch and kick back faster than you can react. Use a chainsaw, sawzall, or rotary tool instead.
Rust removal is a classic grinder job. A knotted wire cup wheel is the go-to for flat surfaces.
Maintenance and Troubleshooting: The 10-Minute Check That Saves the Tool
An angle grinder is simple, which means neglect shows up fast. After every few hours of use, or at least monthly for a casual user, run through this list.
- Inspect the power cord. Look for cuts, nicks, or exposed wire, especially near the plug and tool housing. A damaged cord is a shock waiting to happen.
- Check the carbon brushes. Worn brushes cause loss of power, excessive sparking, and can damage the armature.
- Clean the ventilation slots. Use a soft brush or compressed air to clear dust from the motor cooling vents. A clogged motor overheats and dies prematurely.
- Feel for bearing play. With the wheel removed, grab the spindle and try to wiggle it side-to-side. Any noticeable play means the bearings are worn, causing vibration and imprecise work. This is usually a job for a service center.
If your grinder won’t start, check the obvious first: is it plugged in? Is the outlet live? Is the safety lock disengaged? If the tool feels sluggish or smells like burning insulation, it’s likely overheated. Unplug it immediately and let it cool for at least 30 minutes before further troubleshooting.
Frequently Asked Questions
What is the most important safety rule for using an angle grinder?
Never remove the wheel guard. Every single manual and safety guide, from Harbor Freight to the Northeastern University Makerspaces, stresses this. The guard is your primary defense against wheel fragments, sparks, and debris. Using a grinder without its guard is an immediate, unacceptable risk.
Can I use a cutting disc to grind, or a grinding disc to cut?
No. A cutting disc is thin and brittle, designed for a straight-through slicing action. Side-loading it during grinding will cause it to flex, overheat, and shatter. A grinding disc is thick and meant to withstand pressure from its face. Using it to cut will bog down the motor, overheat the disc, and likely cause it to crack. Use a grinding disc for grinding and a cutting disc for cutting.
How do I know if a grinding wheel is safe to use?
Perform the ring test before mounting it. Tap the suspended wheel with a non-metallic object. A clear, ringing tone indicates an intact wheel. A dull thud indicates a crack. Also, inspect it for visible damage and ensure it has not been damaged or improperly stored.
Why does my angle grinder keep kicking back?
Kickback is usually caused by one of three things: using the wrong angle (e.g., grinding with the edge of the wheel instead of its face), forcing the tool too hard into the workpiece, or a pinched or bound wheel during a cut. Always let the tool do the work at its own pace, maintain the correct angle, and ensure your workpiece is securely clamped to prevent movement.
Can I use an angle grinder to cut wood?
Manufacturers like Makita explicitly warn against it. The extreme speed of an angle grinder is mismatched to wood’s fibrous structure, creating a high risk of severe kickback. Specialized saw blades advertised for wood on grinders are exceptionally dangerous. For cutting or shaping wood, use a circular saw, jigsaw, or reciprocating saw instead.
The Bottom Line
The process of how to use an angle grinder safely isn’t about bravery; it’s about meticulous preparation and respecting physics. The guard stays on. The wheel RPM matches. The angle is either 15 degrees or 90 degrees, with no creative in-between. You let the wheel stop before you set the tool down.
If you remember one thing, let it be this: the grinder’s power is a constant. Your control is the variable. You control it by reading the manual, actually reading it, and treating every step, from the ring test to the break-in pull, as mandatory. That’s how you move from fearing the tool to wielding it effectively. The difference isn’t just in the quality of your welds or cuts. It’s in walking away from the workbench with all your fingers still where they started.
