
Miter vs Bevel Cut: Which One Do You Need?
This post contains affiliate links. As an Amazon Associate, we earn from qualifying purchases.
A miter cut angles across the face of a board, while a bevel cut angles through its thickness. Miter cuts are made by pivoting the saw head left or right with the blade vertical; bevel cuts are made by tilting the blade itself. You use a miter for picture frames and 90-degree corners; you use a bevel for crown molding or softening a tabletop edge. The tool that does both is a compound miter saw.
That’s the direct answer. The confusion starts when you look at the saw. The 0° mark on a miter saw is actually a 90-degree square cut. So when you set your saw to 10°, you’re cutting 10 degrees off square, resulting in board angles of 100° and 80°. Understanding the miter vs bevel cut distinction is key. Mixing up these two cuts is how you end up with gaps in your corners or projects that don’t fit flush to a wall.
What follows is a breakdown of the physics, the tool settings, and the real-world consequences of choosing the wrong cut. By the end, you’ll know exactly which to use for your next project, and how to set your saw to avoid the most common beginner errors.
Key Takeaways
- A miter cut angles across the face of the board; think picture frames. A bevel cut angles through the thickness of the board; think sloped table edges.
- For a standard 90-degree corner, you need two 45-degree miter cuts, one on each piece.
- A compound miter saw is the best tool for the job, as it can tilt the blade for bevels and pivot for miters, often simultaneously.
- Safety glasses rated ANSI Z87.1 are essential; a miter saw’s noise can exceed 100 decibels, so hearing protection is a must.
- A gap on the outside of a miter joint means your angles are too shallow; a gap on the inside means they’re too steep.
Core Definition: Miter vs. Bevel (angle plane)
A miter cut changes the angle across the face of the board while the blade stays vertical. A bevel cut tilts the blade so the cut runs through the thickness of the wood. This distinction is based on the plane of the wood you are angling.
The difference is in the geometry, not the tool. You can make both cuts with several tools, but the miter saw is built for them. Think of the board on your saw table. Its width runs left to right, its thickness runs up and down. Understanding the miter vs bevel cut distinction clarifies that a miter cut changes the angle of that left-to-right width. A bevel cut changes the angle of that up-and-down thickness.
Here’s how to spot them in the real world:
- Miter Cut: The classic 45-degree corner on a picture frame. The blade stayed vertical, but the saw head pivoted to cut the ends at an angle so they meet at 90 degrees.
- Bevel Cut: The sloped edge on a decorative plaque or the angled top of a barn door. The board lay flat, but the blade tilted to slice through its edge at an angle.
The Miter Saw: Your Tool for Both Cuts
Most miter saws are compound miter saws, meaning they can cut either miters or bevels or both at the same time. Common miter saw sizes are 10″ and 12″, referring to the blade diameter. The power behind these cuts matters, too. Saws like the Ronix 5025 and 5030 Miter Saws pack a 2000-watt motor spinning at up to 4,200 RPM.
You set each cut on a different part of the saw. The miter vs bevel cut question is answered by the saw’s controls: the miter angle is adjusted by releasing the table and pivoting the entire saw head left or right along a scale at the front. The bevel angle is set by releasing a knob or lever at the back of the saw and tilting the motor and blade assembly to the side. For a bevel cut, you first set the miter angle to 0 degrees so the saw is firing straight ahead.
Common mistake: Trusting the factory detent stops on your miter saw for perfect 45s. They’re often a fraction of a degree off. Always check a test cut with a quality combination square.
Where this goes sideways: Using a miter saw without understanding its scale. That 0° mark on the miter gauge isn’t a zero-degree cut—it’s a 90-degree square cut. If you set the saw to 10°, you’re cutting 10 degrees off square. The resulting angles on the board are 100° and 80°. This is why test cuts on scrap wood are not a suggestion; they’re a requirement before you touch your project stock.
When to Use a Miter Cut vs. A Bevel Cut
The job tells you which cut to make. Each has a set of classic applications where it’s the only logical choice.
Use a Miter Cut When:
- Joining two boards at a corner to hide the end grain (picture frames, window trim, simple boxes).
- Creating any project where pieces meet at an angle in the same plane (like a hexagon shelf).
- Cutting baseboards for a standard 90-degree wall corner (two 45-degree miters).
Use a Bevel Cut When:
- Softening or decorating the edge of a board (a chamfer on a tabletop).
- Fitting trim against a sloped surface (a baseboard on a stair skirt board).
- Preparing pieces for a joint that meets at an angle through their thickness (some roof rafters).
- Creating the compound angles needed for crown molding.
One expert source states you likely won’t make bevel cuts as often as miter cuts on a miter saw. Another implies bevels are essential for decorative work, stating they are ‘essential for decorative touches’. In my experience, it depends entirely on your projects. A picture-frame maker lives on miter cuts. Someone building furniture with detailed edges will use bevels constantly.
| Project Type | Primary Cut | Why It’s Used | Tool of Choice |
|---|---|---|---|
| Picture Frame | Miter | Joins corners seamlessly, hides end grain | Miter Saw |
| Tabletop Edge Detail | Bevel | Creates a decorative chamfer or slope | Table Saw or Miter Saw |
| Crown Molding | Compound (Both) | Fits molding to wall and ceiling angles | Compound Miter Saw |
| Baseboard (Flat Wall) | Miter | Forms clean 90-degree corners | Miter Saw |
What is a Compound Cut? (Miter + Bevel)
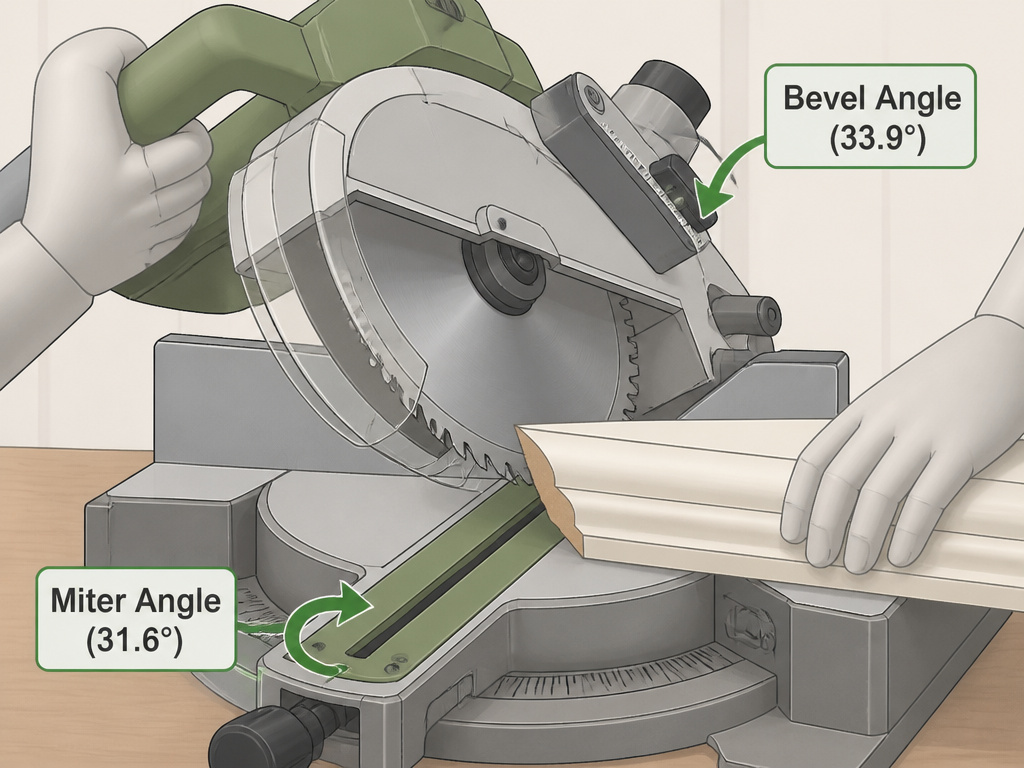
A compound cut combines both a miter and a bevel in one pass. The blade is both tilted (bevel) and the saw head is pivoted (miter). This is essential for complex trim work like crown molding, where the piece has to meet two surfaces that are both angled.
For standard crown molding, the common compound angles are a miter angle of 31.6° and a bevel angle of 33.9°. Your saw has to be capable of both adjustments at once, which is why a compound miter saw is specified for the job. Trying to fudge this with two separate cuts is a fast track to frustration and wasted lumber.
For crown or picture frames, rigidity beats extra cutting capacity every time.
This is where understanding your saw type is critical. A basic miter saw only pivots. A compound miter saw adds a blade that tilts one way. A compound miter saw adds a blade that tilts one way. A sliding compound miter saw adds rails, letting the blade move forward to cut wider boards—a 10-inch sliding miter saw might cut boards up to 12 inches wide.
Common Mistakes and How to Avoid Them
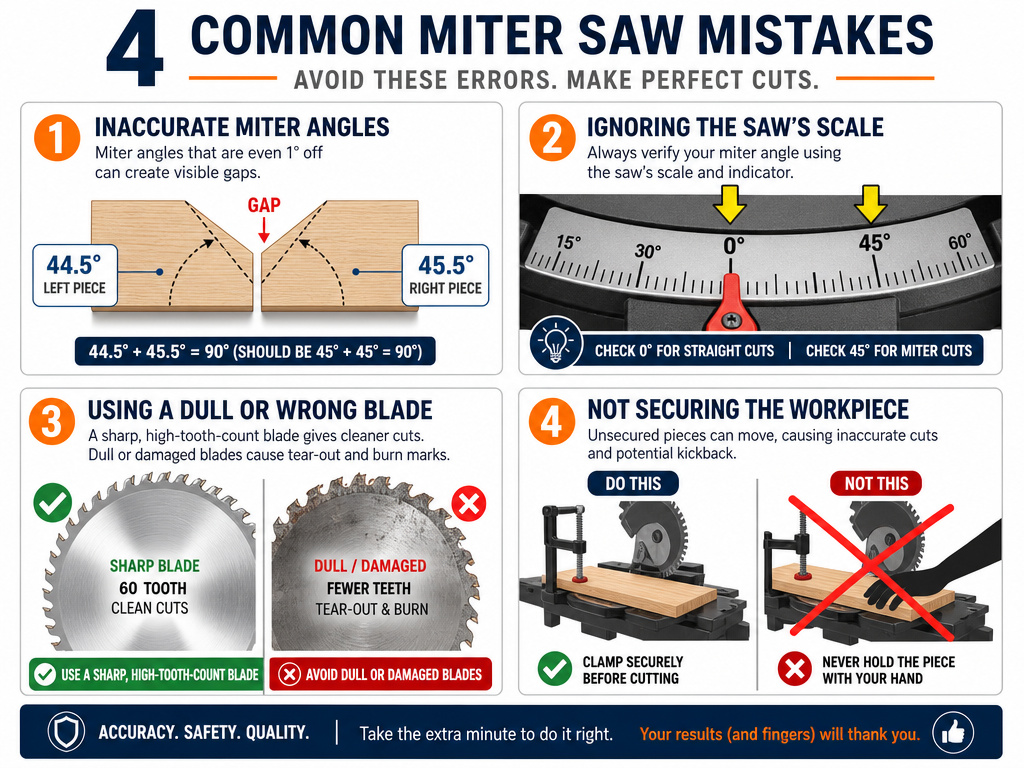
Getting the definition right is step one. Executing it correctly is where most weekend projects stumble. These are the errors I see repeated in workshops.
- Cutting the Wrong Angle for a Corner. You need two 45-degree miters for a perfect 90-degree corner. If your joint has a gap on the outside, your angles are too shallow (e.g., 44.5° + 44.5° = 89°). If the gap is on the inside, your angles are too steep (45.5° + 45.5° = 91°). Adjust your saw a quarter-degree and test again.
- Forgetting the Saw’s Scale. Remember, the miter saw’s 0° is a 90-degree cut. Setting it to 45° gives you a 45-degree miter. This seems obvious until you’re trying to calculate complementary angles for an odd-shaped frame.
- Ignoring Blade Quality. A dull or wrong blade tears wood, especially on bevel cuts through thick material. A clean, sharp blade with a high tooth count is mandatory for precision.
- Skipping the Clamp. Holding a small piece by hand for a bevel cut is asking for trouble. The offcut can bind and get kicked back at high speed. Use the integrated clamp or a bench-mounted hold-down.
Before you start: Wear ANSI Z87.1-rated safety glasses. The noise exceeds 100 decibels, so use earmuffs. Ensure your workpiece is clamped and your saw is on a stable, level surface. Let the blade reach full speed before cutting, and never reach under the blade guard while it’s spinning.
Miter & Bevel vs. Other Cuts (Chamfer, etc.)
You’ll hear other terms like “chamfer.” A chamfer is simply a type of bevel cut, usually at 45 degrees, that removes a sharp corner. It’s a bevel cut for a specific, common purpose. The main difference between a miter and a bevel isn’t the angle degree, but the plane of the wood being modified.
Think of it this way:
- Miter: Adjusts the lengthwise meeting point of two boards.
- Bevel/Chamfer: Adjusts the edge profile of a single board.
When choosing a saw for these jobs, a compound miter saw is the most versatile single tool. For cutting miter joints in trim, it’s unbeatable. If you’re working with sheet goods or long boards, a circular saw set to a bevel cut is often more practical. The key is matching the tool’s strength to the cut’s requirement.
How to set angles on a miter saw
The miter saw’s 0° mark is actually a 90° square cut. To make a miter cut, you pivot the saw head left or right from this zero point. This changes the angle across the face of the board while the blade stays vertical. For a bevel cut, you tilt the blade itself to cut through the thickness of the wood. Start by setting the miter angle to 0 degrees before adjusting the bevel. Remember that a setting of 10° on the miter scale results in board angles of 100° and 80°. For a typical 90-degree corner, set your miter saw to 45 degrees for each piece.
Using other tools (table saw, circular saw)
While a miter saw is built for these cuts, you can create them with other tools. The fundamental geometry remains the same: a miter cut angles across the face of the board, and a bevel cut angles through its thickness. On a table saw, you create a miter by angling the workpiece against the fence, and a bevel by tilting the blade. With a circular saw, you adjust the base plate to set the bevel angle and guide the saw along a marked line for a miter. The key is to securely clamp your workpiece and make test cuts on scrap material to confirm your setup.
Frequently Asked Questions
Is a bevel cut the same as a miter cut?
No. A bevel cut angles through the thickness of the board (the edge), while a miter cut angles across the face of the board (the width). They change different dimensions of the wood. A compound cut uses both at once.
Can a miter saw do a bevel cut?
Yes, if it’s a compound miter saw. Basic miter saws only pivot for miter cuts. Compound miter saws have a tilting mechanism, allowing the blade to be set to a bevel angle. For detailed instructions, see our guide on using a miter saw.
Why would you need a bevel cut?
You need a bevel cut when the edge of the wood, not its end, must meet another surface at an angle. Common uses include creating decorative edges (chamfers), fitting trim on sloped floors, and cutting the compound angles for crown molding. For projects focused on edges, learning about making bevel cuts with different tools is key.
What are the disadvantages of a miter cut?
The main disadvantage is strength. A miter joint has less long-grain gluing surface than a butt joint or a mortise and tenon, making it weaker. It’s primarily an aesthetic joint. For boxes or frames that need to bear weight, reinforcing with splines or nails is recommended. For strong joints, you need the right saws for miter joints and techniques.
Before You Go
The difference between a miter and a bevel is mechanical, not philosophical. One pivots, one tilts. One pivots, one tilts. Your project plans will tell you which one you need. If the instructions call for a 45-degree angle on the end of a board, it’s a miter. If they call for a 20-degree angle along the edge, it’s a bevel.
The single best thing you can do for your next project is a test cut. Set your saw, cut a piece of scrap, and check the angle with a square. That five-minute step saves hours of filling gaps and swearing at misfit joints. And if you’re ever unsure, remember the plane of the wood you’re trying to change. That’s the thing that decides it.
