
What Is an Air Compressor Filter Regulator? How It Works
This post contains affiliate links. As an Amazon Associate, we earn from qualifying purchases.
An air compressor filter regulator is a single unit that first cleans compressed air of water, oil, and debris, then reduces and stabilizes the incoming tank pressure to a safe, consistent level for your tools. The filter stage traps contaminants in a bowl, while the regulator stage uses a spring-loaded diaphragm to precisely control output pressure via an adjustment knob. You need one to protect your pneumatic tools from moisture damage and pressure spikes, and to match air pressure to the specific job, like running a framing nailer at 120 PSI versus a paint sprayer at 40 PSI. A common question is: what is an air compressor filter regulator?
That distinction, filtering versus regulating, is where most shop owners get their first real lesson in pneumatic maintenance, often starting with the what is an air compressor filter regulator question. The filter handles the dirt and water your compressor inevitably makes; the regulator handles the wildly fluctuating pressure that comes straight from the tank. Running a tool on unfiltered, unregulated air is a shortcut that costs you in blown seals, rusted cylinders, and inconsistent performance.
What follows is a breakdown of how this two-in-one unit actually works, the specs that matter when you buy one, where to install it (manufacturers disagree on the ideal distance from the compressor), and how to tell when yours is failing, answering the core what is an air compressor filter regulator inquiry. By the end, you’ll know exactly what to look for on the spec sheet and how to integrate one into your shop air system.
Key Takeaways
- A filter regulator combines two critical jobs: cleaning air (removing water and particulates) and providing stable, adjustable pressure to your tools.
- Match the unit’s flow rate (SCFM or CFM) to your compressor’s output and your highest-demand tool, undersizing chokes performance and overheats the regulator.
- Install the unit downstream of the compressor tank, with Graco advising maximum distance for cooling, while other manufacturers like Chicago Pneumatic do not specify a required distance.
- Drain the filter bowl daily in humid conditions; a bowl that’s more than half full of liquid starts passing water vapor back into your air lines.
- A regulator that won’t hold a set pressure or constantly creeps upward has a worn diaphragm or a clogged vent, it’s failing and needs replacement.
How a Filter Regulator Works: The Two-Stage Process
The unit doesn’t just clean air and then reduce pressure as separate, unrelated tasks. The two stages work in a specific, dependent sequence. Contaminants must be removed first because they jam regulator mechanisms. Pressure must be controlled second because tools have strict upper limits.
The filter stage uses a sintered bronze or pleated paper element housed in a collection bowl. As compressed air enters, it is forced into a cyclonic spin, slinging heavier water droplets and oil mist to the outer wall where they drip into the bowl. Solid particles as small as 5 microns are trapped by the filter media. The regulator stage sits directly downstream. A spring-loaded diaphragm senses the outgoing pressure; turning the adjustment knob compresses or relaxes this spring, which in turn modulates a valve to increase or decrease the air passage, locking in your desired PSI.
The Filter Stage: More Than Just a Strainer
Think of the filter as a centrifugal separator plus a fine sieve. The bowl isn’t a passive container; its shape induces that vital spin. You’ll hear the difference when it’s working, air entering a dry, clean filter has a steady hiss. Air pushing through a bowl half-full of water gains a gurgling, choked tone, a sure sign you’ve missed a drainage cycle.
The filtration grade is the smallest particle size it can catch. Common grades are 40 micron (think fine dust) and 5 micron (bacteria-sized). For general shop use, a 40-micron filter is common. The 5-micron filter provides finer filtration for applications requiring very clean air. For Festo Filter-Regulator-Lubricator FRC units, switching from a 40-micron to a 5-micron cartridge reduces flow by about 20%.
The Regulator Stage: Your Pressure Thermostat
The regulator is a feedback loop. Set the knob to 90 PSI, and the internal diaphragm works to maintain that output, regardless of whether the tank pressure is 150 PSI or 110 PSI. The critical spec here is hysteresis, the maximum amount the output pressure might drift from your set point under varying flow. For a Festo MS4N-LFR, the maximum hysteresis is 3.7 PSI. A regulator with high hysteresis may cause tool performance to vary under changing flow conditions.
Why You Can’t Skip a Filter Regulator
You can technically hook a tool directly to the compressor tank outlet. For inflating a tire, that’s fine. For any tool with moving parts, a nailer, sander, or spray gun, it’s destructive. Unfiltered air carries water vapor that condenses inside the tool, leading to rust. It carries compressor oil that gums up valves. Unregulated air subjects the tool to the tank’s full pressure, which can exceed the tool’s maximum rating, blowing seals and O-rings.
The financial math is simple. A mid-range filter regulator costs less than replacing the cylinder kit on a single pneumatic nailer. It also saves your project: a paint sprayer fed with wet air will spit water droplets, ruining a finish. A die grinder running on surging pressure will cut unevenly.
Common mistake: Mounting the regulator right at the compressor head to save hose length. Hot, saturated air straight from the compressor carries more moisture in vapor form, which the filter can’t yet condense and trap. You end up with a dry bowl but wet tools downstream.
Key Specifications and How to Read Them
Shopping for a filter regulator means matching three numbers to your setup: flow capacity, pressure range, and port size. Getting one wrong means the unit becomes a bottleneck or a safety risk.
| Specification | What It Means | Why It Matters |
|---|---|---|
| Maximum Flow Rate (SCFM/CFM) | The volume of air the unit can pass with minimal pressure drop. | Must meet or exceed your tool’s highest air consumption. Undersizing chokes the tool. |
| Inlet Pressure Range | The maximum pressure the unit can accept from the compressor. | Must be higher than your compressor’s cut-out pressure. Exceeding this can rupture the bowl. |
| Controlled/Outlet Pressure Range | The span of pressures you can dial in for your tools. | Must cover your needed PSI. A range of 4.4–176 psi (like the Festo MS4N-LFR) is a common wide range. |
| Port Size (NPT) | The thread size of the inlet and outlet connections. | Must match your hose or pipe. A 1/4″ NPT port on a high-CFM unit is a flow bottleneck. |
| Filtration Grade (µm) | The size of particles the filter element can trap. | 40 µm for general shop use; 5 µm for painting or sensitive air logic. |
Flow Rate: The Make-or-Break Number
This is the most common sizing error. If your compressor outputs 10 SCFM at 90 PSI and your biggest tool (say, a sandblaster) needs 8 SCFM, your filter regulator must be rated for at least 10 SCFM. Otherwise, pressure drops under load, and the tool stalls. Manufacturers measure this under specific conditions. For example, Graco rates their Filter Regulator Combination models at 105 psi inlet, 90 psi set, with a 17 psi drop. Festo uses different test conditions for different models; for example, their FRC units are tested at 150 psi inlet, 90 psi set, with a 15 psi drop. You can’t compare numbers across brands without checking their test pressure.
The Port Size vs. Flow Mismatch
A unit can have a generous flow rating but a small port, creating a bottleneck. For instance, a Graco 133216 (Intermediate) is rated for 63 CFM and has a 1/4″ NPT port. That’s fine for most 1/4″ hose setups, but if you’re using 3/8″ hose for high-demand tools, you’ve created a restriction right at the regulator. For high-flow systems, step up to a unit with a 1/2″ NPT port, like the Graco 133545, rated for 106 CFM.
Choosing the Right Model: A Comparison
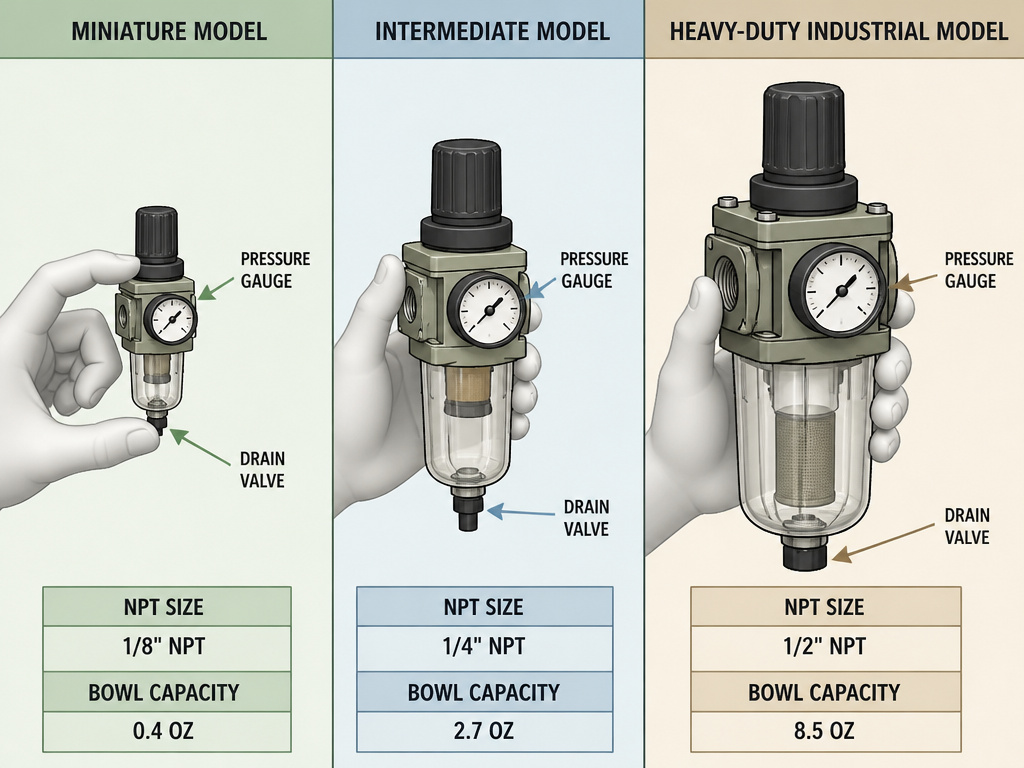
Your shop size and tool arsenal dictate the tier. Here’s how three common classes stack up for different users.
| Model Type | Best For | Typical Specs | Real-World Limitation |
|---|---|---|---|
| Miniature (e.g., Graco 133215) | Small compressors (<4 HP), single low-air-use tools like nailers. | 1/4″ NPT, ~20 CFM flow, 0.3 oz bowl. | The small bowl requires frequent draining to prevent overfilling. |
| Intermediate/General Duty (e.g., Festo MS4N-LFR-D6) | Home workshops, auto garages running multiple tools. | 1/4″ or 3/8″ NPT, 53-63 SCFM flow, 1-1.5 oz bowl. | |
| Heavy Duty/Industrial (e.g., Graco 133546) | Large shops, sandblasters, high-CFM demands. | 3/4″ NPT, 149+ CFM flow, 5.6 oz bowl. |
It handles the flow for an impact wrench and a paint gun without breaking the bank.
Where this goes sideways: Buying a miniature unit because it’s cheap and looks similar, then wondering why your die grinder bogs down after 30 seconds. The regulator overheats trying to push more air than it’s rated for, and the pressure drop is immediate.
Installation: Location, Plumbing, and Safety
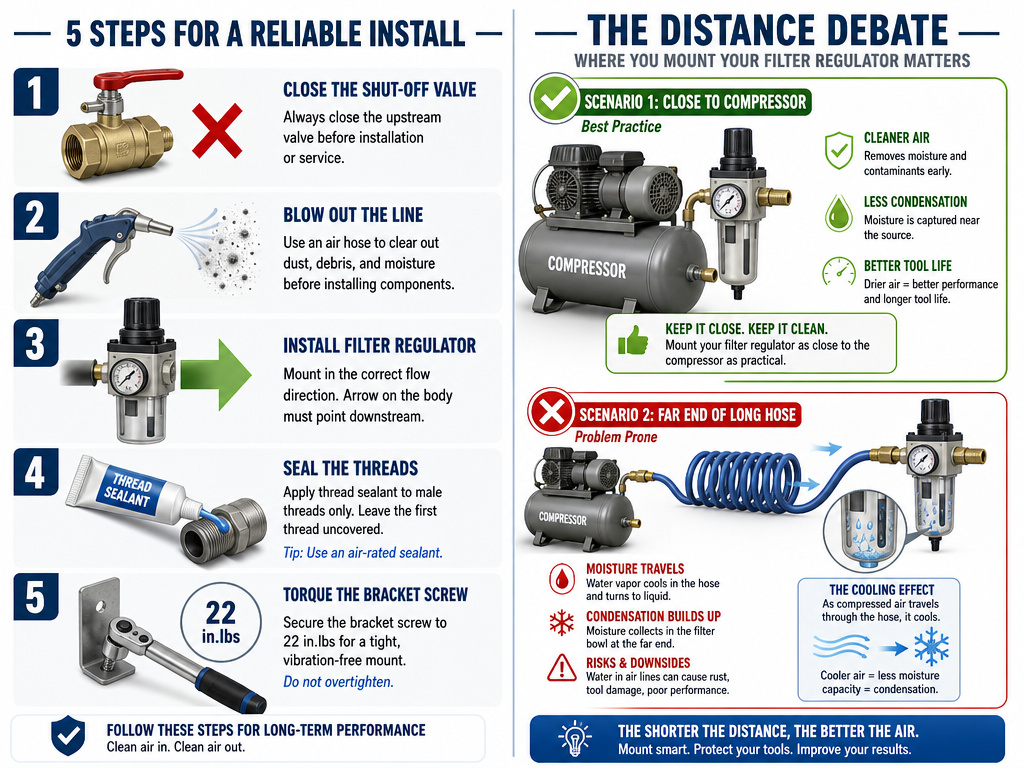
The manuals from Graco and Chicago Pneumatic agree on some steps and disagree on others. Following the strictest advice covers all bases.
- Depressurize the System: Always shut off the compressor and bleed all air from the tank and lines before touching any fittings. This isn’t just safety, it prevents a violent, unexpected disconnect.
- Clean the Lines: Before connecting the new unit, blow out your air lines. As Chicago Pneumatic warns, dirt particles can cause serious malfunctions if they get lodged in the regulator diaphragm.
- Install in the Correct Direction: The arrow on the housing points in the direction of airflow, from the compressor toward the tools. Reversing it destroys the filter element and jams the regulator.
- Seal Threads Sparingly: Use thread tape or a liquid sealant only on the male threads. Avoid pastes or fibers that could enter the unit, as Chicago Pneumatic cautions these cause serious malfunctions.
- Mount Securely: Use the provided or recommended bracket. For a Chicago Pneumatic FRL 1/2″ model, the maximum tightening torque for the wall bracket screws is 2.5 Nm (22 in.lbs). Overtightening cracks the mounting lugs.
The Distance Debate: Far Away or Close Up?
Graco’s manual has a specific, counterintuitive command: “Install the filter regulator as far away from the compressor as possible to allow the air to cool and the moisture to condense.” The goal is to let the air line act as a preliminary cooler, so more water drops out in the filter bowl. Other manuals, like Chicago Pneumatic’s, omit this distance advice, focusing instead on clean lines and correct orientation. When in doubt, follow Graco’s rule, adding additional hose between the tank and the regulator can help air cool and condense moisture.
Operation and Maintenance: The Daily Ritual
Using a filter regulator isn’t a set-and-forget deal. Its health directly dictates your tool’s health.
- Setting Pressure: With the tool off and the air on, turn the regulator knob clockwise to increase pressure, counter-clockwise to decrease. Watch the output gauge, not the tank gauge. Let the pressure stabilize for a few seconds after each adjustment.
- Draining the Bowl: This is essential. In daily use, drain the bowl at the end of every work session. In humid conditions, drain it twice a day. A bowl that is too full can impair separation and allow liquid to pass into the regulator.
- Cleaning the Bowl: If the bowl looks cloudy or dirty, remove it (depressurized system only!). Graco instructs to clean the bowl with soap and water or neutral detergent and warns against synthetic oils, thinner, solvents, trichloroethylene, kerosene, or aromatic hydrocarbons. Chicago Pneumatic specifies warm water and normal washing-up liquid and warns against a different list including acetone, benzol, brake fluid, and others. Graco warns polycarbonate bowls may fail if exposed to synthetic oils, thinner, solvents, trichloroethylene, kerosene, or aromatic hydrocarbons.
Troubleshooting a Failing Filter Regulator
Even with care, parts wear out. Here’s how to diagnose the most common failures.
| Symptom | Likely Cause | Immediate Fix | Long-Term Solution |
|---|---|---|---|
| Pressure drops under tool load. | Filter element clogged, restricting flow. | Check filter condition; replace if dirty. | Install a pre-filter or drain bowl more often. |
| Pressure won’t adjust down. | Regulator diaphragm torn or stuck. | Tap regulator body gently; try adjusting again. | Replace regulator repair kit or entire unit. |
| Pressure creeps up over time. | Regulator exhaust port clogged, diaphragm not venting. | Clean vent port with compressed air (system depressurized). | Replace diaphragm/seat assembly. |
| Water in downstream tools. | Bowl full, automatic drain failed, or filter element saturated. | Manually drain bowl completely. | Replace filter element, repair/replace auto-drain. |
| Air leak from bowl or housing. | Cracked bowl, damaged O-ring, or loose body connection. | Tighten housing bolts, inspect O-ring. | Replace bowl or O-ring kit. |
Easy to miss: A lubricator section on a combined FRL unit (Filter-Regulator-Lubricator) has its own minimum flow requirement. Festo states their FRC lubricator needs a minimum flow of 4 SCFM to function. If you’re running a tool below that flow, the lubricator may not function properly.
How to adjust/set the regulator pressure
Adjusting the regulator pressure is a straightforward task. First, ensure your air system is pressurized and that a tool is connected downstream or the outlet is blocked to get an accurate reading. Locate the adjustment knob or screw on the regulator section, typically marked with a plus and minus sign. Turn the knob clockwise to increase the outlet pressure or counter-clockwise to decrease it, watching the built-in pressure gauge as you make changes. Always set the pressure to the specific requirement of the tool you are using, staying within the regulator’s stated working pressure range. Once set, lock the knob if your model has a locking feature to prevent accidental changes.
Frequently Asked Questions
Can I use an air compressor without a regulator?
You can for simple inflation tasks where pressure isn’t critical. For any pneumatic tool, a nailer, sander, spray gun, or impact wrench, you should not. Tools have maximum pressure ratings; exceeding them with raw tank pressure damages internal seals and can be dangerous. A regulator provides consistent, appropriate pressure for the job.
How to tell if an air compressor regulator is bad?
Three clear signs: 1) It won’t hold a set pressure, drifting up or down without tool use. 2) You can’t adjust the pressure across its full range, the knob turns but the gauge doesn’t move. 3) It leaks air continuously from the exhaust port or body seams. Any of these mean the internal diaphragm is torn or the valve seat is worn.
What’s the difference between tank pressure and regulated pressure?
Tank pressure is the high, variable pressure stored in the compressor tank (e.g., 150 PSI). Regulated pressure is the lower, steady pressure you set on the regulator’s knob for your tool to use (e.g., 90 PSI). The regulator reduces and stabilizes the tank pressure, protecting your tool from spikes and drops.
How often should I drain my filter regulator bowl?
Drain it daily under normal use. If you’re operating in a humid environment or for extended periods, drain it every few hours or install an automatic drain kit. The goal is to never let the liquid level rise more than halfway up the bowl.
Is a 5-micron filter better than a 40-micron?
It’s finer, but “better” depends on your need. A 5-micron filter traps smaller contaminants, essential for paint spraying or sensitive air logic systems. However, it also creates more airflow restriction. Festo notes about a 20% flow reduction. For general workshop use, a 40-micron filter offers a better balance of protection and flow.
Before You Go
The filter regulator isn’t an accessory; it’s the gatekeeper of your pneumatic system. Its job is straightforward: take the dirty, erratic air from your compressor and make it clean and steady for your tools. The choice isn’t whether you need one, but which one you need.
Match the unit’s flow rating to your biggest tool’s appetite, and don’t let a small port size strangle your air supply. Install it with enough hose after the compressor to let the air cool, and make draining its bowl as habitual as wiping your saw blade. When the regulator starts creeping or leaking, replace it, the cost of a new unit is always less than the cost of the tools it fails to protect. Your air system is only as reliable as its weakest point, and the filter regulator is the piece that decides whether that point is a failure or a foundation.
