
When to Replace a Power Saw Blade: The Bottom Line
This post contains affiliate links. As an Amazon Associate, we earn from qualifying purchases.
Replace a power saw blade when you see burning, hear straining, feel excessive resistance, or find physical damage like chipped teeth. For the Mitek Twin Axis Sheathing Saw, the rule is weekly checks and a hard discard diameter of 13.5 inches (342 mm). A dull blade doesn’t just cut poorly, it increases kickback risk and can ruin your workpiece or the tool’s motor.
That 13.5-inch minimum isn’t a suggestion. It’s a safety line drawn by the machine’s manufacturer, Mitek-US, in their service bulletin. When a blade wears down past that point, its structural integrity is compromised, and the risk of catastrophic failure, snapping, throwing shrapnel, goes up exponentially. This measurement is a key indicator for when to replace a power saw blade.
What follows is the breakdown you won’t find in a quick online list: the four universal failure signs, the specific diameter thresholds from OEM manuals, the shift-by-shift inspection routine used in lumber mills, and the real cost math on sharpening versus replacing a carbide blade when to replace a power saw blade.
Key Takeaways
- Burn marks and a pungent burnt-wood smell are the first and most reliable signs of a dull blade forcing its way through material.
- Listen for a labored motor whine and feel for increased push pressure, your tool is telling you it’s working too hard.
- Measure blade diameter against the manufacturer’s discard minimum (often 13.5″, 16″, or 16-5/8″ for industrial saws); a smaller blade is unsafe.
- Inspect for physical damage every time you use the saw, a single missing carbide tooth creates a violent imbalance.
- For carbide-tipped blades, professional re-tipping is often cheaper than a new blade if the steel plate is undamaged.
The 4 Universal Signs a Blade Needs Replacing
You don’t need a micrometer to know a blade is finished. Your senses will tell you, loudly and clearly, long before a cut is ruined. These signs apply to a circular saw, miter saw, table saw, or even a jigsaw.
First, look at the cut. If you see dark brown or black scorch marks along the edge of the wood, the blade is dull. A sharp blade slices fibers cleanly; a dull one rubs against them, creating friction heat. That heat chars the wood. You’ll often smell it before you see it, a sharp, acrid scent of burning pitch.
Next, listen to the tool. A healthy saw makes a clean, aggressive zip. A saw with a dull blade produces a higher-pitched, straining whine. The motor is working harder to achieve the same cut, and the sound is unmistakable. Your hand will feel it, too. Instead of the tool feeding smoothly through the material, you’ll find yourself applying significant forward pressure. The cut feels like a grind.
Finally, examine the blade itself in good light. Look for:
- Chipped or missing carbide teeth. Even one missing tooth throws the blade wildly out of balance, causing vibration that damages the saw’s bearings.
- A rounded-over cutting edge. The sharp, square corner of the tooth should be distinct. If it looks polished and rounded, it can’t bite.
- Significant gumming or pitch buildup. While cleaning can fix this, heavy, baked-on residue insulates the teeth and prevents them from cutting effectively.
A dull blade doesn’t just make bad cuts. According to the Mitek-US service bulletin for their Twin Axis Sheathing Saw, “Dull blades cause high kickback forces which can cause injury.” The blade binds, the saw jerks, and control is lost in a fraction of a second.
The Critical Measurements: Diameter and Schedule
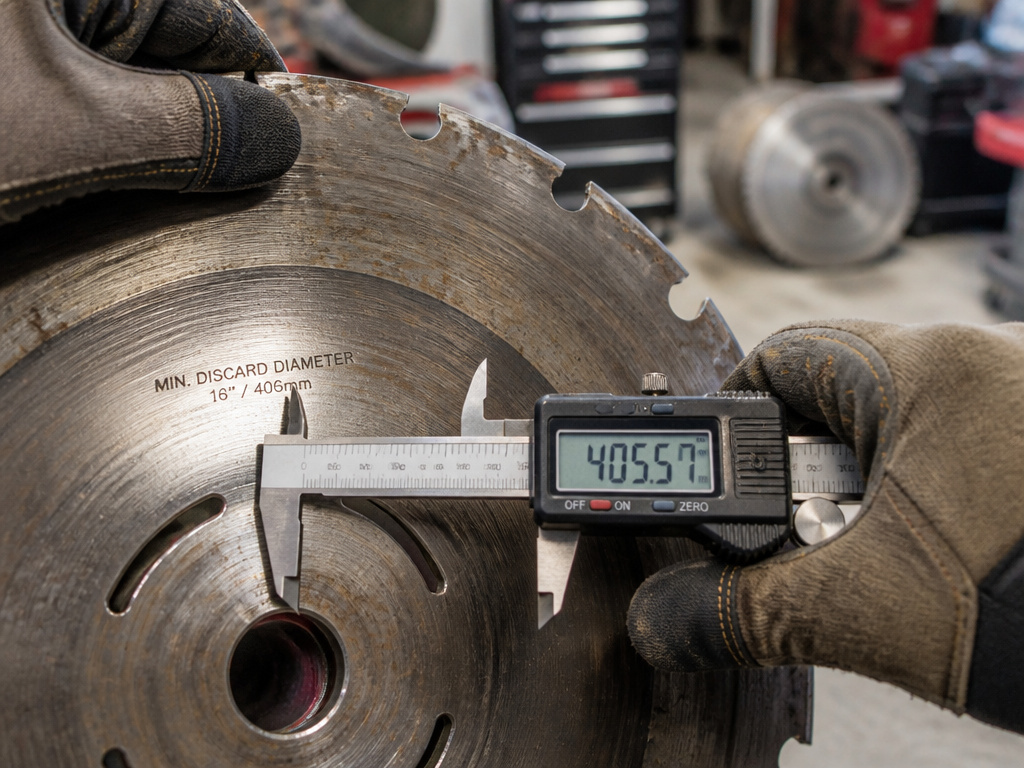
For industrial saws running in shifts, replacement isn’t about feel, it’s about cold, hard numbers and calendars. The OEM service bulletins give two required metrics: minimum blade diameter and replacement frequency.
| Saw Model (Mitek-US) | Minimum Discard Diameter | Replacement Schedule | Blade Part Number |
|---|---|---|---|
| Twin Axis Sheathing Saw | 13.5 inches (342 mm) | Check weekly | 811006 (13.8″) |
| Floor Web Saw | 16 inches | Angled: 1 month (1 shift) / 2 weeks (2 shifts) | 811040 (16″) |
| BLADE / BLADE II Saw | 16-5/8 inches (425 mm) | Check every shift | 811071 (17″) |
The “check every shift” mandate is critical. For the BLADE saw, the manual states the operator must check diameter, look for cracks or warping, and observe for wobble during operation every single shift. If the diameter is under 16-5/8 inches, the blade is removed and discarded immediately. This isn’t overkill. A blade worn beyond its minimum diameter has less structural mass at the rim, increasing centrifugal force on a thinner body. It can crack or shatter.
For home workshops, the when to replace a power saw blade question isn’t governed by a service schedule. But the principle stands: measure your blades periodically. A blade loses diameter with each sharpening.
What Most People Get Wrong: Cleaning vs. Replacing
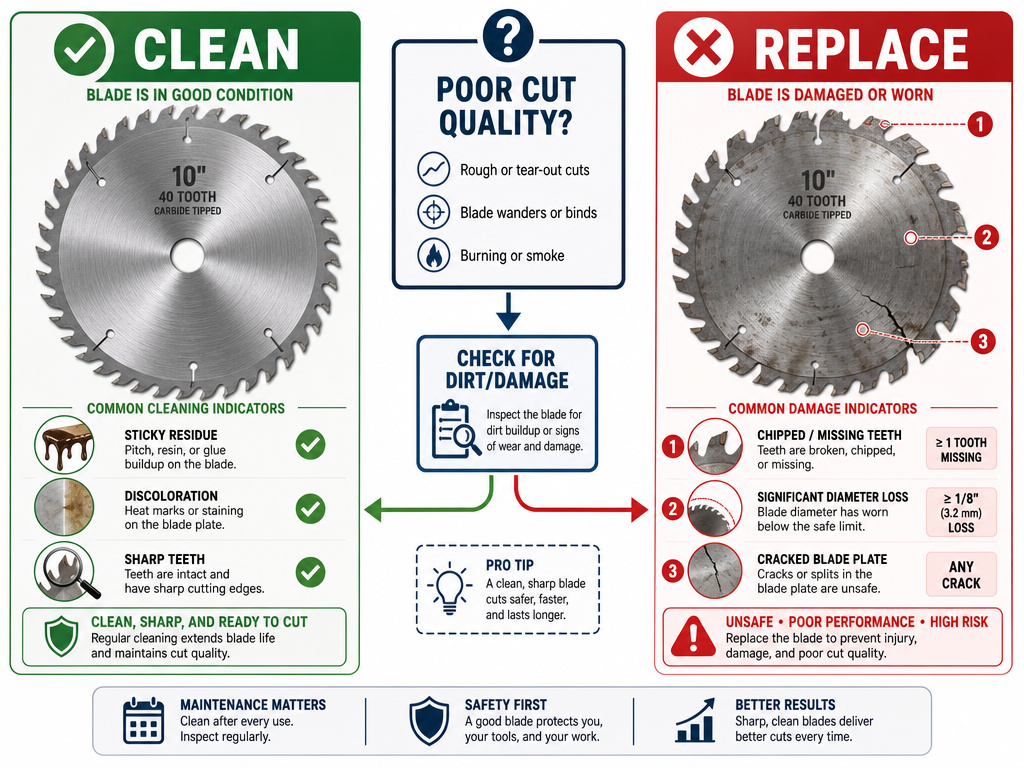
A gunky blade looks terrible and cuts poorly, leading many to think it’s dull. Often, it’s just dirty. Knowing the difference saves you a $80 blade.
Clean a blade if: The cut quality has gradually declined, the blade is discolored with sap or pitch, and the teeth feel sticky but still look sharp under a magnifier. The process is simple:
- Soak the blade in a dedicated blade cleaner or a simple solution of warm water and dish soap.
- Use a plastic brush or old toothbrush to scrub away softened residue. Never use a metal brush, it can damage carbide.
- Dry the blade thoroughly to prevent rust. A quick pass with a hairdryer works.
Replace a blade if: Cleaning doesn’t restore performance, you find physical damage, or the blade is under the minimum diameter. The SKIL tool warranty is a blunt reminder: “THIS LIMITED WARRANTY DOES NOT APPLY TO ACCESSORY ITEMS SUCH AS CIRCULAR SAW BLADES.” They’re consumables, like sandpaper.
Common mistake: Thinking a wobbly cut is always a dull blade. Often, it’s a dirty blade, a warped blade, or a blade that wasn’t installed tightly. Check the arbor nut and flange before you condemn the blade.
Sharpening vs. Replacing: The Carbide Math
With a basic steel blade, replacement is almost always the answer. Sharpening them is rarely cost-effective. For carbide-tipped blades, the standard for circular and miter saws, the calculation changes.
Re-tip (Professional Sharpening): This is where a shop grinds a new edge onto your existing carbide teeth. Re-tipping costs vary depending on blade size and tooth count.
- Pros: Saves money over buying a comparable new blade. Preserves a known, high-quality steel plate. Environmentally less wasteful.
- Cons: Each sharpening removes material, reducing the blade’s overall diameter and slightly changing its cutting geometry. The carbide tooth itself can only be sharpened a limited number of times before it’s too small.
Replace: Buying a brand-new blade.
- Pros: Full diameter, perfect factory geometry, and a fresh, sharp edge. No history of potential damage.
- Cons: Full retail cost. The quality lottery if you’re buying an unfamiliar brand.
The verdict: For a carbide-tipped blade with an undamaged steel plate, re-tipping is often a cost-effective option. For an inexpensive blade, replacement is often simpler. If the steel plate is bent or the body is cracked, replacement is your only option. Our guide on sharpening a circular saw blade by hand covers the DIY approach, but for consistent results, I send mine out.
The Step-by-Step Safe Replacement
Installing a new blade is straightforward, but rushing it is how accidents happen. The industrial procedures emphasize lockout/tagout for a reason. For your workshop, unplug the saw or remove the battery.
- Disconnect Power. This is essential. For corded tools, pull the plug. For cordless, remove the battery pack.
- Retract the Lower Guard. On a circular saw, use the retraction lever to hold the guard open for access.
- Lock the Spindle. Most saws have a spindle lock button. Depress it to keep the arbor from spinning. If your saw doesn’t have one, place a scrap block of wood against the blade to jam it.
- Loosen the Arbor Nut. Use the provided wrench (usually found on the saw’s shoe) to turn the nut in the direction opposite the blade’s rotation, typically lefty-loosey. The spindle lock should hold.
- Remove the Old Blade. Carefully take off the outer flange (washer) and the old blade. Note the direction the blade was facing; the teeth should point upward at the front of the saw.
- Clean the Surfaces. Wipe the inner flange and arbor threads clean of any sawdust or pitch. The Mitek BLADE II manual is adamant: “Mounting surfaces and hardware must be clean and dry… Dust, dirt, and lubrication may cause the blade to come loose.”
- Install the New Blade. Place the new blade on the arbor, ensuring it’s facing the correct direction. Replace the outer flange and hand-tighten the arbor nut.
- Tighten Securely. Re-engage the spindle lock and use the wrench to firmly tighten the nut. Don’t over-torque it, but ensure it’s snug.
Once replaced, do a test cut on scrap wood. Listen for smooth operation. If you notice any new vibration, stop and re-check the installation. A wobbly blade often means it’s not seated flush against the flange.
Industrial Specs and Why They Matter to You
The factory specifications for industrial blades reveal the engineering behind a clean cut. They’re not just trivia; they explain why a blade acts a certain way.
Take the Mitek Floor Web Saw blade (part #811040). Its spec sheet lists a 10º hook angle and a 0º face angle. Hook angle is the amount the tooth leans forward. A positive hook (like on a rip blade) aggressively pulls material in. A negative hook (like on a sliding miter saw blade) resists self-feeding for better control. The Floor Web Saw uses a moderate positive hook for efficient cutting.
The Twin Axis Sheathing Saw has a strict rule: “ONLY a NEGATIVE HOOK saw blade should be used. Positive hook causes inconsistent cut lengths and material grabbing.” Using the wrong hook angle here doesn’t just make a bad cut, it creates a dangerous jam.
For your home saw, this translates to blade selection. Using a high-positive-hook framing blade on a sliding miter saw can cause it to self-feed violently. Using a negative- or zero-hook blade on a table saw for ripping will require excessive feed force. Matching the blade’s design to the tool and task is as important as it being sharp. Our comparison of carbide and steel saw blades dives deeper into material choices.
How to test if a saw blade is sharp
Your senses are the first tool for checking sharpness. Look closely at the teeth for any that are chipped, missing, or visibly rounded over. Feel the cutting edges carefully with your thumb; a sharp tooth should catch on your skin, not slide off. Listen to the cut. A sharp blade moves through material with a clean, steady sound, while a dull one will labor, whine, or produce a burning smell. For a practical check, try a light test cut in a scrap piece of the material you’re using. If the saw struggles, forces the material, or leaves a ragged, burned edge, the blade is no longer doing its job.
How to store and maintain a saw blade
Proper storage and routine maintenance significantly extend blade life. After each use, clean the blade of any pitch or resin buildup using an appropriate solvent and a soft brush. Always store blades in a dry place within the recommended temperature range to prevent corrosion. Ensure the mounting surfaces and hardware are clean and dry before installation. Before each use, conduct a visual and physical inspection. Check that all bolts holding the blade are secure, look for any cracks or warping, and confirm the blade spins true without wobble. A blade that is clean, properly mounted, and inspected regularly will stay sharper and safer for longer.
Frequently Asked Questions
How long should a saw blade last?
There’s no single answer. A blade cutting only soft pine can last for years of DIY use. The same blade cutting abrasive material like MDF, pressure-treated lumber, or old wood with hidden nails might be dull in an afternoon. Industrial schedules like the Mitek Floor Web Saw’s (replace angled blades monthly on a single shift) are based on continuous runtime in commodity lumber.
My new blade is burning the wood. Why?
Brand-new blade can burn wood if it’s installed backwards, if the feed speed is too slow, or if it’s the wrong type of blade for the material. Ensure the teeth are pointing upward at the front of the saw. Push the material at a steady, confident pace. Also, check our article on the causes of wood burning with a circular saw for a full diagnostic.
Can I sharpen a saw blade myself?
You can, but it’s a skilled task requiring a dedicated jig and a diamond file for carbide. It’s very easy to ruin the tooth’s complex geometry (face angle, top angle, hook angle). For most people, professional sharpening is more reliable and cost-effective. If you’re determined, our guide on hand-sharpening a circular saw blade walks you through it.
Is blade wobble always a sign it needs replacing?
Not always. First, ensure the blade is clean, properly installed, and that the arbor nut is tight. Then check that the blade itself isn’t bent. If the wobble persists with a known-good, tightly installed blade, the issue could be a bent arbor or worn saw bearings, a more serious repair.
The Bottom Line
Stop guessing. The signs are physical and unambiguous: look for burns, listen for strain, feel for drag, and look for damage. For the shop, adopt the mill’s discipline: inspect the blade before any major project. Run your finger down the teeth (carefully!) to feel for sharpness. Look for that glint of a clean edge.
And remember the diameter rule. It’s the one metric that never lies. If a blade is worn down enough to measure smaller, it’s not just dull, it’s becoming a liability. That’s when replacement stops being a matter of cut quality and becomes a matter of simple safety. Keep a sharp one on hand, and you’ll never have to wonder again.
