
Why Is My Nail Gun Not Sinking Nails? A Diagnostic Guide
This post contains affiliate links. As an Amazon Associate, we earn from qualifying purchases.
A nail gun not sinking nails is almost always a mismatch between air pressure, fastener size, and material density. The fix is a systematic check of five things: your compressor’s air pressure and CFM output, the nail gun’s depth-of-drive setting, the compatibility of the nail size and type, the tool’s internal cleanliness, and the condition of critical seals like the O-ring.
That mismatch sounds simple, but it shows up in a dozen different ways. A nail that leaves a dent but doesn’t fire is a different problem from a nail that fires but sits proud of the wood. One points to a mechanical failure inside the gun; the other points to your air supply or a simple adjustment you missed. If you’re wondering ‘why is my nail gun not sinking nails’, the process below is the same one a pro would follow in the shop: start with the air, move to the adjustment, then check the hardware, and finally open the tool.
What follows is a five-step diagnostic path, built from manufacturer service manuals, that covers the common fixes and the less obvious ones, like why your gun works fine in July but starts failing in a cold garage by November, answering the why is my nail gun not sinking nails question.
Key Takeaways
- Start with the air supply: confirm your compressor delivers 70–120 PSI (per your tool’s manual) and enough CFM (cubic feet per minute); a framing nailer needs 5–6 CFM, a brad nailer needs 1–2 CFM.
- The depth adjustment wheel is your primary control; turn it toward the “deeper” setting (often a “+” or inward arrow) in small increments and test on scrap wood.
- Nail size and type are not optional: using nails outside the tool’s specified diameter or length range, or switching between angled collations on a multi-use gun, will cause immediate jams or weak drives.
- A worn O-ring or firing valve seal causes a distinct, hollow pfft sound instead of a solid thwack; replacement kits (like Senco’s YK0908) are model-specific.
- In cold weather, lower the compressor’s pressure to 80 PSI or less for startup, actuate the tool 5–6 times into scrap to warm the seals, then adjust to operating pressure.
The 5-Step Diagnostic Check (Start Here)
Before you open the tool or buy new parts, run through this sequence to solve the why is my nail gun not sinking nails problem. It solves about 80% of “nail not sinking” problems in under five minutes. Manufacturers disagree on when to load fasteners: the Harbor Freight 61731 manual says to load fasteners after connecting the tool to the air supply, while the Powernail Model 50F manual warns not to connect air to a loaded nailer to prevent misfire.
Before you start: Disconnect the air hose from the nail gun. Wear ANSI Z87.1 approved safety glasses. Never point the tool at yourself or anyone else, even when you believe it’s empty.
- Check the Air Supply. Is the compressor on? Is the tank pressure above your required operating PSI (check the tool’s casting or manual)? Listen for leaks at the hose connections, a hiss means you’re losing power.
- Test Fire on Scrap. Reconnect the air, load the correct nails, and fire one into a piece of scrap wood identical to your workpiece. Observe the nail head depth. Does it sink? If not, proceed.
- Adjust the Depth. Locate the depth-of-drive adjustment wheel, usually near the nose. Turn it one full rotation toward the “deeper” direction. Fire another test nail. Repeat until the nail sinks flush or you’ve turned it 3-4 rotations with no change.
- Inspect the Fastener. Is the nail the exact type, angle, and length listed in your manual? A 2-inch smooth shank in a gun built for 2-1/2 inch ring shanks will jam before it ever gets enough momentum to drive home.
- Listen to the Sound. A healthy pneumatic nail gun makes a sharp, solid thwack. A weak, hollow pfft or a double-fire pop-pop indicates internal problems, low pressure, a clog, or a worn seal. That sound tells you which section to read next.
If you’ve done all five steps and the nail still won’t sink, the problem is inside the tool or your air system can’t keep up. The next sections break down each major cause.
Cause 1: Low or Unstable Air Pressure
This is the most common culprit. Your nail gun needs two things from the air: sufficient pressure (PSI) and sufficient volume (CFM). Getting one wrong feels the same as the other at the trigger.
PSI (Pounds per Square Inch) is the driving force. Every manufacturer specifies a range.
| Tool Model | Minimum PSI | Maximum PSI | Source |
|---|---|---|---|
| Senco BN31M1P Brad Nailer | 70 | 120 | Senco Operations Manual |
| DeWALT DWFP12233 Brad Nailer | 70 | 120 | DeWALT Instruction Manual |
| Harbor Freight 61731 Framing Nailer | 70 | 120 | Harbor Freight Manual |
| Powernail Model 445 Flooring Nailer | 80 | 110 | Powernail Model 445 Manual |
Set your compressor’s regulator to a pressure within your tool’s specified range. A gauge reading 120 PSI at the compressor tank does not mean 120 PSI at the gun after 50 feet of hose. Check it with a second gauge at the tool inlet if you can.
CFM (Cubic Feet per Minute) is the volume of air the gun consumes per minute. If your compressor can’t deliver it, pressure drops with each shot.
- The Senco BN31M1P uses 2.4 scfm at 60 cycles per minute.
- The DeWALT DWFP12233 uses 1.15 cfm at 80 PSI.
- The Harbor Freight 61731 framing nailer needs 5.8 CFM @ 90 PSI.
A small “pancake” compressor might have a low CFM output. It will run a brad nailer all day but will stagger and fail with a framing nailer, causing nails to drive halfway and stop. The fix is a bigger compressor or slower nailing to let the tank recover.
Where this goes sideways: Assuming a full tank means full power. As the tank empties, CFM drops. On a long run, you’ll hear the motor kick on more often and nails will start sitting proud. Wait for the tank to refill, or get a compressor with a higher CFM rating.
Cause 2: Incorrect Depth-of-Drive Setting
Every pneumatic nailer has a depth adjustment. It’s a wheel or dial that moves the nose piece up and down, changing how far the driver blade extends. It’s your first fix after checking air pressure.
The mechanism is simple. Turning the wheel moves the nose closer to the workpiece. This allows the driver blade to travel its full distance, pushing the nail deeper. On most guns, turning toward the “+” symbol or an inward arrow increases depth.
Here’s the full process for adjusting depth:
- Disconnect the air hose.
- Locate the wheel, usually where the nose meets the main body.
- Turn it one full rotation in the “deeper” direction.
- Reconnect air, fire a test nail into scrap wood identical to your project material.
- If the nail is still proud, repeat steps 1-4. If it sinks too deep (below the surface), turn the wheel back a half-rotation.
Hardwoods like oak need more force than softwoods like pine. You must readjust when you switch materials. A setting that sinks a nail perfectly in pine will leave it sticking out of oak.
The Harbor Freight 61731 manual notes its anti-dry-fire mechanism engages with about 3 nails left. If you’re down to the last few and getting weak drives, that’s the mechanism, not your depth setting. Reload.
Cause 3: Wrong Nail Size, Type, or a Jam
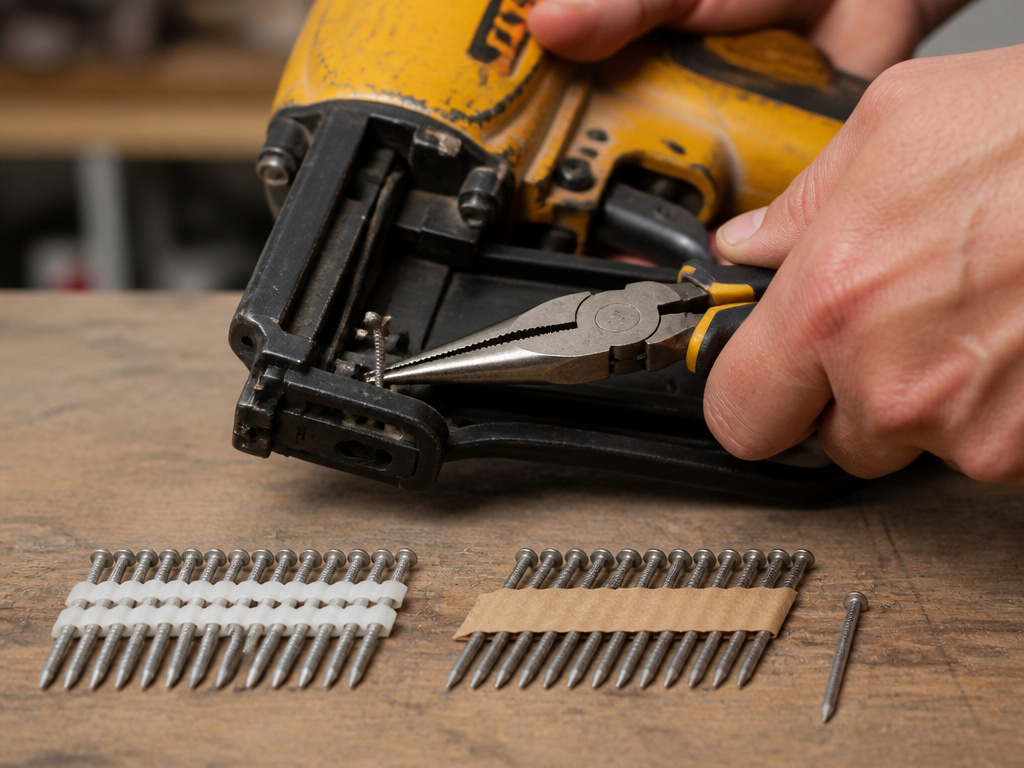
Nail guns are precision instruments. The difference between a 0.113″ and a 0.131″ nail diameter is the difference between feeding smoothly and jamming solid. Using the wrong nail is a direct path to weak drives or total failure.
Your tool’s manual lists exact specifications. Here are a few from our sources:
- Senco BN31M1P: Uses 18-gauge brads with a .050″ (1.27mm) shank diameter.
- Harbor Freight 61731: Accepts nail diameters from 0.113″ to 0.131″ (2.87 – 3.33 mm). Using a 0.099″ finish nail in this gun is guaranteed to misfeed.
- Powernail Model 445: Uses 16 gauge Powercleats nails only. No substitutes.
Collation angle matters just as much. A gun designed for 21-degree plastic-strip nails will not feed 34-degree paper-tape nails, even if the nail itself is the right length. The magazine and pusher are built for a specific angle.
How to clear a basic jam:
- DISCONNECT THE AIR HOSE.
- Depress the magazine latch and remove the nail strip or coil.
- Look into the magazine and nose for a bent nail or a fragment.
- Use needle-nose pliers to gently pull the obstruction straight out, never push it forward.
- Reassemble, load the correct nails, and test fire.
Forcing the trigger when you feel a jam can break the driver blade or bend the pusher. Stop immediately.
Cause 4: Dirty Tool or Worn Internal Parts
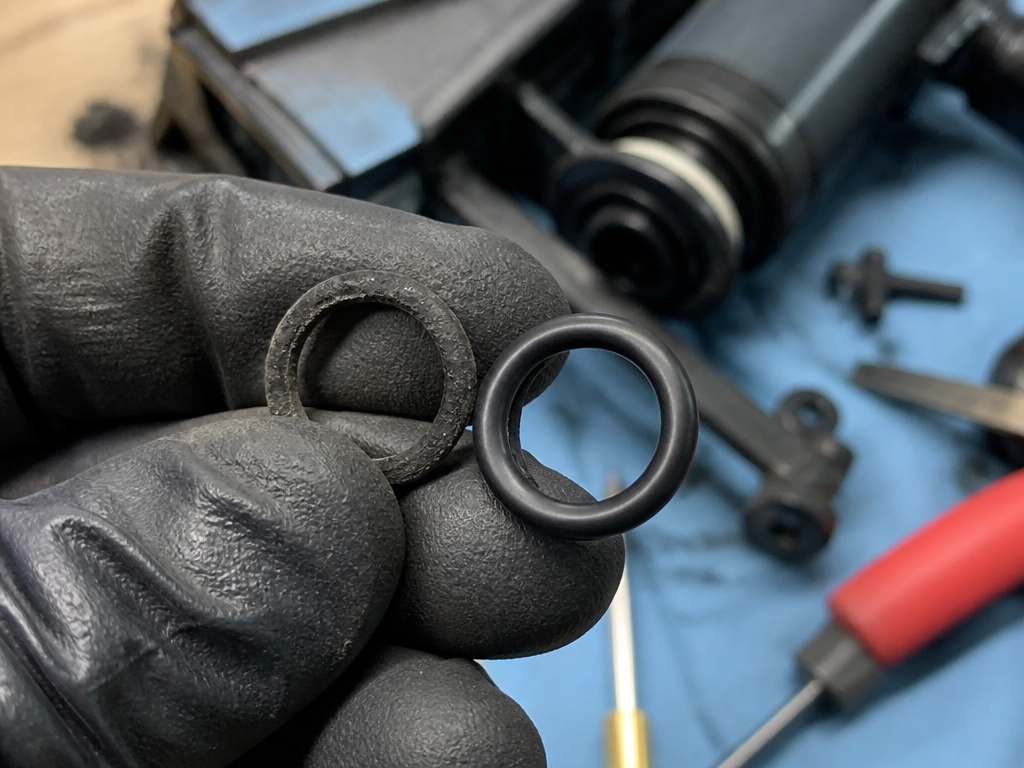
Dirt, sawdust, and dried lubrication gum up the works. A piston can’t travel at full speed if it’s fighting through grit. The first sign is often that hollow pfft sound instead of a solid impact.
Weekly Cleaning (Per DeWALT Manual):
- Wear eye protection.
- Blow out all air vents and the magazine with clean, dry compressed air.
- Wipe the exterior with a cloth dampened with water and mild soap.
- Never spray lubricants or solvents inside the tool.
Internal Wear: The most common part to fail is the O-ring or firing valve seal. When it wears, compressed air leaks past the piston instead of driving it down with full force. The symptom is consistent weak driving, even with perfect air pressure and adjustment.
- The Senco BN31M1P uses parts kit YK0908 for firing valve seal issues.
- The Senco FN71T1 coil nailer uses kit YK0913.
Replacing these seals requires disassembly. If you’re not comfortable, take it to a service center. The DeWALT manual recommends a professional cleaning and inspection once a year for this reason.
Cause 5: Material Problems and Cold Weather
Sometimes the problem isn’t the tool, it’s what you’re nailing into. Knots, end grain, and ultra-dense hardwoods like ipe resist even a perfectly tuned nail gun.
It gives the nail a path and prevents the wood from splitting, which also robs driving energy.
Cold Weather is a Special Case. Cold air holds more moisture, which condenses in your compressor tank and lines. That water can freeze in the tool’s internal passages. The DeWALT DWFP12233 manual has a specific procedure:
- Drain the compressor tank daily.
- Keep the tool as warm as possible before use.
- Lower the air pressure to 80 PSI or less for startup.
- Actuate the tool 5-6 times into scrap lumber to lubricate the cold O-rings.
- Then adjust the pressure up to your normal operating setting (not to exceed 120 PSI).
Following these steps prevents the sluggish, weak firing that happens when you try to use a cold tool at full pressure right away.
Checking air supply (compressor, hose, fittings)
Your nail gun needs clean, dry, and regulated air to hit with enough force. Start at the compressor. Check the gauge to ensure the pressure is within your tool’s operating range, which for many nailers is between 70 and 120 psi. If it’s too low, the nail won’t drive; too high can damage the tool. Listen and feel for air leaks at every connection, from the compressor outlet to the hose and the tool’s inlet. A small leak can rob your gun of power. Make sure your compressor can deliver the continuous airflow your nailer requires, as a small tank trying to run a large framing nailer will struggle to keep up.
Frequently Asked Questions
Why isn’t my finish nailer sinking nails?
The causes are the same: check air pressure first, then the depth adjustment. Finish nailers require using the exact nail type specified in the manual. A worn driver blade O-ring is also a common culprit on finish nailers.
Why does my nail gun leave a dent but not fire a nail?
This is a mechanical failure, not an adjustment issue. The firing pin is striking the wood, but no nail is being released. The most likely cause is a severe jam in the nose preventing a nail from feeding into the firing channel, or a broken/misaligned driver blade. Disconnect the air, clear any jam, and inspect. If the problem persists, internal service is needed.
What PSI should I run my nail gun at?
Refer to your tool’s manual. For the models cited here, the universal range is 70 to 120 PSI. A good starting point is a pressure within the universal range of 70 to 120 PSI. You may need to adjust the pressure based on the fastener and wood being used. Always test on scrap first.
How do I know if my compressor is big enough?
Match the CFM requirement of your nail gun (found in the manual) to the delivered CFM of your compressor at your operating PSI. If your compressor’s delivered CFM is less than your nail gun’s requirement, the tank will drain quickly and nails will not sink. You need a larger compressor or must work much slower.
Can I use any brand of nails in my nail gun?
No. Use only the nails specified for your model. Nail diameter, length, collation material (plastic, paper, wire), and angle (21°, 28°, 34°) are critical. Using off-brand or incorrect nails is the fastest way to cause jams, misfires, and damage that voids your warranty.
The Bottom Line
A nail gun that won’t sink nails is frustrating, but it’s rarely broken. The answer is almost always in the sequence: air, adjustment, fastener, cleanliness. Start with your compressor’s gauge and hose, turn the depth wheel, verify every specification on the nail strip, and keep the tool clean.
If you hear that weak pfft after all that, the O-ring is your next stop. For most DIYers, that’s the line between a fix you can do and one for the service center. That 30 seconds of testing on scrap wood saves hours of pulling proud nails and filling unnecessary holes.
