
How to Use a Drill Clutch Setting: The Step-by-Step Guide
This post contains affiliate links. As an Amazon Associate, we earn from qualifying purchases.
To use a drill clutch setting, turn the torque selector collar to a number, not the drill icon. The clutch slips at a preset torque to stop driving a screw too deep and prevent damage to the screw or tool. The numbers are relative, higher numbers deliver more torque. Always start low, test on scrap material, and increase the setting until the screw seats flush without stripping.
That last part, test on scrap material, is the single line every manufacturer prints in its manual. It’s not a suggestion. It’s the only way to translate a number on a collar into a working torque for your specific screw, wood, and battery charge, which is the core principle of how to use a drill clutch setting.
What follows: the mechanics of the click you hear, a table that decodes the numbers from Milwaukee, DeWalt, and Kreg, the one mistake that burns out the mechanism, and the step-by-step process that replaces guesswork about how to use a drill clutch setting.
Key Takeaways
- The clutch is a mechanical slip-clutch, not an electronic limiter. You’ll hear and feel a distinct ratcheting click when it disengages.
- Clutch numbers are model-specific, not universal. For clutch settings 1-4, the Milwaukee 2803-20 manual lists a torque of 25-40 in. Lbs, while the Milwaukee 2905-20 manual lists 15-27 in-lbs, illustrating that the numbers are model-specific.
- Always start at setting 1 or 2 and work up. Driving a screw at too high a setting strips the head or splits the wood before the clutch can slip.
- The clutch only works in drive mode (screwdriver icon). In drill or hammer-drill mode, the clutch is bypassed and the tool can stall and twist in your hand.
- A gritty feel or absence of the click means dust and debris are inside the clutch ring. Clean it with compressed air before the mechanism seizes.
What a Drill Clutch Actually Does (And When to Bypass It)
A clutch isn’t a speed control. It’s a torque limiter. Its only job is to disconnect the motor from the chuck when resistance hits a certain point.
Think of it like a circuit breaker for your screw. Instead of blowing a fuse, it slips with a loud click. That click means the screw is seated and the motor is now freewheeling, you’ve prevented the screw head from chewing itself apart against the driver bit.
The adjustable clutch, when properly adjusted, will slip at a preset torque to prevent driving the screw too deep into different materials and to prevent damage to the screw or tool.. Milwaukee Tool operator’s manual.
There are two times you must bypass it.
First, for drilling holes. You need full, uninterrupted torque to push a bit through material. Turn the collar to the drill bit icon. The clutch is now disengaged.
Second, for driving screws into metal or very hard joints. The clutch’s slip point may be higher than the torque needed to shear the screw head. In those “hard joint applications,” as Milwaukee notes, the clutch might not save you. You need to control depth with the trigger, not the clutch.
The real danger is forgetting you’ve bypassed it. If your bit binds in a hole while in drill mode, the drill doesn’t click, it stalls and can kick back violently.
Where this goes sideways: Leaving the clutch on a high setting (like 10) and then switching to drill mode to bore a hole. You think you have a torque limit. You don’t. The first bind will surprise you.
The Clutch’s Mechanical Click and What It Means
Inside the collar is a ring of spring-loaded steel balls or ramps. When you select a number, you’re adjusting the spring tension. More tension means the balls have to push harder against their ramps to slip.
When the torque at the chuck matches that tension, the balls ride over the ramps. That’s the click-clack-click sound. The motor spins inside the housing, but the chuck doesn’t turn.
You can feel it in your hand. A proper slip is a rapid, chattering vibration. A worn or dirty clutch feels gritty and may not click at all, the tool just bogs down as if the battery is dying.
This is a physical wear item. After years of heavy use, those balls and ramps polish each other smooth. The slip torque drifts higher. A setting that used to click at 30 in-lbs might now hold to 40. That’s enough to start stripping smaller screws.
The fix isn’t complicated, but it’s often missed. Blow out the clutch ring with compressed air every few months of use. Don’t spray lubricant in there. A dry mechanism is a predictable one.
How to Adjust the Clutch: A 5-Step Process
This dial requires adjustment for each new screw type or material batch.
Step 1: Set the mode collar to the screwdriver/drive icon. Confirm the arrow points to a number, not the drill bit or hammer symbol. If it’s on the drill icon, the clutch is inactive.
Step 2: Start at the lowest setting (1 or 2). This is your safe baseline. The goal is to find the lowest setting that seats the screw, not the highest setting the tool can muster.
Step 3: Drive a screw into an identical piece of scrap material. Use the same screw, same pilot hole (if any), and same wood or drywall you’re using for the project. This test is worthless if the scrap is different.
Step 4: Listen and watch. If the clutch clicks before the screw head is flush, increase the setting by one number and try another screw. If the screw drives flush and the clutch hasn’t clicked, you’re already in the right range, but try one setting lower to see if it still works. You want the minimum effective torque.
Step 5: Lock in that setting for the job. Now drive your production screws. If you change screw size or material, go back to Step 2.
Skipping the scrap test means you’re guessing. And guessing strips screws.
Decoding the Numbers: What Clutch Settings 1-15 Actually Mean
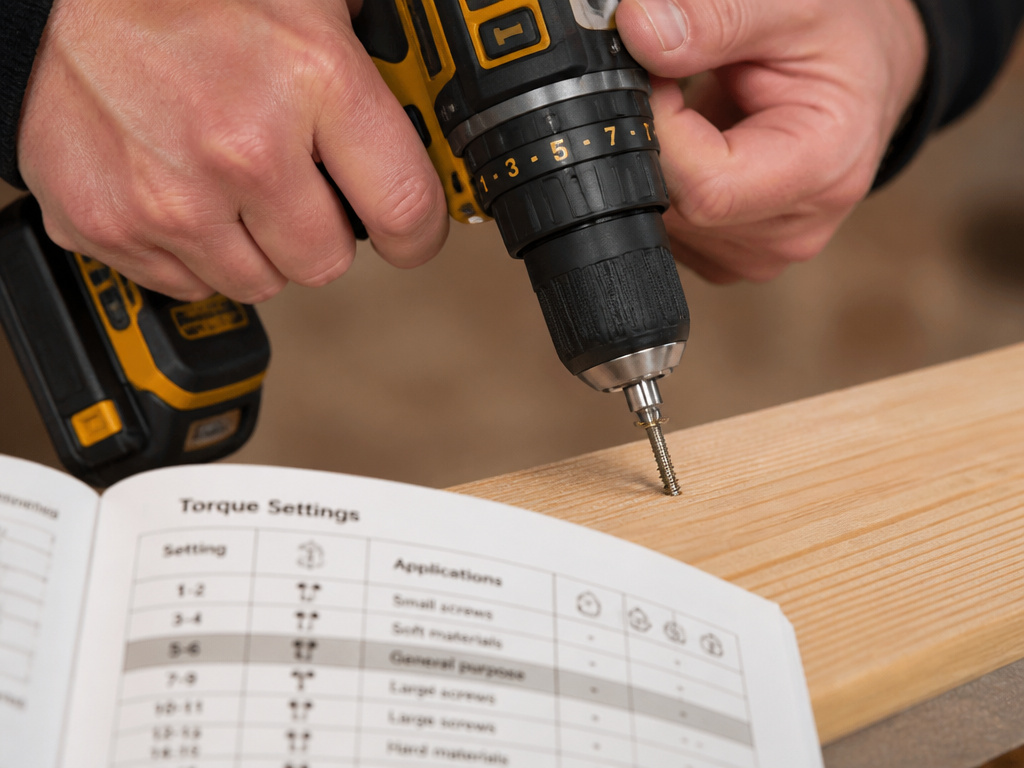
The numbers are relative within a model, not a standard unit. A DeWalt’s ‘5’ isn’t the same as a Milwaukee’s ‘5’. Even within Milwaukee, two different drills have different torque ranges for the same numbered settings.
Manufacturers provide guides, but they stress these are approximations from a fully charged battery. Your half-charged battery will deliver less torque. Your hard maple will demand more torque than their test pine.
Here’s what the manuals say for three common models.
| Drill Model | Clutch Settings | Approximate Torque Range | Recommended Application |
|---|---|---|---|
| Milwaukee M18 FUEL 2803-20 | 1-4 | 25-40 in-lbs | Small screws in softwood. |
| Milwaukee M18 FUEL 2803-20 | 5-8 | 45-60 in-lbs | Medium screws in softwood or small screws in hardwood. |
| DeWalt DCD794 | 1 15 | Higher number = greater torque | Screwdriving — no published in-lb ranges, use the scrap test. |
| Kreg KPTCHD050B_NA | 1-20 | Higher number = greater torque | Screwdriving — test to find the correct setting. |
Notice the disagreement? For clutch settings 1-4, the Milwaukee 2803-20 manual lists 25-40 in-lbs. The Milwaukee 2905-20 manual lists 15-27 in-lbs for the same settings. This isn’t an error. It’s proof that you cannot copy a setting from a YouTube video for a different drill model and expect it to work.
Some manufacturer guides group settings by job size rather than publishing torque numbers. The principle is the same: start low, climb until it works.
Clutch vs. Drill Mode: The One Switch That Changes Everything
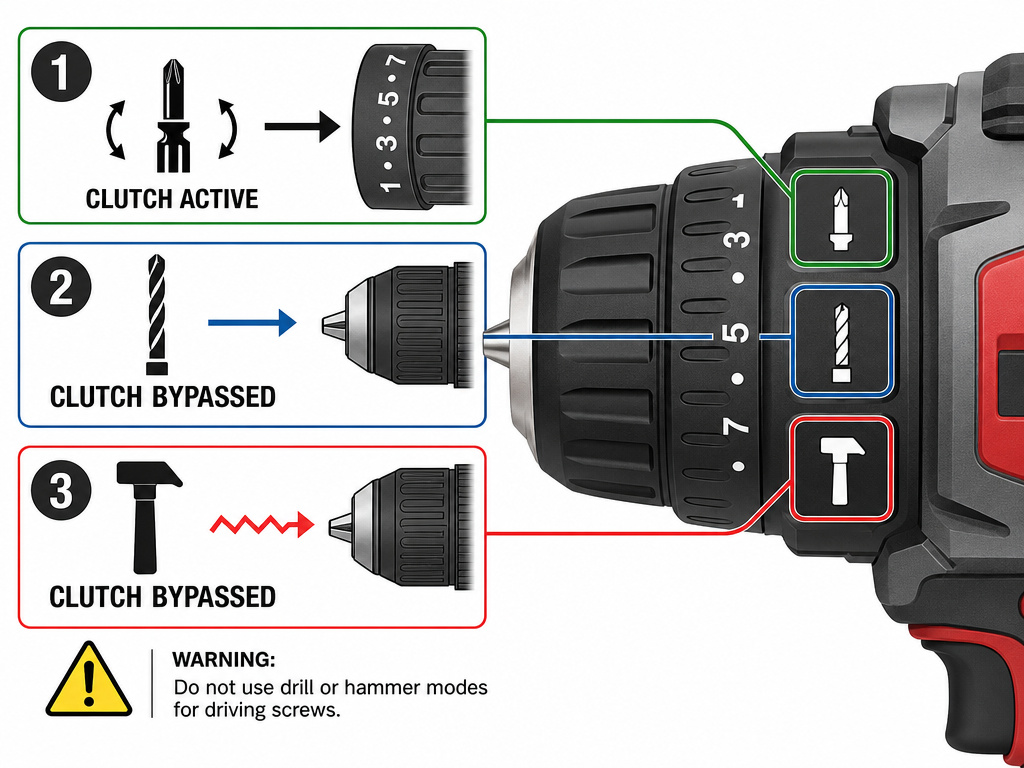
The mode collar is the master override. It decides whether the clutch is in the circuit or not.
- Drive Mode (Screwdriver Icon): Clutch is ACTIVE. The numbered setting controls the slip torque.
- Drill Mode (Drill Bit Icon): Clutch is BYPASSED. You get direct, unlimited torque for drilling.
- Hammer-Drill Mode (Hammer Icon): Clutch is BYPASSED. You get hammer action plus full torque for masonry drilling.
When the mode selection collar is in the drill or hammerdrill positions, the drill will not clutch. The drill may stall if overloaded, causing a sudden twist.. DeWalt DCD794 manual.
This warning exists because the stall is instant and violent. If your bit jams in a hole, the motor stops but your body’s momentum doesn’t. The drill twists in your grip. That’s how wrists get sprained and workpieces get damaged.
The rule is simple. If you are driving a screw, use a numbered clutch setting. If you are drilling a hole, use the drill icon. Never use a clutch setting for drilling.
Troubleshooting Common Clutch Problems
The clutch is a simple mechanism, but three things go wrong regularly.
Problem 1: No click, just bogging down. The clutch slips, but you don’t hear the characteristic ratcheting sound. The drill just slows and stops.
- Likely Cause: Internal components are gummed up with sawdust or debris. The balls can’t slide over the ramps cleanly.
- Fix: Remove the battery. Use compressed air to blow out the seam around the torque selector collar. Cycle the collar through all settings while blowing it out. Do not use oil.
Problem 2: Inconsistent slip point. The same setting clicks early on one screw, late on the next, in the same material.
- Likely Cause: Worn clutch components. The balls and ramps are polished smooth, changing the friction and the slip torque.
- Fix: This is wear. You can compensate by adjusting your baseline setting lower. For critical work, consider a clutch repair or a new drill.
Problem 3: Clutch slips immediately at every setting.
- Likely Cause: Broken spring or severely worn components. The mechanism cannot maintain any tension.
- Fix: This requires professional service. The drill is essentially stuck in a near-zero torque state.
A clutch that’s working right feels precise. A failing clutch feels vague. Trust the feel in your hand as much as the sound.
Safety and Maintenance: What the Manuals Actually Say
The manuals don’t just explain operation. They list the essential safeguards.
- Eye Protection: “To reduce the risk of injury, always wear proper eye protection marked to comply with ANSI Z87.1.” This is a specific standard, not just “safety glasses.”
- Dust Extraction: “When working in dusty situations, wear appropriate respiratory protection or use an OSHA compliant dust extraction solution.” Drywall dust kills clutch mechanisms and lungs.
- Carbide Bit Warning: “When using carbide bits, do not use water to settle dust. Do not attempt to drill through steel reinforcing rods. This will damage the carbide bits.” Water and carbide cause rapid corrosion.
- Battery Charge: “The torque specifications shown here are approximate values obtained with a fully charged battery pack.” A weak battery gives weak torque, which changes your clutch setting.
These are the documented failure modes, not legal boilerplate. Ignore the eye protection, and a shattered screw tip finds a path. Ignore the dust warning, and the clutch fills with fine powder that acts as grinding compound.
Drill Clutch Settings for Drywall, Furniture, and Cabinets
Use lower clutch settings for delicate cabinet and furniture assembly to avoid splitting wood or sinking screw heads too deep. For drywall, a mid-range setting is typically used for fine-thread screws, while a higher setting is needed for coarse-thread screws. The clutch slips at a preset torque to prevent driving the screw too deep and damaging the material or the screw head. Because exact needs vary, always perform a test run on a piece of scrap material to find the proper clutch setting. This prevents damage to your workpiece and ensures a clean, professional finish.
Frequently Asked Questions
What is the 1 and 2 setting on a drill?
The ‘1’ and ‘2’ on the top of the drill are speed settings, not clutch settings. Speed 1 is low RPM/high torque for driving large screws or drilling big holes. Speed 2 is high RPM for small screws, drilling in soft material, or running hole saws. The clutch collar is the separate ring near the chuck with numbers 1-15 or 1-20.
How does the clutch work on a drill?
Mechanical clutch uses a ring of spring-loaded balls or ramps between the motor and the chuck. When torque at the chuck exceeds the spring tension you’ve set by choosing a number, the balls ride over the ramps. This disconnects the chuck from the motor, creating a loud ratcheting sound and preventing more torque from being applied.
Can I use the clutch for drilling?
No. The clutch is only for driving screws and other threaded fasteners. For drilling holes, you must turn the mode collar to the drill bit icon, which bypasses the clutch entirely and delivers full, uninterrupted torque to the bit.
Why does my drill clutch not click?
The most common reason is contamination. Sawdust and debris get inside the clutch mechanism, preventing the internal components from slipping cleanly. Remove the battery and blow out the clutch ring with compressed air. If the problem persists after cleaning, the internal springs or ramps may be worn or broken.
Are clutch settings the same on all drills?
No. Clutch numbers are relative to the specific drill model. A setting of ‘5’ on a DeWalt DCD794 delivers a different torque than a ‘5’ on a Milwaukee 2803-20. Even within the same brand, different models have different torque ranges for the same numbers, as shown in the Milwaukee manuals. Always test on scrap.
Before You Go
The clutch is the smartest part of a drill. It turns a brute-force motor into a precision tool. But it’s not autonomous. You have to tell it where the limit is.
The one habit that changes everything: never drive a screw into your project without first driving an identical screw into scrap. That five-second test is the difference between a stripped head and a perfect seat. The numbers on the collar are a suggestion. The scrap test is the law.
Everything above assumes a standard cordless drill. If you’re driving hundreds of deck screws or working with metal, the calculus shifts. For bulk work, an impact driver’s anvil mechanism is faster and more durable. For hard joints, sometimes you need to drop the clutch idea and control depth by trigger feel alone. That’s the next layer, but first, master the click.
