
What Is Torque on a Drill: How It Works and Why It Matters
This post contains affiliate links. As an Amazon Associate, we earn from qualifying purchases.
Torque is the twisting force a drill applies, measured in Newton-meters (Nm) or inch-pounds (in-lbs). A drill’s adjustable clutch allows you to set a maximum torque limit. The motor disengages when it reaches that force to avoid over-driving and stripping screws. The numbers on the collar are relative settings, not precise values; real usable torque depends on gearing, battery charge, and the drill’s internal clutch mechanism.
That “relative” part is where most guides stop. They don’t tell you why a drill rated for 57.5 Nm of max torque can’t actually drive a 3-inch lag bolt without stalling, or why the clutch clicks off at setting 5 on one job but setting 8 on another that looks identical. To understand this, you need to know what is torque on a drill. The gap between the number on the spec sheet and the force in your hand is the whole game.
What follows: a breakdown of how the clutch actually works, how to read the compliance codes and vibration data buried in your manual, and the one setting that bypasses all torque control entirely. You’ll also get brand-specific looks at how DeWALT, Milwaukee, and Kreg label their settings, and a practical chart for matching torque to common materials.
Key Takeaways
- Drill torque is rotational force, not raw power; a high-torque drill excels at driving large screws, not drilling fast.
- The adjustable clutch is a mechanical slip-ring; once the set torque is reached, it disengages the drive, producing a distinct clicking sound to prevent over-driving.
- Manufacturer max torque specs (like 57.5 Nm) are peak values under ideal lab conditions; real sustained torque is lower and varies with battery charge and gearing.
- Always start low and increase the torque setting; stopping when the screw head is flush prevents stripping and gives you a repeatable setting for the rest of the job.
- In drill or hammer mode, the clutch is bypassed; the tool will stall if overloaded, requiring a firm grip to control the sudden twist.
How a Drill’s Clutch Controls Torque
A drill doesn’t have a torque sensor. It has a clutch. This is a simple, brilliant piece of mechanical regulation. Inside the gearbox, behind the spinning motor, sits a set of stacked plates with ramps and ball bearings. When you select a torque setting, say, number 7 on the collar, you’re adjusting the spring tension on this stack.
As you drive a screw and resistance builds, the force tries to push these plates apart. At the precise moment the twisting force exceeds the spring’s pressure, the plates slip. You hear a rapid click-click-click and the drive shaft stops turning, even though the motor is still spinning. The screw is set, the head is flush, and you didn’t strip the recess.
The clutch is a purely mechanical slip-ring. It doesn’t measure torque; it releases at a preset force. The numbers on the collar (1-15, 1-20) are relative tension settings, not calibrated Newton-meter values.
This is why two different drills, both set to “5,” can deliver different results. The spring stiffness, the ramp angle on the plates, and the wear on the bearings after a few hundred cycles all shift the release point. Your job isn’t to find the universal “setting 5.” It’s to find the setting that drives your specific screw into your specific material until it’s just seated, then stop.
Where this goes sideways: Using the drill on the drill or hammer setting. In these modes, the clutch is completely bypassed. The motor connects directly to the chuck. If you hit something hard, the tool stalls. The DeWALT DCD703 manual puts it bluntly: “Always expect the stall. Grip the drill firmly to control the twisting action and avoid injury.” The sudden stop transfers all that rotational energy back into your wrist. That’s the twist you feel.
Decoding Manufacturer Torque Specs
Open a manual to the technical data section. You’ll see a “Max. Torque” figure, which is the first step in answering what is torque on a drill. The DeWALT DCD703 lists a maximum torque of 57.5 Nm for “hard” and 25.5 Nm for “soft.” The Kreg KPTCHD0500 has a torque selection collar with settings 1-20. Milwaukee provides a different kind of clue: a chart linking torque settings to approximate inch-pound values for specific tasks.
These numbers are not lies, but they are marketing-friendly. The 57.5 Nm is a peak, momentary value, likely measured with a fresh battery, in a specific gear, right before the internal overload protection kicks in. It’s the engine’s horsepower rating, not the pulling power you get through the transmission to the wheels. Your real, usable torque is lower and depends heavily on your drill’s gearing.
| Spec | What It Tells You | What It Doesn’t Tell You |
|---|---|---|
| Max Torque (e.g., 57.5 Nm) | The motor’s maximum possible rotational force under ideal test conditions. | The sustained torque available in 1st vs. 2nd gear, or how it drops as the battery depletes. |
| Torque Settings (e.g., 1-15) | The relative adjustment range of the clutch mechanism. Higher number = higher release force. | The actual Newton-meter value at each setting. These are not calibrated or standardized between brands. |
| No-Load Speed (e.g., 0–425 / 0–1500 min⁻¹) | The maximum RPM in each gear with no load. | How speed drops under load, which is the inverse relationship to torque. Lower gear = higher torque, lower speed. |
The most useful data is often buried deeper. Look for the vibration emission values. For the DeWALT DCD703, drilling into metal produces a vibration emission value (ah,D) of 2.5 m/s². A lower number here often indicates a better-balanced, more robust internal construction that will maintain its clutch calibration longer. It’s a build-quality signal hiding in plain sight.
For practical guidance, Milwaukee’s chart is a rare example of a brand giving real-world context. Their document states that for a fully charged Milwaukee battery, torque setting 1-3 corresponds to 10-16 in. Lbs and setting 7-10 corresponds to 28-34 in. Lbs. This gives you a starting point other brands keep secret.
The Critical Choice: Clutch Mode vs. Drill Mode
Every drill has a collar or switch near the clutch. It selects between the numbered torque settings and a drill/hammer icon. This isn’t a minor toggle. It changes the fundamental behavior of the tool.
- Clutch Mode (Numbered Settings): The clutch is engaged. Use this for all screwdriving. The tool will disengage when the set torque is reached. Start at the lowest setting that gets the screw started and increase until the screw seats perfectly. Write that number down for the next fifty screws.
- Drill Mode (Drill Bit Icon): The clutch is bypassed. Use this only for drilling holes. The motor is directly connected to the chuck, providing full, unstalled power. If the bit binds, the drill will try to twist itself right out of your hands.
The Kreg manual includes a specific warning for this: “When the drill or hammer drill positions are selected, the drill will not clutch and may stall if overloaded, causing a sudden twist.”
The feel is unmistakable. In clutch mode, the tool goes quiet and clicks when done. In drill mode, the sound changes from a high-speed whir to a deep, straining groan right before it stalls. You need to be braced for that.
Matching Torque Settings to Your Material
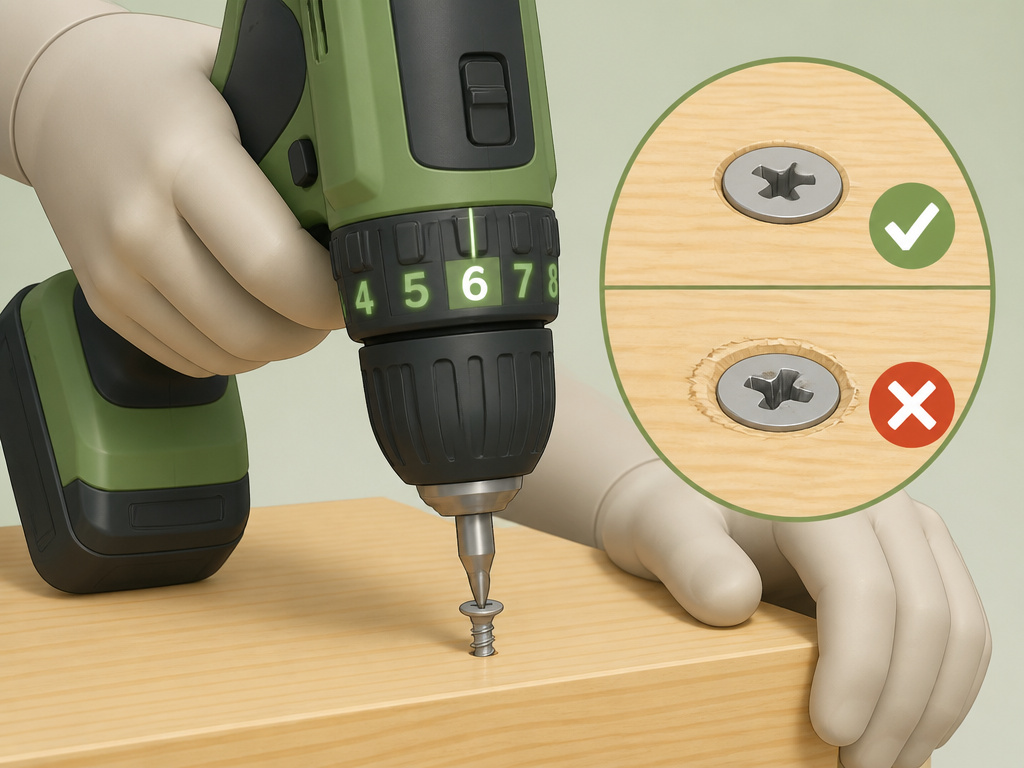
You don’t need a physics degree to answer what is torque on a drill. You need a method. The goal is to match the drill’s output to the fastener’s size and the material’s resistance, so the screw drives flush without stripping, sinking, or breaking.
Here’s a field-tested sequence that works for 90% of wood and drywall jobs:
- Start at the lowest setting that will start the screw. If the clutch trips immediately, go up one number.
- Drive the screw until the head is just flush with the surface. If it stops before flush, increase the setting by one or two clicks.
- Stop when the screw is perfectly seated. That’s your setting for every identical screw in that material.
- For harder materials (hardwood, metal), you’ll need a higher setting. For softer materials (drywall, pine), a lower setting.
- If the screw strips, your setting was too high for the screw’s head strength. Back off two numbers and try again.
Common mistake: Cranking the torque to the max “to be sure.” This strips screw heads, rounds out driver bits, and overheats the drill. The clutch is there to be your limit, not a challenge to overcome.
We can apply manufacturer data by examining capacities. The Milwaukee 3403-20/3404-20 has a screw diameter capacity of 1/2″. That’s a big screw. But the manual’s torque guidance for settings 7-10 (28-34 in-lbs) is for more typical tasks. This tells you that even a powerful drill operates effectively across a wide torque range; you rarely need the maximum.
| Task / Material | Recommended Starting Torque Setting | Watch For |
|---|---|---|
| Assembling Ikea-style particleboard | 1-3 | Stripping. The material has almost no holding power. |
| Hanging drywall | 4-6 | Sinking the head too deep (“breaking the paper”). |
| Driving #8 deck screws into pressure-treated pine | 10-12 | The screw stopping proud. Increase until it pulls tight. |
| Driving 1/4″ lag bolts into a stud | Max (or drill mode) | Stalling. Use low speed/high torque gear and steady pressure. |
Why-Layer: The Inverse Relationship of Speed and Torque
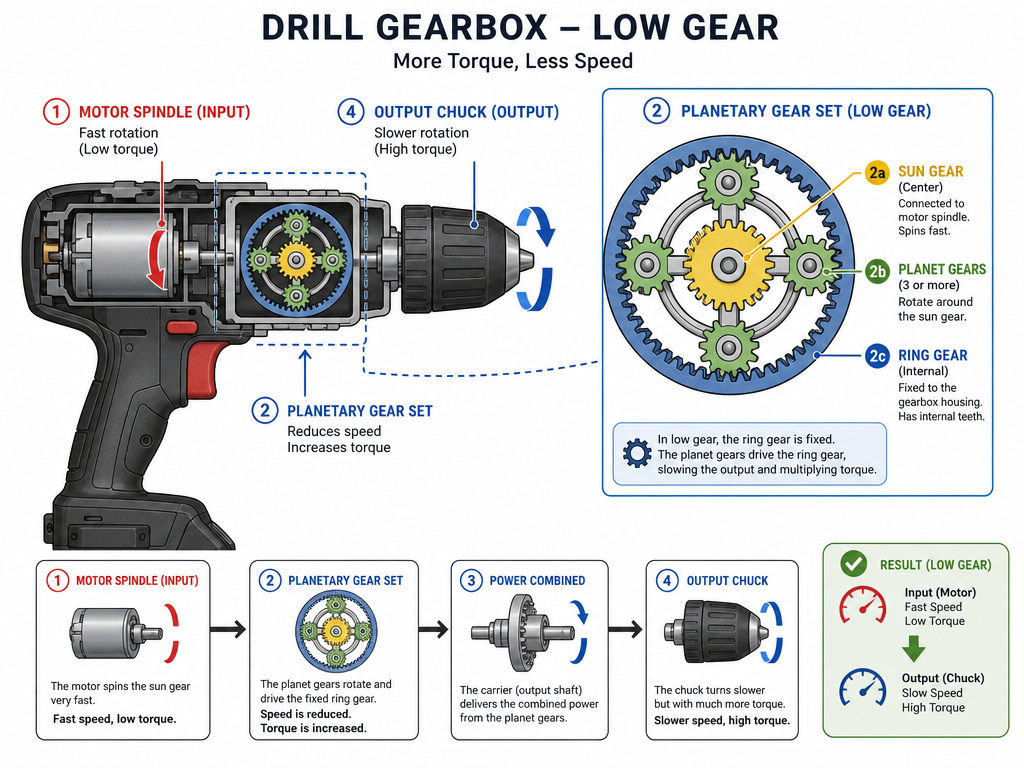
This isn’t just theory. It’s how your drill’s gearbox works. When you shift from high speed (2nd gear, 0–1500 min⁻¹ on the DeWALT DCD703) to low speed (1st gear, 0–425 min⁻¹), you are trading rotational speed for twisting force.
An analogy from cycling works: high gear is for going fast on flat ground with little resistance. Low gear is for climbing a steep hill, where you need powerful, slow cranks. Your drill is the same. High speed/low torque gear is for drilling small holes quickly. Low speed/high torque gear is for driving large screws or drilling large, slow holes where the bit needs to chew through material.
The mechanism is planetary gears. In low gear, these gears force the output shaft to turn slower relative to the motor, multiplying the motor’s force. That’s why you feel more power. It’s also why the drill gets louder and warmer in low gear, the motor is working harder against that gearing to produce that force.
So when you’re struggling with a big screw, don’t just push harder. Shift down. The relationship between torque and RPM is fixed by the gearbox. Use it.
Essential Safety Warnings Tied to Torque
Torque isn’t just about performance; it’s a safety feature. Misusing it leads to the most common drill injuries.
Before you start: The clutch prevents over-torquing, but only in clutch mode. In drill mode, you are the clutch. Grip the insulated handle surfaces firmly. Wear ANSI S12.6 (S3.19) hearing protection for extended use, as high-torque, low-speed work is often the loudest.
The manuals are unanimous on specific, physical dangers:
- Stalling: “Always expect the stall,” says DeWALT. When a drill stalls, the stored rotational energy releases back into the tool, and your wrist.
- Bit Wandering: “Always start drilling at low speed and with the bit tip in contact with the workpiece.” A bit spinning at high RPM with no load can bend and whip.
- Excessive Pressure: “Apply pressure only in direct line with the bit and do not apply excessive pressure.” Pushing sideways bends bits and breaks them. Pushing too hard straight on overheats the drill and burns out the motor.
One warning is easy to miss: “Inserting a drill bit into chuck jaws at an angle and then tightening can cause the bit to be thrown from the drill.” A crooked bit under high torque doesn’t just drill poorly; it becomes a projectile.
What is the inverse relationship between torque and speed in a drill?
Drill gearboxes are designed to trade speed for rotational force, or torque. This is why drills have multiple gear settings. A lower gear setting provides higher torque but lower rotational speed, which is ideal for driving large screws or drilling into dense materials. A higher gear setting provides higher speed but lower torque, which is better for drilling smaller holes or using smaller fasteners. For example, the DeWALT DCD703’s first gear offers a no-load speed range of 0–425 min⁻¹, while its second gear offers a range of 0–1500 min⁻¹. Using the correct gear for the task provides the necessary power without straining the motor and helps you maintain control of the tool.
Frequently Asked Questions
What do the torque numbers on a drill mean?
The numbers (1-15, 1-20, etc.) are relative tension settings for the clutch spring. A higher number means a higher torque threshold before the clutch disengages. They are not standardized Newton-meter values. You calibrate them by finding the setting that correctly seats your screw.
What is a good torque for a drill?
There is no single “good” torque. It depends on the task. For small screws in softwood, a low setting (3-5) is good. For larger screws or hardwoods, a higher setting (10-15) is good. A “good” drill provides a wide, usable range and a clutch that releases consistently.
When should I use the drill setting instead of a torque setting?
Use the drill setting (the drill bit icon) only when drilling holes. The clutch is disengaged, giving the motor full power to the chuck. Never use drill mode for driving screws; the lack of a torque limit will strip screws and strain the tool.
Can you adjust the torque on all drills?
Most modern cordless drill/drivers have an adjustable torque clutch. Some budget “drill-only” models and most dedicated hammer drills do not. Always check for a numbered collar behind the chuck. If it’s not there, the tool has a fixed output or is designed solely for drilling.
How does drill torque compare to impact driver torque?
They are different mechanisms. A drill’s torque is a steady, rotational force limited by a slipping clutch. An impact driver torque combines rotational force with sudden, concussive hammer blows to achieve much higher “breakaway” torque for stubborn fasteners. Use a drill for precision and control, an impact for brute force.
The Bottom Line
Torque is the drill’s most useful feature, and its most misunderstood. The spec sheet number is a headline. The real tool is the clutch and your method for using it.
Forget finding the perfect universal setting. Your job this week is simple: pick one repetitive task, assembling a shelf, hanging a curtain rod. Start at the lowest torque setting that will start the screw. Increase it click by click until the screw drives flush and stops. That’s your number. That’s you using torque correctly.
Everything else, the gearing, the power tool specs, the vibration data, is background music. The clutch click is the conductor. Listen for it.
