
How to Cut Plywood With a Circular Saw: Step-by-Step
This post contains affiliate links. As an Amazon Associate, we earn from qualifying purchases.
To cut plywood with a circular saw, you need to match three things: a fine-tooth carbide blade (40-60 teeth), a fully supported workpiece (rigid foam or a 4-point sawhorse setup), and the correct blade depth (just 1/4 inch below the material). Place the plywood with its good side down, use a guide for straight cuts, and push at a steady pace to prevent splintering and binding.
The gap between a clean cut and a chipped mess is about the thickness of the veneer. Plywood faces are often less than 1/50 of an inch thick. That paper-thin layer splinters the moment the saw blade exits the wood without proper support underneath it. A key skill is knowing how to cut plywood with a circular saw.
What follows is the method that eliminates guesswork when you compare a how to cut plywood with a circular saw: the right blade, a support system that stops the wood from flexing, and the one depth setting that keeps the saw from fighting you. By the end, you’ll know how to break down a full 4×8 sheet by yourself and get a cut clean enough for cabinet work.
Key Takeaways
- Use a 40- to 60-tooth carbide-tipped blade with ATB (Alternate Top Bevel) teeth for plywood; the stock 24-tooth blade will shred the veneer.
- Support the plywood with rigid foam insulation board on the floor or a four-point sawhorse setup; unsupported cuts flex, bind, and cause kickback.
- Set the blade depth correctly; common advice is about 1/4 inch below the bottom, while another source suggests one-half of a saw tooth beyond the bottom.
- Orient the sheet with the good side facing down; the circular saw blade cuts upward, so the cleanest cut is on the bottom face.
- Clamp a straightedge guide to the plywood for factory-straight cuts; trying to cut freehand with an 8-foot sheet almost guarantees a wavering line.
Choosing the Right Blade
The blade your saw came with is for demolition. It’s a low-tooth-count framing blade designed to chew through lumber fast, not slice through veneer. For plywood, you need a blade with more teeth and a specific grind. A 40- to 60-tooth fine-tooth blade with an ATB (Alternate Top Bevel) tooth design is the target, and flat-top rip teeth should be avoided. The higher tooth count means each tooth takes a smaller bite, shearing the wood fibers instead of ripping them. Choose a carbide-tipped blade, as the carbide teeth stay sharp through hours of cutting composite materials and won’t heat up and warp like steel. The geometry matters, too. An ATB (Alternate Top Bevel) tooth design is best for cross-cutting plywood, while flat-top rip teeth should be avoided.
A dull fine-tooth blade causes more tear-out than a sharp coarse-tooth blade. Dull teeth compress and tear the thin veneer instead of slicing it. If the blade tips look rounded or have pitch buildup, clean or replace it before cutting expensive sheet goods.
I used to think all saw blades were similar until a cabinet project with laminated plywood taught me how to cut plywood with a circular saw. The chipping was so bad I had to re-cut every piece. Switching to a dedicated plywood blade was the fix. The difference wasn’t subtle, it was the gap between a professional edge and a splintered mess.
| Blade Type | Tooth Count | Best For | Risk on Plywood |
|---|---|---|---|
| Framing Blade | 14-24 | Fast cuts in lumber | Severe splintering, torn veneer |
| Combination Blade | 30-40 | General-purpose cuts | Moderate tear-out, fuzzy edges |
| Fine-Tooth Plywood Blade | 40-60 | Clean cuts in sheet goods | Minimal splintering with proper support** |
The 4-Point Support Setup That Stops Kickback
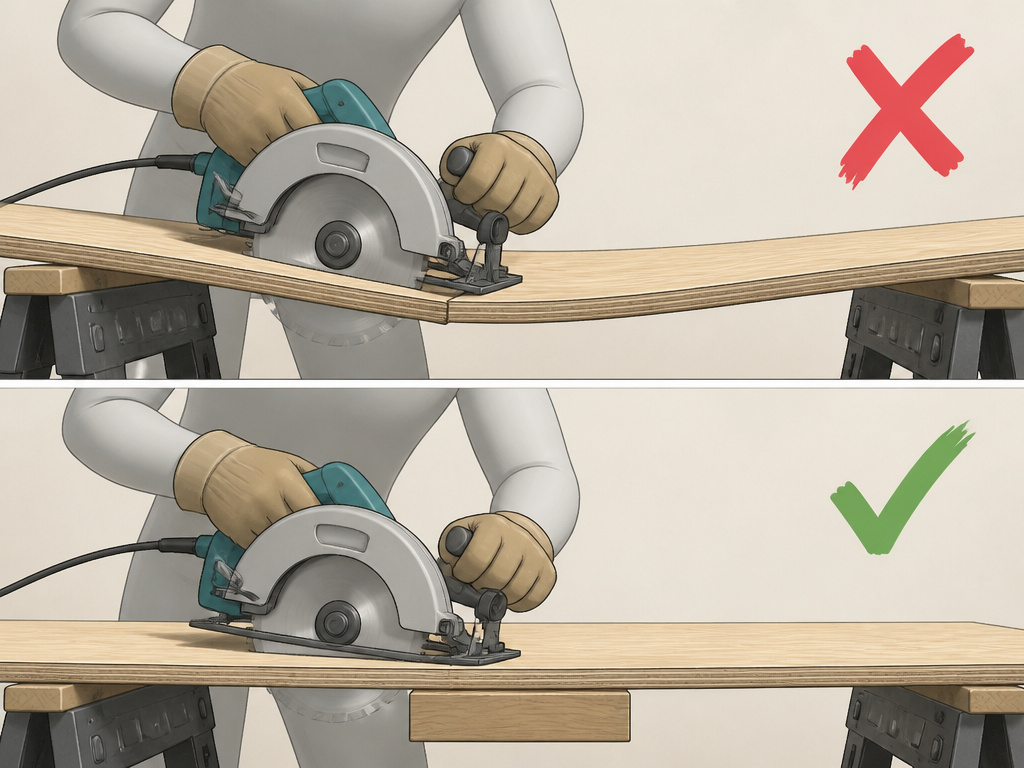
The most dangerous and frustrating part of cutting plywood isn’t the saw, it’s the wood moving. A full 4×8 sheet can weigh between 40 and 70 pounds. When you cut it, the two halves want to sag toward the center, pinching the blade. That’s binding, and it leads to kickback.
You need support under the plywood along the entire cut line. Two common methods work, each with a trade-off.
Method 1: Rigid Foam Insulation Board on the Floor.
Place a sheet of rigid foam insulation board on the floor, then lay your plywood on top. The foam fully supports the entire sheet, so no part sags as you cut. The saw blade cuts harmlessly into the foam below. It’s safe, simple, and perfect for working alone. The downside? You’re on your knees. For a lot of cuts, that gets old fast.
Method 2: The Four-Point Sawhorse Setup.
This is the workshop standard for a reason. It gets the work off the floor. Set two sawhorses about six feet apart. Lay two 2x4s across them to create a platform. Now, the clever part: tack a small scrap block of wood centered between the 2x4s, directly under your marked cut line. When you lift the plywood onto the 2x4s and align your cut line over that block, the sheet is supported at both outer edges and on both sides of the cut. Four points of contact. Zero flex.
Where this goes sideways: Supporting only the outer edges. The unsupported center sags as you cut, the kerf closes, and the blade binds. You’ll feel the saw motor strain, hear a higher-pitched whine, and the saw will likely kick back toward you.
Setting the Saw: Depth and Orientation
With the plywood supported, you now have to tell the saw how to behave. Two settings are essential: blade depth and workpiece orientation. Get these wrong, and even the best support won’t save your cut.
Blade Depth: The 1/4-Inch Rule.
Why the fuss? A blade set too deep exposes more teeth to the wood, creating more friction, heat, and resistance. It also increases the unsupported length of the blade, making it more likely to deflect and cause a rough cut. The shallow setting is safer, more efficient, and gives a cleaner edge.
Plywood Orientation: Good Side Down.
This is the rule everyone quotes, and for a circular saw, it’s correct. The blade spins so the teeth cut upward through the material. The teeth enter the wood from below and exit at the top. The exit point is where tear-out happens. Therefore, you want the face you care about, the show face, on the bottom, so any minor tear-out happens on the hidden top surface.
The part nobody mentions: Some woodworking sources actually argue the opposite for circular saws, stating the show face should be up. This disagreement usually stems from using a zero-clearance base or a track saw, which changes the support dynamics. For a standard circular saw on a standard base, stick with good side down.
Making the Cut: Technique for a Clean Edge
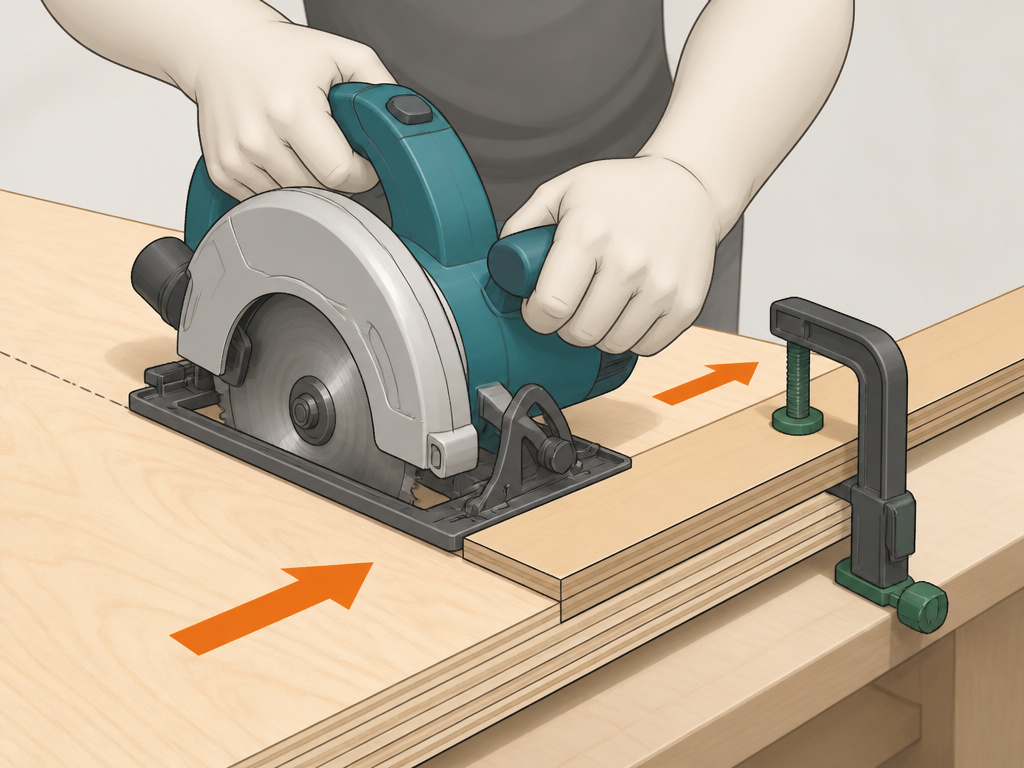
You have the blade, the support, and the saw set. Now you need to guide it. Cutting an 8-foot line freehand with a circular saw is like threading a needle while jogging. You need a fence.
Using a Guide for Straight Cuts.
Clamp a long, straight piece of lumber or a metal level to the plywood to act as a fence for the saw’s base plate to ride against. Measure the offset from the blade to the edge of your saw’s base, then clamp the guide accordingly. For repeated ripping, a dedicated rip guide that attaches directly to your saw can be a worthwhile investment. The goal is to remove your hands from the job of steering. They should only be pushing the saw forward.
The Cutting Motion.
Start the saw and let it reach full speed before contacting the wood. Push forward at a steady, consistent pace, not so fast that the motor bogs down, not so slow that the blade burns the wood. Listen to the sound. A healthy, constant grunt is good. A strained, rising whine means you’re pushing too hard or the blade is binding. Let the saw do the work. Keep the base plate flat on the plywood throughout the cut; lifting the heel or toe will angle the blade and bind it in the kerf.
Troubleshooting Common Plywood Cutting Problems
Even with perfect setup, things can go wrong. Here’s how to diagnose and fix the most common issues.
Problem: The saw binds and kicks back.
Cause: The plywood is flexing and pinching the blade. Your support is inadequate.
Fix: Stop immediately. Re-check your support setup. For a floor cut, ensure the foam is flat. For sawhorses, verify the center support block is directly under the cut line. Never force a binding cut.
Problem: The cut line wanders, even with a guide.
Cause: The guide isn’t secured properly, or you’re not holding the saw base firmly against it.
Fix: Double-check that your guide is clamped securely and hasn’t shifted. As you cut, consciously press the side of the saw’s base plate against the guide throughout the entire stroke.
Problem: Severe splintering on the bottom (good) side.
Cause: Dull blade, wrong blade type, or cutting too fast.
Fix: First, inspect your blade. If it’s a framing blade, switch to a fine-tooth blade. If it’s a fine-tooth blade, it may be dull. Second, slow your feed rate. Let the sharper, finer teeth do their job.
| Symptom | Most Likely Cause | Immediate Fix |
|---|---|---|
| Binding/Kickback | Workpiece flex, poor support | Stop, add support under cut line |
| Wandering Cut | No guide, or poor guide contact | Clamp a straightedge fence, focus on keeping saw base against it |
| Burn Marks on Edge | Cutting too slowly, dull blade | Increase feed rate slightly, check blade sharpness |
| Splintering on Top | Blade exiting through show face | Flip workpiece so good side is down |
| Splintering on Bottom | Dull blade, wrong tooth geometry | Replace with sharp 40-60T ATB blade |
Working with Thin Plywood and Other Sheet Goods
The rules change when the plywood is 1/4 inch or thinner. Flimsy sheets vibrate wildly, making clean cuts nearly impossible. The fix is to sandwich the thin plywood between two sheets of sacrificial scrap wood (like 1/2 inch MDF) and clamp the whole stack together. Cut through the entire “sandwich.” The top layer supports the veneer against tear-out on entry, and the bottom layer supports it on exit. You’ll get a clean cut on both faces of your good piece. This trick also works for veneered MDF and melamine, which are even more prone to chipping.
Frequently Asked Questions
Can I use a circular saw to cut plywood?
Absolutely. A circular saw is one of the best and most accessible tools for breaking down full sheets of plywood. It’s more manageable than wrestling a 4×8 sheet through a table saw solo, and with the right blade and setup, it can produce cuts clean enough for fine woodworking.
How to cut plywood without splintering a circular saw?
Prevent splintering by using a sharp, 40-60 tooth carbide blade, supporting the plywood fully along the cut line (with foam or a 4-point setup), setting the blade depth to 1/4 inch past the material, and placing the good side of the plywood facing down. For critical cuts, score the cut line with a utility knife first.
What type of blade is best for cutting plywood with a circular saw?
The best blade is a 40- to 60-tooth carbide-tipped blade with an ATB (Alternate Top Bevel) tooth grind. This combination provides a fine cut that shears the thin veneer cleanly. Blades marketed specifically for “plywood” or “fine finishing” are your target.
What to put under plywood when cutting with a circular saw?
Use rigid foam insulation board placed directly on the floor. It provides full, safe support and the blade cuts into it without damage. Alternatively, use a supported sawhorse setup with a center block under the cut line to prevent binding.
The Bottom Line
The clean cut happens before the saw touches the wood. It’s in the blade you chose, the rigid foam you laid down, and the quarter-inch you dialed into the depth gauge. If you only remember one thing, make it support. A fully supported sheet resists binding and kickback, allowing the blade to work properly.
For your first project, skip the sawhorse gymnastics. Grab a sheet of rigid foam insulation board from the home center, lay your plywood on top, and make your cuts on the floor. You’ll prove to yourself that a perfect cut is a matter of mechanics, not magic. After that, you can build a guide rail or try the sawhorse method. But start with the foundation: no blade, no technique, no tool can compensate for a sheet of plywood bending into your saw blade.
