
How to Set Circular Saw Blade Depth: 4-Step Process
This post contains affiliate links. As an Amazon Associate, we earn from qualifying purchases.
To set circular saw blade depth, loosen the depth adjustment lever, raise or lower the base plate so the blade projects the correct amount below your workpiece, then re-tighten the lever.
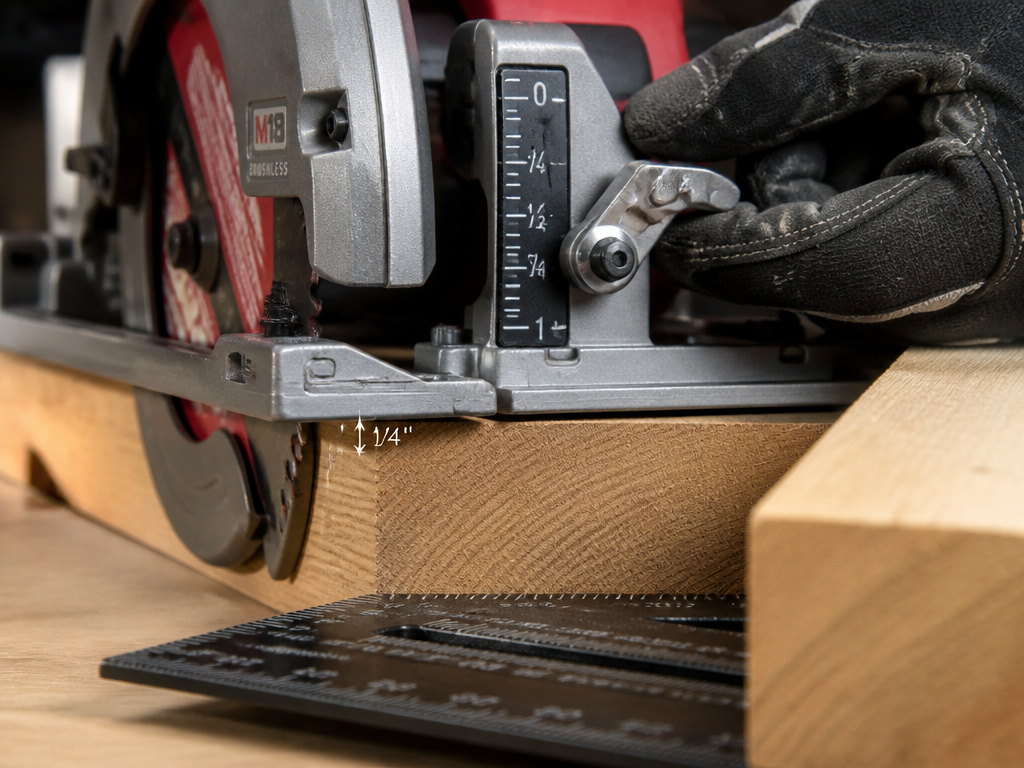
That 1/4-inch rule from Benchmark is the one most DIYers should memorize. It’s a safe, concrete target that works for nearly every cut on a jobsite. The half-tooth versus one-tooth debate matters to pros chasing perfect chip clearance, but for the rest of us, understanding how to set circular saw blade depth to keep the exposed blade under a quarter-inch is the move that prevents kickback and ragged cuts.
What follows: the four-step adjustment you’ll use on any saw, a table that translates “one tooth” into actual measurements for common lumber, and the brand-specific quirks that clarify how to set circular saw blade depth on your particular model.
Key Takeaways
- Set the blade to project no more than 1/4 inch below your material for a safe, universal starting point.
- For precise cuts, the depth changes when you tilt the saw for a bevel — you must reset it after adjusting the angle.
- A blade set too deep increases kickback risk and strains the motor; a blade set too shallow creates a ragged, incomplete cut.
- Always check and tighten the depth lever before every cut; a loose adjustment is a common cause of inaccurate depth mid-cut.
- Manufacturers disagree on the ideal blade projection, so know your saw’s manual but default to the 1/4-inch rule for safety.
The 4-Step Depth Adjustment Process (and the One Safety Rule That Varies)
The mechanism is simple. Find the depth adjustment lever or knob — it’s almost always on the saw’s shoe, near the front or side. On a DeWalt, it’s a large lever you pull. On a Makita, it might be a knob you twist. The motion is the same: loosen, adjust, tighten.
Here’s the universal sequence:
- Unplug the saw or remove the battery. This step is essential. Your fingers will be near the blade.
- Loosen the depth adjustment mechanism. Pull the lever or turn the knob until the shoe moves freely.
- Set the depth. Hold the saw next to your workpiece. Raise or lower the shoe until the blade teeth protrude the correct amount below the material. Don’t guess. Use a ruler or the saw’s built-in scale.
- Tighten the lever securely. Apply firm pressure. A lever that feels only hand-tight will slip under vibration.
Where this goes sideways: Setting depth with the saw powered on. You’ll nudge the trigger, the blade will spin, and your measuring hand is now in the path of the teeth. The motor is off, the battery is out. Every time.
The step people skip when learning how to set circular saw blade depth is verifying the setting. After you tighten the lever, lift the blade guard and look. Does one tooth, or half a tooth, peek out? Or is it a full half-inch of exposed steel? Your eyes are the final check.
Why Blade Projection Rules Aren’t Just Suggestions
A blade set too deep does three bad things. It exposes more sharp steel, increasing the chance of contacting something (or someone) underneath. It forces the saw’s motor to drive more teeth through the wood at once, which can bog down the saw or trigger a kickback when the blade binds. Finally, it makes a rougher cut because the teeth exit the wood at a steeper angle, tearing the fibers instead of shearing them.
A blade set too shallow is less dangerous but just as frustrating. The teeth don’t clear sawdust effectively, so they recut it, generating heat. You’ll hear the motor strain and smell burning wood before you see the ragged, torn edge left behind.
The Manufacturer Disagreement You Need to Know
Here’s the confusing part. Open three different saw manuals, and you’ll get three different answers for “correct blade projection.”
| Manufacturer / Model | Official Recommendation | What It Means Practically |
|---|---|---|
This isn’t a case of one brand being right and the others wrong. It’s a difference in engineering philosophy. DeWalt’s half-tooth rule is for peak cutting efficiency in a pro’s hands. Makita’s one-tooth is a slight relaxation of that. Benchmark’s 1/4-inch rule is a blunt, foolproof safety guard.
My take? For 95% of DIY cuts on dimensional lumber or plywood, the 1/4-inch rule is the one to follow. It’s impossible to mis-measure, it keeps kickback risk low, and it leaves enough blade exposed for a clean cut. Save the half-tooth calibration for when you’re fine-tuning a cabinet-grade plywood cut.
How to Measure Depth Accurately (Forget the Scale)
The stamped metal scale on your saw’s guard is a suggestion, not a gospel. It gets bumped, it wears, and it’s rarely dead-on. You measure depth from the blade to the shoe, not from a number on a dial.
The right way: With the saw unplugged and the blade guard retracted, place the saw’s base plate on your workpiece. Lower the blade so it touches the material. Now, look at the side. How much tooth sticks out past the bottom? Grab a combination square or a small ruler. Measure the gap between the bottom of the workpiece and the tip of the longest tooth.
If you’re following the 1/4-inch rule, that gap should be 1/4 inch. For a half-tooth, the projection will vary based on the blade’s tooth size. This 30-second check is the difference between a guess and a known setting.
The Test Cut That Saves Your Project
Always make a test cut on a scrap piece of the same material. Run the saw. Examine the cut edge and the off-cut.
- Clean cut on both pieces, minimal sawdust: Your depth is perfect.
- Burn marks on the cut edge: The blade is likely too shallow, rubbing instead of cutting.
- Ragged, torn grain on the bottom: The blade is either too deep or dull. Check depth first.
- Saw struggles or kicks back: Depth is almost certainly too deep, causing binding.
This test is your real-world calibration. It overrules any manual, any video, any advice. The wood tells you the truth.
Depth Settings for Common Materials
You don’t need to measure for every single 2×4. Once you know the rules, you can set depth by material thickness for the most common DIY tasks. This table assumes you’re using the 1/4-inch projection rule.
| Material | Nominal Thickness | Set Blade Depth To (Approx.) | Note |
|---|---|---|---|
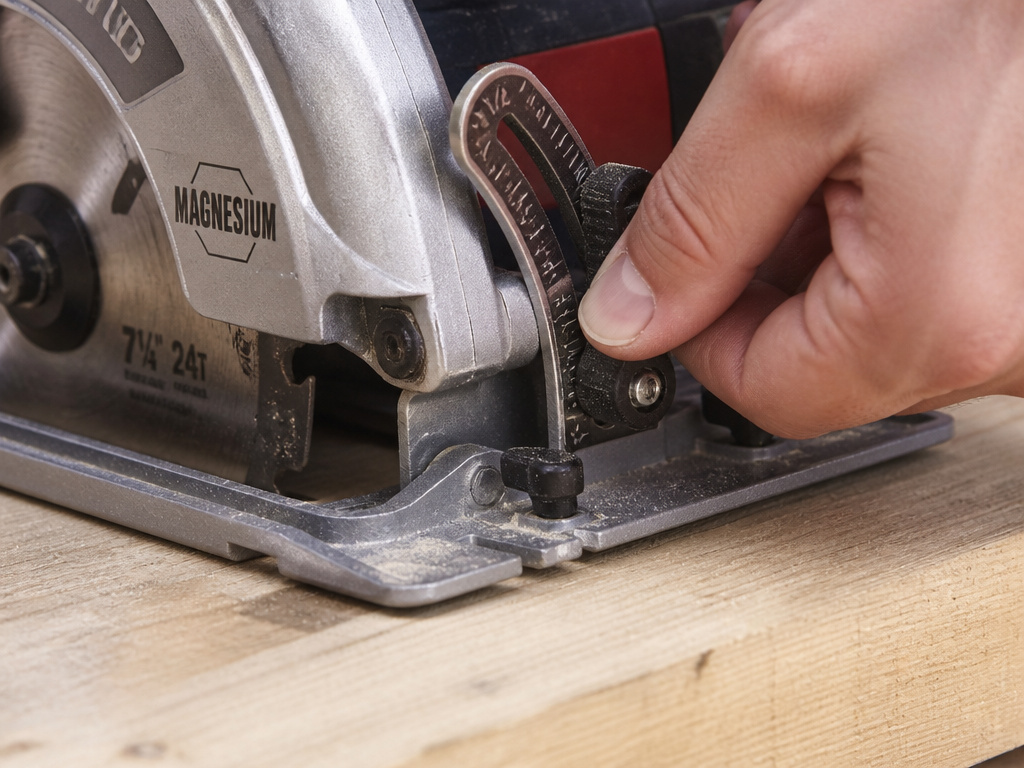
Easy to miss: The depth for a bevel cut is shallower than for a square cut. If you set your depth for a 2×4 at 90°, then tilt the saw to 45°, the blade won’t cut all the way through. You must reset the depth after tilting the shoe.
Common Depth Adjustment Mistakes and Fixes
The Mistake: Overtightening the depth lever until it feels like it’s going to break.
The Fix: Tighten it firmly until all play is removed. You’re not trying to crush the locking mechanism. If it slips, the mechanism is worn, not under-tightened.
The Mistake: Forgetting to re-adjust depth after changing the blade or the bevel angle.
The Fix: Make depth the last setting you check before the cut. Sequence: Install blade, set angle, then set depth.
The Mistake: The adjustment lever is stuck or impossibly stiff.
The Fix: This is usually sawdust and pitch in the threads or pivot. Unplug the saw. Spray a bit of dry lubricant (like PTFE spray) into the pivot point. Work the lever back and forth. Wipe away grime. Never force it.
How Bevel Cuts Change Everything
This is the most overlooked part of setting depth. When you tilt the saw for a bevel cut, the geometry changes. The blade is now cutting at an angle, so it needs to travel a longer path through the material to exit the other side. If you don’t increase the depth, you’ll only score the surface.
The Makita HS014G manual provides a clear example. For a flush cut along a wall (an extreme bevel), they specify setting the tool to its maximum negative bevel angle and then adjusting the depth; for flooring, the manual recommends setting the depth 5 mm thicker than the board thickness. The blade is tilted so far that its effective cutting depth is drastically reduced.
The rule: Any time you loosen the bevel adjustment knob, you must re-check your depth setting. It will need to be deeper than your initial square-cut measurement.
The Critical Safety Context
Depth adjustment isn’t just about cut quality. It’s a primary safety control. The Benchmark manual ties it directly to kickback prevention: “More blade depth will increase the chance of kickback.“
Other non-negotiable safety steps that must happen with correct depth setting:
- Wear safety glasses that comply with ANSI Z87.1. Everyday glasses aren’t enough.
- Keep both hands on the saw, with your second hand on the auxiliary handle. If both hands are holding the saw, they can’t be cut.
- Never reach underneath the workpiece to guide a cut. The guard can’t protect you there.
- Verify the blade is tight and sharp before each use. A wobbly or dull blade requires more force, increasing binding and kickback risk.
Before you start: The blade stays hot for minutes after a cut. When adjusting depth, retract the blade guard by hand—don’t let the hot teeth touch your skin. And always confirm the workpiece is secured to a stable platform. A shifting board is how depth settings become irrelevant and dangerous.
Frequently Asked Questions
Can you adjust the blade depth on any circular saw?
Yes. Every modern circular saw has a depth adjustment mechanism, typically a lever or knob on the shoe. It’s a fundamental feature for controlling cut depth and safety.
What is the typical depth of cut for a 7-1/4″ circular saw?
Standard 7-1/4″ saw’s maximum depth varies by model; for example, the DeWalt DCS578X1 can cut 2-9/16″ (65 mm) deep at 90°. This is enough to completely sever a 2×4 (which is actually 1.5 inches thick) in a single pass.
How deep will a 6-1/2″ circular saw cut?
6-1/2″ saw, like the Benchmark 20V MAX model, has a maximum cut depth of 2 inches (54 mm) at 90°. This is still sufficient for cutting through standard 2×4 lumber and most sheet goods.
Do I need to set the depth differently for ripping vs. Crosscutting?
No, the depth setting is based solely on the thickness of the material you’re cutting, not the direction of the cut. Whether you’re ripping a board lengthwise or crosscutting it, the blade should still only project about 1/4 inch past the bottom.
Why does my saw burn the wood even with a sharp blade?
Burning is often a depth issue, not a sharpness issue. If the blade is set too shallow, the teeth rub instead of taking full bites, creating friction and heat. Before blaming the blade, double-check your depth setting. For a deeper dive, our guide on why your saw burns the wood covers all the causes.
Before You Go
Here’s the one habit that will make this stick: after you change a circular saw blade or set a bevel, place your finger on the depth lever. That’s your mental trigger to check the setting. Don’t assume it’s still right from the last cut.
If you only remember one number, make it 1/4 inch. It’s the benchmark that keeps you safe across any brand of saw. The pros can debate half-tooths and gullets, but for clean, controlled, and kickback-free cuts in the real world, that quarter-inch of exposed tooth is the line you don’t cross. Now go make some dust.
