
Hammer Tacker vs Staple Gun: Which Should You Buy?
This post contains affiliate links. As an Amazon Associate, we earn from qualifying purchases.
A hammer tacker drives staples with a hammer-like swing for speed on large surfaces, while a staple gun uses a trigger squeeze for precision in detailed work. According to some sources, the hammer tacker wins for bulk jobs like insulation or roofing felt; the staple gun wins for upholstery or finish carpentry. However, other sources classify those same bulk jobs as heavy-duty applications suitable for a hammer tacker.
That gap between a swing and a squeeze is where the whole decision lives, such as when choosing between a hammer tacker vs staple gun. One is a full-arm motion, the other is a controlled pull. The material you’re fastening and the precision you need decide which motion is right.
What follows: the exact specs that separate them, a table that compares them head-to-head, and the specific project types where each tool fails or succeeds. By the end, you’ll know whether to reach for the hammer or the gun.
Key Takeaways
- Choose a hammer tacker for speed on large, flat surfaces like installing insulation or roofing felt where perfect placement isn’t critical.
- Choose a staple gun for precision on detailed work like upholstery, cable management, or attaching trim where control matters more than raw speed.
- Most hammer tackers use T50 (A11) staples in 1/4-inch to 3/8-inch lengths; always pick the shortest staple that will fully penetrate your material.
- Never place your hand under the exit point of a staple gun; the staple fires with enough force to cause serious injury.
- For heavy-duty professional work, a pneumatic staple gun connected to an air compressor delivers the most power and can use the longest staples.
The Core Difference: Swing vs. Squeeze
The names tell you everything. A hammer tacker you swing. A staple gun you squeeze.
A hammer tacker uses the momentum of your arm swing to drive a staple, similar to striking with a hammer. A staple gun uses a spring-loaded trigger mechanism that fires the staple when you squeeze the handle. This fundamental action dictates speed, control, and the type of work each tool excels at.
That swing action is why a hammer tacker is significantly faster on a big job. You cover ground quickly because each swing drives a staple. There’s no aiming beyond the general area, no careful trigger pull. You just whack and move. The trade-off is accuracy. A staple fired from a swinging hammer tacker lands where your swing lands, not where you precisely intended.
A staple gun is the opposite. You seat the nose flush against your workpiece, aim, and squeeze. The staple goes exactly where you pointed the tool. That control is essential for upholstery, where you’re stretching fabric with one hand and placing staples with the other. It’s also critical for any task where a protruding staple point is a safety hazard or a cosmetic flaw. The cost of that control is speed and arm fatigue from repeated squeezing.
A Quick-Reference Comparison Table
This table lays out the key specs side-by-side. Use it to match the tool to your job’s requirements.
| Feature | Hammer Tacker | Staple Gun (Manual) |
|---|---|---|
| Primary Action | Hammer swing | Trigger squeeze |
| Hands Required | One | Two (one to hold material, one to operate) |
| Best For | Speed on large areas (insulation, roofing felt, house wrap) | Precision on detailed work (upholstery, trim, crafts) |
| Typical Staple Size | T50 / A11 staples (1/4″ – 3/8″ leg length) | Varies by model (crown staplers, narrow crown, etc.) |
| Power Source | Manual (arm strength) | Manual (hand strength), Electric, or Pneumatic |
| Portability | High; no cords or compressors | Manual: High. Electric/Pneumatic: Lower (cord/battery/air hose) |
When to Swing: Hammer Tacker Best Uses
Think bulk, not detail. A hammer tacker is your tool for covering thousands of square feet in a shift, where a single misplaced staple doesn’t matter because it will be covered.
Roofing felt, house wrap, and insulation are the classic jobs. You’re securing large, flexible sheets to a wooden frame. Speed is the goal, and the hammer tacker delivers. You can move along a roof rafter or a wall stud, slapping staples in as fast as you can swing. The staples only need to hold the material flat and tight until the final exterior or interior covering goes on.
Carpet padding and moisture barriers fall into the same category. You’re fastening a layer that will be hidden under carpet, tile, or flooring. Perfect alignment isn’t just unnecessary; it’s a waste of time.
Common mistake: Using a hammer tacker on thin, delicate materials like fabric for a chair. The swing is too aggressive, often tearing the material or driving the staple too deep. That’s a job for a staple gun.
The tool itself is slim and straightforward. Many hammer tackers are designed for T50 staples and are industry standards for bulk work. They load like most staple guns: you release an internal spring, insert a strip of T50 staples with the staple crowns facing up, and push the spring back in until it clicks. Then you’re ready to swing.
When to Squeeze: Staple Gun Best Uses
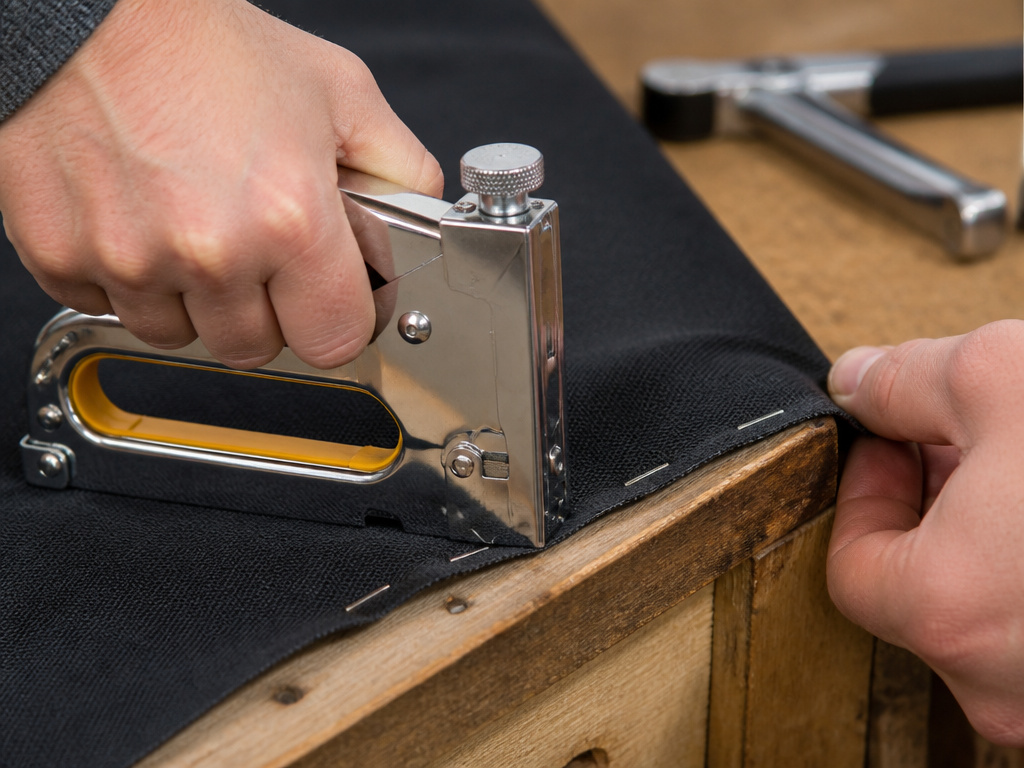
Precision is the name of the game. If you need to place a fastener exactly, control the depth, or work in a tight space, you need a staple gun.
Upholstery is the staple gun’s domain. Re-covering a chair or sofa demands you pull fabric taut with one hand while placing staples precisely along a frame with the other. A hammer tacker is impossible to control one-handed and would destroy the fabric. A manual staple gun gives you the perfect blend of power and control. For a deep dive on technique, read our guide on how to use a staple gun safely.
Finish carpentry and crafts are next. Attaching thin trim, securing cabinet backing, or assembling a decorative box requires careful placement. You can see exactly where a staple gun will place the staple before you fire it. Many also have built-in guides to prevent crushing underlying wires, making them safer for low-voltage cable management.
The world of staple guns has three main types, which our article on the types of staple guns covers in detail. For most DIYers, a manual staple gun is sufficient. If you’re doing a huge upholstery job, an electric staple gun saves your hand from fatigue, though it tethers you to an outlet. For the ultimate in power, professionals use pneumatic staple guns connected to an air compressor, which can drive the longest staples for the toughest materials.
Staple Size and Compatibility: The Universal Rules
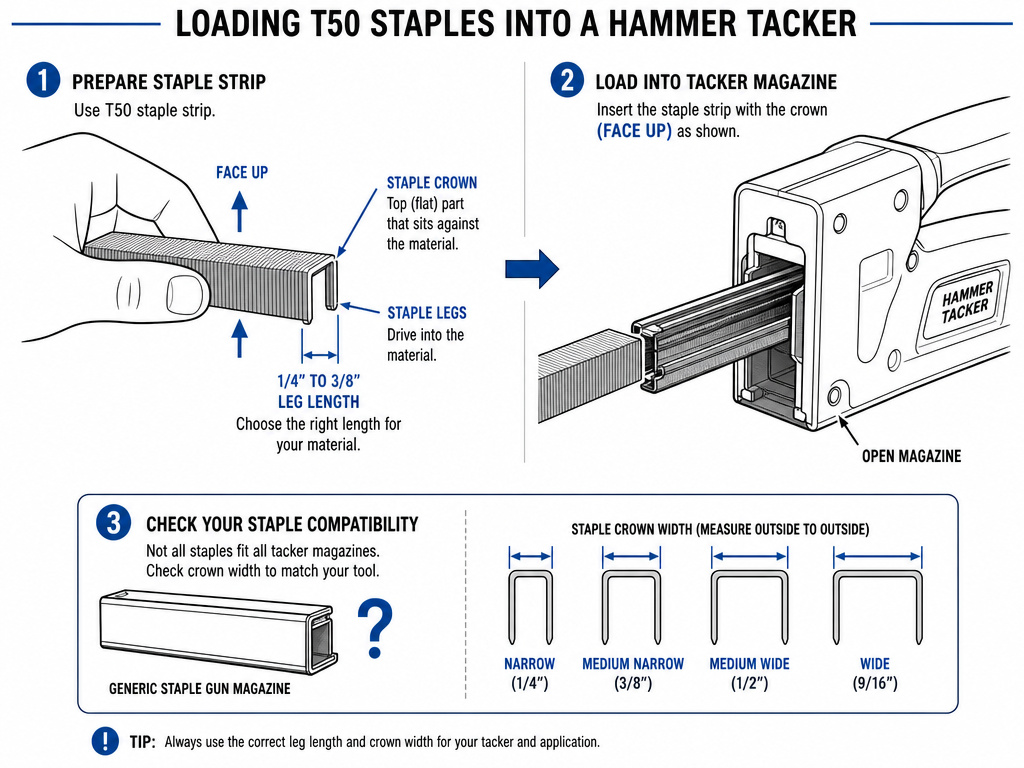
Both tools are useless without the right ammunition. Get this wrong, and you’ll have a jammed tool or a failed project.
Most hammer tackers are designed for T50 staples, which are also known as A11 staples. These come in leg lengths from 1/4 inch to 3/8 inch. The tool’s magazine typically accepts staples from 8 mm to 10 mm deep (which roughly corresponds to that 1/4″ to 3/8″ range). The rule from the manufacturer is clear: always choose the shortest staple that will adequately secure the material. A longer staple doesn’t mean a better hold; it means a higher chance of the point protruding where it shouldn’t.
Staple guns have a wider variety. They might use narrow-crown staples for finish work, wide-crown staples for sheathing, or even specialized staples for specific brands. This is where confusion sets in. Some models, especially older or proprietary ones, require staples from the same brand. Always check your manual. If you’re unsure, ask your supplier what fits your specific gun and job. For a complete breakdown, our staple size guide is the place to go.
Loading both follows a similar, critical procedure. For a hammer tacker, you release the internal spring mechanism, insert the staples with their faces up, then carefully reinstall the spring until you hear a click. The same basic idea applies to loading a staple gun, though the mechanism varies. Doing it wrong is the fastest route to a jammed staple gun.
Safety First: The Non-Negotiable Steps
These tools drive metal fasteners with force. Respect that force.
Before you start: Never place any part of your hand under the business end of a staple gun. The staple fires with enough power to penetrate skin and bone. For a hammer tacker, ensure your swing path is clear and the material is stable to avoid a glancing blow that could send the tool flying.
With a staple gun, you typically use two hands: one to hold the material, one to operate the tool. That hand holding the material must never be in line with the staple’s exit path. It seems obvious until you’re focused on stretching fabric or holding a piece of trim. Make it a habit to check.
A hammer tacker’s danger is in its momentum. A missed swing or a strike on an unexpected hard surface can cause the tool to kick back. Keep a firm grip and swing with a controlled wrist flick, not a wild arm motion. Always hold the tool parallel to the work surface and keep the head level and straight as you strike.
Making the Final Choice: Project-Based Scenarios
We can apply this to real jobs. Your project tells you which tool to buy in the hammer tacker vs staple gun debate.
Scenario 1: Installing fiberglass batt insulation in an attic.
You have hundreds of square feet to cover. The staples will be hidden behind drywall. Speed is everything; precision is irrelevant. Tool Choice: Hammer Tacker. It’s the only answer. You’ll finish in a fraction of the time.
Scenario 2: Re-upholstering a dining room chair.
You need to attach new fabric to a wooden frame, pulling it tight around curves and corners. Every staple must be placed exactly to create a smooth, professional finish. Tool Choice: Manual Staple Gun. The control is mandatory. Consider an electric model if you have multiple chairs.
Scenario 3: Securing roofing felt (tar paper) to a shed roof.
This is a large, flat surface where the staples will be covered by shingles. You want to move quickly. Tool Choice: Hammer Tacker. This is its home turf. A heavy-duty hammer tacker is built for this.
Scenario 4: Attaching decorative lattice to a garden trellis.
The lattice is thin wood. Staples will be visible, so they need to be straight and flush without splitting the material. Tool Choice: Staple Gun with narrow-crown staples. The precision of a staple gun prevents splits and ensures neat placement.
Sometimes, the answer is both. A contractor hanging house wrap might use a hammer tacker for the vast field of the wall but switch to a staple gun for precise fastening around windows and doors. Your toolbox can hold a hammer tacker for bulk work and a reliable manual staple gun for detail.
Frequently Asked Questions
What is the main difference between a hammer tacker and a staple gun?
The main difference is the driving action. A hammer tacker uses a swinging hammer-like motion to drive staples, favoring speed. A staple gun uses a squeezing trigger action, favoring precision and control.
What do you use a hammer tacker for?
Use a hammer tacker for fast, bulk applications where staples will be hidden. This includes installing insulation, roofing felt, house wrap, carpet padding, and moisture barriers over large areas.
What staples does a hammer tacker use?
Most hammer tackers use T50 staples, also known as A11 staples. These come in leg lengths from 1/4 inch to 3/8 inch (approximately 8 mm to 10 mm deep).
Is a pneumatic staple gun better than a hammer tacker?
It’s not better, it’s different. A pneumatic staple gun is more powerful and can use longer staples, making it suitable for heavy-duty professional work like furniture building or sheathing. However, it requires an air compressor. A hammer tacker is faster and more portable for bulk installation of thinner materials.
Can you use a staple gun for roofing?
You can, but it’s the wrong tool for the job. A staple gun is too slow for the vast area of a roof. A hammer tacker is three to five times faster, which is why it’s the standard tool for securing roofing felt.
Before You Go
One rule most guides skip: if your project involves both large expanses and detailed corners, you might genuinely need both tools. Buying a hammer tacker for a one-time insulation job and then expecting it to handle a chair re-upholstery project is a recipe for frustration and ruined fabric.
For the vast majority of DIYers tackling common jobs, the choice is clear. If you’re staring at a roll of insulation or a bundle of roofing felt, get a hammer tacker. If you’re looking at a sagging chair seat or a bundle of trim, get a manual staple gun. Start with the tool that matches the majority of the work you see yourself doing in the next year. You can always add the other one later when a new project demands it. Don’t overthink it.
