
Cutting Bricks With a Tile Saw: The 3-Step Safety Check
This post contains affiliate links. As an Amazon Associate, we earn from qualifying purchases.
You can cut bricks with a standard wet tile saw, but it requires matching three things: your saw’s cutting depth, a diamond blade rated for masonry, and consistent water cooling. Brick is often softer than porcelain tile, but its abrasiveness and thickness demand a specific setup to avoid burning out the saw’s motor or pump.
The Vevor TC180II is designed for sawing brick, stone, and tiles, but it also states the machine must only be operated by persons familiar with its hazards. That’s the critical line most DIY guides skip. Brick cutting isn’t about raw power; it’s about managing the gritty, muddy byproduct that can seize a pump and checking if your saw’s throat depth can actually clear the material. A common task like cutting bricks with a tile saw illustrates these points perfectly.
What follows is the three-step safety check, the actual cutting sequence, and the post-job cleanup that keeps your saw from dying an early, slurry-clogged death.
Key Takeaways
- Verify your saw’s maximum cutting depth against the brick’s thickness; for example, the Pearl Abrasive VX141MSPRO masonry saw cuts 5 inches deep.
- Use a masonry-rated diamond blade; a continuous-rim tile blade will glaze over and burn on brick within minutes.
- Maintain constant water flow; brick slurry is abrasive and will jam an impeller pump if the water level drops.
- Clean the pump and tray immediately after cutting; dried brick mud is concrete and will ruin the saw.
The 3-Step Pre-Cut Safety Check
Before you even plug in the saw, run through these three checks. Missing one turns a simple job into a broken tool or a safety hazard.
First, measure your brick and your saw’s throat. The maximum cutting depth varies wildly by model. The Pearl Abrasive VX141MSPRO masonry saw cuts 5 inches deep. A typical 7-inch DIY tile saw may have a limited cutting depth; always check your saw’s specifications. If your brick is 2-1/2 inches thick and your saw only cuts 1-1/4, you must plan to cut from both sides or find another tool. Forcing a too-thick brick will stall the motor and likely crack the blade.
Second, inspect the blade. The factory blade that came with your saw is almost certainly a continuous-rim diamond blade for ceramic or porcelain. It has a smooth edge. For brick, you need a blade rated for masonry or general purpose. These often have a segmented rim, small gaps between the diamond sections, which helps clear the wet, gritty debris and prevents overheating. Using a tile blade on brick will cause it to “glaze over.” The diamonds get polished smooth by the abrasive brick material, the blade stops cutting, and the friction generates enough heat to crack the brick or damage the saw’s motor bearings.
Where this goes sideways: Using a tile blade on brick. The blade glazes over within a few feet of cutting, the motor strains, and the brick can shatter from the heat stress. Swap in a masonry blade first.
Third, test the water system. Fill the tray, plug in the saw, and turn on the pump only (don’t start the blade). Watch the water stream hitting where the blade will spin. It needs to be consistent. Brick cutting creates a thick, sandy slurry. If the water flow is weak or the pump inlet clogs, the blade runs dry instantly. A dry diamond blade on brick wears out in seconds and can warp from the heat. The Pearl Abrasive PA-7R manual explicitly lists “no water flow to blade” as a critical troubleshooting point, advising to check for kinks and clean the impeller.
| Check | What to Look For | What Happens If You Skip It |
|---|---|---|
| Cutting Depth | Blade must clear brick thickness in one pass or via a planned flip. | Brick binds, motor stalls, blade snaps, or cut is incomplete. |
| Blade Type | Segmented-rim diamond blade labeled for masonry/general purpose. | Blade glazes, stops cutting, overheats, and ruins the blade. |
| Water Flow | Strong, consistent stream from pump to both sides of blade. | Blade runs dry, overheats, warps, and bricks dust becomes airborne silica. |
Gearing Up: What You Actually Need
You need more than the saw. Brick slurry is messy and abrasive, and the process is loud.
Start with real safety gear. ANSI-approved safety glasses are essential. Not old sunglasses, sealed goggles. Brick slurry is wet concrete dust, and a spray to the eye is a trip to the emergency room. Add a dust mask or respirator. Even with water, fine silica particles become airborne. A basic N95 mask works. Hearing protection is wise; wet saws can be loud; hearing protection is wise.
For the saw itself, you need a masonry diamond blade. Don’t overthink it. You need a masonry diamond blade that matches your saw’s diameter and arbor size. The arbor size is critical, it must match your saw’s spindle. The arbor size must match your saw’s spindle. Using a reducer bushing for a smaller arbor can cause blade wobble and vibration.
Other tools include a speed square or carpenter’s square for marking straight lines, a grease pencil (ink washes off), and a stiff-bristle brush for the messy cleanup you’ll do after. Have a bucket and sponge ready to manage the watery mess.
The Step-by-Step Cut
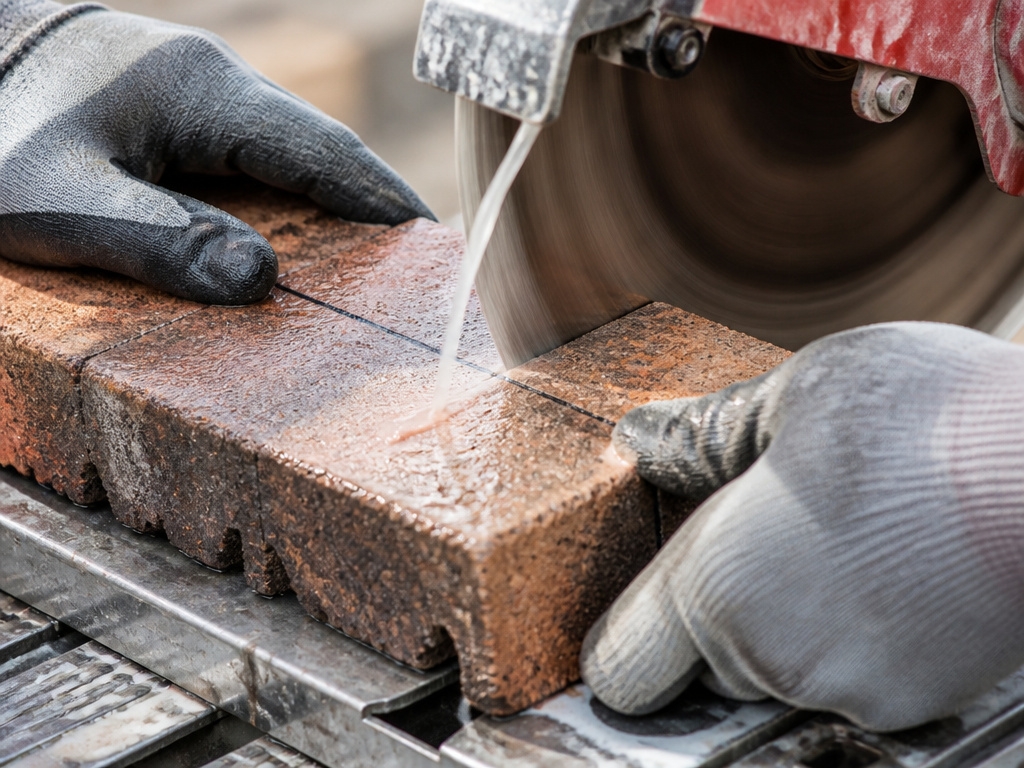
With the checks done and gear on, the cut itself is straightforward. Aim for a slow, steady feed so the blade and water do the work.
- Mark and Set Up. Mark your cut line on the brick with a grease pencil. Set the brick in the saw’s tray, supporting it so it won’t rock. Adjust the fence or guide so the marked line aligns with the blade. Do a dry run (saw off) to ensure the brick moves smoothly and the blade will contact where you want.
- Power and Coolant. Turn on the water pump first. Wait for the stream to hit the blade. Then, start the saw motor and let it reach full speed. You’ll hear a distinct change in pitch.
- Make the Cut. Gently feed the brick into the blade. Don’t push. You should hear a steady, gritty grinding sound and see a stream of muddy water. If you hear a high-pitched whine or smell burning, you’re feeding too fast or the water isn’t hitting the blade. Stop, back out, and check coolant flow.
- Complete the Pass. Push the brick completely through until the cut piece separates. Keep both hands clear of the blade path. For thicker bricks requiring a flip, cut halfway, turn the brick over, align the blade with the existing kerf, and complete the cut.
Let the saw do the work. If you have to lean into the brick to keep it moving, your blade is either wrong, dull, or the water flow has failed. Forcing it only breaks things.
The sensory cue is sound and slurry. The slurry should be a thin, milky paste. If the slurry looks dry and powdery, or you see sparks, stop immediately. The blade is dry and overheating.
Post-Cut: The Cleanup Nobody Mentions
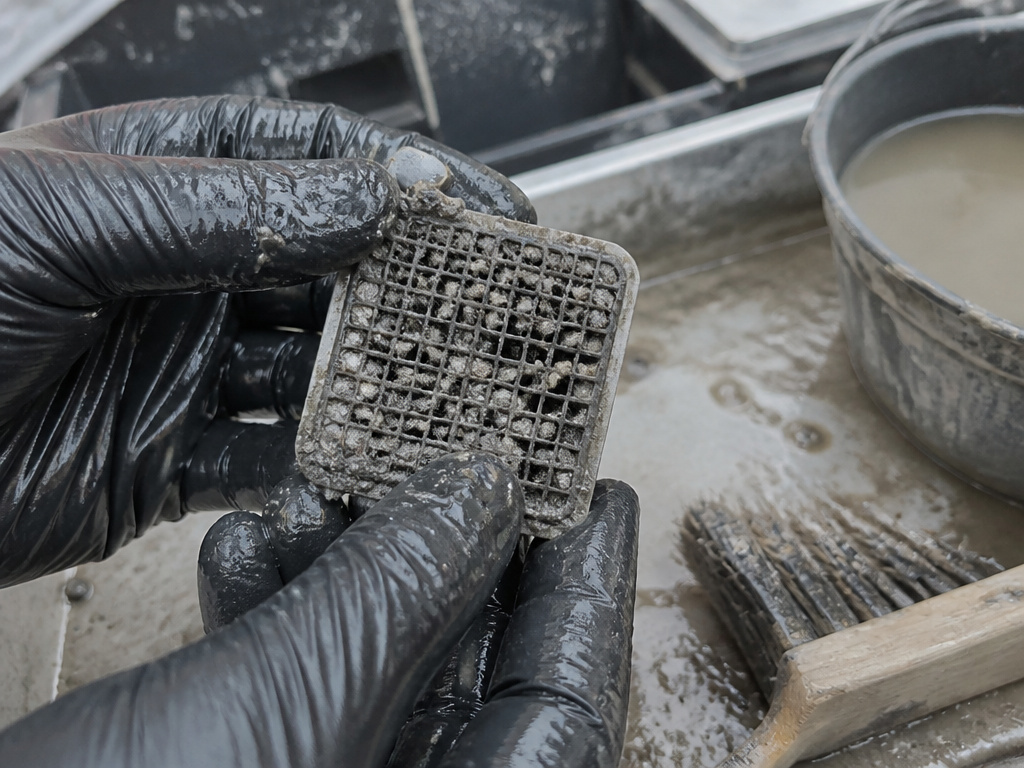
This is the step that preserves your tool. Brick slurry is essentially wet concrete. Left to dry in the pump or tray, it turns to rock.
As soon as you finish cutting, unplug the saw. The Vevor TC180II manual is explicit: “Unplug tile saw before changing water.” Pull the drain plug or carefully tip the tray to empty the slurry water into a bucket. Do not pour it down a sink drain, it will settle and harden in your pipes. Dispose of it outside on gravel or in construction waste.
Next, flush the tray with clean water. Use your stiff brush to scrub the tray, rails, and any removable parts. Pay special attention to the water pump inlet screen. This little filter catches debris to protect the impeller. It will be caked with sand. Rinse it clean.
Finally, wipe down the entire saw with a damp cloth. The Vevor manual advises using only a damp cloth and soap, warning against harsh chemicals that can damage plastic and metal. Let everything air dry completely before storing it. A saw put away wet will grow mold and the residual grit will accelerate corrosion on every moving part.
Tile Saw vs. Angle Grinder for Brick
When does it make sense to use a different tool? For a few straight cuts on standard bricks, cutting bricks with a tile saw is fine. For a whole patio’s worth, or for cuts deeper than your saw’s capacity, the equation changes.
An angle grinder with a diamond masonry blade is a common alternative. It’s more versatile and handles thicker material easily. Here is a direct comparison.
| Factor | Wet Tile Saw | Angle Grinder with Diamond Blade |
|---|---|---|
| Cut Quality | Superior. Perfectly straight, smooth, splinter-free edges. | Good. Can be very straight with a guide, but edge is rougher. |
| Dust Control | Excellent. Water contains all silica dust. | Poor. Creates massive amounts of hazardous silica dust unless used with a vacuum. |
| Depth Capacity | Limited by saw throat (often 1-1/4″ to 2-3/8″). | Virtually unlimited; can cut through any thickness with multiple passes. |
| Portability & Setup | Low. Heavy, requires water source, cleanup. | High. Cordless, grab and go, no cleanup. |
| Best For | Precision cuts on bricks that fit, indoor work, dust-sensitive areas. | Quick cuts, thick material, notches, curves, outdoor projects. |
The grinder wins on speed and depth. The tile saw wins on cleanliness and precision. For cutting a simple notch for a pipe in a single brick, the grinder is the right tool. For slicing fifty brick pavers to a exact dimension for a walkway, cutting bricks with a tile saw is worth the setup.
Troubleshooting Common Problems
Even with preparation, things can go wrong. Here’s how to diagnose the usual suspects.
- Blade won’t cut / Slow cutting: The blade is glazed or dull. This is the most common issue when using a tile blade on brick. Dress the blade by making a few cuts into a concrete paver or abrasive brick to expose fresh diamonds. If that doesn’t work, the blade is shot.
- Excessive vibration: The blade isn’t mounted tight or is damaged. Unplug the saw and check that the blade nut is secure. The inner and outer flange washers on the Vevor TC180II are different, make sure they are installed correctly. A bent blade or worn arbor bearings also cause this.
- Motor shuts off mid-cut: Circuit overload. The Pearl Abrasive PA-7R manual points directly to this: “The fuse or circuit breaker may not have sufficient capacity, use 20-amp power.” You’re likely on a 15-amp circuit with other loads. Plug into a dedicated 20-amp outlet. Also, check that your extension cord is heavy enough (12-gauge for long runs).
- No water flow: Clogged pump. Unplug the saw. Check the feed tube for kinks. Clean the inlet screen. As the PA-7R manual suggests, you may need to remove the pump housing to clean the impeller and apply a drop of light oil so it spins freely.
Before you start: Brick cutting generates slurry that can jam pump impellers and abrasive dust that harms lungs. Wear sealed eye protection and a respirator. Always unplug the saw before checking or cleaning the water system.
Frequently Asked Questions
Can I use my tile saw to cut brick?
Yes, if your saw has enough cutting depth for the brick’s thickness and you use a masonry-rated diamond blade. The Vevor TC180II manual lists brick as an intended use. The water cooling is essential to control dust and prevent blade overheating.
What is the best blade for cutting brick with a tile saw?
Segmented-rim diamond blade rated for masonry or general purpose. Avoid the continuous-rim blades designed for ceramic tile, as they will glaze over and stop cutting on abrasive brick material. Match the blade diameter and arbor size (commonly 7″ and 5/8″) to your saw.
Do I need water to cut brick with a tile saw?
Absolutely. Running a diamond blade dry on brick will destroy it in seconds due to overheating. The water also suppresses the hazardous silica dust created by cutting masonry, which is a major health concern. It turns the dust into a manageable slurry.
Can I cut concrete blocks with a tile saw?
You can, but it’s challenging. Concrete blocks are thicker and more abrasive than standard brick. Most tabletop tile saws lack the depth capacity and motor power. A dedicated masonry saw like the Pearl Abrasive VX141MSPRO is built for this, with a 5-inch cutting depth and a 2HP motor. For a few cuts on a small block, a tile saw with a diamond blade might work with slow, careful passes.
Is an angle grinder better than a tile saw for brick?
It depends on the job. An angle grinder is faster, more portable, and can cut any thickness. However, it creates huge amounts of dangerous silica dust. A wet tile saw provides a cleaner, more precise cut with zero dust, but it’s limited by depth and requires setup and cleanup. For a few outdoor cuts, the grinder is fine. For precision or indoor work, the wet saw is safer.
The Bottom Line
Cutting brick with a tile saw works, but it’s a conditional yes. The condition is your saw’s depth capacity. If your brick is thicker than your saw’s maximum cut, stop. That’s the hard line. No amount of blade swapping or technique will overcome a physical limit.
For bricks that fit, the job boils down to blade and water. Buy a masonry blade. Guard the water flow like the tool’s life depends on it, because it does. And clean the gritty aftermath immediately; that slurry is a pump’s worst enemy.
The right tool isn’t always the one you already own.
