
How to Undercut Door Jambs With an Oscillating Tool
This post contains affiliate links. As an Amazon Associate, we earn from qualifying purchases.
To undercut a door jamb with an oscillating tool, you need three things: a scrap piece of your new flooring as a height guide, a flush-cut wood blade, and a steady hand. The oscillating head allows you to make a flush horizontal cut, letting the flooring slide under the jamb. Using the wrong blade or technique can lead to scuffed trim, broken teeth, and an uneven cut that shows.
That gap is essential for floating floors like LVP. It’s not an aesthetic choice; it’s a mechanical requirement for the floor to expand and contract without buckling. Most guides tell you to just slide the blade in and go. They skip the part where a standard blade runs out of reach halfway through a thick casing, or where a hidden finishing nail instantly ruins a fresh edge. This is why you need to know how to undercut door jambs with an oscillating tool.
What follows is the workshop method for how to undercut door jambs with an oscillating tool: the specific blade specs that matter, the debate on tool speed, and the four ways a simple cut can go sideways if you aren’t watching for them.
Key Takeaways
- Use a scrap flooring piece as a physical height guide; guessing the cut depth almost guarantees the plank won’t fit.
- An extended reach blade (2-3/4″ minimum) is essential for cutting through wide casings and inner door stops in one pass.
- The speed setting is contested: the Benchmark manual says maximum OPM, but pros often start with a controlled medium-high speed to prevent blade grab and blowout.
- Expect hidden nails in the jamb; a bi-metal or titanium-coated blade rated for wood and metal saves you from a ruined blade mid-cut.
- Undercutting saves 4-6 hours of labor per room compared to removing, trimming, and reinstalling door casing.
Why Blade Length is Your First Problem
Standard multitool blades offer 1-1/2 to 2 inches of cutting depth. On a typical door casing, that’s often not enough. The blade hits the outer molding at an angle, runs out of length before reaching the inner door stop, and forces you into an awkward plunge. The result is a jagged cut and almost certainly a scuff on the visible face of your trim.
An extended reach blade for undercutting should have a 2-3/4” cutting depth. This bridges the width of thick trim and deep jambs, letting you lay the blade flat and make the cut in one smooth, horizontal stroke.
That spec comes from an EZARC Tools guide, and it’s the single biggest upgrade you can make for this job. An extended reach blade with a 2-3/4” cutting depth gives you the reach to clear both the outer casing and the inner jamb without the tool body bumping into the wall. It turns a finesse job into a straightforward pass.
This is where choosing the right oscillating tool blades pays off. For clean wood cuts, you want a sharp, flush-cut design. If you suspect, or discover, nails, you need a blade rated for both materials.
The Right Gear for the Job (Beyond the Tool)
Your oscillating multi-tool is the star, but the supporting cast determines the final cut quality. Here’s what you actually need on the bench.
The Non-Negotiables:
- Oscillating Multi-Tool: Any corded or cordless model will work. For reference, a tool like the Benchmark Oscillating Multi-Tool Kit runs at 120V, 3.0 amps, with a variable speed range of 11,000–21,000 OPM.
- Extended Reach Flush-Cut Blade: Aim for 2-3/4″ of cutting depth. A titanium-coated blade resists heat and handles incidental nails better than basic carbon steel.
- Scrap Flooring & Underlayment: This is your gauge. It must be the exact thickness of your installed floor.
- Safety Gear: This isn’t optional. You need CSA approved eye protection, ear protection, and a face mask. The manual is adamant on all three.
The Problem-Solvers:
- Wood Chisel & Mallet: For prying out the stubborn cut-out block if it doesn’t fall free.
- Shop Vac: A clean cut line is a visible cut line. Dust obscures your guide mark.
- Painter’s Tape: Apply a strip along the cut line to minimize paint chipping.
Before you start, know how to change the blade on your specific model. A loose blade wanders and ruins your cut.
The Speed Debate: Manual vs. Real World
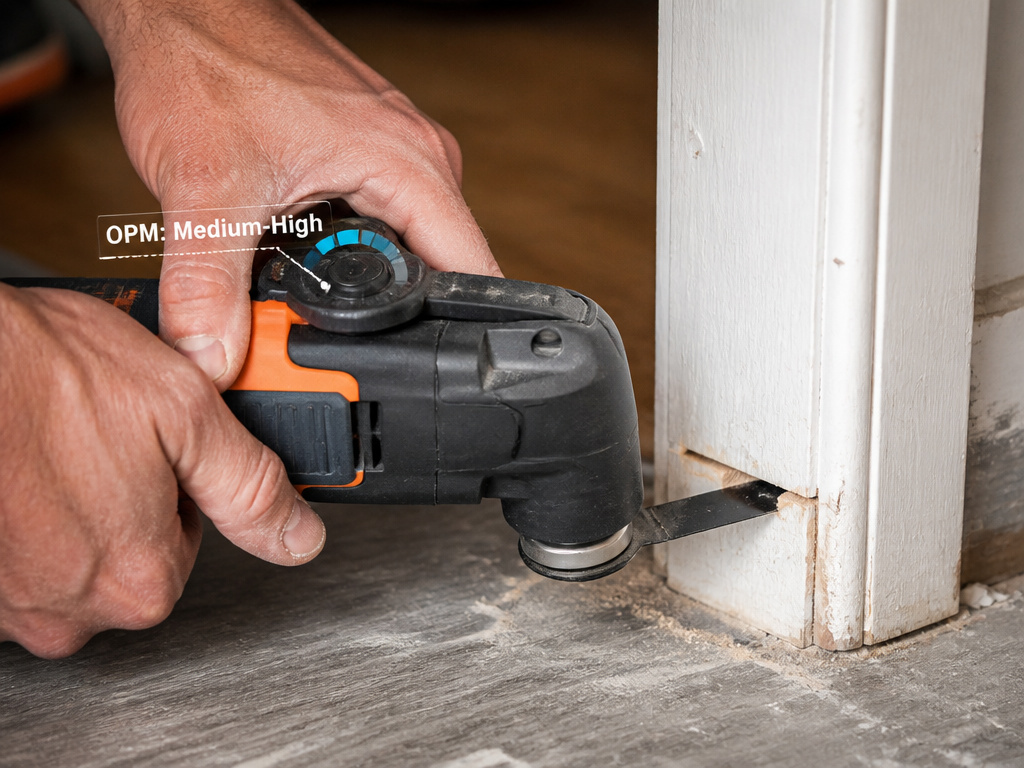
Here’s a clear disagreement the top search results won’t resolve for you. The official Benchmark manual for its oscillating tool states plainly: for flush cutting a door jamb, use the “fastest speed” (Maximum OPM).
Other professional sources contradict this. One flooring pro guide advises a “medium-high speed” to maintain control when sliding through the jamb. Another suggests starting with a light, shallow pass to let the teeth establish a kerf, implying a more measured pace than full throttle.
So who’s right? The Benchmark manual recommends maximum speed for efficiency, while other professional sources recommend a medium-high or controlled speed for better control and to minimize tear-out.
| Speed Setting | Source | The Rationale |
|---|---|---|
| Maximum OPM (Fastest) | Benchmark Tool Manual | Maximizes cutting speed for efficiency in the demonstrated procedure. |
| Medium-High / Controlled | JourneymanHQ, FloorTalks | Improves control, reduces blade grab and heat, and minimizes blowout on the exit side of the cut. |
In the real world, I start at a medium-high setting. A blade at maximum speed can bounce and grab, especially at the start of the cut or if it hits a tough knot. You can always increase speed if the blade is moving smoothly; it’s harder to repair a chunk torn out of your door casing.
The 7-Step Process for a Clean Undercut
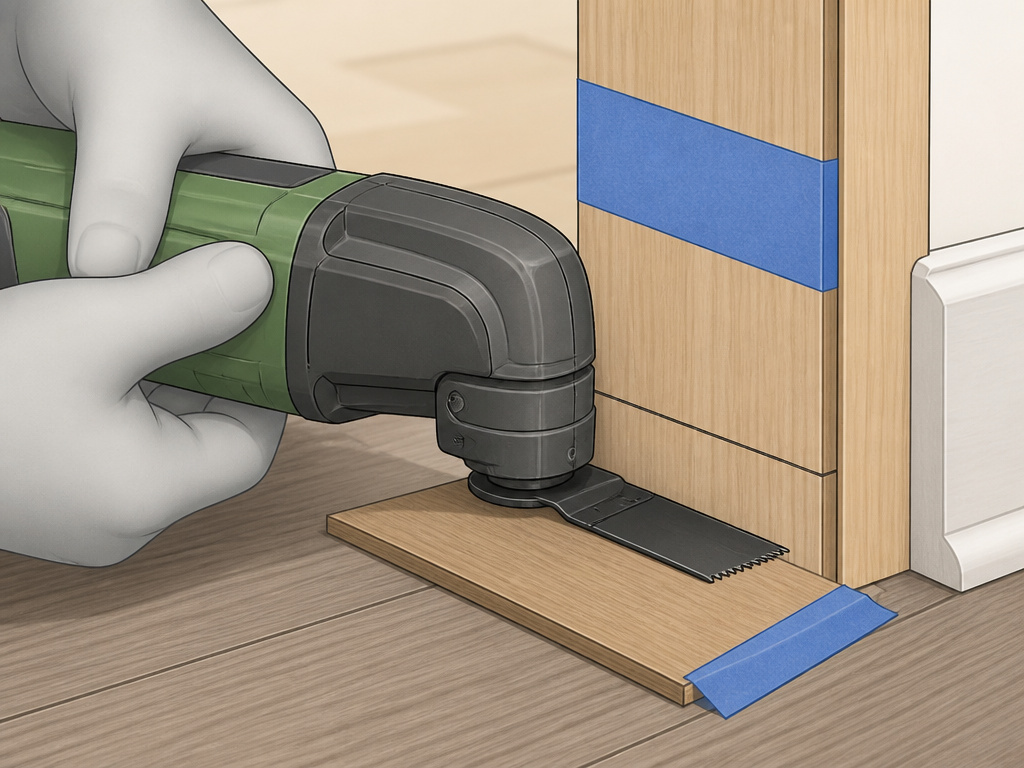
This list of actions is specifically ordered to prevent the four most common errors: cutting too deep, scarring the trim, leaving waste behind, and missing hidden fasteners.
1. Mark the Cut Line.
Don’t just hold the scrap flooring in place. Tape it down securely against the jamb. Use a pencil or a knife to scribe a line along its top edge on both sides of the casing. A mark on one side only guarantees your cut will angle inward or outward by the end.
2. Apply Painter’s Tape.
Run a strip of tape just above your scribed line. This helps contain splintering and gives you a crisp visual guide to follow with the blade.
3. Set Your Blade and Tool.
Install your extended reach blade, ensuring it’s tight and centered in the holder. Place your scrap flooring guide back on the floor. Rest the blade flat on top of it. This physical stop is your guarantee of cut height. The tool should now be at the correct height to start the cut.
4. Make the Initial Kerf.
Start the tool at a medium speed. Gently ease the blade into the casing at one end, using your guide to keep it level. Let the tool do the work; forcing it creates heat and jump. Make a shallow scoring pass along the entire line to establish your cut path.
5. Complete the Cut.
Once the kerf is established, you can proceed with full, steady pressure. Guide the tool horizontally, following your taped line. If you feel significant resistance, stop. You’ve likely found a nail. For this, having a blade that can cut nails flush is part of the job. Don’t force a wood-only blade through metal.
6. Remove the Waste.
Often, the rectangular block will fall out. If it doesn’t, don’t pry it. Use a sharp wood chisel to tap it loose from the backside. A block that remains stuck is often pinned by a brad nail, cutting again is better than ripping and splintering the casing.
7. Test and Clean.
Slide your scrap flooring piece into the new gap. It should slip under with slight resistance. Vacuum out the channel thoroughly; debris left inside can prevent the actual floor plank from seating fully.
Where This Goes Sideways: Hidden Fasteners and Door Stops
The theory is a clean cut through wood. The reality often includes hardened steel. Door jambs are secured to the wall framing with finishing nails or staples, usually driven in at an angle near the floor.
Common mistake: Assuming the jamb is clear. A standard high-carbon steel wood blade will instantly lose teeth against a hidden nail, leaving you with a useless blade and an incomplete cut.
The fix is proactive. If you’re cutting an older home, assume nails are present. Use a bi-metal or titanium-coated blade from the start. These blades for wood that also handle metal are slower than pure wood blades but will power through a nail without failing. It’s the difference between a slight pause and a trip to the store.
Another snag is the door stop, the thin strip of wood the door closes against. On a wide jamb, a standard blade may not reach it. You have two choices: use an extended reach blade, or carefully undercut the stop separately with the tool turned 90 degrees, using the already-cut jamb as your height guide.
Oscillating Tool vs. Other Methods
The oscillating tool isn’t the only way, but it’s the best for most DIY scenarios. Here’s how it stacks up.
| Tool | Best For | The Catch |
|---|---|---|
| Oscillating Multi-Tool | Controlled, precise cuts in tight spaces. Minimal tear-out. | Blade can overheat. Standard blades lack reach. |
| Jamb Saw (Undercut Saw) | Speed. Cuts a perfectly flat, level line across wide jambs fast. | Easy to cut too deep into the subfloor. No finesse near walls. |
| Hand Saw (Pull Saw) | Quiet, dust-free work on a single doorway. Total control. | Physically demanding. Extremely difficult to keep the cut perfectly level. |
| Circular Saw with Guide | Long, straight cuts on multiple jambs in new construction. | Overkill for remodels. High risk of damaging adjacent flooring or walls. |
For a retrofit flooring job in a lived-in house, the oscillating tool’s compact size and flush-cutting ability are unmatched when you compare a how to undercut door jambs with an oscillating tool method to others. Its versatility for other tasks, like sanding or scraping, justifies it as a core workshop tool. To get the most from it, explore the best oscillating tool accessories that expand its usefulness.
Safety: The Protocol the Manual Demands
Power tool safety can sound like a broken record, but the oscillating tool’s high-frequency oscillation demands specific respect. The Benchmark manual’s warnings are exhaustive for a reason.
First, eye protection must be CSA approved. Safety glasses aren’t enough; you need goggles that seal. The tool throws out a fine, direct stream of dust and debris. Ear protection is also listed as required, the high-pitched whine is damaging over time. A face mask is required; you’re cutting potentially lead-painted old wood or MDF dust.
For a 120V, 3.0-amp tool like the Benchmark, if you use a 50-foot extension cord, it should be 16 AWG. Using an undersized extension cord can overheat, drop voltage, and potentially damage the tool’s motor. If you’re working in a damp basement, the manual insists on using a Residual Current Device (RCD) or GFCI-protected outlet.
These are the mandatory conditions under which the tool’s 5-year warranty is valid. Neglect them, and you’re assuming risk no guide can mitigate.
Frequently Asked Questions
Can any oscillating tool undercut a door jamb?
Yes. Any oscillating multi-tool, corded or cordless, can perform this task. The limiting factor is rarely the tool’s power but the blade’s length and quality.
How deep should I cut the door jamb?
The cut depth must equal the thickness of your new flooring plus the manufacturer’s required expansion gap. For most LVP, this total includes the flooring thickness plus the required expansion gap. Using a scrap piece of your actual flooring and underlayment as a guide guarantees the correct depth.
What if I damage the face of the trim?
Prevention is key: use painter’s tape and ensure the tool’s footplate is clean and smooth. If you get a minor scuff, it can often be sanded and touched up with paint. A deep gouge may require wood filler, sanding, and repainting of the entire casing section.
Can I use this method for laminate flooring?
Absolutely. The principle is identical for any floating floor system (laminate, LVP, engineered wood) that requires a perimeter expansion gap. Always use the specific flooring material as your height guide.
Do I need to remove the door?
It’s highly recommended. Removing the door provides unobstructed access to the jamb and eliminates the risk of accidentally cutting the door bottom or damaging it with the tool. It usually takes less than a minute to lift the door off its hinges.
Before You Go
Undercutting door jambs is one of those skills that feels like a secret hack once you’ve done it. The real cost lies in the blade you choose and the five minutes of setup you don’t skip.
If you take one thing from this, let it be the scrap flooring guide. That physical block stops the conversation about depth. Everything else, the speed debate, the nail warnings, the blade reach, is about protecting your trim and your time. Now you know what to watch for, the sound of the motor will just be the sound of a job done right.
For more on mastering this versatile tool, our full guide to oscillating tools covers everything from sanding drywall to cutting pipe.
