
What Psi Should a Nail Gun Be Set at: A Sourced Guide
This post contains affiliate links. As an Amazon Associate, we earn from qualifying purchases.
*Set your pneumatic nail gun’s air pressure within the range specified in its manual, typically between 70 and 120 PSI. For example, the DeWALT DWFP71917 finish nailer specifies 70–120 psig, while the Paslode PS225C coil nailer lists 80–120 psi.* The exact sweet spot depends on your nailer type, nail length, and wood density, but 90 PSI is the most common and safe starting point for general work.
You’ll find a pressure regulator on your air compressor for a reason. Setting the right PSI is about control, not raw power. Too little pressure, and the nail sits proud, bending against the wood. Too much, and you risk blowing through trim, splitting wood, or wearing out the tool’s internal seals ahead of schedule. The difference between a clean drive and a jammed mess is often just 10 PSI. A common question is what psi should a nail gun be set at.
What follows is a breakdown of the numbers straight from the tool manuals, a step-by-step method for finding your perfect setting on any job, and the specific warnings manufacturers print in bold that most weekend users skip.
Key Takeaways
- Sources disagree on the recommended upper limit: some manuals, like those for generic Home Depot nailers, advise a working pressure of 70–110 PSI, while others, like DeWALT’s, specify an operating range up to 120 PSI.
- Start at a pressure within the tool’s specified range (often around 90 PSI is cited for initial setup), then adjust in 5 PSI increments based on nail depth in a scrap piece.
- Your compressor’s CFM rating matters as much as PSI; a framing nailer needs ~5.8 CFM, while a finish nailer needs ~1.5 CFM to run continuously.
- Never connect a tool to a compressor rated over 200 PSI maximum output, even with a regulator, as per DeWALT’s explicit warning.
- Always use a filter-regulator-lubricator unit close to the tool to supply clean, dry, regulated air, condensation destroys internal parts.
The Universal PSI Range (and Where It Splits)
Pull the manual for any major brand pneumatic nailer. The operating pressure spec is always the first thing I check. After comparing a dozen manuals, from DeWALT and Paslode to Senco and generic Home Depot models, when you compare a what psi should a nail gun be set at, a clear pattern emerges, with one interesting split.
All pneumatic nailers operate within a 70–120 PSI range. For example, the DeWALT DWFP71917 16-gauge finish nailer specifies 70–120 psig, the Paslode PS225C coil nailer lists 80–120 psi, and the Senco FN71T1 coil nailer states 70–120 psi. The 90 PSI midpoint is the most frequently cited setting for initial setup.
But here’s where the advice splits. Some manufacturers distinguish between maximum pressure and recommended working pressure. The manual for a generic pneumatic framing nailer lists a “Maximum pressure” of 120 PSI but advises “Working pressure” at 70–110 PSI. A similar generic 16-gauge finish nailer manual also specifies an “Operating Pressure” of 70–110 PSI, while other 16-gauge models, like the DeWALT DWFP71917, specify a range up to 120 PSI.
This suggests a practical rule for the what psi should a nail gun be set at: 120 PSI is the absolute ceiling your tool can withstand, but for daily, sustainable use, keeping it at or below 110 PSI is kinder to the internal O-rings and driver blade. It’s the difference between a tool that lasts for years and one that starts leaking air in a season.
PSI by Nailer Type: A Quick Reference
While the 70–120 PSI bracket covers almost everything, different nailers have different sweet spots based on the work they do.
| Nailer Type | Typical Gauge | Common PSI Starting Point | Air Consumption (CFM @ ~90 PSI) | Primary Use Case |
|---|---|---|---|---|
| Framing Nailer | 21° / 30° / 34° | 90–100 PSI | ~5.8 CFM | Framing walls, sheathing, decking |
| Finish Nailer | 16 GA | 70–90 PSI | 1.5 – 2.0 CFM | Trim, casing, baseboards |
| Brad Nailer | 18 GA | 70–85 PSI | ~1.15 CFM | Thin trim, cabinet face frames |
| Coil Nailer | Varies | Varies (e.g., Paslode PS225C: 80–120 psi, Senco FN71T1: 70–120 psi) | Varies (~5.86 CFM for Senco FN71T1) | Sheathing, fencing, roofing |
The air consumption (CFM) is critical. A framing nailer requiring ~5.8 CFM will demand more air than a very small compressor can typically deliver continuously, causing the motor to run constantly and pressure to drop. That leads to inconsistent driving depth. Matching your air compressor size to the tool’s CFM demand is as important as setting the PSI.
What Your Compressor’s Regulator Actually Does
That knob or dial on your compressor is a pressure regulator, which reduces the high pressure stored in the tank down to a safe, steady stream for your tool. Your tank might hold pressure higher than your nailer needs (e.g., 150 PSI), but your nailer only requires a lower regulated pressure (e.g., 90 PSI). The regulator makes that happen.
Common mistake: Cranking the regulator to the tank pressure. If your tank is at 150 PSI and you set the regulator to 150 PSI, you’ve bypassed its function and are sending full tank pressure to your tool. This can instantly exceed the nailer’s 120 PSI maximum and damage it.
The filter removes water and grit, the regulator sets the PSI, and the lubricator injects a fine mist of pneumatic oil into the air stream. This trio is the life support system for your nailer. Without it, you’re sending abrasive, wet air straight into the tool’s cylinder, a sure way to rust the bore and score the O-rings.
The process for how to set an air compressor regulator is simple but essential: turn on the compressor, let the tank pressurize, then turn the regulator knob counter-clockwise to lower the output pressure before connecting your hose. Adjust with the tool disconnected and the trigger briefly pulled to bleed the line, then check the gauge.
Dialing In PSI: The Scrap-Piece Method
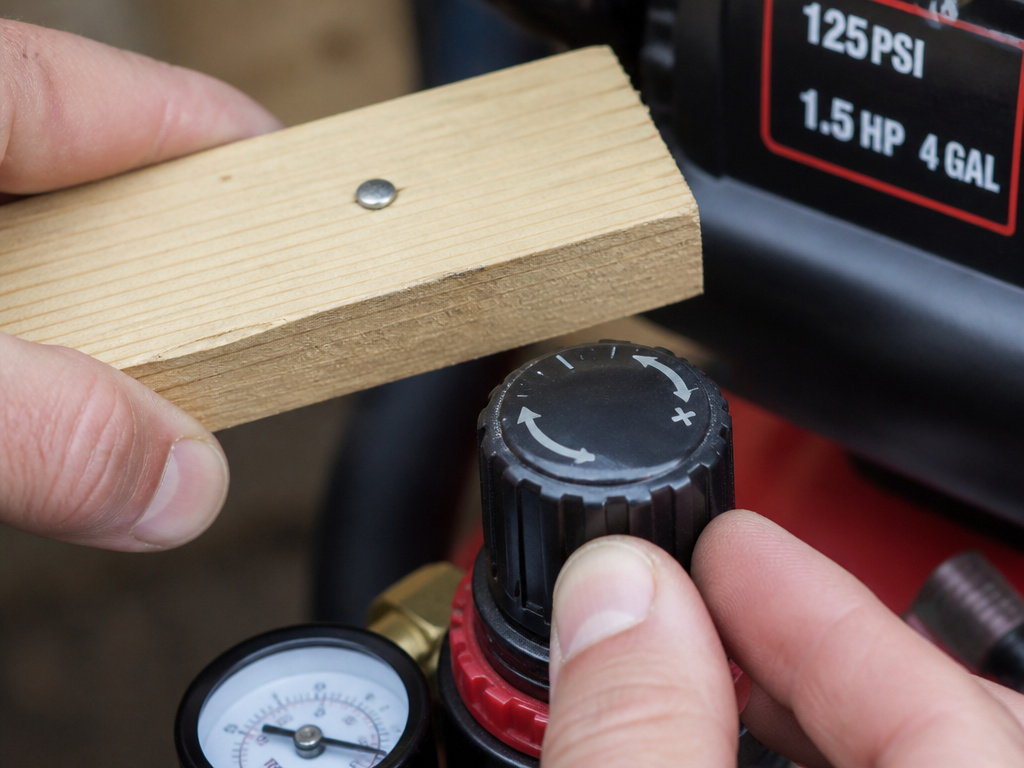
Forget guessing. The only way to know your PSI is perfect for today’s nails and wood is to test fire. This takes two minutes and saves a morning of frustration.
Here’s the sequence:
- Start Low. Set your regulator to the lower end of the range for your nailer type (e.g., 70 PSI for a finish nailer).
- Load and Connect. Load a strip of the nails you’ll be using and connect the air hose.
- Fire into Scrap. Use an offcut of the exact same material you’re working with. Fire one nail.
- Read the Nail Head. Is it sitting 1/16″ above the surface? Increase pressure by 5 PSI. Did it blow through the wood or sink too deep? Decrease by 5 PSI.
- Repeat and Refine. Fire another test nail. Repeat until the nail head sits flush or slightly below the surface without breaking the wood fibers.
This method works in tandem with the tool’s depth adjustment dial. If you’re at the top of your PSI range and nails still won’t sink, don’t crank the pressure further. First, check that the depth adjustment wheel isn’t set to its shallowest stop. A quarter-turn can make all the difference.
The goal is consistent depth, not maximum force. If your nails are sinking well at 85 PSI in pine, leave it there. Jumping to 110 PSI “for good measure” only increases wear on the tool and the risk of splitting your workpiece.
When PSI Goes Wrong: A Troubleshooting Table
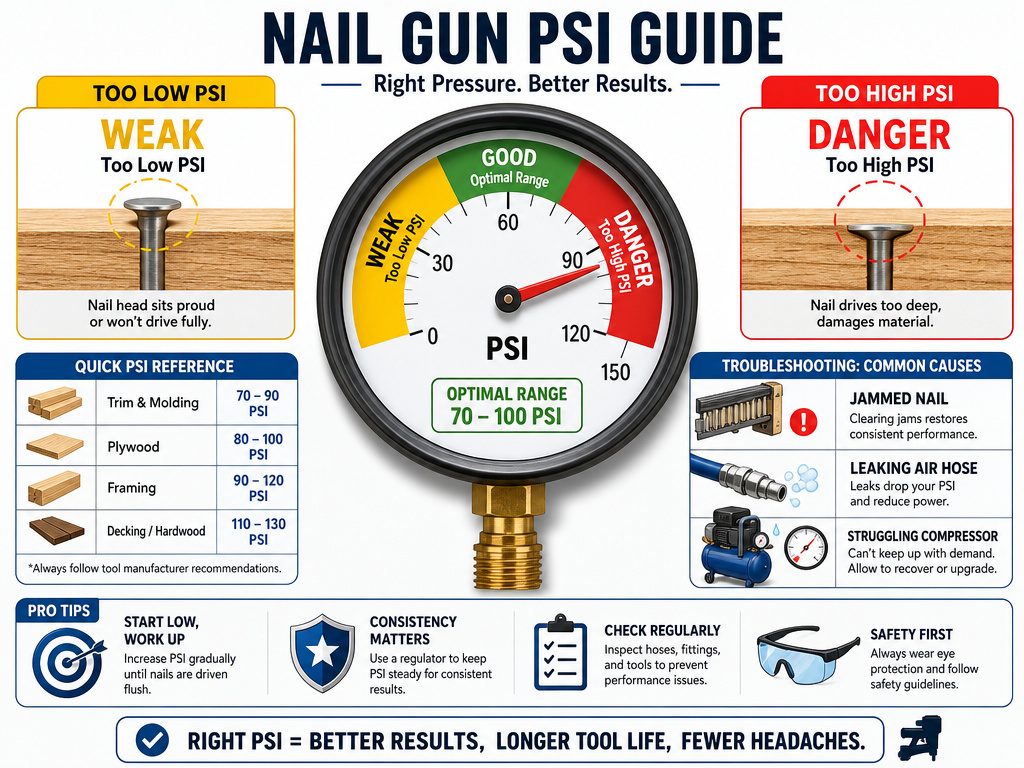
Even with the right starting point, things can go sideways. Here’s how to read the symptoms and adjust your pressure or look for other issues.
| Symptom | Likely PSI Issue | Immediate Fix | Other Possible Causes |
|---|---|---|---|
| Nail head sits proud, won’t drive flush | Pressure too low | Increase PSI in 5–10 psi increments. | Worn driver blade, incorrect nail sizes, depth adjuster set too shallow. |
| Nail blows through material or sinks too deep | Pressure too high | Decrease PSI immediately. | Depth adjuster set too deep, material too thin, nail too long for application. |
| Nail jams consistently in the nose | Pressure potentially too high or low | Reset to 90 PSI, test on scrap. | Damaged or dirty driver blade, incorrect nail collation, misaligned magazine. |
| Tool cycles slowly or seems weak | Pressure too low, or CFM insufficient | Check regulator setting; ensure compressor can deliver required CFM. | Long or undersized air hose, clogged filter in FRL unit, compressor too small. |
| Air leaks from tool body or exhaust | Pressure may be exacerbating a seal failure | Reduce pressure and discontinue use. | Worn or damaged internal O-rings or gaskets (requires service). |
Many cases of nails not sinking are blamed on low PSI when the real culprit is a mismatched compressor size. If your compressor can’t deliver the CFM, the tank pressure (PSI) will plummet the moment you pull the trigger, starving the tool. You hear the motor struggling. That’s a CFM problem, not a PSI problem.
Safety Warnings You Can’t Afford to Skip
The manuals list failure modes that happen regularly in shops that ignore their cautions.
Before you start: Wear ANSI Z87.1 safety glasses and hearing protection. Pneumatic nailers operate at sound levels that cause hearing damage, and a nail can ricochet or a faulty nail can fragment. Disconnect the air supply before loading, clearing jams, or performing any maintenance.
Some warnings are strikingly specific. The DeWALT DWFP71917 manual states: “Do not connect the tool to a compressor rated over 200 psi. The tool operating pressure must never exceed 200 psi even in the event of regulator failure.” This is critical. If your compressor’s maximum output is 200 PSI, but your regulator fails, 200 PSI goes straight into your 120 PSI-max tool. The result can be catastrophic failure of the tool’s housing or seals.
Similarly, the Powernail 50FKIT manual warns that “excess air pressure can cause the nailer to explode” and explicitly says to use “only regulated compressed air, do not use bottled gases of any kind (no oxygen or combustible gasses).”
These are documented risks. Your air hose also needs a minimum rating. DeWALT requires a hose “rated for a maximum working pressure of at least 150 PSI or 150% of the maximum system pressure, whichever is greater.” A cheap hose can burst under pressure.
The Compressor Connection: PSI and CFM Together
Setting the PSI correctly is only half the battle for using a nail gun effectively. Your compressor must also deliver enough volume of air, measured in Cubic Feet per Minute (CFM).
The DeWALT DWFP71917 finish nailer consumes 2.0 CFM at 80 PSI when firing 60 nails per minute. A generic framing nailer manual lists 5.8 CFM at 90 PSI. If your compressor’s “free air delivery” CFM rating at 90 PSI is lower than your tool’s requirement, the compressor will run non-stop, pressure will drop between shots, and nail depth will become inconsistent.
A small compressor with a low CFM output may be sufficient for a brad nailer but can be overwhelmed by the higher CFM demand of a framing nailer. For continuous framing work, you need a compressor with a tank and pump capable of delivering the required CFM without constant cycling. This is why pairing the tool with the right compressor is a foundational step before you ever touch the regulator.
What PSI for Hardwood vs Softwood
While tool manuals specify a general operating range, they also note that the ideal pressure should be adjusted based on the wood you’re fastening. Harder woods like oak or maple require more driving force than softer woods like pine or cedar. Start with a lower pressure within the recommended range on a scrap piece of your actual material. If the nail doesn’t sink to the proper depth or the gun struggles to cycle, increase the pressure in small increments. For softwoods, you can often use a lower setting, which reduces the risk of the nail over-penetrating or damaging the wood surface. Always test on scrap first to dial in the setting.
PSI Drop Over Long Air Hoses
Using a long air hose between your compressor and nail gun can cause a drop in pressure at the tool. The pressure reading at your compressor’s regulator may not reflect the actual pressure reaching the nailer. This is why testing on scrap material is critical. If you experience inconsistent driving power or the tool seems weak despite the regulator being set correctly, pressure loss in the hose is a likely culprit. To compensate, you may need to increase the regulator setting slightly above your target working pressure. Ensure your air hose is rated for at least 150% of your system’s maximum pressure to handle this adjustment safely and prevent hose failure.
Frequently Asked Questions
Is 120 PSI too high for a nail gun?
120 PSI is the maximum safe operating pressure for most pneumatic nailers, as stated in manuals from DeWALT, Paslode, and others. However, for daily use to minimize wear, many generic manuals recommend a “working pressure” of 70–110 PSI. You should only approach 120 PSI if necessary to sink a nail into very hard material, and even then, test carefully on scrap first.
What happens if PSI is too low?
If the air pressure is too low, the nail gun’s piston won’t have enough force to drive the nail completely. The nail head will sit proud of the surface (a “shiner”), or the nail may bend against the wood. This also forces you to hold the tool against the workpiece longer, increasing the chance of a double-fire or a misaligned shot.
Can I use the same PSI for all nail lengths?
No. Longer nails require more force to drive. You will typically need to increase the PSI by 5–10 when switching from a 2-inch nail to a 3-inch nail in the same tool and material. Always re-test on scrap when changing nail length or wood species.
Why does my nail gun need oil?
Pneumatic tools require oil to lubricate internal O-rings, seals, and the cylinder. Without lubrication, these components dry out, wear quickly, and the tool will eventually leak air or fail. You can add a few drops of pneumatic oil directly into the air inlet daily, or use an in-line lubricator for automatic oiling.
How do I know if my compressor is big enough?
Check your nail gun’s manual for its CFM (cubic feet per minute) requirement at a given PSI. Then, check your compressor’s “free air delivery” CFM rating at the same PSI. Your compressor’s CFM output should meet or exceed the tool’s requirement. If it doesn’t, the compressor will run continuously, overheat, and fail to maintain consistent pressure.
Before You Go
The right PSI setting is the difference between a professional-looking job and a frustrating mess. Start with the manual’s range, use the scrap-piece method to dial it in for your specific materials, and never ignore the manufacturer’s safety ceilings. Your nailer is a precision piston-driven tool, not a blunt instrument. Treating it that way, with clean, regulated air at the correct pressure, is what makes it last for years and perform flawlessly on every shot.
If you’re ever in doubt, lower the pressure and test. It’s easier to add five PSI than to repair a split piece of oak trim or explain to the service center why your tool’s housing cracked. The numbers in the manual are your map. The scrap wood is your proof. Trust both.
