
How to Use a Metal Lathe: A Beginner’s Guide
This post contains affiliate links. As an Amazon Associate, we earn from qualifying purchases.
To use a metal lathe, you secure the workpiece in a rotating chuck or collet, select a cutting tool, set the machine’s speed (RPM) and feed rate based on the material, and move the tool against the spinning metal to remove material. The core skill is managing three elements: rotation speed, cutting depth, and feed speed, but if you don’t know the right values, start lower and smaller. For a 3/4 HP benchtop lathe like the Harbor Freight 93212, that means starting at 0–1100 RPM in low range and taking light cuts.
Think of those three elements. RPM, depth, feed, as the gas, brake, and steering of the cut. Get one wrong and the finish suffers; get two wrong and the tool breaks; get all three wrong and you’ve got a hazard. The rest is about checking clearances, measuring true, and letting the machine do the work, which is the core of how to use a metal lathe.
This guide walks through the setup, the cut, and the cleanup, with the safety and machine specs that actually apply to learning how to use a metal lathe in a home-shop. You’ll know how to read a lathe’s capacity from its spec sheet, choose a starting point for speed and feed, and walk away with a simple first project that ties it all together.
Key Takeaways
- Spin the chuck by hand before starting the motor. This one check ensures the workpiece, tool, and carriage have clearance and prevents an immediate, expensive crash.
- Set RPM low initially, the UCR ME lathe SOP advises a lower speed at the first stage. For a Harbor Freight 93212, that means using the 0–1100 RPM low range.
- Check workpiece concentricity with a dial indicator to within 0.001–0.002 inch before you tighten the chuck fully, or your final part will be out of round.
- Never leave the chuck key in the chuck. Place it on the bench away from moving parts, starting the lathe with the key in it turns the key into a lethal projectile.
- Remove only a small amount of material on the final pass for a smooth surface finish, as the UCR SOP states. This means planning your cuts so the last one is a light skim.
The 4 Safety Steps Nobody Should Skip
Safety around a spinning metal chuck isn’t optional. It’s mechanical. The Harbor Freight 93212 manual and the UC Riverside Standard Operating Procedure lay out mandatory rules. These aren’t suggestions, they are the documented steps that stand between you and the emergency room.
First, gear up. The manual states eye protection must be ANSI-approved and breathing protection must be NIOSH-approved for the specific hazards. That means safety glasses with a Z87+ mark and a respirator with a NIOSH filter rating, not a dust mask from the garage. Long sleeves are fine, but no loose cuffs, strings, or gloves near the rotating chuck.
Second, clear the zone. Before you even think about power, do this: spin the chuck by hand. The UCR SOP mandates you “spin the chuck by hand to make sure it clears the carriage, cross slide, tools, tool post and/or all other parts of the machine!” You’re checking that the workpiece, the tool bit clamped in the tool post, and the entire carriage assembly have a full rotation of clearance. A half-inch overhang that looks fine at rest can swing into the tool post at 500 RPM.
Third, manage the key. The UCR SOP prints it in all caps: “NEVER LEAVE THE KEY IN THE CHUCK!!! Place the chuck key on the workbench, away from all moving parts.” It’s the single most common point of failure in a training shop. You tighten the chuck, set the key down on the lathe bed for “just a second,” turn around, and hit start. The key becomes a missile. Designate a spot on the bench, away from the lathe, and put it there every single time.
Fourth, know the machine’s limits and yours. The Harbor Freight manual includes specific warnings: people with pacemakers should consult a physician, and pregnant women or people with conditions like Raynaud’s Disease should not use the tool due to vibration exposure. It also states industrial applications must follow OSHA guidelines. For a home shop, that means treating the lathe with the same respect a pro would. If you’re tired, walk away.
Common mistake: Assuming the chuck has stopped because the motor is off. The chuck and workpiece have significant mass and can coast for minutes. Wait for complete stillness before handling anything near the business end.
How a Metal Lathe Actually Works (It’s Not a Wood Lathe)
A metal lathe is a removal machine, not a shaping tool. The workpiece spins, and a stationary, hardened cutting tool is fed into it to peel away material. That’s the fundamental difference from a wood lathe, where you press a gouge into spinning wood to shape it. In metal, the tool doesn’t move, the coordinated movement of the lathe’s carriage does.
The headstock holds the spindle, which rotates the chuck. The chuck, usually a 3-jaw self-centering type for beginners, grips your workpiece. The tailstock can support the other end of long work with a live center. Between them runs the bed, a heavy, precision-ground rail that carries the carriage. The carriage holds the tool post and cutting tool, and you move it using handwheels for the carriage (forward/back) and cross slide (in/out). The compound rest sits on the cross slide and allows you to angle the tool for taper cuts.
Your control over the cut boils down to three things, as outlined in the UC Riverside lathe SOP manual. Rotation speed (RPM) is how fast the chuck spins. Cutting depth is how far into the workpiece the tool moves per pass. Feed speed is how fast the carriage moves the tool along the workpiece. Change one, and the others must adjust. Start with all three set conservatively.
For most home setups, a small benchtop lathe like the Harbor Freight 93212 is the starting point. Its specs, a 7″ swing over bed and 10″ between centers, define what you can make. Anything larger, and you’re stepping up to a floor-model engine lathe, which is a different category of machine and investment.
Reading Your Lathe’s Spec Sheet (What the Numbers Mean)
You can’t learn how to use a metal lathe correctly if you don’t know what it’s capable of. The spec sheet is the blueprint. We will examine the Harbor Freight 93212’s specs, as they’re typical for a 7×12 mini lathe.
| Specification | Value (Harbor Freight 93212) | What It Means for You |
|---|---|---|
| Swing Over Bed | 7″ | The maximum diameter of workpiece that can rotate over the bed. A 7″ swing means you can turn a rod up to 7″ in diameter. |
| Distance Between Centers | 10″ | The maximum length of workpiece you can mount between the chuck and tailstock center. |
| Swing Over Cross Slide | 2-1/8″ | The max diameter you can turn when the workpiece is positioned over the cross slide. This is often less than the bed swing. |
| Tailstock Taper | MT#2 | The Morse Taper size of the tailstock. You need MT#2 centers and drill chucks. |
| Through Chuck Capacity | 5/8″ | The largest diameter rod that can pass completely through the spindle. Handy for long bar work. |
| Max. Tool Bit Size | 5/16″ | The shank size of the cutting tool bits this lathe’s tool post can hold. |
| Work Tolerance | 0.005″ | The claimed accuracy of the machine under ideal conditions. In practice, your skill determines the final tolerance. |
| Speed Ranges | 0–1100 RPM (Low), 0–2500 RPM (High) | The spindle speed settings. Start in Low range for most operations. |
These numbers are your guardrails. Trying to turn an 8″ diameter part on a 7″ swing lathe is impossible. Trying to support a 12″ long bar between 10″ centers means part of it hangs unsupported, a recipe for vibration and danger. Before you buy material, check the spec sheet.
If you’re choosing your first machine, understanding these specs helps you compare models. Our guide on benchtop lathes dives deeper into how these numbers play out in real work.
Mounting and Truing Your Workpiece
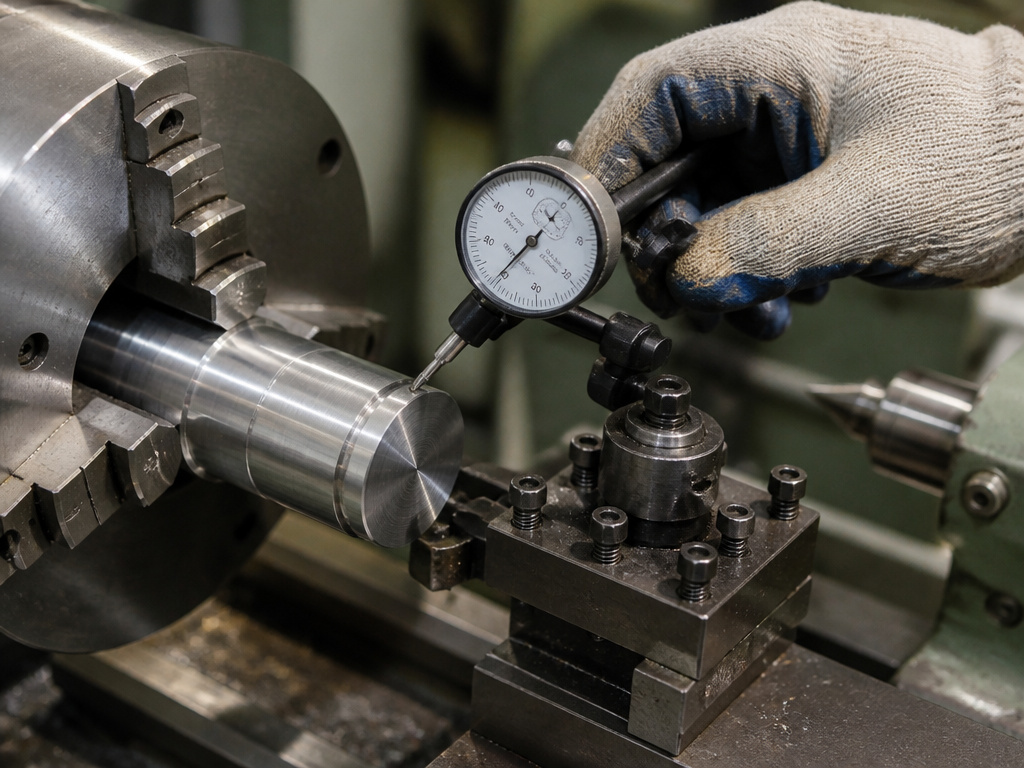
The chuck holds the truth. A workpiece clamped even a few thousandths of an inch off-center will produce an out-of-round part. The goal is concentricity, getting the workpiece’s central axis to align perfectly with the spindle’s axis.
For a cylindrical piece, start with a 3-jaw chuck. It’s self-centering and forgives minor irregularities. The UCR SOP emphasizes safe chuck use, including never leaving the key in the chuck. You’ll feel the resistance; it’s firm, not Herculean.
Now, check for truth. The SOP recommends using a dial indicator. Mount the indicator on the tool post or carriage so its tip touches the workpiece. Rotate the chuck by hand. The dial will show how much the workpiece wobbles. You’re aiming for runout “within one or two thousands of an inch” (0.001″–0.002″). If it’s out, loosen the chuck, give the workpiece a slight tap to reseat it, and retighten. Re-check.
For longer work, you’ll need tailstock support. Bring up the tailstock and lock it to the bed. Insert a live center (MT#2 for the 93212) into the tailstock quill and extend it until it seats firmly in a center-drilled hole in the end of your workpiece. The Harbor Freight manual warns to “turn supported long stock at slower RPM’s” to minimize whip.
Where this goes sideways: Using a collet without checking the diameter. The UCR SOP states a collet requires the workpiece diameter to match within +/- 0.015”. Go outside that tolerance, and the workpiece can slip or the collet can be damaged. Measure first.
How to Choose and Set Up Your Cutting Tool
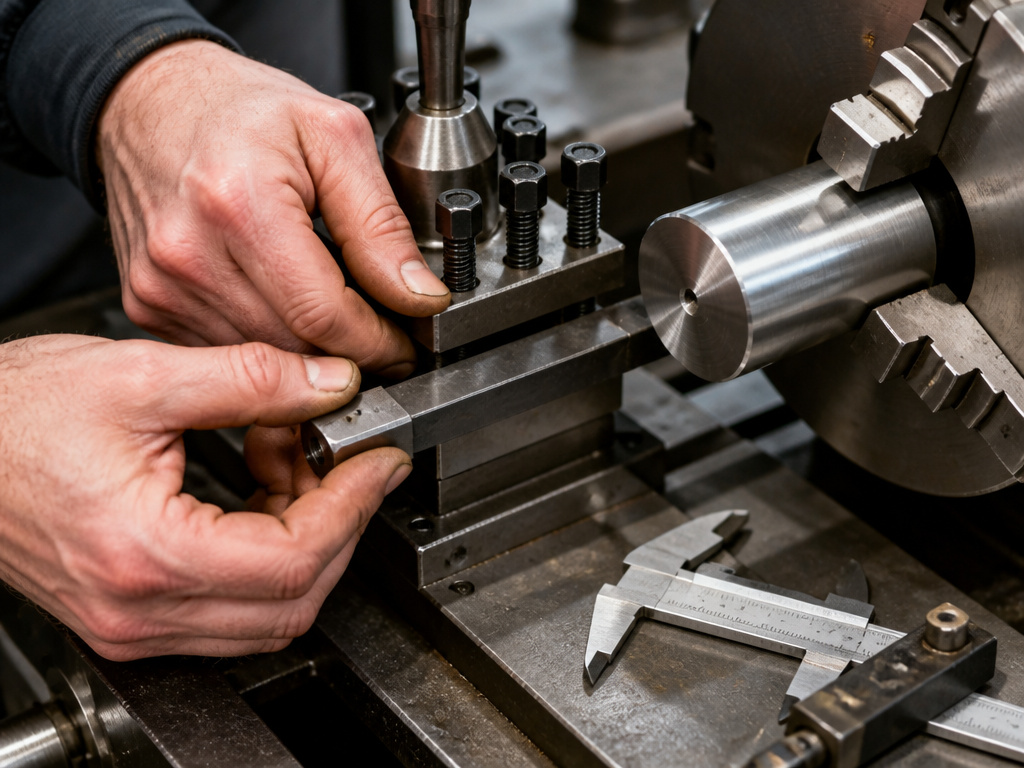
The tool does the cutting, but the setup does the work. A lathe tool bit is a small, hardened piece of steel or carbide that fits into a tool holder in your tool post. For the Harbor Freight 93212, the max tool bit size is 5/16″, so that’s the shank dimension you’re shopping for.
Tool geometry matters. A right-hand turning tool is the most common; it cuts from right to left. A parting tool is thin and cuts straight in. A facing tool cuts across the end of the workpiece. Start with a general-purpose right-hand tool. Clamp it into the tool holder so it extends just enough to reach the workpiece, less overhang means more rigidity.
Height is critical. The cutting tip of the tool must be set exactly on the centerline of the workpiece. If it’s too high, it rubs; too low, it digs in and can snap. This simple alignment prevents a huge amount of chatter and poor finish.
Tool sharpness is essential. A dull tool doesn’t cut; it rubs, heats the workpiece, work-hardens the metal, and puts excessive strain on the lathe’s motor. The Harbor Freight manual notes that using the correct tool “produces a better finish and minimizes strain on the lathe.” A sharp tool is the correct tool. For High-Speed Steel (HSS) bits, you’ll need to learn to grind them on a bench grinder. For carbide insert tools, you rotate or replace the insert when it dulls.
Your arsenal of lathe tools will grow with your projects, but a single right-hand tool and a parting tool will let you accomplish 80% of beginner tasks.
Making Your First Cut: RPM, Depth, and Feed
This is where the theory becomes chips. You have a true workpiece and a sharp, aligned tool. Now you must set the three interdependent variables: RPM, cutting depth, and feed.
We will use the Harbor Freight 93212’s ranges. Start in the low range (0–1100 RPM). For steel, a good starting point is at the lower end of the machine’s 0–1100 RPM range. For aluminum, you can start at a higher speed within the range. The UCR SOP’s advice is clear: “it is better to set lower rotating speed at the first stage.” You can always increase speed later; a too-high speed on an unbalanced cut leads immediately to vibration and danger.
Cutting depth is how much material you’re removing radially per pass. If you’re turning a 1″ diameter rod down to 0.875″, you have 0.125″ of material to remove. Don’t try to do it in one pass. The SOP says, “If you do not know a suitable cutting depth, it is better to set to a small value.” Start with a small cutting depth per pass. This is controlled by the cross slide handwheel.
Feed is the speed of the carriage travel along the bed. Engage the carriage lock release and turn the handwheel at a steady, slow pace. You’ll see a continuous chip form. A fast feed gives a rough finish; a slow feed gives a smoother one. The SOP states that a beginner must always use the manual mode until they have enough experience.
I learned this the hard way trying to face the end of an aluminum rod. I set the RPM too high and took too deep a cut. The tool screeched, the part vibrated, and I ended up with a stepped, ugly face instead of a clean one. The problem wasn’t the lathe; it was my failure to start low and light. Now my first cut on any new material is at a lower speed and a shallower depth.
Here’s a decision table for your first cuts in common materials:
| Material | Starting RPM (on a 7″ lathe) | Starting Depth of Cut | Feed Speed | What to Listen For |
|---|---|---|---|---|
| Note: These are starting points. Always start at the lower end of the RPM range and shallower depth. Increase only if the cut is stable, the finish is acceptable, and the machine isn’t straining. |
A Simple First Project: Turning a Cylinder to a Specific Diameter
Theory is fine, but you learn by making a thing. A perfect beginner project is turning a piece of round stock into a precise cylinder. It practices facing, turning to a diameter, and measuring, all fundamental skills.
Get a piece of round stock of a manageable size for your lathe. Your lathe’s 7″ swing and 10″ between centers can easily handle this. Chuck it up, leaving a safe amount protruding. True it with a dial indicator to under 0.002″ runout.
Step 1: Face the end. Bring your tool to the very end of the rod. Take a light cut across the face to create a clean, square reference surface. This is facing.
Step 2: Turn to a specific diameter. For example, you might want to turn a cylinder to a specific diameter and length. Set your tool for a 0.015″ depth of cut. Make a pass along the length you need. Retract, return to start, and advance the cross slide another 0.015″. Repeat. Stop when you’re about 0.020″ above your target diameter.
Step 3: The finishing pass. This is where you apply the UCR SOP rule: “Always remove a very small amount of material on your final pass to assure a smooth surface finish.” Take a final, very light cut to assure a smooth surface finish. Use a slower, consistent manual feed. The surface will be noticeably smoother.
Step 4: Measure as you go. Use a micrometer to check your diameter after every couple of passes. Don’t wait until the end. If you’re new to precision measurement, our guide on essential techniques for drilling metal covers the use of calipers and micrometers, which translates directly to lathe work.
Step 5: Part off (optional). If you want to cut your cylinder free from the stock, switch to a parting tool. Set the RPM to a lower speed for parting off. Feed the tool in slowly and steadily with the cross slide. Use cutting fluid. The moment the part separates, it will drop. Have a container ready to catch it so it doesn’t damage the ways.
Cleaning Up and Basic Maintenance
A clean lathe is a accurate, safe lathe. Metal chips are sharp, hot, and can jam mechanisms. The Harbor Freight manual is unequivocal: “Do not clear chips by hand or when lathe is running. Use a brush to sweep chips away after the tool has come to a complete stop.”
After every session, brush chips off the bed, carriage, and cross slide. Wipe down the precision-ground ways with a light oil to prevent rust. Check that the chuck jaws move freely. A tiny piece of chip lodged behind a jaw can throw off its centering.
For a benchtop lathe, the main maintenance is lubrication. The gearbox and carriage might have oil ports; use the recommended non-detergent machine oil. The manual will specify. The tailstock and cross slide screws also need occasional oil to keep movement smooth.
Finally, store it properly. If you’re in a humid environment, consider a breathable cover. Leaving a chuck mounted is fine, but don’t leave a workpiece clamped in it for weeks, thermal expansion and contraction can stress the jaws.
Frequently Asked Questions
How difficult is it to use a lathe?
The physical operation is straightforward: you turn handles and watch metal come off. The difficulty is in the judgment, knowing how fast to spin, how deep to cut, how fast to feed, and how to measure the thousandths of an inch that separate a precise part from scrap. It’s a skill built over hours, not minutes. Start with simple projects and expect your first few attempts to be learning experiences, not masterpieces.
What is a good metal lathe for beginners?
7×12 or 7×14 benchtop lathe, like the Harbor Freight 93212 or similar models from Grizzly and Precision Matthews, is the typical entry point. The “7” refers to the swing (7 inches), and the “12” or “14” refers to the distance between centers. These lathes are large enough to handle meaningful projects but small enough to fit in a home shop and learn on without overwhelming power. You can explore specific models in our roundup of best metal lathes for beginners.
What to make on a lathe for beginners?
Start with fundamental shapes that teach core skills: a simple cylinder, a stepped shaft (practicing different diameters), a basic mallet head (combining turning and facing), or a tool handle. These projects require no complex tooling beyond a standard turning tool and give immediate, tangible results. Avoid threads and tapers until you’re comfortable with basic turning.
Can I use a wood lathe for metal?
No. The **functional differences between lathes** are foundational. A wood lathe spins much faster (often over 1000 RPM) and is designed for handheld tools scraping softer material. A metal lathe spins slower, is massively more rigid to resist cutting forces, and uses a rigidly mounted tool. Attempting to turn metal on a wood lathe is dangerous and will damage the machine.
Before You Go
The real secret to using a metal lathe isn’t in a special trick; it’s in respecting the machine’s physical limits and your own knowledge limits. The Harbor Freight and UCR manuals aren’t being overly cautious, they’re documenting the failure modes that happen predictably when those limits are crossed.
Your first ten hours on the lathe should be spent making scrap on cheap mild steel. Get a feel for the handwheels. Listen to the sound of a proper cut versus an improper one. Learn what 0.001″ looks like on a micrometer. This time isn’t wasted; it’s the foundation everything else is built on.
When you’re ready to expand into more complex operations like milling, the principles of rigidity, tool selection, and measured cuts translate directly. The fundamentals you learn here are the same ones that govern safe operation of a milling machine.
One last rule, from someone who’s been there: if you ever think, “This is probably fine,” stop. That’s the moment to re-check the chuck key, the workpiece clearance, the tool height, or your speed setting. The lathe rewards deliberate, patient work and punishes haste without mercy.
