
How to Use a Desktop CNC Router: The 4-Step Power-Up
This post contains affiliate links. As an Amazon Associate, we earn from qualifying purchases.
Using a desktop CNC router requires matching three things: a correctly prepared G-code file, a properly homed and zeroed machine, and the right tooling, specifically solid carbide bits for machines like the McGill University router. Skipping any one leads to broken tools, scrapped work, or a machine fault.
The G-code part is where most new users trip first, especially those starting with CNC routers for beginners. It’s not just a file from your CAD software; it’s a set of instructions the machine’s specific controller can actually read. An “M-code” for coolant, harmless in simulation, will halt your real job with an error dialog. Understanding this is a key part of learning how to use a desktop CNC router.
What follows is the sequence that moves from a powered-off machine to finished cuts. This section details the essential safety steps, the different opinions on homing, the two methods for setting your Z-zero, and how to respond to motor faults. This is the compiled procedure from university labs and OEM manuals.
Key Takeaways
- Home the machine every startup. Sources from McGill University and Techno CNC agree: skipping this leaves no reference position, making soft limits and tool offsets invalid.
- Remove all M-codes from your G-code. Controllers like the one on the McGill router do not support these machine-specific commands and will throw an error.
- Use solid carbide tooling only on certain machines. The McGill router explicitly forbids anything else to prevent spindle damage from unbalanced equipment.
- Reset faulted motors with a two-button sequence. If an axis stops moving after a collision, press the red emergency stop, release it, then press the grey reset button before re-homing.
- Zero the Z-axis for every tool change if you lack a tool-changer. Split your G-code into separate programs and re-zero Z manually or with a touch-off pad between each.
Before You Start: The Non-Negotiables
A desktop CNC router isn’t a drill press. You can’t just plug it in and go. Three setup items are absolute, and getting them wrong has expensive consequences.
First, power. Your machine likely needs 220V single-phase power. The Techno CNC HD II Tabletop manual specifies a 15-amp circuit. That 10-foot power cable it comes with? According to one Techno CNC manual, it must be hardwired to your source, while another states the customer is responsible to hardwire it or install a mating plug. Don’t gamble with a cheap adapter.
Second, the workspace. Clear the bed. Then clear it again. A forgotten clamp or a stray offcut under the gantry means a collision. Pull the see-through dust curtain around the table. That keeps the rest of your shop clean and contains any flying debris.
Third, the tool. This isn’t a suggestion. Using a cheap high-speed steel (HSS) bit or a damaged carbide bit risks an unbalanced load; invest in quality CNC router bits for wood. The Techno manual warns directly: “THE SPINDLE WILL BE DAMAGED IF UNBALANCED EQUIPMENT IS USED.” An unbalanced tool vibrates at high RPM, wearing bearings and potentially seizing the spindle. The repair bill can be significant.
Common mistake: Assuming any end mill will work. An unbalanced tool vibrates at high RPM, wearing bearings and potentially seizing the spindle. The failure happens inside a single job.
Your collet must match your tool shank exactly. The McGill router offers collets from 0.1250” up to 0.6250”. A 0.250” bit in a 0.1875” collet won’t tighten correctly; in a 0.3125” collet, it will wobble. Both scenarios lead to a poor finish and a broken bit.
The 4-Step Power-Up and Homing Sequence
You’ve cleared the bed, clamped your material, and installed a sharp, solid carbide bit. Now you bring the machine to life. The order here is critical.
- Power On the Electronics. Turn on the Windows computer, then the signal generator and stepper motor driver box. On many setups, these live beneath the monitor. You should hear cooling fans spin up.
- Check the Emergency Stop. Ensure the big red safety button is not triggered. You often need to turn it until it pops up. This button is your physical panic stop, if anything goes wrong, hit it immediately.
- Home the Machine. This is the command that tells the machine, “Where are your limits?” It moves each axis slowly until it touches a limit switch, establishing a reliable “machine zero.” Do this every time you start the controllers.
- Power the Vacuum. Press the green button to start the dust collection vacuum. Then, slide the metal plate gate on the hose to the left to open it. This isn’t just for cleanliness; it keeps chips from piling up under your workpiece and affecting the cut depth.
Why is homing so critical? If you skip it, the machine has no reference point. Any subsequent command to move to a specific coordinate is a guess. The Techno CNC manual for the WinCNC controller warns that features like soft limits and boundaries “cannot be used if Machine Zero is not properly set.” You might get away with it once, but eventually you’ll command a move that the machine thinks is within bounds, but it drives the cutter straight into your vise.
| Controller Type | Homing Command / Action | Consequence of Skipping |
|---|---|---|
| NCstudio (Techno) | Automatic prompt on startup | No reference position. Break points, offsets, and related functions become invalid. |
| WinCNC (Techno) | G28 command (50 ipm search) | Soft limits and boundary features disabled. Machine may drift from known position. |
| McGill University | Manual homing routine via software | Machine coordinates are unreliable, creating a high risk of collision. |
Jogging, Stepping, and Finding Your Start Point
With the machine homed, you need to position the cutter where your job will begin. This point is your “work zero” or “program zero.” You use the handheld pendant or keyboard to move the machine.
There are two movement modes: Jog and Step.
- Jog Mode is continuous. Hold down the X+ button, and the gantry moves right until you let go. It’s for covering large distances quickly.
- Step Mode is incremental. Each press of a direction button moves the axis a fixed distance. It’s for fine, precise positioning. On the Techno HD II in stepping mode, the X and Y axes default to .005-inch moves, and the Z axis moves .001 inches per press.
You’ll use step mode to nudge the cutter to the exact corner of your material, a fundamental skill shared with using a CNC router vs mill. The goal is to place the tip of the bit directly over the bottom-left corner of your workpiece (for XY zero) and just touching the top surface (for Z zero).
Setting Your Work Zero: The XY and Z Dance
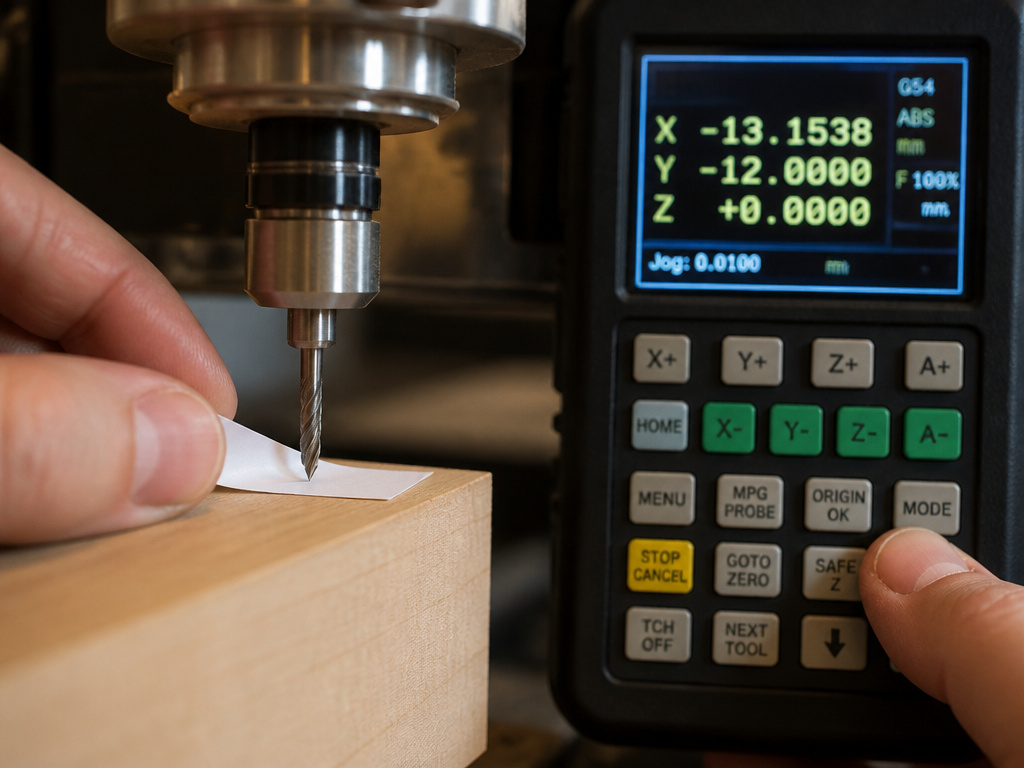
This is the most tactile part of the process. You’re telling the machine, “This spot right here is X0, Y0, Z0 for my program.”
Setting XY Zero:
- Jog the router so the tip of the bit is roughly over the bottom-left corner of your material.
- Switch to step mode for fine control.
- Nudge the bit until it is perfectly aligned with the corner. A bright task light and a magnifying glass help here.
- Press the “Set XY Zero” button on the pendant or in the software. The coordinate readout should now show X0.000, Y0.000.
Setting Z Zero:
You have two proven methods. The manual method teaches you feel; the tool calibration pad method gives you repeatable precision.
- Manual Method: With the spindle off, use step mode to lower the bit slowly toward the material. Place a thin piece of paper (a sticky note works) on the surface. Lower the bit until it just pinches the paper, preventing you from pulling it free but not tearing it. That’s your zero. Press the designated Z-zero button combination (on the Techno, it’s Shift/Aux + Z=0).
- Tool Calibration Pad (Touch-Off): This is a small, wired pad you place on top of your material. You command the machine to “find Z,” and the spindle slowly descends until the bit makes electrical contact with the pad. It then automatically sets Z0. It’s foolproof and perfect for multi-tool jobs.
I prefer the manual method for one-off jobs, it forces you to engage with the machine’s sensitivity. But for any job requiring multiple tool changes, the touch-off pad is the only sane choice. The time you save and the consistency you gain are worth the small investment.
After zeroing, your machine’s display will show all zeros. The physical world (your material corner) is now mapped to the digital world (your G-code coordinates).
Loading and Running Your First G-Code File
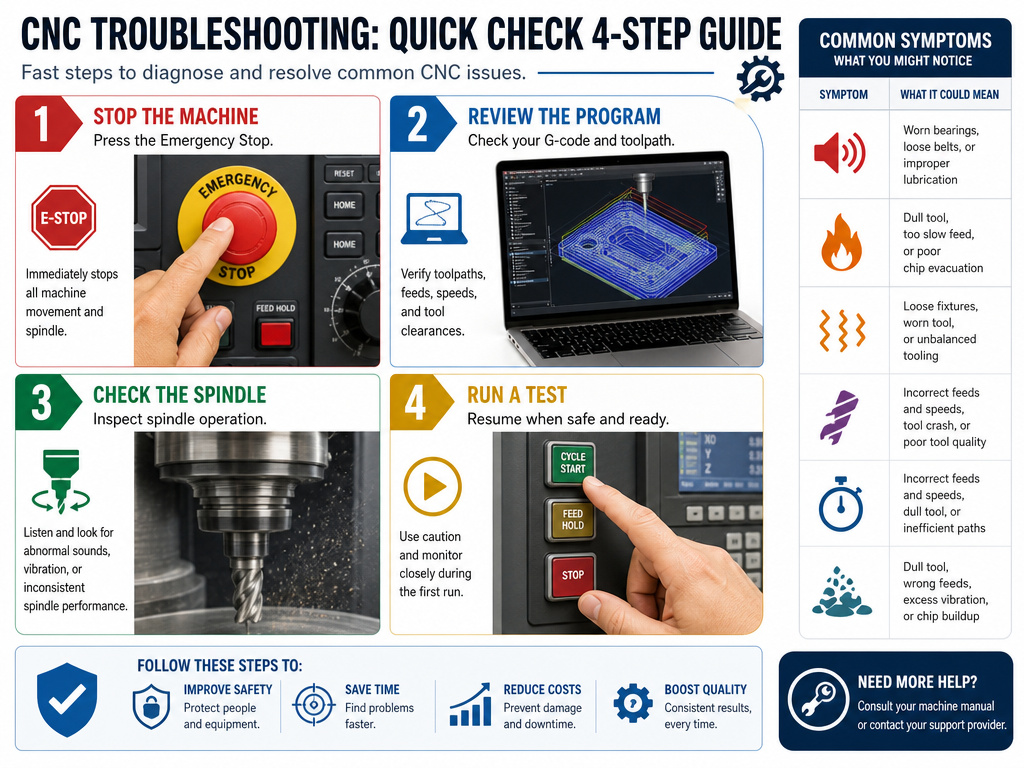
Your file is ready, and the machine is zeroed. Now you execute.
- Final Safety Check. Look over the bed. Ensure the router head and gantry path are clear. Verify the safety curtain is closed and the red stop button is ready.
- Load the File. Open your G-code file in the machine’s control software (like NCstudio or WinCNC). The toolpath should render on the screen.
- Start the Spindle. Command the spindle to start. Let it reach its programmed speed. For a machine that’s been idle, a warm-up cycle is wise. The McGill router specifies 5 minutes at 5,000 RPM.
- Begin the Job. Press the cycle start button. Stand ready with your hand near the emergency stop for the first few moves. Listen. A smooth cut sounds like a consistent hum. Chattering, squealing, or sudden changes in pitch mean something is wrong, feed rate, speed, or tool sharpness.
| Symptom | Likely Cause | Immediate Action |
|---|---|---|
| Loud squealing or screeching | Feed rate too slow or dull tool | Hit Feed Hold, then Stop. Check tool, increase feed rate. |
| Motor groaning, axis not moving | Collision or overload fault | Press Emergency Stop. Follow motor reset procedure. |
| Burn marks on material | Feed rate too fast or spindle speed too low | Stop job. Recalculate speeds/feeds. |
| G-code error dialog on load | Unsupported M-codes in file | Open G-code editor, search for “M” and delete all M-code lines. |
When Things Stop Moving: Resets and Recovery
It will happen. A hold-down comes loose, the bit catches, and an axis stalls. The software says it’s moving, but the machine is frozen.
The Techno and McGill procedures agree on the reset:
- Press the red emergency stop button on the controller box.
- Release the emergency stop button.
- Press the grey reset button (often on the lower left of the same box).
The motors should re-engage. But you are not ready to restart. You must home the machine again. The collision has lost the machine’s reference. If you try to continue from where you left off, the coordinates are meaningless and you will almost certainly crash.
This is also the fix for when only one axis isn’t moving. A localized overload can fault a single motor driver. The same reset-and-rehome sequence applies.
Navigating Multi-Tool Jobs Without a Tool-Changer
You need a roughing cut with a 0.250″ bit and a finish cut with a 0.125″ bit. Your desktop router probably doesn’t have an automatic tool-changer. Here’s the workaround straight from the McGill guide:
- Split your G-code. In your CAM software, generate one complete program for Tool 1. Then generate a separate, complete program for Tool 2.
- Run the first program. Zero for Tool 1, run the file to completion.
- Change the tool. Power down the spindle. Loosen the collet, install Tool 2, and tighten it.
- Re-zero the Z-axis. This is critical. The new tool is a different length. Use the manual or touch-off method to set the new Z zero. Your XY zero should remain the same if you didn’t move the workpiece.
- Load and run the second program.
It’s clunky, but it works. The key is never assuming two tools are the same length. Even two bits from the same manufacturer can vary by a few thousandths of an inch, enough to plunge too deep and ruin your part.
Frequently Asked Questions
Do I really need to home the machine every single time?
Yes. Every major manual. McGill, Techno NCstudio, Techno WinCNC, either states it as a requirement or strongly implies it by warning of the consequences of skipping it. The machine may lose its reference position when powered off or after a fault., and the homing routine re-establishes a true, reliable zero point. Skipping homing can cause crashes where the machine moves to a coordinate it thinks is safe but isn’t.
What are M-codes and why do I need to remove them?
M-codes are machine-specific commands for things like turning on a coolant pump (M8), changing a tool (M6), or ending the program (M30). The controller software on many desktop routers, like the one in the McGill lab, does not support these commands. If your CAM software’s post-processor leaves them in, the router will throw an error dialog and refuse to run the file. Open the G-code in a text editor, search for “M”, and delete the entire line containing any M-code.
Can I use high-speed steel (HSS) bits to save money?
On a machine that specifies “solid carbide ONLY,” like the McGill router, no. The reason is balance and RPM. These spindles run up to 20,000 RPM. HSS bits are often not balanced to the same tolerances as quality carbide bits, and at high speeds, that imbalance creates destructive vibration. For other machines, check your manual. Some lower-RPM spindles might tolerate HSS, but carbide will still last longer and produce a cleaner cut.
The router moved during my job and now the cut is off. What happened?
This is almost always a workpiece securing issue. The cutting forces are substantial. If your material isn’t firmly held down, using a vacuum table, clamps, or double-sided tape, the bit can actually push it around. The machine records its position correctly, but the material has shifted underneath it. The fix is better workholding. For sheet goods, secure workholding is critical.
How do I know what feed rate and spindle speed to use?
Start with the material manufacturer’s recommendations. For example, a 0.250″ solid carbide up-cut spiral bit cutting 0.5″ plywood might call for 18,000 RPM and a feed rate, but note that the maximum feed rate for the McGill router is 70 IPM. The maximum feed rate for the McGill router is 70 IPM, so you’d cap it there. It’s a balance: too slow and you burn the material; too fast and you risk breaking the bit or overloading the motor. When in doubt, start conservatively and make test cuts on scrap material.
The Bottom Line
Using a desktop CNC router is a discipline of procedure. The machine is unforgiving of skipped steps. Homing every startup, scrubbing M-codes from your G-code, and using only balanced, solid carbide tooling are the rules written after expensive failures.
The real skill lies in the setup: in the careful zeroing of the Z-axis with a touch-off pad, in the systematic securing of your workpiece, and in listening to the sound of a cut that’s running right. When that high-pitched whine of a carbide bit cutting wood settles into a steady hum, you know your speeds and feeds are dialed.
One final, contrarian take: don’t become over-reliant on the digital readout for your first dozen jobs. Learn to set zero by eye and by feel. That physical connection to the material and the machine will teach you more about machining fundamentals than any automated routine. Later, when you use the automation, you’ll understand exactly what it’s doing for you. Now go make some chips.
