
How to Use a Portable Tire Inflator: The 5-Step Process
This post contains affiliate links. As an Amazon Associate, we earn from qualifying purchases.
To use a portable tire inflator, you plug its 12V power cord into your car’s cigarette lighter socket, attach the air chuck securely to the tire valve, set your target PSI on the unit or gauge, and turn it on. The inflator runs until it hits the set pressure or you shut it off. The critical step most people miss is checking the manufacturer’s pressure limit, many portable units max out at 50 PSI, and exceeding it risks a burst tire.
That 50 PSI ceiling isn’t a suggestion. It’s the hard stop printed on units like the Toyota Innova pump. Go past it, and you’re not just overfilling, you’re loading a pressure vessel past its rated failure point. A key part of how to use a portable tire inflator is knowing this limit. The sound you don’t want to hear is a sharp pop followed by a hiss, not the pump’s motor.
What follows: the five physical steps that get air in the tire, the two connection types that decide whether it stays in, the safety rules from the manuals competitors skip, and the one field test that shows why trusting the unit’s digital gauge is a gamble.
Key Takeaways
- Set your target PSI before you start. Guessing and shutting off manually leads to over-inflation. The Toyota Innova manual explicitly warns this can cause a tire to burst.
- Sources disagree on this point: the Toyota Innova and Northern Tool manuals recommend keeping the engine running to prevent battery drain and enhance performance, while the Autozone guide does not explicitly mention it. The Innova manual states this prevents battery drain and enhances pump performance.
- Never run the inflator unattended. Overheating is a common failure mode; some manufacturer manuals specify a maximum operation duration and a cool-down period.
- Use a screw-on chuck for car tires. The threaded brass connector seals far better than a clip-on style, which is the main source of frustrating air leaks.
- Verify pressure with a standalone gauge. The digital readout on your inflator can be inaccurate. Your car’s recommended pressure is on the driver’s door jamb sticker.
The 5-Step Inflation Process (and Where It Goes Wrong)
Plug it in, hook it up, set the number, and turn it on. That’s the theory of how to use a portable tire inflator. In practice, each of those four actions has a wrong way that either wastes your time or damages your tire. Here is the correct way to proceed.
First, find your car’s recommended tire pressure. It’s on a sticker inside the driver’s door jamb, not on the tire sidewall (see our guide on how to inflate car tires). The sidewall shows the tire’s maximum pressure rating, which is typically higher than the vehicle manufacturer’s recommended pressure. Inflating to the max sidewall number gives you a harsh, unstable ride and wears the tread unevenly.
Before you start: A portable inflator draws significant current. The Toyota Innova pump pulls a maximum of 6 amps. If your vehicle’s engine is off, the inflator’s current draw (max. 6A) can drain the battery. The Innova manual strongly recommends keeping the engine running to prevent this and to improve pump performance.
Step 1: Power Up.
Plug the 12V power cord into your car’s cigarette lighter socket. Don’t use an extension cord or adapter. The pump needs a clean, direct connection to handle its current draw. If your car doesn’t have a working socket, you’re out of luck with a 12V unit, you’ll need a cordless model or an AC-powered air compressor inflator.
Step 2: Connect the Chuck.
Remove the valve stem cap. Now, look at the end of your inflator’s hose. You have one of two types:
- Screw-on (Brass Connector): Thread this clockwise onto the valve stem. The Toyota manual says, “Be sure to screw the valve stem threads tightly.” Hand-tight is enough; you’ll feel a soft stop. This forms a metal-to-metal seal.
- Clip-on (Lever-style): Press this straight down onto the valve stem and flip the lever to lock it. It’s faster, but it relies on a rubber gasket for a seal.
The screw-on type wins for car tires. Every time. The clip-on style is notorious for leaking a faint hiss of air, especially if the valve stem is slightly dirty or bent. That leak fools the pump’s sensor, making it run longer than needed and heat up.
Step 3: Set Your Target PSI.
Many units have a digital dial. Turn it to match the number from your door jamb sticker. If your inflator is basic, just note the number, you’ll watch the analog gauge and shut it off manually. This is where attention matters. Set it and then double-check. A mistake here is the direct path to over-inflation.
Step 4: Turn It On and Monitor.
Hit the power button. The motor will whir to life. On an auto-stop model, it will run until the target is reached and then beep. On a manual model, watch the gauge climb. Do not walk away. The Toyota manual is clear: “Do Not leave the inflator unattended when the unit is in operation.”
Step 5: Disconnect and Verify.
Turn the unit off. Unscrew or unclip the chuck. You’ll hear a short pssst as the remaining air in the hose escapes, that’s normal. Immediately replace the valve stem cap. It keeps dirt and moisture out.
Now, check your work with a standalone tire gauge. The pump’s built-in gauge, digital or analog, can be inaccurate. A dedicated gauge is your truth-teller. If you’re off by a few PSI, reconnect and top up or use the deflate button.
Screw-On vs. Clip-On: The Connection That Decides Everything
Your inflator is only as good as its seal. A leaky connection means the pump struggles, overheats, and never reaches the correct pressure, which is a key failure in how to use a portable tire inflator. I’ve watched a clip-on chuck lose 2 PSI per minute while the pump was supposedly “holding” pressure. The user thought the tire was slow-leaking; it was the tool.
| Chuck Type | Best For | How It Seals | Risk If You Choose Wrong |
|---|---|---|---|
| Screw-On (Brass) | Car, bike, and high-PSI tires | Threads onto valve stem, metal-to-metal compression | Overtightening can damage valve core. Undertightening causes major leak. |
| Clip-On (Lever) | Sports balls, air mattresses, quick checks | Lever presses a rubber gasket onto the stem | Gasket wears or gets dirty, leading to a constant hiss and inaccurate inflation. |
The screw-on chuck is the professional choice. It’s the type shown in the Toyota Innova manual diagrams. The brass connector threads on, and when it’s snug, the air path is sealed. The pump’s pressure sensor reads only the tire’s pressure, not a leak.
Clip-on chucks are for convenience, not precision. They’re fine for a football or a pool float. On a car tire, that rubber gasket is the failure point. Road grime, old rubber, a slightly recessed valve stem, any of these breaks the seal. You’ll hear it. That hissing sound isn’t the tire; it’s your pump fighting a leak it can’t win.
If your inflator came with a clip-on and you use it for your car, you’re working against the tool. Upgrade to a screw-on accessory hose. It’s a ten-dollar part that fixes ninety percent of “my inflator doesn’t work” problems.
Safety Rules the Manuals Shout (That Most Guides Whisper)
Portable inflators are simple, not harmless. The manufacturer warnings exist because they’ve seen the failures. Ignoring them doesn’t make you brave; it makes you a statistic.
The Toyota Innova manual has two warnings in all-caps that change how you use the tool.
WARNING: Risk of bursting. Over inflating tyre can cause tyre to burst. Double check the rated pressure values recommended for your vehicle.
This isn’t legal boilerplate. A tire is a pressurized vessel. Exceed its structural limit, or the inflator’s limit, and it fails violently. The Innova pump has a maximum working pressure of 50 PSI (3.5 Bar). If your target is 35 PSI, but you set the dial to 85 by mistake, the pump will try to get there. It will either burn out its motor or, if it somehow succeeds, blow the tire off the rim.
It is strongly recommended that you keep the vehicle’s engine running while using the inflator to prevent discharge of your vehicle’s battery. Inflator performance is also enhanced when operating inflator with vehicle engine running.
Here’s a source disagreement. The Toyota manual and the Northern Tool manual both say to start the engine. The AutoZone guide doesn’t mention it. Who do you follow? Follow the toolmaker. They know how many amps their pump draws (6A for the Innova). A car battery at rest can handle that for a while, but on a cold day with a weak battery, you might not start your car after filling two tires. Running the engine eliminates the risk. It’s a five-minute job; the fuel cost is pennies.
Other manuals add time limits. The CAEurope 12265 guide states: “Never run for more than 10 minutes. After each 10 minute run allow inflator to cool for 10 minutes.” These pumps have small motors that heat up fast. Continuous use melts internal seals and kills the unit. If you’re inflating from completely flat, you might hit that limit. Let it cool.
What Your Portable Inflator Can’t Do (The Edge Cases)
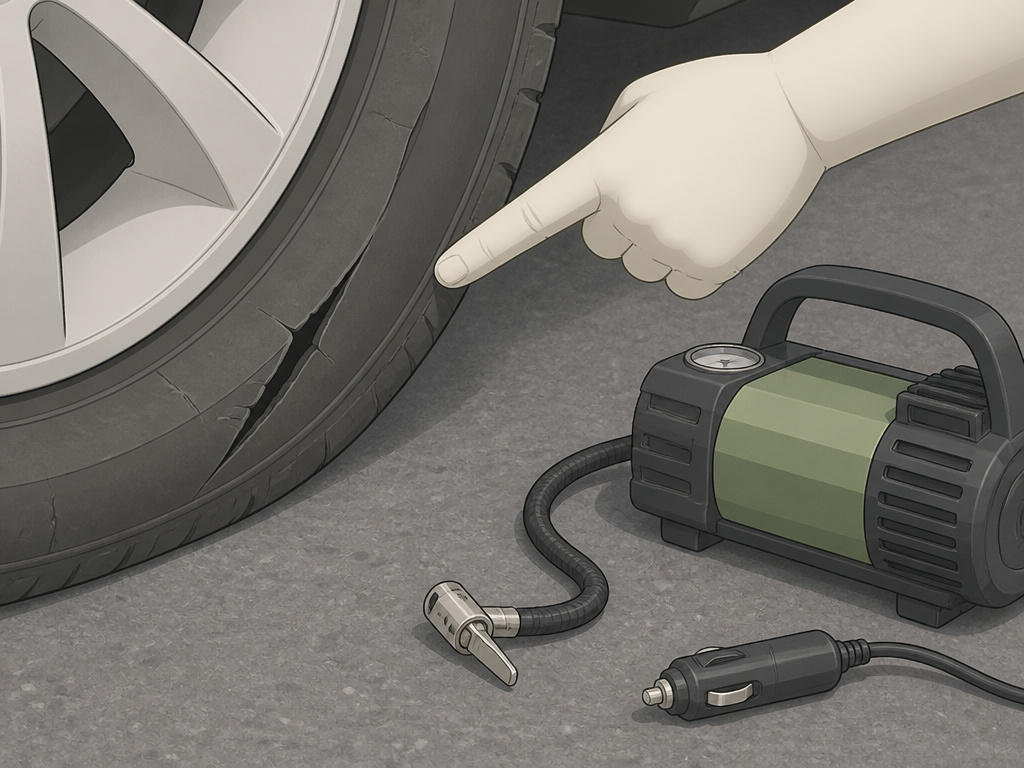
Not every flat tire is a job for your glovebox pump.
Don’t inflate a damaged tire. The AutoZone guide is direct: “Examine the tire for any visible damage, such as cuts, punctures, or bulges. Do not inflate a damaged tire.” Adding pressure to a cut sidewall or a bulge can turn a repairable puncture into a sudden blowout. If you see damage, the inflator’s job is over. Reach for the spare.
Large tires exceed small pumps. AutoZone notes some inflators “might not be capable of lowing up a tire on an RV, heavy-duty pickup, or other large vehicle.” Your passenger car tire might need 35 PSI. A truck tire could need 65-80 PSI. Check your inflator’s max pressure rating. If it’s 50 PSI, it will never get a truck tire to spec. It’ll just run until it overheats or times out.
Space-saver spares are a different beast. Some manufacturer manuals may warn against inflating certain types of tires, like space-saver spares. These compact spares often require 60 PSI or more and have specific construction. Using a general-purpose inflator on them can be unsafe.
Cold tires give true readings. Tire pressure increases as the tire warms up from driving. For an accurate fill, check and inflate when the tires are cold, meaning the car hasn’t been driven in three hours. Topping up a hot tire based on its hot reading will leave you under-inflated in the morning.
Troubleshooting: When the Air Won’t Go In
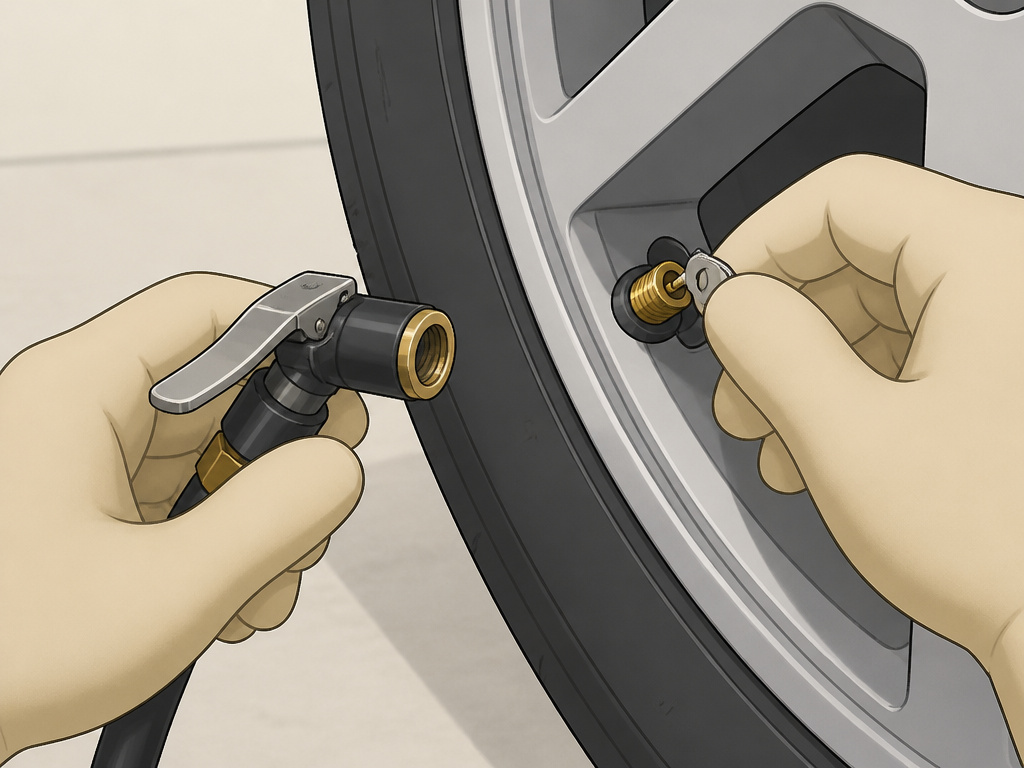
You’ve plugged it in. It’s humming. But the gauge needle isn’t moving, or it’s creeping up painfully slow. Before you declare the tool dead, run through this checklist.
| Symptom | Likely Cause | Fix |
|---|---|---|
| Gauge doesn’t move, motor sounds strained | Valve stem core is closed or faulty. | Press the pin in the center of the valve stem with a key. If no air comes out, the core is stuck. Replace the valve core (a $2 part). |
| Hissing sound at the connection | Chuck isn’t sealed (clip-on type) or not tight enough (screw-on). | For screw-on, tighten firmly by hand. For clip-on, clean the rubber gasket and press straight down before locking the lever. |
| Motor runs but pressure rises very slowly | Large tire volume or inflator is underpowered for the task. | Be patient. Inflating a completely flat car tire can take several minutes. Check for leaks. |
| Unit shuts off automatically after a short time | Overheat protection has activated. | Let it cool for 10-15 minutes as per the manual. It’s not broken; it’s preventing its own meltdown. |
| Digital readout is inconsistent | Low battery (cordless) or poor power connection (12V). | For 12V, ensure the engine is running for full voltage. For cordless, recharge the battery. |
The most common fix is also the simplest: the valve core. Sometimes, when you attach the chuck, you accidentally press the tiny pin inside the valve stem. This opens the core, and all the pump’s air escapes straight out. The pump sounds like it’s working, but it’s just moving air from the intake to the leak. Make sure your chuck is designed to depress the pin only when fully locked, not during attachment.
Using It for More Than Tires
That bag of accessories isn’t just filler. Your inflator can handle a weekend’s worth of chores if you know which nozzle to use.
The Toyota manual shows the process: attach the needle or plastic nozzle to the brass connector, then insert it into the item. The pump doesn’t care if it’s filling a tire or a soccer ball.
- Needle Adapter: For sports balls (basketballs, soccer balls, footballs). Insert the needle gently to avoid puncturing the inner bladder.
- Plastic Nozzle (Conical): For air mattresses, pool floats, and some beach toys. It fits over wider, softer inlet valves.
- Brass Connector Alone: For standard Schrader valves on bicycles, wheelbarrows, and most car tires.
The principle is the same: secure connection, set a lower target pressure (a basketball might need 8 PSI), and monitor closely. Over-inflating an air mattress can pop its seams just as easily as over-inflating a tire.
Types of Portable Tire Inflators
Portable tire inflators come in a few main types, each with different power sources. The most common is the 12V model, which plugs into your vehicle’s cigarette lighter socket. These are convenient as they draw power directly from the car. Some inflators are cordless and run on rechargeable batteries, offering more flexibility away from the vehicle. Hybrid models combine both capabilities, allowing you to use either a 12V plug or a battery. Regardless of type, always monitor the pressure to avoid over-inflation, which can cause a tire to burst. Do not leave any inflator unattended while it is running.
Frequently Asked Questions
How long does it take to inflate a tire with a portable inflator?
It depends on the tire size and how flat it is. Inflating a standard car tire can take a few minutes. Going from completely flat to full can take several minutes and may require a cool-down break for the inflator. Larger SUV tires take longer. The pump’s motor will get hot to the touch, that’s normal, but if it smells like burning plastic, stop and let it cool.
Do I need to keep my car engine running?
Check your inflator’s manual. Some, like the Toyota Innova pump, strongly recommend it to prevent battery drain and improve performance. Others don’t mention it. The safe rule: if you’re inflating more than one tire or your battery is older than three years, start the engine. The power draw from a 12V inflator is significant (max. 6A for the Innova pump), which can drain the battery.
Why is my portable inflator not reaching the correct PSI?
Three likely reasons. First, an air leak at the chuck connection (most common with clip-on styles). Second, the inflator’s built-in gauge is inaccurate, always verify with a standalone gauge. Third, the inflator may be underpowered for the tire size and simply can’t reach higher pressures. Check its maximum pressure rating; if it’s 50 PSI, it will never fill a tire that requires 60.
Can I use a portable inflator on a bike tire?
Yes, but bike tires use Presta valves, not the Schrader valves on cars. You’ll need a Presta valve adapter, which usually screws onto the valve before you attach your standard chuck. Bike tires also require much higher pressure (80.120 PSI). Ensure your inflator’s maximum pressure rating exceeds your bike tire’s requirement.
Is it safe to leave the inflator plugged in after it’s done?
No. Unplug it from the 12V socket as soon as you turn the unit off. Leaving it plugged in can continue a small parasitic drain on your car’s battery. It also keeps the electronics active and exposed to power surges if you start the engine.
The Bottom Line
A portable tire inflator turns a roadside headache into a five-minute fix. But it’s a precision tool, not a magic wand. The rule that matters most: know your limits. Your inflator’s limit (50 PSI on many models), your tire’s limit (on the sidewall), and your car’s need (on the door jamb).
If you take one action from this guide, make it this: buy a standalone tire pressure gauge. The one on your inflator lies. A standalone analog gauge costs less than a latte and tells you the truth. Trust that number, not the pump’s display.
Everything above assumes you’re filling a healthy, passenger-car tire. If you’re facing an RV, a space-saver spare, or a tire with a gash in the sidewall, the math changes. In those cases, the inflator is the wrong tool. Knowing the difference is what separates a quick top-up from a call for a tow truck.
