
How to Remove Nails From Wood: Step-by-Step
This post contains affiliate links. As an Amazon Associate, we earn from qualifying purchases.
To remove nails from wood, set a block under a claw hammer’s head and lever the nail out in one steady motion. For flush heads, lift the head with a tack lifter or punch the nail through and grab it from the back. Finish nails come out through the back of the board.
Where the hammer pivots decides how hard the pull is, and that matters whenever you learn How to Remove Nails From Wood. A straight pull moves the pivot to the front of the head, the point farthest from the nail, so the handle takes the strain. Every method below either shortens that distance or avoids pulling through the visible face.
What follows: protruding nails, flush nails, finish nails in trim, the point where cutting beats pulling, and what to check on reclaimed boards before they touch a saw. One spot where the sources disagree gets its own explanation.
Key Takeaways
- Wear safety glasses or goggles every time you pull a nail. CCOHS recommends them for hammering, and one video creator warns that a nail can flick up toward the eye.
- A block under the hammer head shortens the pivot distance and makes a stubborn nail easier to pull than a straight pull-back does.
- Pull finish nails through the back of the board with end-cutting nippers, and put a flat bar under the tool if you must work from the front.
- Galvanized nails are much harder to pull and more likely to bend or break, so slow down and use a longer lever.
- Discard a hammer with a mushroomed or chipped face. Do not grind or reheat-treat it.
Pulling a Protruding Nail: The Claw Hammer Method
A hammer pulls well only when the pivot sits close to the nail, which is the heart of How to Remove Nails From Wood. CCOHS lists nail pulling among the jobs hammers are designed for, and tells you to pick one of the proper size and weight for the job.
A hammer’s striking face should measure about 12 mm (0.5 in) larger than the face of the tool being struck, per CCOHS. Bevelled faces chip and spall less often. Hammers with a mushroomed or chipped face, or cracks in the claw or eye, get discarded. Loose heads and cracked handles get replaced before any nail pulling starts.
Before you start: Safety glasses or goggles go on first, because a nail can flick up toward your eye as it releases. Inspect the hammer face and claw for chips or cracks, since CCOHS says misuse can make the face chip and cause serious injury. Look behind and above you before swinging, and keep clear of other people.
Here’s the sequence for a nail that sticks up from the board:
- Put on eye protection. If you skip it, a nail that lets go suddenly can fly toward your face.
- Check the hammer. Confirm the head is firmly attached and the handle is sound. A loose head or cracked handle fails exactly when you load it.
- Seat the claw under the head and slide a block under the hammer head. Skip the block and the pivot migrates to the front of the head, which is the hardest way to pull and puts the most stress on the handle.
- Pull in one direction. If the handle can clear the edge of the wood, twist the nail out in one motion. Rocking back and forth wastes effort and works the nail loose in the hole.
- Switch to the side of the claw for a stubborn nail. The side gives the strongest pulling force, but the nail only travels a short distance, so reset and repeat. Going back to a straight pull strains the handle again.
A straight pull on a tough nail is the hardest method and stresses the handle the most, according to Fine Homebuilding. If you feel the handle bending, stop and add the block.
Protecting the Wood: Blocks, Flat Bars and Sacrificial Plywood
Anything pressing on a small patch of wood will dent it, so in How to Remove Nails From Wood you spread the load. For finish or siding nails, Fine Homebuilding recommends a flat bar under the hammer or nippers.
A video creator who works on trim carries a scrap of thin 1/4-in plywood for the same reason. The plywood slides easily under the tool and takes the prying damage instead of the face. I like that habit because it costs nothing and it works with a hammer, a bar, or a tack lifter.
I’d hold off buying any specialty puller until you’ve tried a flat bar, a scrap of thin plywood, and locking pliers. That trio solves most of what a toolbox throws at you, and you probably own two of the three already.
Where this goes sideways: pulling a nail straight back through a visible face, with bare steel against bare wood. The pressure lands on a tiny area, and the dent is permanent. Add the plywood before the first pull, not after the first dent.
Flush Nails: Cat’s Paw, Tack Lifter, or Punch It Through
Nail heads driven flush are hard to grip because there’s nothing to grab. Prying one out with a screwdriver is like opening a can with a steak knife. You’ll get there, but the surface pays for it.
Lifting the head from the face
A tack lifter slides behind the head and raises it enough for a claw or bar to bite. The video creator I’m drawing on recommends heavy-duty versions for nails, with lighter ones better for tacks. He admits that going through the face always risks damaging the wood. If the board is headed for the scrap pile, that risk doesn’t matter, and this is the quickest route.
Fine Homebuilding describes a claw bar with a built-in Dimpler. Struck with a hammer over an embedded head, the Dimpler crushes the wood fibers so the pry tongs can grab the nail without digging. The author’s only complaint is that it costs a lot.
Punching it through and pulling from the back
When the face has to survive, the same video creator drives the nail through instead. He chooses a punch the size of the head or smaller, sets the nail so it sticks out slightly on the far side, then grips it with a claw hammer from the back. The face stays clean and any damage lands on the hidden side.
It takes longer than prying from the front, and the face looks untouched afterward.
Can you hit a tack lifter with a hammer?
The sources disagree here, and the disagreement is worth showing.
| Source | Position | What it means for you |
|---|---|---|
| CCOHS | Don’t strike hard metal objects with a hammer | The face can chip |
| Video creator | Taps a tack lifter under the head with a small hammer | Anecdotal, not a safety standard |
| Fine Homebuilding | Strikes the Dimpler with a hammer | A trade-magazine tool review |
CCOHS makes no exception for nail pullers. If you tap a tool anyway, you’re accepting a risk, so match the hammer face to the tool (CCOHS says about 12 mm larger than the tool’s face), keep the goggles on, and retire any hammer whose face starts to chip.
Pliers and Nippers: Finish Nails, Corroded Heads and Trim
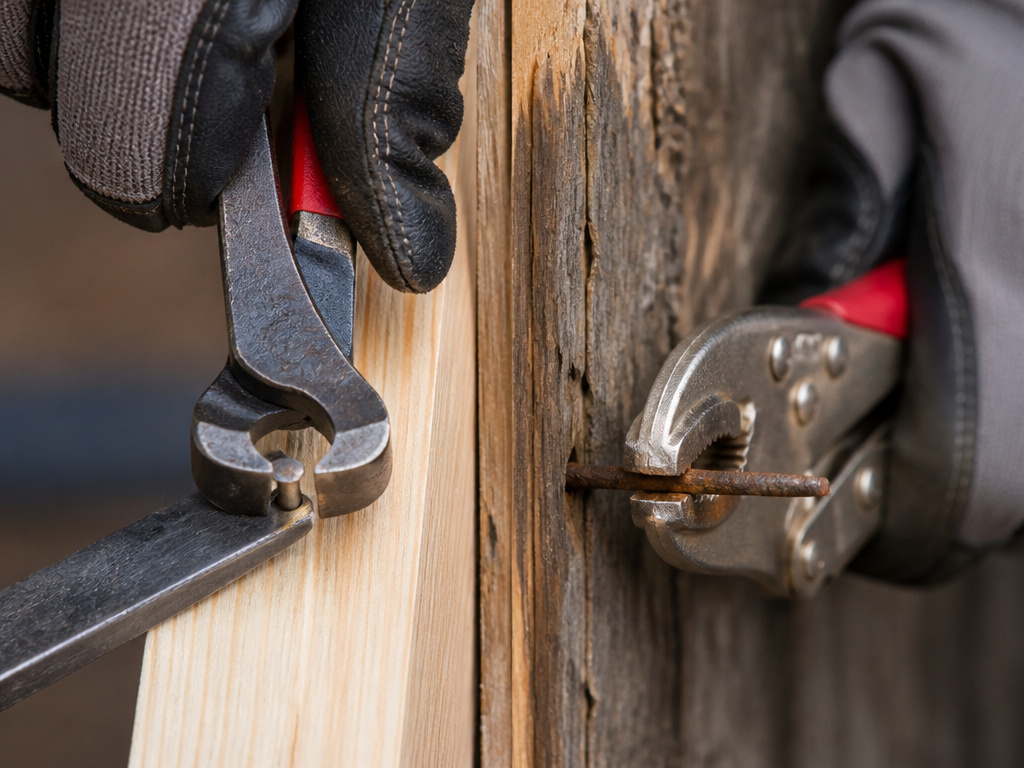
Finish nails have small heads, so you can pull them out the back. Fine Homebuilding says end-cutting nippers will draw a finish nail through the back of a board, protecting the show side of molding. If you have to work from the front, put a flat bar under the nippers to spread the pressure and reduce denting.
A Fine Homebuilding reader suggests another route: clamp locking pliers onto the nail and pry against the jaws. The reader says it’s slower than pulling common nails, but fast once the pliers are set tight. It also works on corroded heads that would strip off under a claw. For a long nail, release the pliers, slide more nail into the jaws, lock again, and pry another section out.
Staples need a different grip and a different tool, which is why removing staples gets its own approach.
Three quick rules for this section:
- Pull through the back whenever the back is hidden or disposable.
- Put a flat bar under nippers or hammer on any visible face.
- Clamp locking pliers on the shank, not the head, when the head is corroded.
Which Way Should You Remove Nails From Wood? A Quick Pick
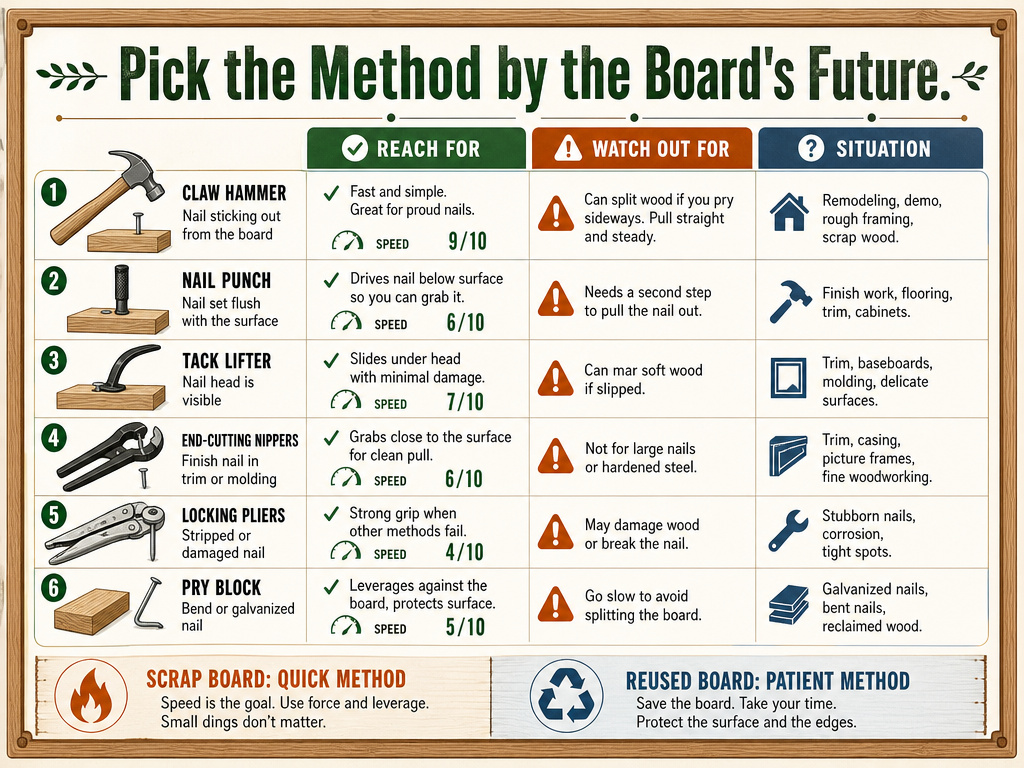
Choose by what the board is for and what the nail is doing.
| Situation | Reach for | Watch out for |
|---|---|---|
| Protruding common nail | Claw hammer, block under head | Straight pull strains handle |
| Flush nail, face must survive | Punch through, pull from back | Punch no larger than the head |
| Flush nail, board is scrap | Tack lifter, then bar or hammer | Face will be damaged |
| Finish nail in trim | End-cutting nippers from back | Flat bar under tool on front |
| Corroded or stripped head | Locking pliers on the shank | Slower on common nails |
| Galvanized nail | Block, side leverage | Bends or breaks |
My take: pick the method that matches the board’s future. A board bound for the burn pile gets the quick approach. A board you’re reusing gets the patient one.
Should You Cut the Nail Instead of Pulling It?
Cut when the nail has nowhere to go: it’s bent flat, the head is gone, or pulling would split the board. I can’t cite a source for cut-versus-pull rules. This is shop judgment, so treat it as such.
An oscillating tool with a metal-cutting blade can cut nails flush with the surface, and a hacksaw handles a nail you can reach from the side. Wear eye protection for any of these, because cut-off ends and metal fragments fly.
If the head sits just below the surface, chiseling around it exposes enough to grip. This works, but it scars the wood, so it belongs on boards where the face doesn’t matter.
Last resorts like drilling out a head are even less forgiving. They leave a hole you’ll fill later.
Deck Nails, Galvanized Nails and Why Some Fight Back
Fine Homebuilding’s author says the rough-textured surface of galvanized nails makes them much harder to pull, and more likely to bend or break. He uses them only when he’s sure he won’t need to remove them. You feel the difference immediately: a galvanized nail drags the whole way out instead of sliding free.
That’s the practical rule for deck boards. Slow down, use a block under the head, favor the side pull, and put a flat bar under the tool so the board doesn’t dent. Ring-shank nails weren’t covered in my sources, so I won’t make claims about them beyond the obvious: expect them to resist.
Holding power depends on species and moisture, too. The USDA’s nail-withdrawal resistance in American wood species research note gives species-by-species data, and the Wood Handbook fastenings chapter covers how nailed connections behave. I couldn’t open either file while researching, so I’m pointing you to them rather than quoting numbers.
Here’s a field guide to the common problems:
| Problem | Likely cause | Fix |
|---|---|---|
| Nail bends or snaps | Rough galvanized surface | Block under head, lever to the side |
| Handle strains | Straight pull, pivot at front | Add a block under the head |
| Dents beside the nail | Tool pressure on a small area | Flat bar or plywood under tool |
| Head strips off | Corroded head | Locking pliers on the shank |
Easy to miss: a bent nail that pulls through the wood tends to tear the hole wider. Straighten your approach, not your nail.
What About Nails Held by Adhesive?
None of my sources address dissolving construction adhesive or nail glue. I’m not going to invent a solvent for you. Check the adhesive’s label for how it releases before you reach for any chemical.
What the sources do support is a pull that spreads the load: a flat bar under the tool, and a gap opened with a flat knife or old chisel tapped in beside the fixing. That approach cracks a glued joint without gouging the face.
Reclaimed Wood: Check Every Board Before the Saw Touches It
Years ago I ran a brand-new planer blade into a hidden nail in a reclaimed board. It was a rookie mistake, and I’d been at this for decades. That blade was dull before the first pass finished.
Now I scan every face and edge of salvaged lumber before it gets near a blade, and I pull or cut anything I find. A nail you can’t see is the one that hits the cutter.
OSHA’s 29 CFR 1926.25 housekeeping regulation requires form and scrap lumber with protruding nails to be cleared from work areas, passageways, and stairs during construction, alteration, or repairs. It’s a site-cleanliness rule, but the lesson carries into your garage: don’t leave nailed boards where someone will step.
A short checklist before you cut reclaimed lumber:
- Look closely at both faces and all four edges.
- Run a gloved hand along each edge for anything that snags.
- Pull or cut every nail you find, including broken-off stubs.
- Fill the holes once the nails are out.
After the nails are out, repair the damage with wood filler, then sand it flush. When I drive new nails into extremely hard wood, I drill a small pilot hole first because it keeps the nail from bending.
How do I drive a nail below the surface and fill the hole?
When a nail head sits proud and pulling would chew up the face, sinking it is often the cleaner fix. Rest the tip of a nail set on the head, hold it square, and tap it with a hammer until the head sits just below the surface. Wear safety glasses or goggles, strike squarely with the hammer face parallel to the work, and choose a hammer face larger than the set so the edge never clips it. Check the hammer for chips or mushrooming first. Once the head is sunk, press wood filler or putty into the dimple, let it dry, and sand it flush. Match the filler to the wood if the spot will be stained or clear coated. If the nail has to come out completely, a punch the size of the head or smaller can push it through until the point shows on the back, where a claw hammer can grip it.
What can I use to pull a nail if I don’t have a nail puller?
Locking pliers are the best stand-in. Clamp them tight on a finish nail and pry against the jaws. It is slower than pulling common nails, but it goes quickly once the grip is set, and it works on corroded heads that would strip off under other tools. For a long nail, release the jaws, slide more of the nail in, and pry again. Slide it under the head and work it up gently, with a thin scrap of plywood beneath to protect the wood face. Wear goggles throughout, because a nail can flick toward your eye. CCOHS says not to strike hard metal objects with a hammer because the face can chip, while one video creator taps a tack lifter or bar under a flush nail head with a small hammer.
Frequently Asked Questions
What is the easiest way to remove nails from wood?
For a nail that sticks up, a claw hammer with a block under the head is the easiest way. For finish nails, pull them through the back with end-cutting nippers. For flush nails, a tack lifter or a punch is the common approach.
How do you remove deck nails without damaging the wood?
Galvanized nails are hard to pull because of their rough surface, so use a block under the hammer head and a flat bar under the tool to protect the board. Work slowly and lever to the side for the strongest pull. Expect some nails to bend or break.
What dissolves nail glue on wood?
My sources don’t cover this, so I won’t guess at a chemical. Check the adhesive label for how it releases. Opening the joint with a flat knife or thin chisel and prying with a flat bar is the approach the sources do support.
How do you cut nails sticking out of wood?
Hacksaw works on nails you can reach from the side, and an oscillating tool with a metal-cutting blade can cut them flush. Wear eye protection either way. Cut when pulling would split the board or the head is gone.
Do I really need safety glasses to pull nails?
Yes. CCOHS recommends safety glasses or goggles when hammering, and one video creator warns a nail can flick up toward your eye as it releases.
The Bottom Line
If the board is scrap, take the fast route and accept the face damage. If the board is staying, punch the nail through or pull it from the back. That single decision matters more than which tool you pick.
One limit to the advice above: when a nail won’t budge and the wood is starting to split, stop pulling and cut the nail instead. A clean cut beats a torn board.
This week, grab one salvaged board and practice the punch-through method on a spare nail before you try it on something that matters. You’ll learn the feel of it on a throwaway. And replace any hammer with a chipped face before you start.
