
Finish Nailer vs Framing Nailer: Key Differences Explained
This post contains affiliate links. As an Amazon Associate, we earn from qualifying purchases.
A finish nailer and a framing nailer are not interchangeable. A finish nailer typically uses 15- or 16-gauge nails for trim work like baseboards and crown molding, where appearance and a clean finish matter, though some sources also include 14 gauge. A framing nailer drives thicker, 8- to 12-gauge nails for structural work like framing a wall or building a deck, where holding power and code compliance are mandatory. Choose a finish nailer for any visible, non-structural piece; choose a framing nailer for anything load-bearing.
That distinction, aesthetics versus structure, is written into the building code. The numbers are literal: a framing nail’s minimum diameter is 0.113 inches, while the thickest finish nail is 0.0800 inches. A gap of 0.033 inches might sound small, but in a load-bearing joint, it’s the difference between a connection that passes inspection and one that fails.
What follows is the arithmetic behind the uses: the nail diameters, the gauge conventions that run backwards, and the one-sentence rule that settles 90% of your tool choices. By the end, you’ll know exactly which gun to grab, and more importantly, why the other one would ruin your project.
Key Takeaways
- Diameter decides. Framing nails (0.113″–0.162″) are over twice as thick as finish nails (0.0625″–0.0800″). A finish nailer cannot meet structural code.
- Match the gauge to the material. Use a 16-gauge finish nailer for most trim like baseboard and door casing. Use a framing nailer for any connection that carries weight or an inspector will check.
- Rent the big one. For most DIYers, buying a quality finish nailer and renting a framing nailer for occasional projects is the most cost-effective path.
- Power source is secondary. Pneumatic nailers are lighter and cheaper; cordless offers mobility. Neither changes the fundamental gauge decision or the jobs each tool can do.
- The hole tells the story. A framing nail leaves a large, unfillable hole and will split thin trim. A finish nail leaves a small hole you can hide with putty.
Finish Nailer vs Framing Nailer At A Glance
The core difference is a matter of engineering, not opinion. The following table lays out the specs that force these tools into separate categories.
| Specification | Framing Nailer | Finish Nailer |
|---|---|---|
| Nail Gauge | 8 to 12 gauge | 15 or 16 gauge |
| Nail Diameter Range | 0.113 to 0.162 inches | 0.0625 to 0.0800 inches |
| Nail Length Range | 1-¼ inches to 3-½ inches | 1 inch to 2-½ inches |
| Meets Building Code | Yes, for specified connections | Never for structural work |
| Primary Job | Structural: framing walls, decks, sheathing, fencing | Finish carpentry: baseboard, crown molding, trim, casing |
| Hole Left Behind | Large, often unfillable without noticeable repair | Small, easily filled and disguised with wood putty |
| Risk of Splitting Trim | High | Low |
Framing nailers use 8-gauge to 12-gauge nails ranging from 0.113 to 0.162 inches in diameter and 1-¼ inches to 3-½ inches in length. Finish nailers typically use 15-gauge or 16-gauge nails ranging from 0.0625 to 0.0800 inches in diameter and 1-inch to 2-½ inches in length, though some sources also include 14 gauge. The thicker diameter of framing nails provides the withdrawal resistance required for structural connections, while the thinner finish nails prioritize a concealed, aesthetic result.
The numbers in that blockquote are the physical constraints that make substitution dangerous. We’ll begin with the heavier hitter.
What a Framing Nailer Actually Does
A framing nailer is for building skeletons. Its job is to join large pieces of dimensional lumber, 2x4s, 2x6s, joists, plates, with enough force and staying power to hold a house together against gravity and wind.
Think of it as the power tool equivalent of a surgical bone screw. It’s not pretty, and you hope to never see it again, but it’s what keeps everything standing. The tool is built for this: it’s heavier, often louder, and drives nails with a definitive thwack that sets them deep.
Common mistake: Using a framing nailer on any trim thinner than about 3/4 inch. The nail’s diameter is simply too large for the material. You’ll hear a sharp crack as the wood splits along the grain, ruining the piece instantly.
Where You Must Use a Framing Nailer:
- House Framing: Stud-to-stud, plate-to-stud, and other structural connections.
- Deck Building: Joists, blocking, and ledger board attachments (often with ring shank nails for extra grip).
- Fencing: Rails and posts, typically with 3-¼ inch galvanized nails.
- Sheathing & Subflooring: Attaching plywood or OSB panels to framing. Code often specifies a minimum 6d nail.
The holding power doesn’t come from magic. It comes from physics. A nail’s resistance to pulling out, its withdrawal resistance, is a direct function of its shank diameter and the friction of the shank type. A smooth 0.131-inch nail holds better than a smooth 0.072-inch nail. Add rings or twists to the shank, and that holding power jumps again because the metal deforms into the wood fibers.
This is why a finish nailer can’t frame. Even if you used the longest 2-½ inch finish nail, its thin shank (max 0.0800″) lacks the cross-sectional area to develop the necessary grip. Under load, it would slowly pull out or bend. Building inspectors know this, which is why finish nails are never on an approved fastener schedule for structural work.
What a Finish Nailer Is Designed For
If the framing nailer builds the skeleton, the finish nailer dresses it. This tool exists for one reason: to attach visible trim so securely that you barely notice it’s there.
The goal is a seamless look. That’s why finish nails have smaller heads or are headless, and why the guns are lighter and more precise. You’re not driving nails with reckless abandon; you’re placing them with intention, often into corners or tight spaces.
My own hard lesson came on a flooring job. I was reinstalling oak baseboard after laying new hardwood. My first few shots with the finish nailer sunk the nails perfectly flush. Then I hit a section where the drywall was thicker, and the stud was just out of reach. The 2-inch nails, only grabbing drywall, felt loose within a week. I had to pull them all and switch to 2-½ inch nails to ensure every one bit into solid wood. The holding power lesson was immediate: for trim, length matters, but hitting the backing matters more.
Where a Finish Nailer Is the Right Tool:
- Baseboard & Door Casing: A 16-gauge finish nailer with 2 to 2-½ inch nails is the standard.
- Crown Molding: A 15 or 16-gauge nailer with 2-½ inch nails.
- Chair Rails, Wainscoting, & Picture Frame Molding.
- Building Furniture & Face-Frame Cabinetry: Where screws would be visible or splitting is a concern.
- Faux Beams & Decorative Boxes.
For DIY and pro trim work, the 15/16 gauge range is the practical universe. The 18-gauge brad nailer is a different tool for even lighter work, and a 23-gauge pin nailer is for delicate, glue-assisted holds.
Nail Gauge, Diameter, and the Backwards Math
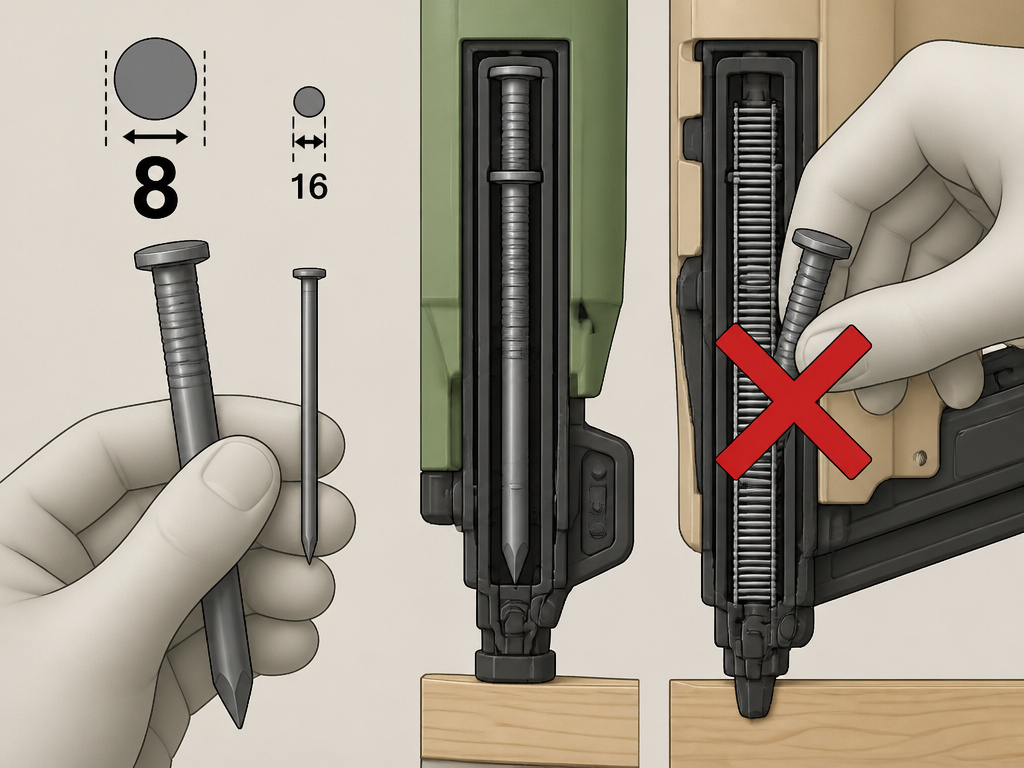
This trips everyone up at first. Gauge numbers run backwards. A smaller gauge number means a thicker nail.
It’s a holdover from wire manufacturing. The system states that as the gauge number decreases, the wire diameter increases. So an 8-gauge framing nail (0.162″) is much thicker than a 16-gauge finish nail (0.0625″).
The part nobody mentions: This gauge system is why “heavier gauge” is ambiguous. Does it mean a bigger number (18-gauge) or a physically thicker nail (15-gauge)? Always clarify: “I need a thicker nail” means a lower gauge number.
This is the practical reason you can’t eyeball compatibility. A finish nailer’s magazine and driver blade are machined to fit nails within a specific diameter range. Forcing a framing nail, even a short one, into a finish nailer will jam the mechanism, likely damaging the tool. The reverse is also true; a finish nail in a framing nailer will rattle in the channel and fail to drive properly.
Which Nailer Your Project Actually Needs
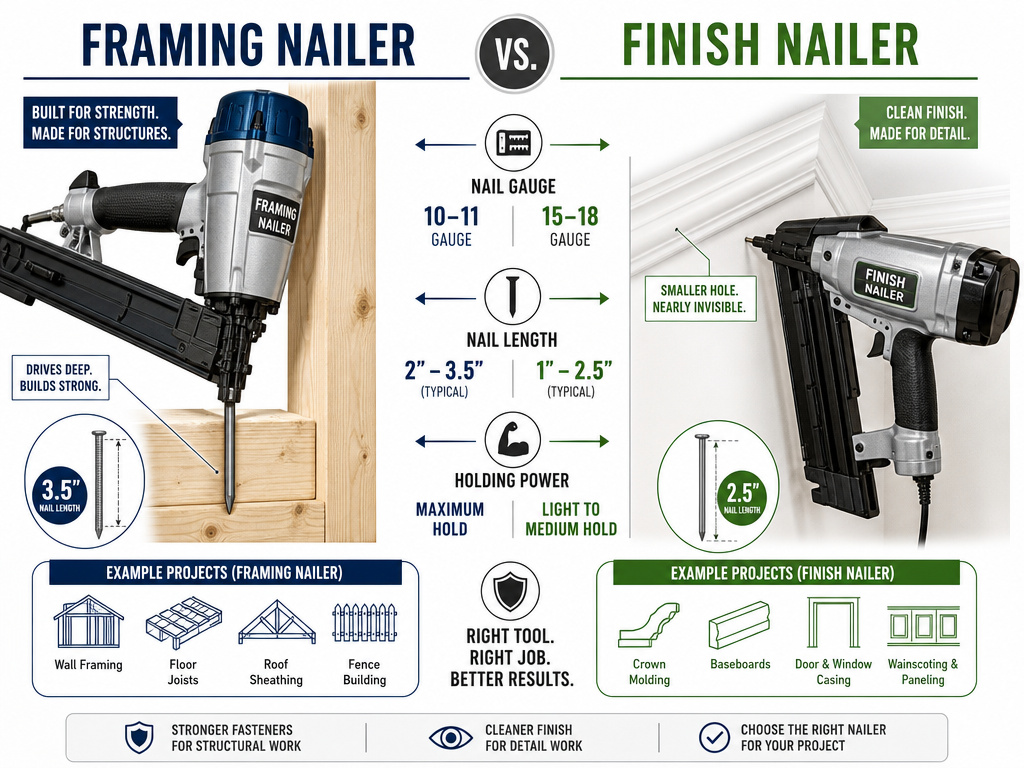
We can turn specifications into decisions. This table removes the guesswork for common projects.
| Your Project | Reach For | Nail Size & Notes |
|---|---|---|
| Framing a shed or garage wall | Framing Nailer | 3 to 3-½ in., 0.131 in. Diameter or heavier |
| Deck framing, joists, blocking | Framing Nailer | 3-¼ in., ring shank highly recommended in high-wind zones |
| Wall sheathing or subfloor | Framing Nailer | 6d minimum nail as per building code |
| Fence rails and posts | Framing Nailer | 3-¼ in. Galvanized nails |
| Baseboard and door casing | 16-Gauge Finish Nailer | 2 to 2-½ in. Nails; must hit stud or solid blocking behind drywall |
| Crown molding | 15 or 16-Gauge Finish Nailer | 2-½ in. Nails |
| Shoe molding, quarter round | 18-Gauge Brad Nailer | 1 to 1-¼ in. Nails; minimal holding power, often used with glue |
| Faux beams, 1x decorative boxes | Finish Nailer | 2 in. Nails |
| Cabinet face frames, delicate trim | 23-Gauge Pin Nailer | Short pins used only with glue for alignment during clamp-up |
The rule is brutally simple when you compare a finish nailer vs framing nailer: If the piece carries weight or an inspector will look at it, use a framing nailer. If a person will look at it, use a finish nailer.
There’s one genuinely ambiguous case: attaching siding or cladding. It’s visible, so you want a clean hole, but it’s also an exterior, semi-structural element. Here, the manufacturer’s installation instructions are law. They will specify a nail type, gauge, length, and sometimes even a head style (often a ring-shank with a large head). Never assume a finish nailer is acceptable.
Pneumatic vs. Cordless: A Power Source Reality Check
The debate isn’t about capability anymore; it’s about economics and feel. Both pneumatic (air-powered) and cordless nailers can drive the correct nails for their class.
Pneumatic Pros: Lighter weight, lower upfront tool cost, consistent power as long as the compressor keeps up. The tool itself is simpler, with fewer electronics to fail.
Pneumatic Cons: You’re tethered to a hose and compressor, which adds setup time, noise, and portability challenges.
Cordless Pros: Ultimate portability. No hoses, no compressor, perfect for quick jobs or moving room-to-room.
Cordless Cons: Higher tool cost, heavier tool due to the battery, and power can diminish as the battery drains. There’s also a consensus among users that even the best cordless framing nailers, like the DeWalt DCN692B, are “not as powerful as a pneumatic one” for the toughest applications, like driving 3-½ inch nails into dense, engineered lumber.
My stance hasn’t changed: for finish work, a pneumatic nailer offers better control, lighter weight, and a lower cost of entry. But for the DIYer who hates setup and does smaller projects, a cordless finish nailer like the Metabo HPT is a justifiable luxury. For a framing nailer, unless you’re a pro, renting a pneumatic setup is often smarter than buying a costly cordless rig.
The Cost Comparison: Buy, Rent, or Borrow?
We’ll discuss numbers without prices, since the relative cost is what matters.
An entry-level pneumatic framing nailer is the cheapest way to own a framer, but you must add the cost of a capable air compressor and hose. This is a significant, often overlooked, additional investment. A cordless framing nailer kit is a major purchase, often costing several times more than a basic pneumatic setup.
This is why the rental counter exists. For a one-time deck or shed project, renting a pro-grade pneumatic framing nailer for a day is economically brilliant. You get a powerful, reliable tool without the long-term cost, storage, or maintenance.
A cordless 16-gauge finish nailer, sold “tool only” for use with a battery platform you may already own, represents a moderate investment. It’s a tool most homeowners will use repeatedly over years for trim work, repairs, and small builds, justifying its purchase.
The fasteners tell their own story. Framing nails are commodity items, sold in bulk boxes of 3,000 or more. Finish nails cost more per nail but are used in far smaller quantities. Over a decade, the nail cost for a homeowner’s finish nailer is negligible; the tool itself is the investment.
Frequently Asked Questions
Can a finishing nailer be used for framing?
No. The nails are neither long nor thick enough to provide the required holding power for structural connections. Using a finish nailer for framing creates a safety hazard and would never pass a building inspection.
Can I use a framing nailer for baseboards?
You should not. The large nail diameter will likely split the thinner wood of the baseboard. Even if it doesn’t split, the massive hole left behind is virtually impossible to fill and hide, leaving a visible defect in your finish work.
What size nails do I need for baseboards?
For baseboards, use 2-inch to 2-½ inch nails from a 16-gauge finish nailer. The key is length: the nail must pass through the baseboard and drywall and embed deeply into the wall stud behind. Hitting only drywall provides almost no holding power.
What is the difference between a brad nailer and a finish nailer?
Brad nailer drives thin, 18-gauge nails with very small heads. It’s for ultra-light trim (like shoe molding) or holding pieces together while glue dries. A finish nailer drives thicker 15 or 16-gauge nails with more holding power, meant for permanent installation of trim like baseboards and crown molding. For a deeper dive, see our brad nailer vs finish nailer comparison.
Should I buy a pneumatic or cordless nailer?
For a finish nailer you’ll use often, many users prefer pneumatic models for their lighter weight and consistent power. If you value portability above all and work in finished spaces, a cordless model is justifiable. For a framing nailer used infrequently, strongly consider renting a pneumatic tool.
Before You Go
The “finish nailer vs framing nailer” question is essentially a diagnosis.
Look at the material in your hand. Is it a 2×4 that will hold up a roof? That’s a framing nailer job. Is it a piece of trim that someone will sand, paint, and stare at for years? That’s finish nailer territory. The tools are specialists because the jobs demand it.
If you’re building a home workshop, the 16-gauge finish nailer is the one to buy first. It handles the vast majority of projects a homeowner actually encounters. The framing nailer is the specialist you call in for the big jobs, and you can rent that one with confidence when the time comes.
Don’t get lost in brand wars or the latest battery technology. Start with the nail your project requires, and let that choice lead you to the right gun. Everything else is just noise between you and the smell of sawdust.
