
How to Clean a Shop Vac Filter: The 3-Step Dry Method
This post contains affiliate links. As an Amazon Associate, we earn from qualifying purchases.
To clean a shop vac filter, you must first empty the drum, safely remove the filter, and choose the correct cleaning method based on the debris. For dry, chunky debris, tap the filter against the inside of the drum. For fine, caked-on dust, you may wash it with water, but you must let it dry completely before reinstalling it for dry pickup.
That drying step isn’t a suggestion when you consider a how to clean a shop vac filter. A wet filter used for dry dust acts like a clog magnet, choking suction within minutes and potentially damaging the motor. The real work is in the details: knowing when water is okay, how to check for hidden tears, and what to do with the fine dust that ruins filters fastest.
What follows is the sequence for how to clean a shop vac filter that keeps your vac pulling hard. The guide explains the dry clean, the wet wash, the brand-specific quirks, and the one upgrade that makes all of this less frequent.
Key Takeaways
- Always unplug the vac before touching the filter. Reaching into a powered unit risks serious injury.
- For dry cleaning, tap the filter against the inside wall of the drum to dislodge debris; slapping the lid first can knock some loose without full removal.
- If you wash a filter with water, dry it for at least 24 hours in a warm, ventilated area before using it for dry pickup. A damp filter clogs instantly.
- Inspect the filter for tears or holes after every clean. A pinhole leak will blast fine dust back into your shop air.
- For fine dust like drywall or cold ash, use a high-efficiency filter bag with your cartridge filter. The standard filter alone isn’t rated for it.
Before You Start: Safety and Setup
Before you start: Unplug the power cord. This is non-negotiable. Shop-Vac and RIDGID manuals both list this as the first step to prevent accidental startup while your hands are near the impeller. Do this work outdoors if possible; RIDGID advises cleaning outside your living quarters to avoid spreading dust indoors.
You’ll need a flat, clean surface, a garden hose or spigot if washing, and a well-ventilated spot for drying. Find the filter release. Most cartridge filters twist off a central cage or snap free from a Quick-Lock stud. If you have a RIDGID model, it likely came with the VF5000 filter installed. The process is the same.
First, a point of clarification. Your shop vac is not a dust collector for a table saw. It’s for cleanup. Using it as primary collection on a big tool will kill the motor and still leave the air dirty. That’s a different system.
The 3-Step Dry Cleaning Method (No Hose Needed)
You don’t always need water. For sawdust, wood chips, or general shop grit, a physical knock-out works fine and gets you back to work faster.
Step 1: Slap the lid. With the vac off and unplugged, give the closed lid a firm slap with your hand. This can dislodge a surprising amount of surface debris from the filter down into the drum. It’s a quick first pass.
Step 2: Remove and tap. Take the filter out. Hold it over your open drum and gently tap the end cap or the body against the drum’s inside wall. Don’t bang it like you’re trying to break concrete. A series of firm, controlled raps will shake the packed dust loose. You’ll see a cloud fall out.
Step 3: Final visual check. Hold the filter up to a light source. Look for any debris still wedged deep in the pleats. If it looks clear and the pleats aren’t caked with fine powder, you’re done. Reinstall it.
If the pleats are packed with a fine, talc-like dust, the kind from drywall or cold fireplace ash, tapping won’t cut it. That’s when you consider water. But first, understand your shop vac filters. A standard cartridge filter can be washed. A specialty CleanStream Abrasive Resistant filter has different rules.
Washing a Filter (The Right Way)
Here’s where the manuals disagree, and it’s worth knowing both sides. The Shop-Vac corporation manual states that extremely dirty filters “may be cleaned with water by rinsing from the inside of the filter.” RIDGID’s manual also says to run water through the filter for thorough cleaning of fine dust. However, both issue a stern warning: a filter must be completely dry before any dry pickup, or it will clog “quickly and be very difficult to clean.”
So washing is permitted, but with strict conditions. This isn’t a casual rinse.
- Take it outside. Do this in the driveway or yard. You’ll make a mess.
- Rinse from the inside out. Hold the filter upright. Use a hose or spigot and run water through the inside of the filter cartridge, letting it flow out through the pleats. This carries the embedded dust away. Do not use a pressure washer nozzle, the force can tear the paper material.
- Inspect for damage. With the filter clean and wet, any holes or tears become more visible. Run your fingers gently over the pleats. A small tear feels like a flap. If you find one, stop. The filter is done. Using it will just exhaust dust.
- Shake off excess water. Give it a few firm shakes to shed the bulk of the water.
Where this goes sideways: Putting a washed filter back in the vac while it’s still damp. The first time you hit the trigger for dry sawdust, that dust will plaster itself to the wet pleats like concrete. Suction drops rapidly, and you’ll spend significant time picking at a ruined filter.
The drying stage is the whole game. It’s not about being sort-of dry. It’s about bone-dry.
The Critical Dry-Out (24 Hours Is Real)
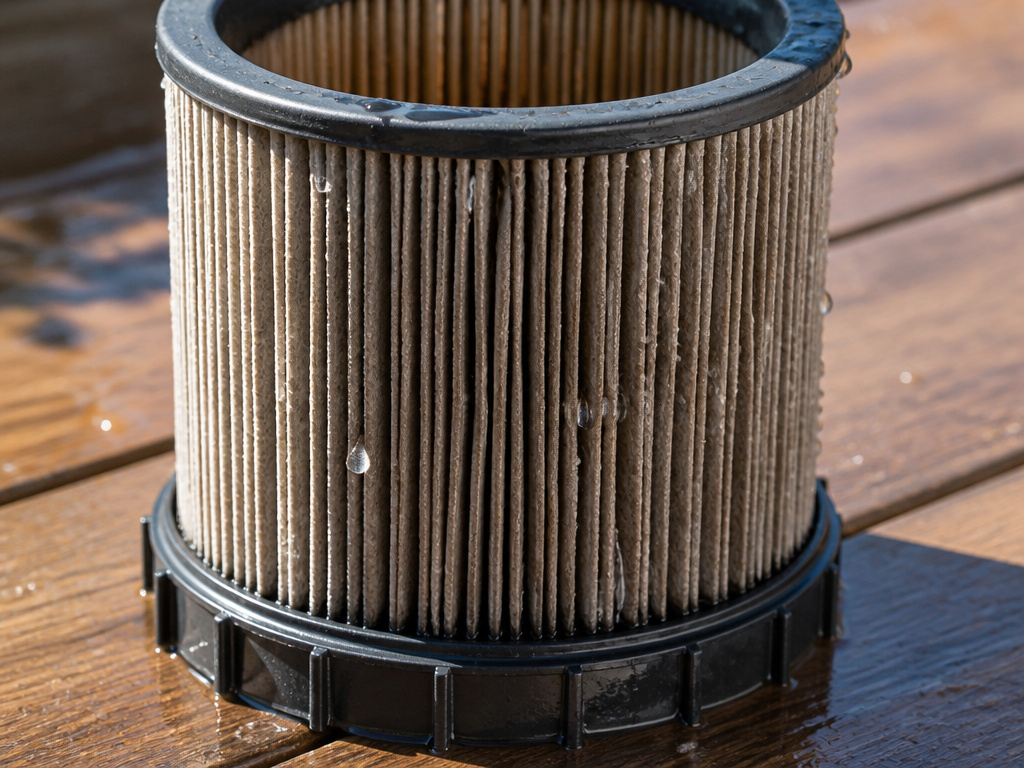
A washed filter needs time. The Shop-Vac manual specifies “dry completely (approximately 24 hours).” In a humid garage, it might take longer.
Do not speed this up with a heat gun or hair dryer. High heat can warp the filter media or melt the glue holding the pleats. You want warm, moving air.
- Best: Place it in the sun with good airflow, standing on its end cap so water can drain.
- Good: Put it near a dehumidifier or a gentle fan in a warm room.
- Bad: Stuff it in a corner of your damp basement.
How do you know it’s truly dry? The paper will feel rigid, not cool or flexible, and there will be zero visible moisture. When in doubt, wait longer. This is why having a spare filter is one of the best small investments for your shop. This allows you to clean one properly without any downtime.
If you’ve just finished vacuuming water, the same rule applies. Dry that filter before you go back to sawdust.
When to Replace, Not Clean
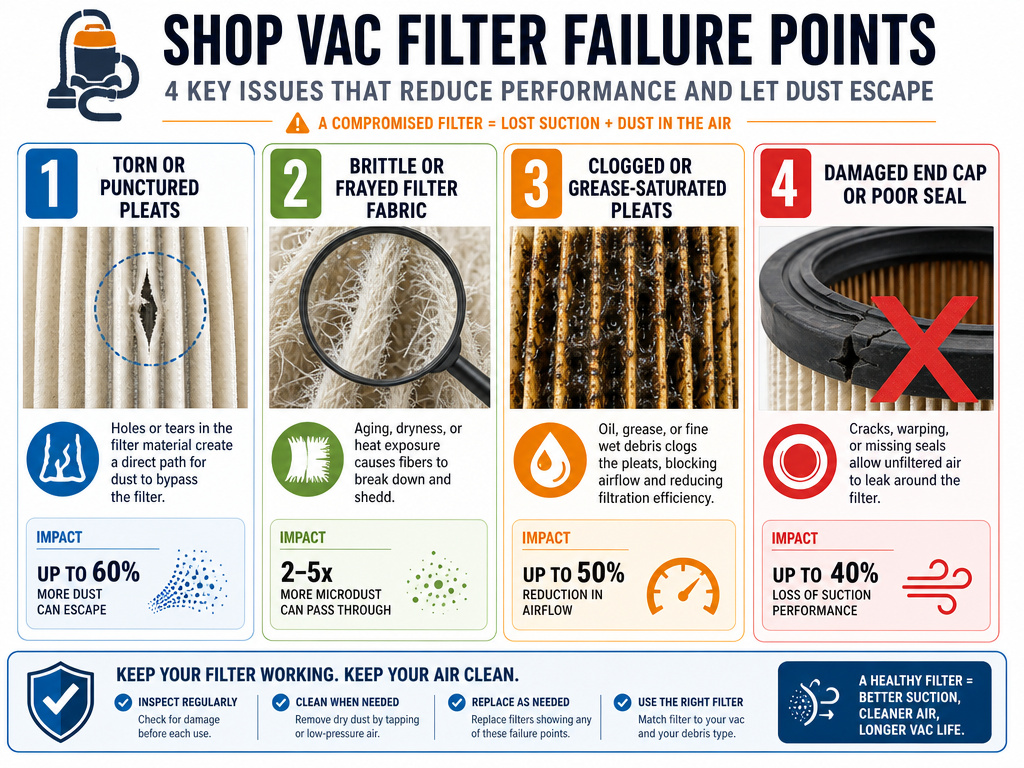
Cleaning has limits. You can’t wash away wear. After each cleaning, do this check:
| What to Look For | Why It Fails | Action |
|---|---|---|
| Tears or holes in the pleats | Dust bypasses the filter, gets sucked into the motor, and is blown back into the air you breathe. | Replace immediately. |
| Worn, frayed fabric that feels brittle | The filter media has degraded and won’t capture fine particles effectively. | Replace. |
| Permanent clog from grease, paint, or insulation | Water won’t dissolve these; they block airflow permanently. | Replace. |
| Damaged end cap or seal | Creates an air leak, killing suction and allowing dust into the motor compartment. | Replace. |
RIDGID’s manual is blunt: “If your filter is worn or damaged, replace it immediately.” A new filter is cheaper than a motor repair. This is especially true for HEPA filters, where a compromised seal defeats the entire point of the filter.
The Fine Dust Problem (Drywall, Ash, Concrete)
This is the filter killer. Standard cartridge filters are not designed for fine powder on their own. The Shop-Vac manual has a specific warning in all caps: “When vacuuming fine dust, or powders of any kind (plaster, drywall dust, cold ashes, concrete dust, etc.) a high efficiency drywall filter bag MUST be used.”
The bag acts as a pre-filter, catching the fine dust before it ever touches the cartridge filter. Your cartridge stays clean, suction stays strong, and you just toss the bag when it’s full. Trying to clean a filter caked with drywall dust is a losing battle, even with water, the ultra-fine particles embed themselves deeply.
If you do this kind of work often, a cyclonic separator like a Dust Deputy makes a huge difference. It spins the dust out of the airstream before it reaches the vac, depositing it in a separate bucket. Your filter might go months without needing attention. It’s the single best upgrade for using a shop vac for messy cleanup.
Storage and Extra Maintenance
Once your filter is clean and dry, reinstall it by reversing the removal steps. Make sure it’s fully seated and locked. For storage, both RIDGID and Shop-Vac say to store the vacuum indoors, away from rain and temperature extremes. Never leave a wet filter installed in a stored vac; mildew will destroy it.
While you’re at it, give the drum a wipe-out and check the hose for clogs. A clean machine starts with a clean filter, but doesn’t end there. And if your shop is attached to your house, look into ways to reduce noise, your family will thank you.
How to Clean a Shop Vac Filter with Compressed Air
Compressed air can be a quick way to blow out loose, dry debris from your filter. First, ensure the vacuum is unplugged for safety. Remove the filter from the vacuum. To dislodge dry debris without fully removing the filter, you can slap your hand on top of the lid while the vac is off. For a more thorough cleaning after removal, gently tap the filter against the inside wall of your dust drum to knock out the dust. Always perform this cleaning outdoors, not in living quarters, to avoid spreading dust. Wear a dust mask and safety eyewear during this process. After cleaning, check the filter for any tears or small holes, and do not use it if damaged.
Frequently Asked Questions
Can you wash a shop vac filter with soap?
The manufacturer manuals only specify using water. Soap or detergent can leave a residue that might attract more dust or affect the filter material. Stick to clean water. For disinfecting the plastic drum, RIDGID recommends a mix of 1 gallon of water and 1 teaspoon of chlorine bleach, rinsed thoroughly.
How often should you clean a shop vac filter?
Clean it whenever you notice a significant drop in suction. For heavy use, that might be after every few hours of runtime. For occasional use, check it visually before each project. A clogged filter strains the motor and reduces performance.
Can you use a shop vac without a filter?
Only when vacuuming liquids, as stated in the manuals. For any dry material, you must have a dry-use filter installed. Running it dry without a filter will send debris straight into the motor, causing damage and blowing dust out the exhaust.
What’s the difference between cleaning a HEPA filter and a standard filter?
The cleaning process (tapping, careful washing, thorough drying) is similar. The critical difference is that a HEPA filter’s seal and integrity are paramount for its rated efficiency. Any damage or improper seating renders its HEPA claim void. Handle it even more carefully.
Why does my shop vac smell bad after cleaning the filter?
Mildewy smell means the filter or the interior drum was stored damp. You must ensure everything is completely dry before reassembly. Running the vac with a smelly, damp filter can spread mold spores into the air.
The Bottom Line
Cleaning a shop vac filter boils down to matching the method to the debris and respecting the dry-time. Tap out the chunks, wash out the fines, and never, ever rush the dry. The one rule that overrides all others? If the filter is torn, replace it. No debate.
Everything changes if you’re dealing with drywall dust. In that case, the real answer isn’t a better cleaning method, it’s adding a disposable bag to your system. That simple shift turns a weekly chore into a monthly one. Your vac will thank you with stronger, more consistent suction, project after project.
