
How to Cut a Circle With a Jigsaw: Step-by-Step
This post contains affiliate links. As an Amazon Associate, we earn from qualifying purchases.
To cut a circle with a jigsaw, you need a pivot point, a guided path, and the right blade. Use a homemade jig from scrap wood or a commercial guide like the Bosch JA1010. Drill a starter hole, turn off the orbital action, and cut slowly, following your marked line. The blade’s stiffness and your feed speed decide the cut’s quality.
The pivot point is what separates a wobbly oval from a clean circle. A nail through a piece of scrap plywood works. A Bosch JA1010 guide uses a precision pin. Both methods anchor the saw’s path to a fixed center, turning the jigsaw into a compass. That mechanical constraint is the whole game when you learn how to cut a circle with a jigsaw.
What follows: the three essential setup steps for how to cut a circle with a jigsaw, a head-to-head on blade choice where manufacturers disagree, and the one trick with a wood wedge that keeps your disc from pinching the blade at the last second.
Key Takeaways
- Turn orbital action to zero for curved cuts; the pendulum motion is designed for straight-line speed and will deflect the blade off your line.
- For small circles, a thin scrolling blade is often necessary, as thick blades can bind and overheat on tight curves.
- Place small wood wedges in the kerf as you near the end of the cut to prevent the inner circle from dropping and pinching your blade.
- The required starter hole size varies: the Bosch DIY guide states the bit should be wider than the blade, while the Makita JV002G manual specifies a hole 12 mm or more in diameter for internal cutouts.
- Cut from the inside for a hole, outside for a disc, this accounts for the blade’s width and lands your cut exactly on the line.
The Core Three-Step Process
Forget complicated jigs for a moment. Every successful circle cut, whether with a scrap-wood compass or a $50 guide, follows the same mechanical sequence for how to cut a circle with a jigsaw. Miss one, and the cut wanders.
First, establish a fixed pivot point at the center of your intended circle. For a homemade jig, this is a nail or bolt through a strip of plywood. For the Bosch JA1010 Circle Cutting Guide, it’s a 3/16-inch (5 mm) steel pin that drops into a pre-drilled hole. That hole should be 7/8 inch (23 mm) deep, and Bosch recommends using a drill press if possible for enhanced precision. The pin doesn’t just locate the cut; it carries the rotational force, so a sloppy hole means a wobbly circle.
Second, create a guided path for the saw. Your jig’s arm, the distance from the pivot pin to the blade, sets the radius. This is where you must account for the blade’s width. If you want a disc, measure from the pivot to the outside of the blade. If you’re cutting a hole, measure to the inside of the blade. Mark that adjusted radius on your jig and lock it down. The guide bar on a tool like the JA1010 has measurement markings, but a strip of plywood needs a pencil line and a clamped block.
Third, manage the cutting forces. A jigsaw blade wants to deflect, especially on a curve. You counteract this with blade selection, speed, and support.
A proper circle-cutting setup acts as a mechanical compass, converting the jigsaw’s linear stroke into a precise rotational path. The pivot point absorbs lateral force, the fixed radius guarantees consistency, and the operator’s job is reduced to controlling feed speed and clearing chips.
Choosing the Right Blade: Thick vs. Thin
Here’s where the instruction manuals don’t agree. Your choice directly affects whether the blade snaps on a tight curve or wanders on a long one.
The Bosch JA1010 guide’s manual explicitly recommends a thick blade like the Bosch T101TP or T144DP for circle cutting with that guide. The logic is sound: a thicker blade resists deflection, helping it stay straight in the cut for a smoother edge on larger diameters. For cutting larger circles, this is solid advice. The blade’s body acts like a stiffener.
Conversely, the Bosch DIY website and other general guides advise using “special, thin curved saw blades for sawing rounded shapes.” This is the classic scrolling blade. Its narrow profile allows it to pivot easily around tight radii without binding. If you’re cutting a circle with a very small radius, a thick blade may not be able to make the turn. It will overheat, stall, or snap.
| Blade Type | Best For | Risk If Used Wrong |
|---|---|---|
| Thick Stiff Blade (e.g., Bosch T101TP) | Larger circles, dense materials like hardwoods. | Binds and snaps on tight curves; creates excessive friction on small radii. |
| Thin Scrolling Blade | Small circles, intricate curves, cutouts in thin material. | Deflects and wanders on long, slow cuts; can break if forced on thick stock. |
| General-Purpose Blade | Rough circles where finish doesn’t matter. | Leaves a ragged, chewed edge; high chance of blade drift. |
The Makita JV002G manual specifies blade models No. B-17, B-18, B-26, or B-27 for cutting circles or arcs. These are all fine-tooth blades designed for clean cutting, but their thickness isn’t the highlighted feature.
The short version: Match the blade to the radius. For big circles, a stiff blade keeps the line. For small circles, a scrolling blade makes the turn. There is no universal answer.
Setting Up Your Jigsaw and Workpiece
The saw itself needs two adjustments, and the wood needs to be immobilized. Skip these, and you’re fighting the tool instead of guiding it.
Turn the orbital action off. Set the dial or switch to 0. Orbital action pitches the blade forward on the upstroke for faster, more aggressive straight-line cutting. On a curve, that pitching motion pushes the blade’s teeth laterally, forcing it off your line and creating a ragged, chewed kerf. A straight, vertical stroke is slower but offers maximum control.
Clamp everything, twice. Your workpiece must be secured to a stable bench or sawhorses. Your circle-cutting jig must be firmly attached to the saw’s footplate. The Bosch JA1010 manual says to use both of its provided clamps if possible for “enhanced grip and precision.” A homemade jig often relies on double-sided tape or a clamped block. Any shift during the cut translates directly into a gouge or an out-of-round shape.
Common mistake: Starting with the blade in the starter hole before the jig is fully secured. The blade bends, throwing your initial radius off by a sixteenth of an inch, enough to ruin the final fit.
Drill your starter hole within the waste area of your intended circle. The rule is simple: the hole must be larger than the width of your blade so the saw can enter freely. How much larger is a point of contention. Bosch DIY says just bigger than the blade. The Makita JV002G manual is specific: for internal cutouts, you need a hole 12 mm or more in diameter. When in doubt, go bigger, it’s easier to nibble back to the line than to force a bound blade.
The Cutting Technique: Slow and Steady Wins
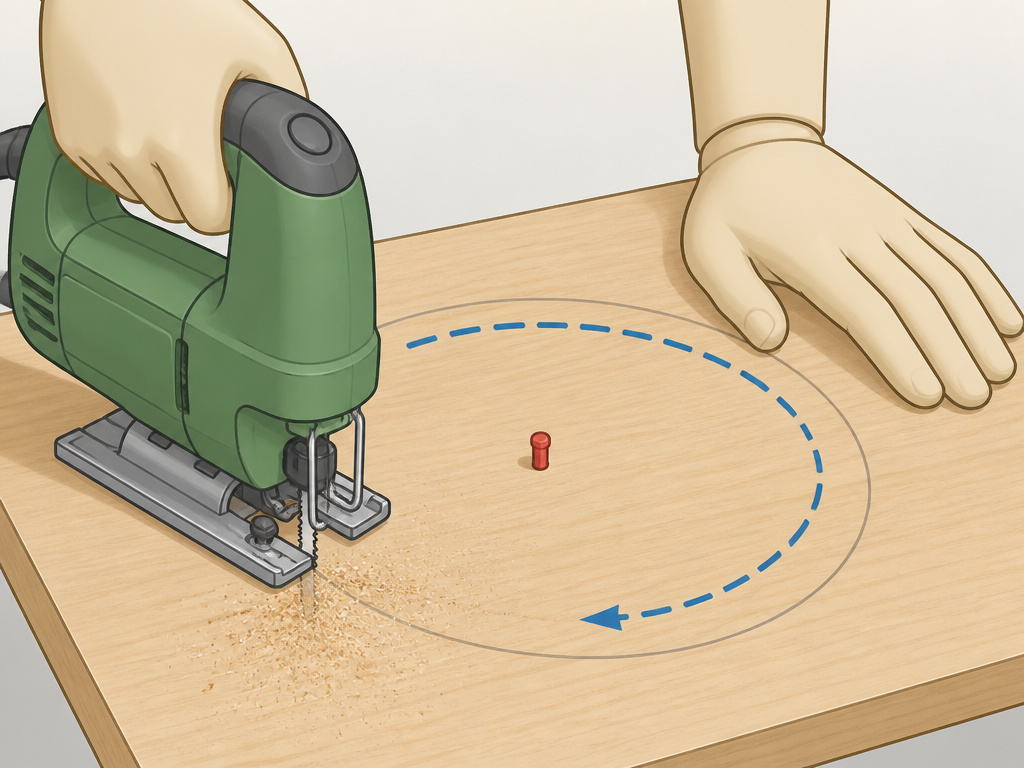
Now you cut. The machine does the spinning; your job is feed and control.
Start the saw and let it reach full speed before touching the blade to the wood. Feed with gentle, consistent forward pressure. The real skill is in the turn, you must rotate the entire saw and jig assembly around the pivot point smoothly. Don’t push the saw sideways; let the pivot guide the arc. Your hands are just following.
If the position gets awkward, stop. The Bosch DIY guide’s best piece of real-world advice is to put the saw down, reposition yourself or reclamp the workpiece, and then continue. Fighting an uncomfortable stance leads to jerky movements and a ruined cut. Sawing should be a relaxed, focused motion.
Listen to the motor. A high-pitched whine means you’re feeding too fast or the blade is dulling. A bogging-down sound means the blade is binding. Ease up. Let the teeth do the work.
Preventing the Inner Circle from Spreading

You’re three-quarters of the way around a perfect disc when the inside piece drops, pinches the blade, and splinters the last inch of your cut. Everyone who cuts circles has faced this.
The Bosch JA1010 manual provides the fix: “Place small wedges in the cut as shown… to keep the inner circle from spreading when near the end of the cut.” This is a non-commodity gem. As you cut, stop periodically and tap small wooden shims or wedges into the kerf behind the blade. These wedges hold the inner piece in place, supporting it and preventing the pinch that causes tear-out or blade bind.
For cutting a hole (where the inner piece is the waste), the same principle applies but in reverse. The waste piece can sag and bind. Wedges keep it supported until the cut is complete, at which point it drops free cleanly.
Commercial Guide vs. Homemade Jig
Should you buy a dedicated tool or build one from scrap? The answer depends on frequency and required precision.
The Bosch JA1010 Circle Cutting Guide is the benchmark. It’s a metal bar with clamps, a centering pin, and calibrated markings for radii from 5 inches to 16-1/2 inches. It also does parallel cuts. For repeat work or when you need a perfect, repeatable circle, it’s worth the investment. Its design eliminates the guesswork in setting the radius. When used with compatible Bosch jigsaws like the JS572 or JS180, you use the holes labeled for the JS572 on the guide.
A homemade jig is a piece of plywood or MDF, a nail, and a clamp. It’s free and infinitely adjustable. You can cut curves of various radii. The downsides are setup time and potential for flex. For a one-off project, it’s more than adequate. It teaches you the fundamentals of how a jigsaw guide works.
| Factor | Commercial Guide (e.g., Bosch JA1010) | Homemade Jig |
|---|---|---|
| Cost | Significant investment. | Nearly free (scrap materials). |
| Precision | High, with calibrated settings. | Variable; depends on builder’s care. |
| Setup Speed | Fast, repeatable. | Slower, custom each time. |
| Best For | Frequent use, professional results, parallel cuts. | Occasional use, learning the basics, unique radii. |
Troubleshooting Common Problems
Even with perfect setup, things go wrong. Here’s how to diagnose the usual suspects.
The blade is bending, giving a beveled edge. You’re forcing the turn. The blade cannot physically make that tight a radius. Switch to a thinner scrolling blade. Also, ensure your orbital action is at 0, it’s the most common cause of unintentional blade skew.
The cut is wandering inside the line. Your pivot point is loose, or your jig is flexing. Check that the center pin or nail is tight and that your jig arm is securely fastened to the saw. For homemade jigs, use sturdy material to prevent flexing.
The saw is vibrating excessively. The workpiece isn’t clamped securely, or you’re using a blade with too few teeth for the material. A finer-tooth blade runs smoother. Also, check that the blade is clamped tightly in the saw; a loose blade shank causes horrific vibration.
Rough, torn edges on the underside. You’re feeding too fast, or the blade is dull. Slow down. For a cleaner bottom edge, place painter’s tape over your cut line on the underside of the workpiece before you start. The tape reinforces the wood fibers, reducing tear-out.
How to sand the edge of a jigsaw-cut circle
After cutting your circle, you will likely have a rough edge that needs smoothing. Start with a coarse-grit sandpaper wrapped around a sanding block or a small piece of scrap wood with a curved profile. Work your way around the circle, following the curve of the edge. Apply even pressure and move the sandpaper in the direction of the wood grain if possible. For a finer finish, progress to medium and then fine-grit sandpaper. This process removes any splinters or blade marks left from the cut. Take your time to ensure the entire circumference is smooth and even before applying any stain, paint, or sealant.
Jigsaw vs router or hole saw for cutting circles
A jigsaw is the most versatile tool for cutting circles, especially large ones or those in the middle of a panel. Unlike a hole saw, which is limited to smaller diameters and requires a pilot bit, a jigsaw can start from a small drilled hole and cut any size. Compared to a router, a jigsaw is more accessible and requires less setup with jigs or trammels, though a router typically produces a smoother edge that needs less sanding. For one-off projects or cuts in thicker material where a hole saw would struggle, the jigsaw is the practical choice. Its ability to make both the outer rim of a disc and an internal cutout from a single starting hole makes it uniquely flexible.
Frequently Asked Questions
Can any jigsaw cut a circle?
Yes, any standard jigsaw can cut a circle if you use a guide or jig to control its path. The saw’s features, like a tool-less blade change and a stable footplate, make the job easier, but the basic reciprocating action is all you need. Some best jigsaws have built-in circle-cutting capabilities or better dust blower systems for keeping your line visible.
What is the smallest circle I can cut with a jigsaw?
The limit is the blade’s ability to turn. With a dedicated scrolling blade, you can cut circles with a very small radius in thin material. The Makita JV002G manual states it can cut arcs of 170 mm or less in radius.
Why do I need to turn off the orbital action?
Orbital action is designed for aggressive, fast straight cuts. On a curve, the forward pitching motion pushes the blade sideways, forcing it off your marked line and creating a rough cut. Setting the orbital action to 0 gives you a straight up-and-down stroke for maximum control and a cleaner kerf.
How do I cut a circle without a center hole?
For a solid disc with no hole in the middle, you still need a pivot point. One method is to drill a shallow hole that doesn’t go all the way through the workpiece, or to use a nail with a head that sits above the surface. Your jig pivots on this, and the resulting small dimple on the back of your disc can be filled or sanded.
What’s the best blade for cutting circles in plywood?
For clean circles in plywood, use a fine-tooth blade with high tooth count to minimize splintering. A downstroke blade is ideal if your saw supports it, as it cuts on the downstroke to clean up the top surface. Otherwise, a sharp, fine general-purpose or clean-finish blade from our guide on best jigsaw blades for wood will work well.
Before You Go
Circle cutting exposes the jigsaw’s true nature: a versatile tool that demands respect for its limitations. The cleanest circles come from respecting three things, a rigid guide, a matched blade, and a patient hand.
If you need to cut small circles, buy a pack of scrolling blades first. That single change solves more problems than any jig ever will. For everything else, remember the wedge trick. It’s the difference between a professional result and a last-second splinter.
The goal isn’t just a round shape. It’s a round shape that fits. Whether you’re building a wheel, installing a sink, or making a custom speaker grill, that final piece should drop into place with a soft tap, not a hammer. That’s the sign you got all three steps right.
