
How to Drill a Straight Hole With a Hand Drill
This post contains affiliate links. As an Amazon Associate, we earn from qualifying purchases.
To drill a straight hole with a hand drill, you use a physical guide to enforce a perpendicular angle. The three proven paths are a DIY scrap-wood guide, a commercial drill guide jig, or a two-sided drilling technique for through-holes. The DIY guide is the fastest and cheapest for one-off jobs, while a commercial jig like the Kreg Drill Guide Pro delivers repeatable, shop-grade accuracy for multiple holes. Learning how to drill a straight hole with a hand drill is a fundamental skill.
The choice between a scrap block and a $100 jig when you compare a how to drill a straight hole with a hand drill method comes down to your tolerance for error and how many holes you need to make. A homemade guide gets you within a couple of degrees if you build it carefully; a metal-sleeved commercial guide holds the drill bit to within a single degree of true vertical, which matters for joinery. The rest is about setup, clamping your work, choosing the right bit, and managing the drill’s own odd balance.
What follows: the step-by-step for the scrap-wood method, the specs and setup for a commercial guide, the technique for drilling into walls and ceilings, and the one bit-selection rule that stops your hole from wandering before you even pull the trigger.
Key Takeaways
- A DIY right-angle guide from scrap wood gets the job done for most one-off holes, build it, clamp it, and let the two reference faces steer your drill.
- For joinery or multiple holes, a commercial guide like the Kreg Drill Guide Pro is worth the investment for its metal bushing and depth stop, guaranteeing accuracy within one degree.
- Clamp your workpiece every time. A moving board is the number one cause of a skewed entry point, and the hole is crooked before the bit is halfway in.
- Match the drill bit type to your material. Using a twist drill bit meant for metal on hardwood will cause it to deflect and wander, no matter how good your guide is.
- When drilling into a ceiling or wall, start with a punch and use the two-handed grip with an auxiliary handle to fight gravity and maintain pressure on the axis.
Why a Hand Drill Drills Crooked (It’s Not You)
Drills are shaped for your hand, not for your eye. The motor housing is a fat cylinder, the handle sticks out at an angle, and the chuck adds weight forward of your grip. There is no flat, vertical reference surface on the tool itself. You’re trying to sight a 1/4-inch diameter bit against a vague, rounded body while also applying forward pressure. Your brain guesses. Your wrist tilts a fraction of a degree. The hole ends up angled.
The other half of the problem is bit wander. If you’re drilling into hardwood with a standard twist drill bit, the sharp point can skate across the dense grain instead of biting in. You start off-center without realizing it. Even if you correct your body position, the hole’s path is already committed. This is why the first step in any method isn’t about your stance, it’s about creating an unmovable mechanical guide for the bit. Your job is to align the guide, not the drill.
A drill’s balance point is rarely at the chuck. On a typical 1.3 kg model like the Makita 6411, the weight distribution can affect handling. This means when you press forward, the nose wants to dip unless you consciously counter it with wrist pressure.
The 7-Step DIY Scrap-Wood Guide (and the One Step Nobody Skips)
This is the method you’ll see in every garage workshop. It costs nothing, takes five minutes to build, and solves 90 percent of straight-drilling problems. The key is making the guide block thick enough to stabilize the drill at the start of the cut.
- Cut two pieces of scrap wood. One should be a longer piece for a vertical reference; the other can be shorter. The species doesn’t matter, but use stock thick enough to resist flexing under pressure. Thinner wood flexes under pressure.
- Join them at a right angle. Use glue and screws or a couple of brad nails. It does not need to be a perfect 90-degree corner, but get it as close as you can by eye. A small error here multiplies over the depth of your hole.
- Clamp the guide to your workpiece. This is the step people skip, and it ruins everything. If the guide can shift when the drill bit makes contact, your starting point is wrong. Use a clamp to secure the guide block firmly to the workpiece.
- Place your drill bit. Insert the correct bit for your material and tighten the chuck. For a keyed chuck like on the Makita 6411, place the bit in the chuck as far as it will go, then place the chuck key in each of the three holes and tighten clockwise evenly. For a keyless chuck like on the 6413, hold the ring and turn the sleeve clockwise until the jaws grip the bit fully.
- Align the drill body. Rest the drill’s motor housing against the vertical face of your guide block. Simultaneously, rest the side of the chuck or a flat part of the drill’s nose against the horizontal face. The drill should now be cradled in the corner.
- Start the hole. With the drill bit correctly installed, lower it until it touches your marked spot. Pull the trigger to start at a low speed, letting the guide block keep the drill from tilting.
- Drill to depth. Once the bit has entered the workpiece and established a pilot, you can ease back slightly from the guide. The initial pilot section of the hole will now act as its own guide. Complete the hole at full speed.
The short version: A thick, clamped block gives your drill the two reference planes it lacks. The first 1/4 inch of travel sets the path for the rest.
The Commercial Guide Option: Kreg Drill Guide Pro
When you need to drill a dozen identical holes for shelf pins or dowels, a homemade block becomes tedious. A commercial drill guide jig turns your hand drill into a quasi-drill press. The Kreg Drill Guide Pro (model KDG6500) is one commercial option.
The unit includes a base, guide rods, and a bridge that holds your drill. A metal bushing in the bridge is the secret. It accepts bits with a shank diameter up to 3/8 inch and guides twist drill bits, spade bits, and Forstner bits up to 2-3/4 inches in diameter. The bushing eliminates all side-to-side play.
| Feature | What It Does | Why It Beats a DIY Block |
|---|---|---|
| Metal Bushing | Sleeve guides the drill bit directly | Zero flex, repeatable within ~1 degree |
| Depth Stop | Locking collar on guide rod sets hole depth | Consistent depth for multiple holes |
| **Base | Provides a stable platform for drilling | Accurate edge-to-hole distance without measuring |
| Dust Collection Port | Accepts a vacuum hose for bits up to 1/2″ | Keeps the work area clean, improves visibility |
Setup is straightforward. You position the base on your workpiece or workbench. Assemble the guide according to the manufacturer’s instructions, and securely tighten the drill’s chuck onto the guide’s input shaft. The manual is explicit: “When connecting a drill to the tool input shaft, make sure to securely tighten the drill’s chuck to prevent the drill from slipping.” That’s a warning you ignore once.
Where this goes sideways: Not tightening the drill’s chuck onto the guide’s shaft.
The limitation is material. The Kreg guide is rated for wood, composite, steel, tile, and masonry. But for steel, you still need a center punch to start the hole and cutting lubricant to keep the bit cool. The guide ensures straightness; it doesn’t change the fundamental drilling techniques for metal.
Drilling Straight into a Wall or Ceiling
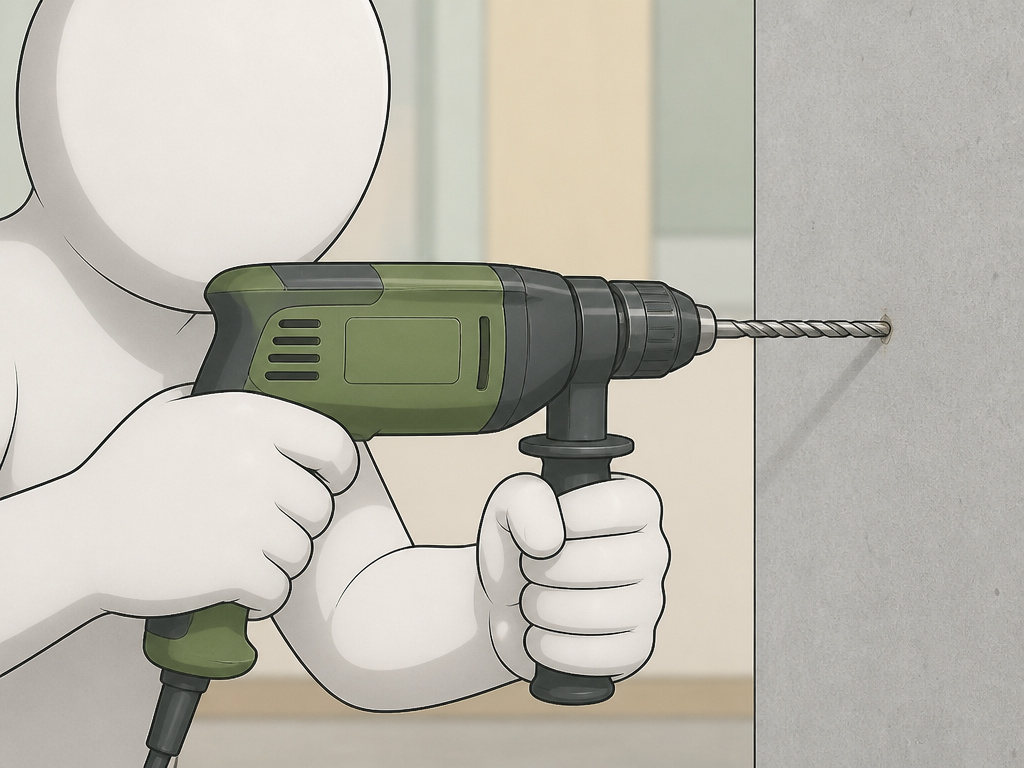
Gravity is your enemy here. Drilling overhead or into a vertical wall removes the simple “downward” pressure you use on a bench. Your body position is everything, and a guide is often impractical.
- Mark and punch. Use a center punch to make a definitive starting dent. This gives the bit tip a place to seat so it can’t skate on the drywall or wood siding.
- Use an auxiliary handle. If your drill has a side handle, install it. This allows you to grip the drill with both hands, one on the pistol grip and one on the side handle, applying pressure directly along the bit’s axis.
- Brace your body. For a ceiling, stand directly under the hole. Don’t reach. For a wall, stand facing it squarely. Use your body weight to lean into the drill, not just your arms.
- Start slow. Engage the trigger gently. Let the bit establish its cut before applying full speed and pressure.
- This is your only real-time feedback. Correct by adjusting your body, not by forcing the drill.
This is one scenario where the debate over center punching matters. Makita’s manual says to always use one for metal. DEWALT’s manual for the DWD110 says with a variable-speed drill, you can start slow without one. For a wall, many recommend using a punch. Makita advises using a center punch to prevent slipping, while DEWALT states that with a variable-speed drill you can start slow without one.
Matching the Drill Bit to the Job (The Wander-Stopper)
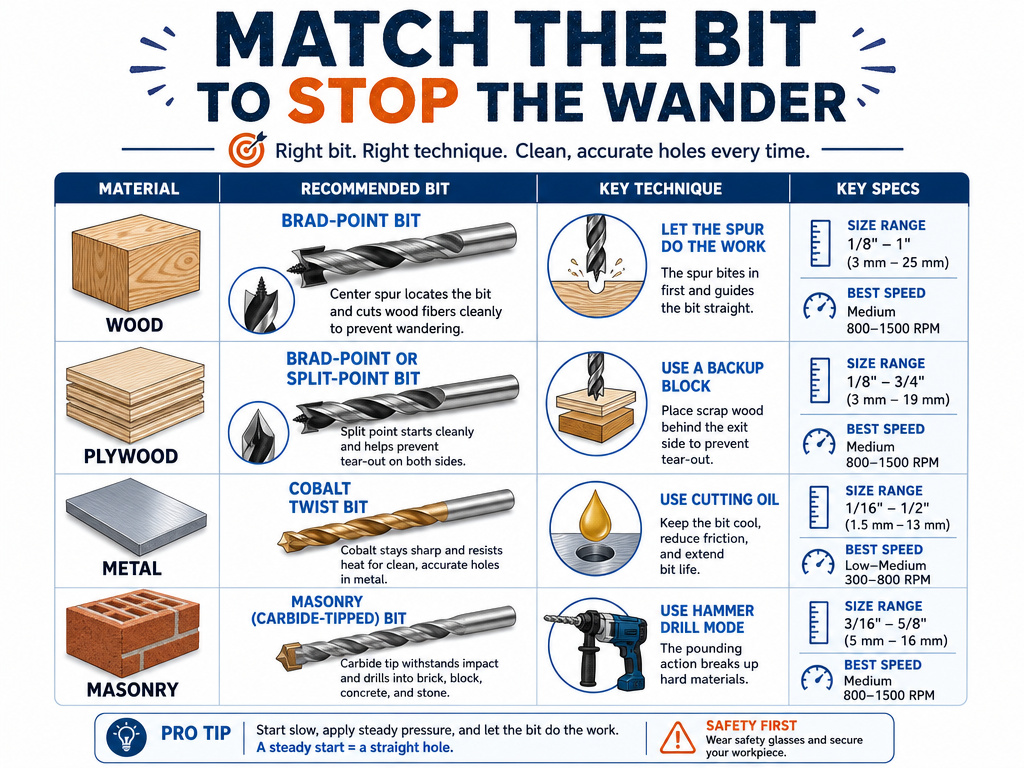
A guide ensures your drill is straight. The right bit ensures the hole goes where you aimed. If your bit deflects at the surface, the hole is crooked from the first millimeter.
| Material | Best Bit Type | Critical Setting/Technique | | :— | :— | :— | :— | | Softwood/Hardwood | Brad-point bit or Forstner bit | Brad-point’s sharp spur cuts the fiber outline before the flutes engage, preventing wander. | | Plywood or MDF | Standard twist drill bit | Use a back-up block behind the material to prevent tear-out on the exit side. | | Metal (Steel, Aluminum) | Cobalt or Titanium-coated twist drill | Use cutting lubricant. The exceptions are iron (or cast iron, per some manuals) and brass, which should be drilled dry. | | Masonry/Concrete | Carbide-tipped masonry bit | Hammer drill mode required. Use steady, firm pressure — let the bit do the work, don’t lean on it. |
The guide screw on a wood drill bit is an underrated feature. The Makita manual calls it out specifically: “When drilling in wood, the best results are obtained with wood drills equipped with a guide screw. The guide screw makes drilling easier by pulling the bit into the workpiece.” That screw tip acts like a mini winch, drawing the bit straight in and countering any side pressure from your hand.
For large holes, drilling a pilot hole can help guide the larger bit. For large holes in any material, a common rule is to drill a pilot hole first. This gives the larger bit a centered path to follow, dramatically reducing the force required and the chance of walking.
Common Mistakes and How to Correct Them Mid-Drill
You’ll feel it before you see it. The drill sound changes, the resistance spikes, or you see fine dust blowing from one side of the hole instead of the flutes. Here’s what’s happening and how to salvage the operation.
- The bit is binding and screeching. You’re tilting, and the side of the bit is rubbing hard against the wall of the hole. Stop immediately. Withdraw the bit completely. Check your guide or body alignment. If the hole is already deep and angled, you have two choices: abandon it and drill a new one a half-inch over, or
- The hole is visibly oval at the entrance. This is classic bit wander. The bit skated before it bit. There’s no fixing this hole.
- The drill is jumping or “chattering” at the start. This happens often with hole saws or spade bits on a curved surface. The fix is to angle-entry. Tilt the drill about 15 degrees, start the outer edge of the bit cutting, then slowly rock it to vertical as it establishes a groove.
The part nobody mentions: A wobbly chuck makes every technique pointless. Before you blame your skills, check the chuck. Tighten it on a bit, Any visible movement means the chuck jaws are worn or the arbor is bent.
The Two-Sided Drilling Technique for Through-Holes
When you need a perfectly perpendicular hole that goes all the way through a board, and you have access to both sides, this method is infallible. It’s standard in cabinet and furniture making.
- Drill from the first side. Use your chosen guide method to drill in from one side, but only go halfway through the board’s thickness.
- Flip the workpiece. Clamp the board back down, now with the partially drilled hole facing down.
- Locate the hole center. On the opposite side, the small dimple or breakthrough point from your first drill pass will be visible. Use an awl or a small brad-point bit to precisely find this center.
- Drill from the second side. Align your guide and drill in from this new side. The two holes will meet in the middle of the board’s thickness.
- Clean up the intersection. There will be a small ridge where the two holes meet inside the board. A long twist drill bit or a reamer passed through the finished hole will clean this out.
This technique completely eliminates the break-through tear-out that happens when a bit exits the back side of wood. It also cancels out any minor angle error from your first drill pass, because the second pass corrects from the opposite direction. It’s slower, but for a visible through-hole on a fine project, it’s the only way to guarantee a clean, straight result.
How to use a square or mirror to drill straight
A simple try square or a small mirror can act as a visual guide. Place the square’s blade against your workpiece and its handle against the side of your drill. As you start the hole, keep the drill body parallel to the square’s handle to maintain a straight line in that plane. For a more complete check, use a small mirror held perpendicular to the workpiece. Position it so you can see the reflection of your drill from the side. This second viewpoint allows you to align the drill both front-to-back and side-to-side at the same time. It’s a low-tech way to double-check your angle before committing.
How to attach a level to your drill for straight holes
Some drills have a flat spot on the body or chuck where a small bubble level can be attached. If yours does not, you can temporarily secure one with a rubber band. The goal is to get the level centered so you can see it while operating the tool. Before drilling, position the drill bit on your mark and adjust your stance until the bubble is centered. Maintain that position as you start the hole. Remember, this only ensures the drill is level relative to the ground, so your workpiece must also be level for a perfectly perpendicular hole. For angled holes, this method is not suitable.
How to stand and aim for straight drilling
Your body position is foundational. Stand directly behind the drill, aligning your dominant eye with the drill chuck and the target point on your workpiece. Keep your feet planted for stability. Hold the tool only by the handle and use your other hand to support the back of the drill if needed, avoiding awkward hand positions. Start the drill at a slow speed to establish the hole, then you can increase speed. Pressing excessively on the tool will not speed up the drilling. Focus on keeping your shoulders square to the work and make small adjustments by moving your entire torso, not just your arms.
Frequently Asked Questions
How to drill a perfectly straight hole without a drill press?
Use a commercial drill guide jig with a metal bushing, like the Kreg Drill Guide Pro. It clamps to your work and provides a rigid sleeve for your drill bit, holding it to within one degree of perpendicular. It is the closest you can get to drill press accuracy without the stationary machine.
What can I use to drill a straight hole if I don’t have a guide?
Make a right-angle guide from two pieces of scrap wood at least 3/4-inch thick. Glue and screw them together at a 90-degree angle, clamp this block firmly to your workpiece, and cradle your drill in the corner. The two reference faces will keep the drill from tilting as you start the hole.
Why does my drill bit always wander to the side?
You are likely using the wrong bit type for the material, or you failed to create a positive starting point. In wood, use a brad-point bit or punch a starter indent. In metal, always use a center punch. A standard twist drill bit will skate on hard materials if it doesn’t have a notch to bite into.
Is it better to drill fast or slow for a straight hole?
Start slow. A high speed at the moment of contact gives the bit more energy to skate off-course. Pull the trigger gently to let the bit’s point or cutting edges establish themselves in the material. Once the hole is started 1/4 inch deep, you can increase to full speed.
How do I drill a straight hole into a metal pipe?
This is a two-step process. First, securely clamp the pipe in a vise. Second, use a center punch to make a deep, definitive dimple exactly where you want the hole. The curved surface of the pipe makes wandering almost guaranteed without this punch. Use a lubricated cobalt bit and start at the slowest speed your drill allows.
Before You Go
One rule that reframes all of this: straight drilling is about eliminating variables, not about having a perfectly steady hand. Your first variable is the workpiece, clamp it. Your second variable is the starting point, punch it or use a brad-point bit. Your third variable is the drill’s body, give it a physical guide to lean against. Control those three, and the hole will be straight even if your grip is imperfect.
If you’re drilling more than a couple of holes a month, look at a commercial guide. The time you save on setup and the frustration you avoid from a single botched hole in a finished piece will justify the cost on the first project. For the once-a-year task, the scrap wood block is a testament to simple, effective shop wisdom. It worked yesterday, and it’ll work tomorrow.
The real difference between a drill press vs hand drill isn’t just power, it’s the absolute rigidity of the quill. Your goal with any guide is to approximate that rigidity as closely as your project demands. Sometimes, close enough is perfect.
