
How to Fix a Leaking Air Hose Fitting: Step-by-Step
This post contains affiliate links. As an Amazon Associate, we earn from qualifying purchases.
To fix a leaking air hose fitting, you must first identify the exact leak source, then apply the correct repair for that fitting type. For threaded connections, disassemble, clean, and re-seal with fresh thread tape or a liquid sealant. For quick-connect couplers, replace the internal O-ring or the entire coupler. For hose-end failures, cut the damaged section and install a new fitting using a crimp tool or, in specific cases, a manufacturer-approved service clamp.
The “correct repair” part is where most guides stop being useful. They tell you to use a hose clamp or Teflon tape, but they don’t tell you when those fixes are a temporary patch versus a violation of the standard that governs your system. The difference isn’t academic. It’s the line between a fix that lasts for years and one that fails catastrophically the first time your compressor cycles under load.
What follows is the repair logic: a diagnostic method to find your leak, the step-by-step universal process, and the manufacturer-specific rules that decide whether you crimp, clamp, or replace the whole assembly. By the end, you’ll know which of the three common leak types you have and the one right way to fix it for good.
Key Takeaways
- Find the leak with soapy water before you disassemble anything; a spray bottle with dish soap and water pinpoints the exact hiss as bubbles form.
- Thread tape is for tapered threads only; applying it to straight-thread O-ring ports creates a seal failure and contaminates the system.
- Tighten service clamps to 40 in. Lbs. The GMC Truck service bulletin specifies this exact torque for their “special screw-type service clamp” on A/C lines, though Ross Airworks (citing SAE) recommends against using hose clamps for refrigerant connections.
- Nylon barrier hose cannot be field-repaired; hoses marked “PARKER PARFLEX 80” must be replaced as an entire assembly, per the same bulletin.
- Lubricate before assembly. Danfoss mandates lubricating the nipple with compressor oil before insertion to prevent damage and ensure a seal.
Diagnose the Leak Before You Touch a Wrench
You hear a hiss. Your compressor cycles too often. The knee-jerk reaction is to grab the nearest wrench and start tightening every fitting in sight. That almost never works, and it often makes the leak worse by distorting soft brass or aluminum.
The right first move is to find the exact source. Is the air escaping from the threaded body of a coupler, from the seam where the hose meets a fitting, or from the quick-connect mechanism itself?
Common mistake: Tightening a fitting that’s leaking from a bad O-ring. You’ll crush the seal, guarantee a leak, and likely strip the threads. Find the bubbles first.
Here’s the field method:
- Mix a tablespoon of dish soap in a spray bottle filled with water.
- With the system pressurized, spray the solution generously over the entire suspect fitting and a few inches of hose on either side.
- Watch closely. A steady stream of small bubbles will form at the leak point. No bubbles? The leak might be internal to a valve or further upstream.
- Mark the spot with a paint pen or tape. This visual confirmation stops you from fixing the wrong thing.
This simple test separates thread leaks from hose-end leaks from coupler-seal leaks. Each has a different fix. Skipping diagnosis in the how to fix a leaking air hose fitting process is how you replace a perfectly good $20 coupler only to find the leak was a 50-cent O-ring two inches away.
The 7-Step Universal Repair Process (And the One Step Nobody Skips)
Once you’ve pinpointed the leak, this sequence applies to almost every repair. It’s the foundation. The specific technique for your fitting type comes next.
1. Depressurize and Disconnect. This isn’t a suggestion. Open the drain valve on your tank and trigger any quick-connect couplers to bleed the entire line. You’re working with stored energy that can turn a fitting into a projectile.
2. Clean the Area. Wipe away all dirt, oil, and old thread sealant from the fitting and surrounding hose. Contamination is the enemy of any new seal. A clean rag and some isopropyl alcohol work fine.
3. Disassemble the Fitting. Take it completely apart. For a threaded adapter, unscrew it from its port. For a quick-connect, depress the collar and pull the hose free. If the leak is at the hose end, you’ll be cutting the hose off the fitting stem.
4. Inspect and Identify. This is the step everyone rushes. Look for: * Cross-threading: Jagged, uneven thread wear. * Cracked or deformed fittings: Especially common in cheap zinc-alloy couplers. * Worn or flattened O-rings: They should be round and supple. * Damaged hose ends: Cracks, deep abrasions, or a swollen, loose fit over the barbs.
5. Select the Correct Repair Method. Your inspection tells you what to do next. Use the decision guide below. This is where you commit to a path.
| Leak Location | Primary Cause | Correct Repair | Incorrect / Temporary Fix |
|---|---|---|---|
| Threads of a fitting | Lack of sealant, damaged threads | Apply fresh thread seal tape or liquid sealant to tapered (NPT) threads. | Applying tape to straight threads (SAE O-ring ports). |
| Quick-connect coupler | Worn internal O-ring, damaged check ball | Replace the O-ring or the entire coupler assembly. | Lubricating the outside to quiet the hiss. |
| Hose-to-fitting junction | Failed crimp, loose clamp, hose degradation | Cut hose, install new fitting with proper crimp or clamp. | Adding a second worm-gear clamp over the first. |
6. Execute the Repair. Follow the specific instructions for your chosen method from the sections below. Have the right tools ready before you start.
7. Pressure Test. Reconnect the hose, pressurize the system, and go back to your soapy water bottle. Spray the repaired area thoroughly. No bubbles? You’re done. Any bubbles mean you must depressurize and re-evaluate step 5.
The gap between a permanent fix and a comeback leak in the how to fix a leaking air hose fitting process is usually in step 5. Picking the wrong repair method works just long enough for you to put your tools away.
Fixing Threaded Connection Leaks: Tape, Dope, and the Straight-Thread Trap
Most air system threads are NPT (National Pipe Tapered). The seal is made by the interference between the tapered threads and a sealant that fills the microscopic gaps. The other type, straight threads (common in SAE O-ring boss ports), seal with a crush washer or O-ring—the threads only provide clamping force.
Thread seal tape or a liquid pipe thread sealant (dope) MUST be used on NPT threads. On straight-thread O-ring ports, the only seal is the O-ring; adding tape prevents the fitting from seating and will cause a leak.
Here’s the right way to apply thread tape:
- Clean the male threads completely of old tape or dope.
- Hold the fitting with the threads facing you. Start wrapping the tape clockwise (when looking at the threads) around the second thread from the end. This prevents the tape from bunching up when you screw the fitting in.
- Wrap with a 50% overlap for several layers. You want full coverage without excessive thickness.
- Tear the tape and press it firmly into the threads with your thumb. Screw the fitting in hand-tight, then use a wrench to tighten it further. Overtightening splits fittings.
For liquid sealant, apply a thin, even coat to the male threads. Avoid getting sealant on the first thread to prevent contamination of your air line. The cure time varies by product, so check the label.
Fixing Quick-Connect Coupler Leaks
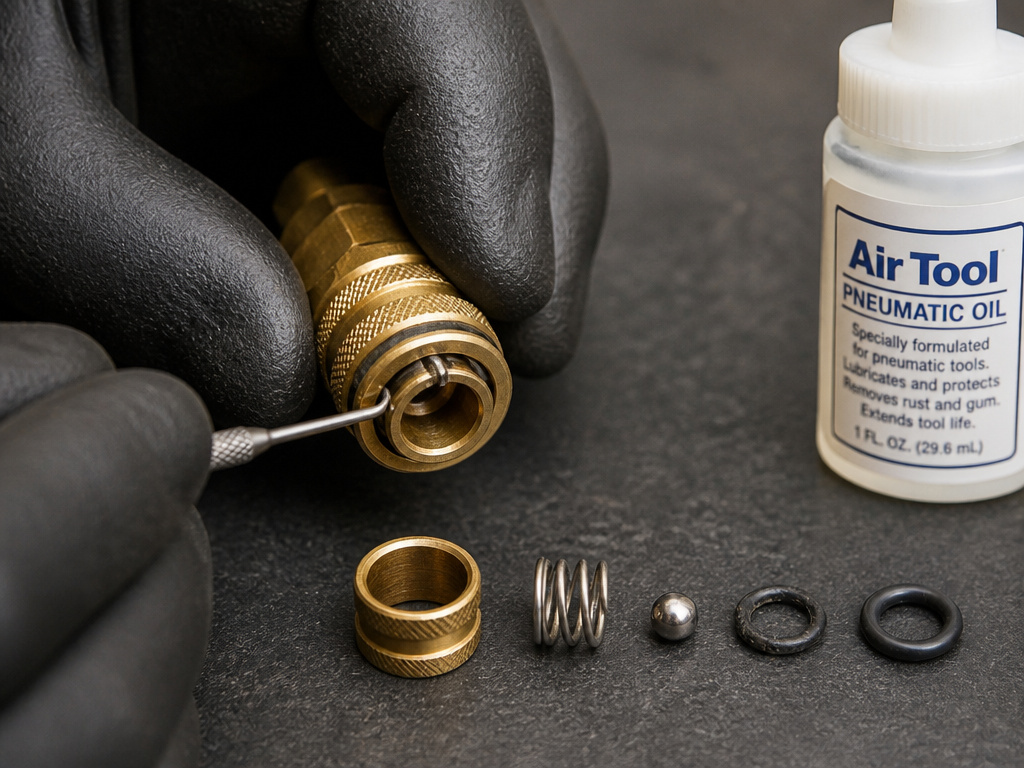
The hiss from a coupler is usually from the internal O-ring that seals the plug (the part on your tool) to the coupler body. Dirt and wear grind it down.
- Depressurize and disconnect the hose.
- Most couplers have a retaining ring or C-clip. Use a small pick or screwdriver to remove it.
- The internal sleeve, spring, and O-ring can now be pushed out. Note the order.
- Replace the O-ring with an identical one. An O-ring that’s too thick or too hard will prevent the check ball from seating. A kit with common sizes is a wise investment.
- Lightly lubricate the new O-ring with a dry PTFE lubricant or light pneumatic oil. Reassemble in the reverse order.
If the coupler body itself is cracked or the check ball is pitted, replacement is the only option. This is the time to consider upgrading to a higher-flow industrial-style coupler if you’re using the common automotive type. The difference in air delivery to your tools is noticeable.
Fixing Hose-End Leaks: To Crimp, to Clamp, or to Replace
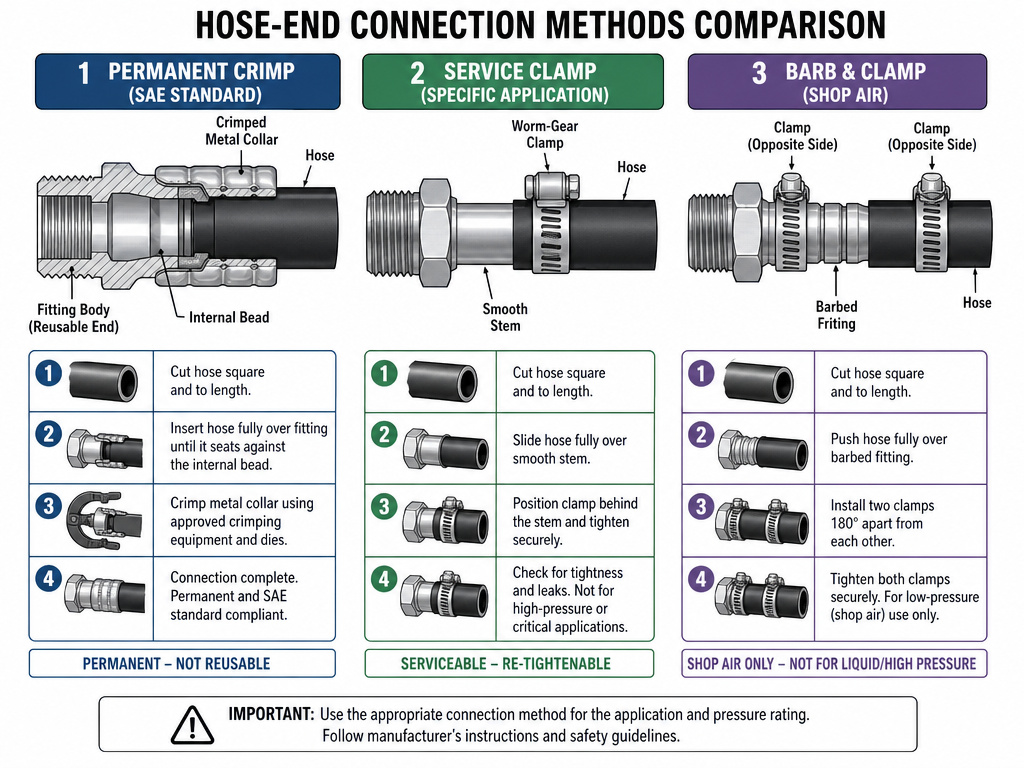
This is the most critical repair, with the highest stakes for safety and performance. The leak is where the hose attaches to the fitting stem. You have three paths, dictated by the hose type and the standards it must meet.
The Manufacturer-Approved Service Clamp
In a specific historical case, a major manufacturer provided a procedure for field repair. A GMC Truck service bulletin states that a leaking, factory-crimped metal band on an A/C refrigerant hose “may be replaced with a special screw-type service clamp.”
The bulletin gives a precise method: after safely discharging the system and removing the old crimp band, you install the clamp so its locator lug is on the hose end and tighten it to 4.5 N·m (40 in. Lbs.). This authorized a dealer-level repair instead of a full assembly replacement.
Where this goes sideways: Assuming this clamp procedure applies to every air hose. The bulletin is for a specific A/C refrigerant hose, not for general shop air lines under constant pressure cycling.
The Modern Standard: Crimped Beadlock Fittings
For high-pressure systems, especially those using R134a refrigerant, the industry standard is clear. Ross Airworks, citing SAE J2064 standards, states: “The use of hose clamps for refrigerant connections is not recommended.” The standard calls for a BEADLOCK fitting with barrier hose and a factory-style ‘bubble crimp.’
This is why you see pre-made hose assemblies with permanent, swaged metal collars. The crimp distributes force evenly and won’t loosen under vibration. Doing this right requires a dedicated crimping tool matched to the fitting size. This is an investment for a shop that makes many hoses, but often a “buy the assembly” moment for a DIYer.
The DIY Shop-Air Compromise: Barbed Fittings and Clamps
For lower-pressure shop air, using a barbed brass fitting and two stainless steel worm-gear clamps is a common and generally accepted practice. It is not as robust as a crimp, but it’s serviceable.
The technique matters:
- Cut the hose square. Use a sharp utility knife or a hose-cutting tool. A ragged cut won’t seal.
- Lubricate the barb. A drop of soapy water or silicone spray eases assembly.
- Push the hose on until it bottoms out. You should feel it hit the fitting’s shoulder.
- Use two clamps, positioned opposite each other. Tighten them evenly until the band is fully compressed. Overtightening cuts the hose. (Note: Danfoss recommends two clips on a hose end, while GMC Truck specifies one service clamp at a fitting.)
This method works for rubber or synthetic shop air hose. It is explicitly not recommended for refrigerant lines, hydraulic hoses, or any system governed by SAE J2064.
When a Hose Clamp Is (and Isn’t) Acceptable
The research reveals a clear disagreement between sources, and your application decides who is right.
| Scenario | Acceptable Method | Source / Standard | Rationale |
|---|---|---|---|
| Repairing a 1984 GMC A/C refrigerant hose with a failed factory crimp. | Special screw-type service clamp torqued to 40 in. Lbs. | GMC Truck Service Bulletin | OEM-authorized field repair procedure. |
| Creating or repairing a shop air hose for general use (<200 PSI). | Barbed fitting with two worm-gear clamps. | Common workshop practice. | Accessible, serviceable, sufficient for typical DIY pressures. |
| Repairing a modern automotive A/C line or any R134a system. | Beadlock fitting with barrier hose, bubble-crimped. | Ross Airworks / SAE J2064 Standard | Prevents refrigerant permeation and ensures vibration-resistant seal. |
| Working with nylon barrier hose (marked “PARKER PARFLEX 80”). | Full hose assembly replacement. | GMC Truck Service Bulletin | Manufacturer states this hose “cannot be repaired by these procedures.” |
The takeaway is contextual. A hose clamp is a valid repair when executing the exact procedure from the GMC bulletin for that specific purpose. It is a practical compromise for low-pressure shop air. It is not acceptable when replacing a crimp on a modern refrigerant line or when dealing with nylon barrier hose. Knowing which standard applies to your hose is the key.
The Tools You Actually Need
You can’t do this right with just a crescent wrench and a guess. Here’s the shortlist:
- Soapy water spray bottle: For diagnosis. You must have this.
- Adjustable wrenches or correct-size socket set: For disassembly without rounding fittings.
- Utility knife or hose cutter: For a clean, square cut. The Danfoss guide emphasizes a “cut made square to the hose length.”
- Thread seal tape or liquid sealant: For NPT threads.
- O-ring pick and assortment kit: For coupler repairs.
- Torque wrench (in.-lb. Capacity): If following the GMC bulletin’s 40 in. Lbs. Spec.
- Crimping tool: If you’re installing beadlock fittings to SAE standard. This is a specialized crimping tool.
For the vast majority of shop air leaks at the air hose fittings, the first five items on that list will get you there. The last two are for professional or automotive-specific repairs.
When to Repair vs. Replace the Entire Hose
This is the final decision point. Repair the fitting if:
- The hose itself is flexible, uncracked, and shows no signs of dry rot.
- The leak is isolated to a serviceable fitting.
- You have the correct replacement part and tools per the standards above.
Replace the entire hose assembly if:
- The hose is cracked, brittle, or heavily abraded (especially near the connection to the compressor).
- It’s a nylon barrier hose (Parker Parflex 80).
- The leak is in the middle of a long, cheap hose. Your time is worth more than the $20 for a new, better hose.
- You’re dealing with a critical system like vehicle brakes or A/C where failure has serious consequences.
Sometimes, the smarter repair is a replacement. A new, high-quality hose is more flexible, kink-resistant, and will have modern, leak-free fittings installed correctly at the factory. It’s an upgrade, not just a fix.
How to Identify and Match Quick-Connect Fitting Types
Don’t assume all fittings are the same. Automotive and industrial systems often use different standards. For automotive air conditioning, environmental rules have led to stricter standards like SAE J2064 for hose couplings. Some systems use barrier hose with specific fittings like a BEADLOCK and a bubble crimp for modern refrigerants, while older systems might use a different style. The hose material itself is a key identifier; some nylon hoses are marked and cannot be repaired with standard field methods. Matching the fitting type to your system’s original design and refrigerant type is the first step to a permanent fix.
When to Replace Worn or Low-Quality Fittings
If a fitting is leaking, it’s often a sign of wear or a design that can’t handle the pressure. Replacing it with a higher-quality, purpose-built fitting is the solution. Look for components engineered to meet or exceed recognized industry standards for your application. During replacement, never reuse old clip or clamp components from certain systems. When installing a new fitting, proper lubrication is critical; use the compressor oil specified for the system on nipples and O-rings to ease assembly and prevent damage. A fitting engineered to meet or exceed recognized industry standards, installed correctly with the right torque, forms a reliable seal.
Frequently Asked Questions
Can I use a regular hose clamp to fix a leaking air fitting?
For general shop air use on a barbed fitting, yes. Use two clamps. For a factory-crimped automotive A/C line, only if you are following the exact procedure and torque spec from the GMC service bulletin. For modern refrigerant lines meeting SAE J2064, no. The standard recommends against hose clamps in favor of crimped fittings.
How do I stop a quick-connect fitting from leaking?
First, diagnose with soapy water. If the leak is from the coupler body when a tool is attached, replace the internal O-ring. If it leaks from the coupler even when disconnected, the internal check valve or seal is faulty, and you should replace the entire coupler. Never use thread tape on the coupler’s external threads if they are straight-threaded with an O-ring.
Is Teflon tape or pipe dope better for air fittings?
Both work well on NPT threads if applied correctly. Tape is cleaner and easier to control, making it preferable for beginners. Liquid sealant (dope) can be better for larger threads or if the fitting might need occasional adjustment, as it’s less likely to shred. The key is to use one of them—dry metal-on-metal tapered threads will always leak.
Why does my new air hose fitting still leak?
The most common reasons are incorrect sealant application (tape on straight threads), a damaged or missing O-ring, a non-square hose cut, or under-tightened clamps. Go back to the diagnostic step with soapy water. The bubbles don’t lie.
Can you fix a leak at the compressor tank’s built-in fitting?
Yes, but it depends. If it’s a threaded port, use the standard thread-sealing method. If it’s a welded bung that’s cracked, the repair is beyond DIY and the tank may need professional service or replacement. A persistent leak at the tank valve could also indicate a failed check valve, which is a replaceable part.
The Bottom Line
Fixing a leaking air hose fitting is a systematic cut-and-dry process, not a guessing game. Find the leak with soapy water, match the repair to the fitting type, and respect the standards that apply to your system. The 40 in. Lbs. Torque spec from the GMC bulletin and the SAE J2064 standard against hose clamps aren’t suggestions—they are the documented right ways.
For 90% of shop air leaks, the answer is a clean cut, a barbed fitting, two clamps, and a pressure test. If your leak is on a vehicle A/C system or you see “Parker Parflex 80” on the hose, the rules change. In those cases, the right tool for the job is often a credit card and a call to the parts desk for a pre-made, correctly crimped assembly. That’s not a cop-out; it’s the safe, permanent fix.
