
How to Install Wainscoting With a Brad Nailer
This post contains affiliate links. As an Amazon Associate, we earn from qualifying purchases.
*Installing wainscoting with a brad nailer requires three specs: nail length (1″ for trim per House of Fara, 1 ½” for panels per Family Handyman), a consistent layout line (between 32″ and 42″ from the floor), and deliberate expansion gaps (between 1/32″ and 1/16″).* The brad nailer drives fast, holds tight, and leaves a hole small enough to disappear with putty, making it the right tool for most paneling jobs.
The height and gap numbers aren’t arbitrary. They come from manufacturer installation guides and trade publications, and they exist to prevent buckling, gaps, and loose panels after the wood expands and contracts with the seasons. Get those three things wrong, and your wainscoting shows it within a year. A key part of the process is knowing how to install wainscoting with a brad nailer.
What follows: a walkthrough of the whole process, from letting the wood acclimate for 72 hours to setting your nail gun’s depth and firing the last brad, which is the essence of how to install wainscoting with a brad nailer. It covers the specs where the guides disagree, the technique for uneven walls, and how to handle outlets and inside corners so nothing looks cobbled together.
Key Takeaways
- Let panels acclimate for 72 hours in the room where they’ll be installed, spaced apart for air circulation, to minimize expansion and contraction after installation.
- Set your brad nailer to 18-gauge, 1″ to 1 ½” nails; the shorter nails are for thin panels and trim, the longer ones bite into studs when you can find them.
- Establish a level layout line between 32″ and 42″ from the floor—classic height is 36″-42″, but 32″ panels are common and follow the same rule.
- Maintain a consistent expansion gap between panels (1/16″ per True Value, 1/32″ per House of Fara for tongue-and-groove) and leave a gap at corners (House of Fara recommends at least 1/8″, while True Value advises 1/16″).
- For walls that aren’t flat, glue and nail; a bead of construction adhesive on the panel back provides hold where nails miss the studs, which is often.
The 72-Hour Rule (And Why You Can’t Skip It)
Every manufacturer sheet in the fact file starts with the same instruction. House of Fara states it plainly: allow 72 hours for pieces to adjust to the temperature and humidity of the room in which they will be installed. This isn’t a suggestion. It’s the buffer that stops your tight, pretty panels from pushing each other apart or pulling away from the wall when your home’s climate shifts.
The process is simple but specific, a fundamental step in how to install wainscoting with a brad nailer. Unpack everything. Place the pieces flat with space between each for air to circulate. Don’t stack them tightly in a corner or leave them in a damp garage. The goal is for the wood to reach equilibrium with your living space so what you install today is what you still have in six months. I’ve seen skipped acclimation warp a whole bathroom wainscoting job into a wave pattern. The fix involved pulling every panel, waiting three days, and starting over. Do it first.
Where this goes sideways: Stacking panels straight from the store. The outer boards acclimate; the inner ones don’t. When you install them mixed, the differential movement creates stress points and visible seams within two seasons.
Tools and Materials: The Short List
You need fewer tools than you think. A brad nailer is the star, but it doesn’t work alone.
The Core Tools:
- Brad Nailer: An 18-gauge nailer is ideal. It’s light, the nails have a small head, and they sink cleanly into wood trim. A brad nailer vs finish nailer comparison shows the 18-gauge brad nailer is better for thin stock and leaves a smaller hole than a 16-gauge finish nailer.
- Compressor & Hose: Match it to your nailer’s requirements. A compressor matched to your nailer’s requirements is needed.
- Level: A 4-foot level is essential for snapping your layout line. A 2-foot level helps with spot-checking panels.
- Tape Measure & Pencil: For marking studs, panel heights, and cut lines.
- Stud Finder: Critical. You want to drive nails into studs whenever possible.
- Jigsaw or Coping Saw: For cutting out electrical outlets and notching panels.
- Construction Adhesive: A tube of panel adhesive is your backup for missed studs.
- Caulk Gun & Painter’s Putty: For finishing seams and hiding nail holes.
The Materials:
- Wainscoting panels or planks
- Baseboard and chair rail/cap molding (if your kit doesn’t include them)
- 18-gauge brad nails (1″ for thin trim, 1 ¼” or 1 ½” for panels)
- Painter’s tape for layout
Brad Nailer Setup: Gauge, Length, and Depth
Here’s the part most step-by-step guides gloss over: your brad nailer needs the right nails, set to the right depth, or the job gets messy.
Nail Gauge and Length
An 18-gauge brad nailer is the standard for this work. The nails are thin enough to minimize splitting but have enough holding power for vertical panels. For length, follow this rule: * 1″ brads: For attaching thin trim, as House of Fara recommends for base trim. * 1 ½” brads: For securing panels, especially when missing studs, as Family Handyman suggests. The extra length helps the nail penetrate the drywall and grab the wood stud behind it. If you can’t find a stud, the longer nail still has more grip in the drywall alone.
Depth Adjustment
This is the secret to a professional finish. You must adjust nail gun depth so the nail head sits just below the surface of the wood—deep enough to cover with putty, but not so deep it punches through the face veneer of a thin panel. Most guns have a dial or knob. Test on a scrap piece identical to your paneling. The nail should leave a clean dimple, not a crater.
A properly set brad nailer fires with a confident pop and leaves a near-invisible hole. One set too deep punches a brad straight through a beadboard panel, and you can’t hide that tear-out with putty.
Nail Spacing
How far apart should your nails be? Sources offer a range. House of Fara’s guide says space nails 16” apart for base trim. This Old House advises nailing beadboard panels every 12 to 16 inches through the tongue. The takeaway: nail at regular intervals, aiming for studs, within the recommended range. More nails in solid wood; fewer in drywall-only spots.
Height, Layout, and the Level Line
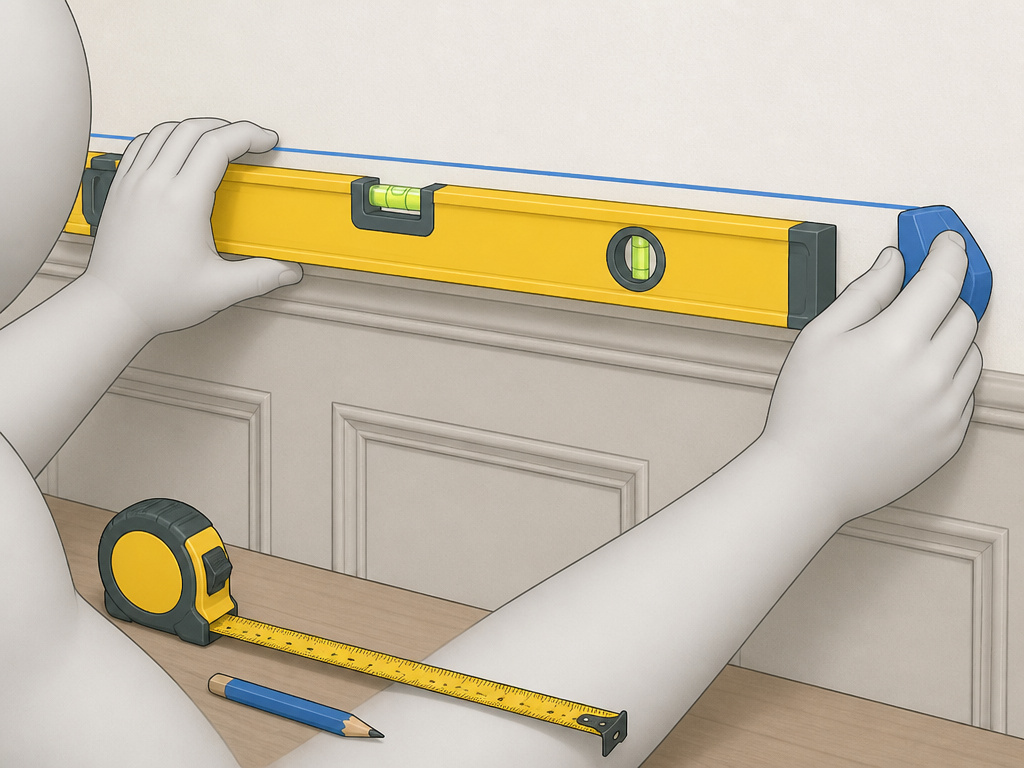
This is the moment your project goes from a idea to a physical mark on the wall. Get this line wrong, and every panel that follows will be wrong.
Choosing a Height
The “correct” height isn’t one number. It’s a band guided by tradition, panel size, and proportion.
- Classic Height (This Old House): Between 36 and 42 inches from the ground. This traditional look works in dining rooms and formal spaces.
- Beadboard & Precut Panels (True Value): Commonly 32 to 36 inches. Many precut panels are 32″ tall, so you’d mark a layout line at 32 ½” to allow for the baseboard.
- The Golden Mean (Fine Homebuilding): Historically, wainscoting followed a proportion a little more than one-third of the wall height. Never install it exactly halfway up a wall—it visually cuts the room in two.
Snapping the Line
- Find the highest point on your floor along the wall using your 4-foot level.
- Measure up your chosen height (say, 36 ½”) from that high spot and make a mark.
- Place your level so the bubble is centered and the end aligns with that mark. Draw a line along the level’s edge.
- Move the level down the wall, connecting the lines until you have a continuous, level line around the entire room. For long walls, a chalk line is faster.
This line represents the top edge of your wainscoting panels, not the chair rail. The chair rail or cap molding will cover the top edge later.
Step-by-Step Installation

With your line snapped and tools ready, the installation is a methodical process. This table outlines the core sequence and the consequence of rushing a step.
| Step | Action | What Happens If You Skip It |
|---|---|---|
| 1. Install Baseboard | Nail the baseboard to the wall, level and parallel to the floor. | Panels have no solid footing; the bottom edge floats, creating a visible gap. |
| 2. Place First Panel | Apply adhesive to the panel back, align its top with the layout line, nail every 12″ and into studs. | The entire wall’s alignment hinges on this panel being level and plumb. |
| 3. Maintain Expansion Gap | Insert a 1/16″ spacer (like a nail) between panels as you work. | Panels expand against each other and buckle, often within the first seasonal change. |
| 4. Work Around Obstacles | Cut panels to fit around outlets, using a jigsaw. Notch for pipes or vents. | Panels look amateurish; electrical covers won’t fit; you must remove and re-cut panels. |
| 5. Install Chair Rail / Cap | Nail the cap molding over the top edge of the panels, covering the layout line. | The raw top edge of the panels is exposed, the install looks unfinished. |
| 6. Final Trim | Add inside/outside corner trim pieces, quarter-round at the base if needed. | Corners are sharp and unprotected; gaps at the floor are visible. |
The Adhesive Rule
Even with a stud finder, you’ll miss studs. That’s where construction adhesive comes in. Apply construction adhesive to the back of each panel before you lift it into place. The nails hold it temporarily; the adhesive cures in 24 hours and provides a permanent, full-spread bond. The Family Handyman guide notes that if there are no studs to nail into, apply adhesive and toenail with 1 ½-inch-long nails. The nails hold until the glue sets.
Handling Outlets, Corners, and Uneven Walls
Flat, empty walls are easy. Real walls have switches, corners, and bumps.
Electrical Outlets
- Hold the panel in its exact position and mark the outlet location on the back.
- Use a jigsaw to cut out the rectangle. Cut slightly larger than the outlet box to ensure a clean fit.
- Dry-fit the panel to check the fit before applying adhesive and nailing.
Inside Corners
You need a gap here for expansion. House of Fara states to leave a minimum of 1/8” at the edge of first/last board and corner. True Value advises a specific approach for corner panels: subtract 1/8″ from top and bottom measurements, and install the corner panel 1/16″ from the last full panel, which differs from House of Fara’s minimum 1/8″ corner gap. The principle is the same: never jam a panel tight into a corner.
Uneven Walls
This is the most common problem nobody talks about. If your walls are cracked, uneven or extremely rough, the House of Fara guide says planks should be glued and/or nailed to a framework of 2” x 4”, 1” x 3” or 1” x 4” strips of kiln-dried wood. This creates a true, flat surface to nail to. It’s more work, but it’s the only way to get a smooth, professional result on a wavy wall.
Finishing: Filling, Caulking, and Painting
The brad nailer’s job is done, but yours isn’t. Now you make the nails disappear.
- Fill Nail Holes: Use a paintable latex putty. Overfill each dimple slightly, let it dry completely, then sand it flush with 220-grit sandpaper. Don’t skip the sanding—globs of putty are more visible than the nail holes were.
- Caulk the Seams: Run a thin bead of paintable latex caulk along the top edge where the chair rail meets the panel, and at the inside corners where panels meet. Smooth it with a damp finger for a seamless transition. This countersink nails and caulking process is what separates a DIY job from a pro finish.
- Paint or Stain: If painting, Fine Homebuilding warns to avoid painting any projecting grooves, as it can interfere with the wood’s natural movement. Apply a coat of primer first, then your top coat. If staining, sand rough areas with 150 to 220 grit sandpaper, apply stain, then install the molding per House of Fara’s finishing guide.
How to prepare a room for wainscoting
Start by clearing the workspace. Remove any outlet covers and switch plates from the walls where the wainscoting will go. Carefully remove the existing baseboards using a pry bar; you will reinstall them over the new wainscoting later. Before bringing your wood into the room, let it acclimate. Place the pieces flat with space between each for air to circulate during this period. This step allows the material to adjust to the room’s temperature and humidity, which helps prevent warping or gaps after installation.
How to plan wainscoting panel layout
Deciding on the height is your first layout step. Standard wainscoting heights vary; classic styles often sit higher on the wall, while beadboard and many precut panels are shorter. Fine Homebuilding advises to never install wainscoting or chair rail exactly halfway up a wall. Once you’ve chosen a height, mark a level line around the room. When installing the panels, you must leave a small gap between each piece and at the corners to allow for natural expansion and contraction of the wood. Sources differ on the exact size of this gap, but it is a critical detail. Space your nails at regular intervals along the studs for a secure hold.
Frequently Asked Questions
What nail gun is best for wainscoting?
An 18-gauge brad nailer is the best choice for most wainscoting. It drives nails that are strong enough to hold the panels but small enough that the holes are easy to hide. For thicker, solid wood planking, some prefer the holding power of a 16-gauge finish nailer, but the larger holes require more filling.
Do you nail or glue wainscoting?
You should do both. Nail into studs whenever possible for a secure mechanical hold, and use construction adhesive on the back of each panel. The adhesive bonds the panel to the wall across its entire surface, preventing rattles and providing support where nails miss framing. This is especially critical for install shiplap or any paneling on uneven walls.
Can you use a brad nailer to install paneling?
Yes, absolutely. A brad nailer is an excellent tool for installing wainscoting paneling, beadboard, and other thin wood panels. The key is using the correct nail length (1 ¼” or 1 ½” for panels) and ensuring you drive nails into wall studs for the strongest hold. For a similar project, the technique mirrors how to install board and batten.
What is the recommended brad nail length for wainscoting?
Use 1-inch brads for thin trim pieces like cap molding. For the wainscoting panels themselves, use 1 ¼-inch to 1 ½-inch brads. The longer nail provides better holding power in the wall stud and is necessary if you can’t always find a stud. Always check your panel thickness first.
How do you hide the nail holes?
After installation, use a paintable latex putty to fill the small dimples left by the brad nails. Overfill slightly, let it dry completely, then sand it smooth with fine-grit sandpaper. Once painted, the holes vanish. This final touch is part of learning to operate a brad nailer for a clean finish.
The Bottom Line
Installing wainscoting with a brad nailer is a project that rewards patience with a professional-looking result. The three things that decide it are the 72-hour acclimation, a dead-level layout line, and deliberate expansion gaps. Where the sources disagree on gap size—1/16″ vs. 1/32″—pick one and be consistent. Your panels won’t know the difference; they just need the space to breathe.
Your brad nailer is the right tool. Set it up with 18-gauge, 1 ¼” nails, adjust the depth so the nail head sits just below the surface, and fire with confidence into every stud you can find. Back each panel with adhesive for insurance. When you’re done, the filling and caulking will hide your work, leaving only the crisp, classic look of wainscoting that lasts. For your next project, the same brad nailer guide principles apply to trim, casing, and other detailed work.
