
How to Remove a Broken Bolt With a Drill: Step-by-Step
This post contains affiliate links. As an Amazon Associate, we earn from qualifying purchases.
To remove a broken bolt with a drill, you drill a centered pilot hole into the stub, then use a reverse-threaded extractor tool turned counter-clockwise. The exact drill bit size and depth depend on the bolt diameter and the component, with official sources specifying a 1/8″ bit for 1/4″ bolts and a depth of 10–15 mm (or 1 inch in specific engine repairs) to avoid catastrophic damage.
The difference between a clean extraction and a ruined thread block often comes down to three things you can control before the drill even spins: the centering of your punch, the hardness of your drill bit, and knowing when the extractor is fighting a seizure, not just a break. A key part of how to remove a broken bolt with a drill is getting these initial steps right. Get those wrong, and you graduate from a simple extraction to a full thread repair, or a trip to the machine shop.
What follows is the ladder, from the basic tool check to the advanced salvage operation. We’ll walk through official specs from service bulletins, explain why tapered spiral extractors snap in seized bolts, and show you how to read the signs that it’s time to stop drilling and switch tactics.
Key Takeaways
- For a 1/4″ bolt, some official guidance, like from spaco.org, specifies a 1/8″ drill bit, while the GM Bolt Extractor Tool Kit uses a 5/32″ drill.
- Drill to a depth of 10 to 15 mm into the broken stub; in specific cases like the Ford Triton spark plug, the limit is 1 inch to avoid piercing a water jacket.
- Use a straight-flute or multi-spline extractor for seized or soft-metal work; tapered spiral types can wedge the bolt tighter and are prone to snapping.
- Left-hand (reverse) drill bits can sometimes back the bolt out during drilling, making extractors unnecessary, if you have them.
- If your extractor starts to twist under moderate torque, stop. Pull it out and drill the bolt to the minor thread diameter, then re-tap.
The Core Drill & Extract Sequence (Official Specs)
To be honest. Most guides give you a generic list. The one from the shop floor has numbers attached, and those numbers come from the people who write the repair manuals.
For a 1/4″ bolt, use a 1/8″ drill bit. Drill just to the flute edge, check your alignment, then proceed. Tap the 1/8″ Snap-On extractor in about 1/4″. Apply only moderate torque. If the extractor starts to twist, pull it out and drill the fastener to the minor thread diameter.
Start by making the broken surface as flat as possible with a file or grinder, a fundamental step in the how to remove a broken bolt with a drill process. This gives your center punch a stable target. That punch mark isn’t a suggestion, it’s your only insurance against the drill bit “skating” across the hardened steel and gouging the surrounding threads. A sharp, hardened punch is important.
Drill your pilot hole slowly, with the drill running in its lowest speed setting. Keep the bit lubricated, cutting oil or even a few drops of motor oil reduces heat and prolongs bit life. According to a common service manual, you should drill to a depth of 10 to 15 mm into the broken bolt. That’s deep enough for the extractor to bite, but not so deep you risk drilling into whatever is underneath in a blind hole.
Spray a penetrating oil like WD-40 or PB Blaster around the broken bolt and let it wick down the threads. Heat can help, too. A heat gun (careful on painted or chromed parts) applied to the surrounding component expands the metal slightly, breaking the corrosion’s grip. Don’t heat the bolt itself, you want the hole to expand.
Now insert the extractor. Tap it gently into the drilled hole with a hammer until it’s firmly seated. The fit should be snug, not forced. Attach your wrench or socket and turn it counter-clockwise. Use steady, increasing pressure. The goal is a smooth, continuous rotation. If it moves even a fraction, keep going. If it feels like you’re nearing the torque that might break a tool, stop.
Where this goes sideways: Cranking an extractor with a breaker bar. The hardened steel of a cheap extractor snaps before a seized bolt yields, leaving you with an impossible-to-drill stub inside your bolt. That’s a machine-shop problem.
If the bolt feels seized, not just broken, the extractor method for the how to remove a broken bolt with a drill might be the wrong tool. One primary source is blunt: “extractors are intended to remove only fasteners broken off from vibration or over-torque. They are NOT for removing seized, thread-welded fasteners.” That’s the line between a five-minute fix and an afternoon of regret.
The Tool & Material Checklist (Not Just a Drill)
| Tool | Purpose & Specification | Risk If Skipped/Misused |
|---|---|---|
| Center Punch | Creates a positive dimple to prevent drill bit skating. Must be hardened steel. | The drill wanders, damages parent threads, and makes centering impossible. |
| Drill Bits | Cobalt bits for hardened bolts. Size: 1/8″ for a 1/4″ bolt (per SPACO guide). | High-speed steel bits may dull, overheating the workpiece and work-hardening the bolt. |
| Left-Hand Drill Bits | Reverse-spiral bits that may back the bolt out during drilling. A good first attempt. | Using standard bits removes the chance of a free extraction before resorting to extractors. |
| Extractor Set | Straight-flute or multi-spline design preferred for seized bolts. Tapered spirals can wedge. | A tapered spiral extractor can expand and lock a seized bolt tighter, or snap off. |
| Cutting Fluid/Oil | Lubricates and cools the drill bit. Extends bit life and keeps chips from welding. | Friction heat can make the bolt tougher to drill. |
| Safety Glasses | Stops metal shavings and broken tool fragments. | Metal shavings can cause eye damage. |
Use a low speed for the initial pilot hole.
Speaking of extractors, the design matters more than the price tag. Analysis of removal guides points out that tapered spiral extractors can wedge the stub outward, potentially pinching a seized bolt tighter, and are prone to snapping. For a stuck bolt or soft aluminum components, a straight-flute or multi-spline extractor is considered safer. They apply torque more evenly and are less likely to act like a wedge.
Blind Hole vs. Through-Hole: A Driller’s Guide
In a through-hole, chips can fall out the bottom, reducing clogging. In a blind hole, every shaving you create stays in the hole, packing around the drill bit and increasing the risk of binding.
For a blind hole, you must be meticulous about peck drilling. Drill for a short time, pull the bit completely out to clear chips, reapply lubricant, and go back in. Listen to the sound. A high-pitched whine means the bit is rubbing, not cutting, pull out and check for dullness. The official Cyclepedia manual advises a depth of 10 to 15 mm into the broken bolt.
For a through-hole, the process is more forgiving. Still, start with the same cautious pilot hole. The through-hole advantage is most apparent when you’re drilling out the entire bolt to re-tap, chips evacuate freely, keeping the bit cooler.
Common mistake: Assuming all broken bolts are the same. A blind hole in an engine block (like a spark plug thread) has a finite safe depth. Exceeding it is catastrophic. The Lisle Corporation instructions for the Ford Triton spark plug remover kit explicitly limit drilling to 1 inch to avoid piercing the water jacket.
The feel is different, too. That’s your cue to stop drilling and assess.
When to Stop Drilling and Switch Methods
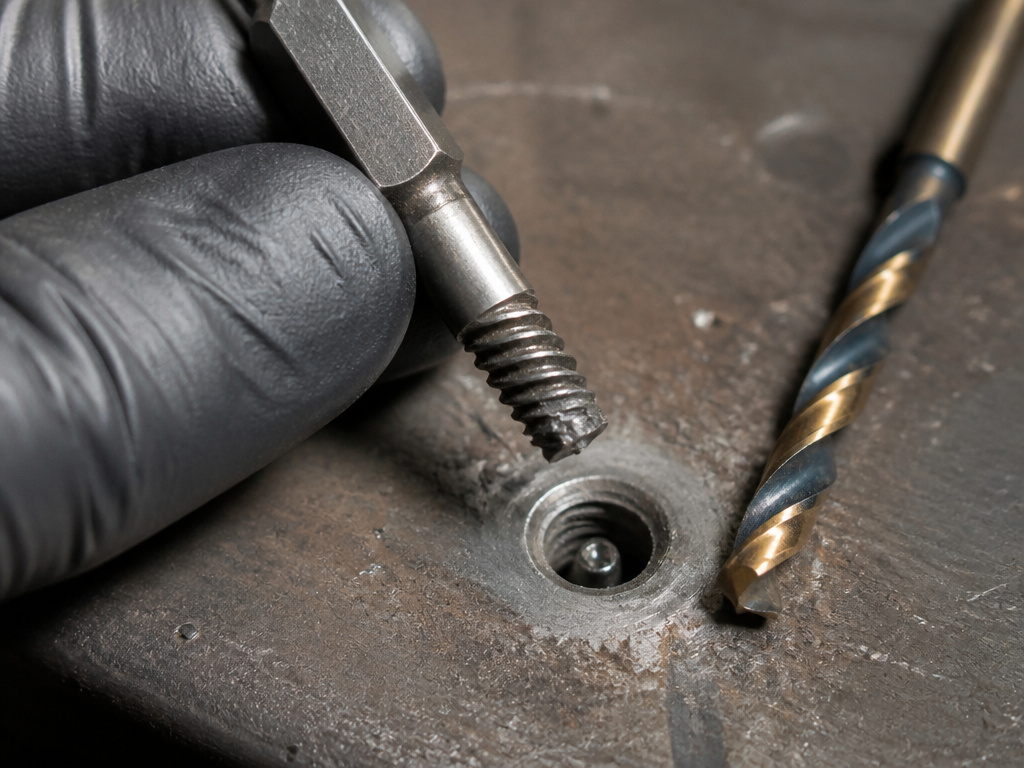
You’re drilling, and the bit isn’t progressing. Or the extractor is turning, but the bolt isn’t. This is the critical decision point most DIY guides gloss over.
Here are your off-ramps, in order of escalation:
- The Drill Bit Won’t Bite: If your pilot hole is wandering, stop. The bolt is likely harder than your bit. Switch to a cobalt drill bit. If that still fails, the bolt may be case-hardened. Your next step may require professional machining.
- The Extractor Twists but Doesn’t Grab: If the extractor starts to twist in the hole under moderate torque, it’s stripping the purchase you drilled. Do not force it. Follow the SPACO machine shop advice: pull it out and drill the fastener to the minor thread diameter. Then chase the threads with a tap.
- The Extractor Snaps: This is the worst-case scenario. You now have a piece of hardened, brittle steel embedded in your bolt. A standard drill bit cannot touch it. Your options shrink to specialized machining or taking the whole assembly to a machine shop. Prevention is everything here: use the correct extractor type and never apply heroic torque.
The shop-floor truth is that knowing when to walk away is as important as knowing how to proceed. Investing time in a failed extraction can cost more time in repair.
Advanced Scenarios & OEM Procedures
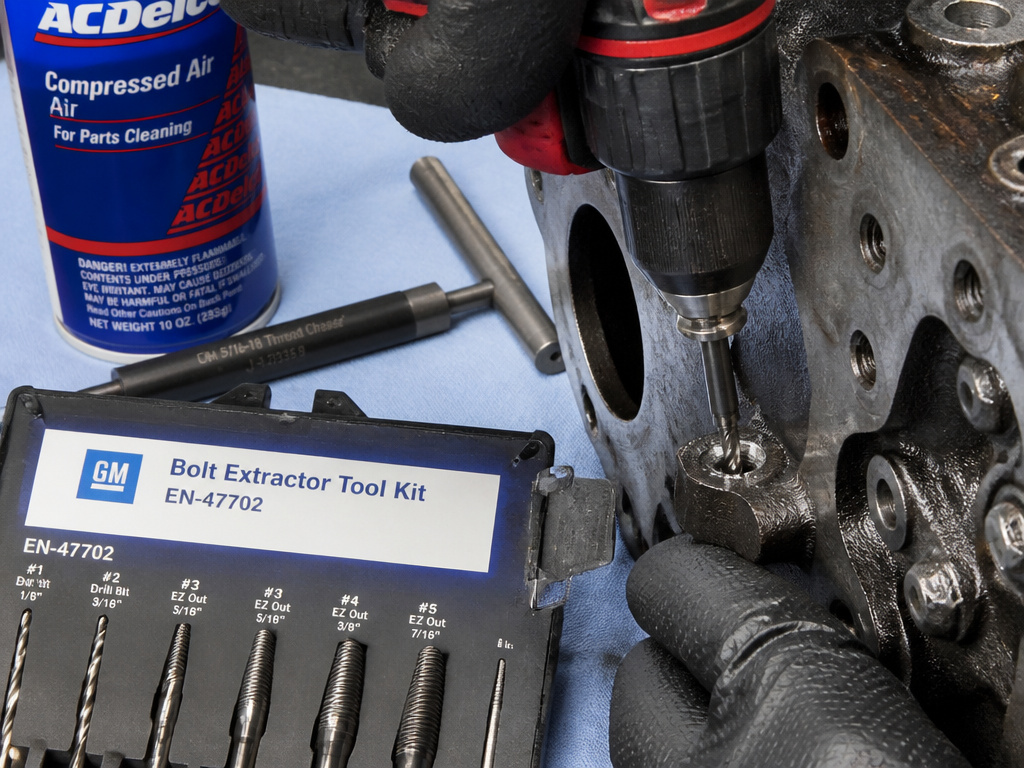
Sometimes, the bolt isn’t just broken; it’s a specific type in a specific place with specific rules. Torque-to-yield (TTY) bolts used in modern engines are a prime example. These bolts are designed to stretch.
General Motors issued a service bulletin for their inline truck engines detailing the extraction of broken cylinder head or main bearing cap bolts. The procedure includes rapping on the head of each bolt with a punch and hammer before removal to assist extraction. It specifies using their GM Bolt Extractor Tool Kit (Part Number EN-47702), which includes a 5/32″ reverse twist drill and a #3 EZ out. After extraction, they mandate cleaning the threads with a chase tool and dry compressed air, noting that trace oil or debris can cause new bolts to fail under torque.
This highlights two critical points for advanced work:
- Drill bit size disagreement: Where SPACO says 1/8″ for a 1/4″ bolt, the GM kit uses a 5/32″ drill. This isn’t an error; it’s tool-specific engineering. Always prefer the specification that comes with your dedicated extraction kit.
- Thread preparation is essential. Before installing any new bolt, especially a TTY bolt, the hole must be clean and dry. Residue can affect the installation of new bolts.
For common but delicate jobs, dedicated kits exist. The Lisle Corporation 65600 kit for broken Ford Triton spark plugs uses a 1/8″ drill bit and a depth gauge to ensure you drill exactly 1 inch, no more, no less, to avoid the water jacket. This is the kind of scenario-specific intel that separates a successful repair from a flooded cylinder.
How to weld a nut onto a broken bolt
Welding provides a direct mechanical handle when an extractor won’t work. This method is most effective for bolts broken from vibration or over-torque, not those seized or thread-welded in place. Clean the top of the broken stub thoroughly. Use a nut that fits the bolt, or a washer first and then a nut, positioning it to center over the stub. The weld must penetrate the nut and fuse with the bolt material. Once cool, apply penetrating oil around the threads and use a wrench to turn it out. The heat from welding can also help break corrosion’s grip on the threads.
What to do if a drill bit breaks off in the bolt
A snapped drill bit is a major setback, but you can recover. Stop drilling immediately. Attempting to drill past a broken bit will only harden the metal and likely break another bit. Your goal is to remove the fragment. If any portion protrudes, use locking pliers to grip and rotate it counter-clockwise. If it’s flush or below, you may need a punch and hammer to carefully fracture it, or a small, sturdy tool to pick out the pieces. This is a delicate operation to avoid damaging the surrounding threads. After removal, reassess your drilling setup with a fresh, sharp bit and ample lubrication.
Frequently Asked Questions
Can you just drill out a broken bolt?
You can, but it’s a last-resort method called “drilling to the minor diameter.” You deliberately destroy the bolt by drilling out its core until only the threads remain stuck in the hole, then you pick them out or use a tap to clean them up. It requires precision to avoid damaging the female threads in the component. It’s preferable to try an extractor first.
What is the best drill bit to drill through a broken bolt?
For hardened or stainless steel bolts, a cobalt drill bit is the best choice for DIYers. It retains its hardness at high temperatures better than high-speed steel. For the toughest case-hardened bolts, a carbide bit is needed, but these are brittle and require a rigid, professional setup. Always start with a small pilot bit (like 1/8″) and step up gradually.
What is the best tool for removing broken bolts?
The best tool is the one that matches the problem. For a clean break (not seized), a quality screw extractor set like those from Snap-On is excellent. For a seized bolt, left-hand drill bits paired with heat and penetrating oil offer a chance of removal without an extractor. For inaccessible or critical applications, a dedicated OEM kit like the Lisle or GM tools mentioned is the safest bet.
Can I use a drill to remove bolts?
Yes, but not directly. A drill is used to create a pilot hole for an extractor or to run a left-hand drill bit. The rotary force of a standard drill chuck isn’t designed to apply the high, steady torque needed to break a bolt loose. You need a wrench or socket on the extractor for final removal.
The Bottom Line
Removing a broken bolt is a test of patience, not force. The sequence is simple: center punch, pilot drill, insert extractor, turn. The artistry is in the details: using a cobalt bit, limiting your depth to 10–15 mm, choosing a straight-flute extractor, and knowing the moment your torque is twisting the extractor, not the bolt.
If you remember one thing, let it be this: extractors are for broken bolts, not seized ones. If the bolt was frozen before it snapped, you’re likely in for a drilling operation, not an extraction. In that case, drilling to the minor diameter and re-tapping is a predictable, salvageable outcome. Trying to heroically twist out a seized bolt with an extractor usually ends with a harder problem than you started with.
For your next project, the right tool isn’t just the drill, it’s the screw extractor you pair with it, the best drill bits you choose, and the discipline to stop when the method isn’t working.
