
How to Use a Screw Extractor: Step-by-Step
This post contains affiliate links. As an Amazon Associate, we earn from qualifying purchases.
To use a screw extractor, you drill a pilot hole into the damaged fastener, flip the double-ended bit, and turn it counter-clockwise with a drill in reverse. The critical variables are the extractor size, the drill speed, and whether your tool is approved for the job, manufacturers disagree on using impact drivers.
The “drill and twist” summary misses the mechanics that make this work. An extractor isn’t a magic bit; it’s a tapered tool that bites deeper into the metal as you turn it counter-clockwise. According to Irwin Tools, straight flute extractors work on both left-hand and right-hand threads. That reverse rotation is what applies the unscrewing force. Get the pilot hole wrong, or spin too fast, and you’ll just polish the inside of the hole you made. The key is knowing how to use a screw extractor correctly.
What follows is the shop-floor procedure, grounded in the actual manuals from Milwaukee Tool, Coopers of Stortford, and Irwin. We’ll walk through the seven universal steps, the disagreement on impact drivers, the exact pilot hole sizes for different extractor types, and what to do when the tool slips or the screw won’t let go, covering every aspect of how to use a screw extractor.
Key Takeaways
- Sources disagree on drill speed for extraction: Milwaukee Tool says to switch to low speed, while Coopers of Stortford says to use the lowest level of power.
- Match the extractor to the screw size using the manufacturer’s chart, a #1 extractor fits screws No. 4-7, a #2 fits No. 8-10, and so on.
- The extractor and screw will be hot after use; let them cool or wear gloves when handling.
- If the extractor slips, stop and re-burnish the hole an additional 1/16″ deeper or move up to the next larger extractor size.
The Core Conflict: Can You Use an Impact Driver?
Milwaukee Tool’s manual for their extractor bits states that sizes #1, #2, and #3 “can be used in an impact driver in low speed for all steps.” This includes both the initial drilling and the extraction. Their logic likely ties to the controlled torque and the prevalence of their M12/M18 platforms.
Coopers of Stortford’s manual for their Damaged Screw Extractor Set is blunt: “DO NOT use with Impact Drivers.” The concern is that the hammering action could damage the extractor’s fine flutes or cause it to jump in the chuck, ruining the pilot hole.
Where this goes sideways: Assuming all extractor brands are the same. Milwaukee designs theirs for impact use; others explicitly forbid it. Using a non-rated extractor in an impact driver can snap the tool inside the screw, creating a much harder problem.
Manufacturers disagree: Milwaukee Tool says sizes #1-#3 can be used in an impact driver in low speed, while Coopers of Stortford says “DO NOT use with Impact Drivers.” The drill gives you smoother, more controllable rotation, which is what the extraction process needs most.
The 7-Step Bump-Feed Replacement (and the One Step Nobody Skips)
This is the universal process, adapted from the Coopers of Stortford and Milwaukee manuals. According to Coopers of Stortford, extractors can be used on screw types including HEX, PHILLIPS, TORX, SQUARE DRIVE, etc., and are suitable for wood and sheet metal. Milwaukee Tool specifies use on stripped screws in soft wood.
- Secure the workpiece. Clamp it down. A shifting piece will break your bit or enlarge the hole.
- Insert the extractor into the drill chuck. Make sure the “A” end (the burnishing/drilling end) is facing out. Tighten the chuck securely.
- Set your drill to REVERSE (counter-clockwise) and DRILL mode. This step is essential. You are drilling in reverse to create the pilot hole.
- Pre-drill the screw head. Center the bit and apply firm, straight pressure. Drill a clean hole between 1/16” and 1/8” deep. You should feel the bit bite and see clean metal curls. If the hole is ragged, the extractor won’t grip later.
- Flip the extractor bit. The bit will be hot. Wear gloves, pull it from the chuck, and insert the “B” end (the extracting end). Secure it tightly.
- Set the drill to REVERSE and its LOWEST speed setting.
- Extract the screw. Place the extractor into the pilot hole, apply firm downward pressure, and slowly pull the trigger. The extractor should bite and walk the screw out. If the screw spins freely (“free spins”), pull the drill lightly away from the workpiece to engage the threads.
The step everyone tries to skip when learning how to use a screw extractor is #6, the low speed. They think faster is stronger. It’s not. Extraction is about steady, increasing torque, not RPMs.
The part nobody mentions: After removal, the screw will often be stuck on the extractor. Don’t force it. Tap the screw on a hard surface or use pliers to twist it off. The metal is hot and slightly expanded; forcing it can damage the extractor’s flutes.
Choosing the Right Extractor and Drill Bit Size
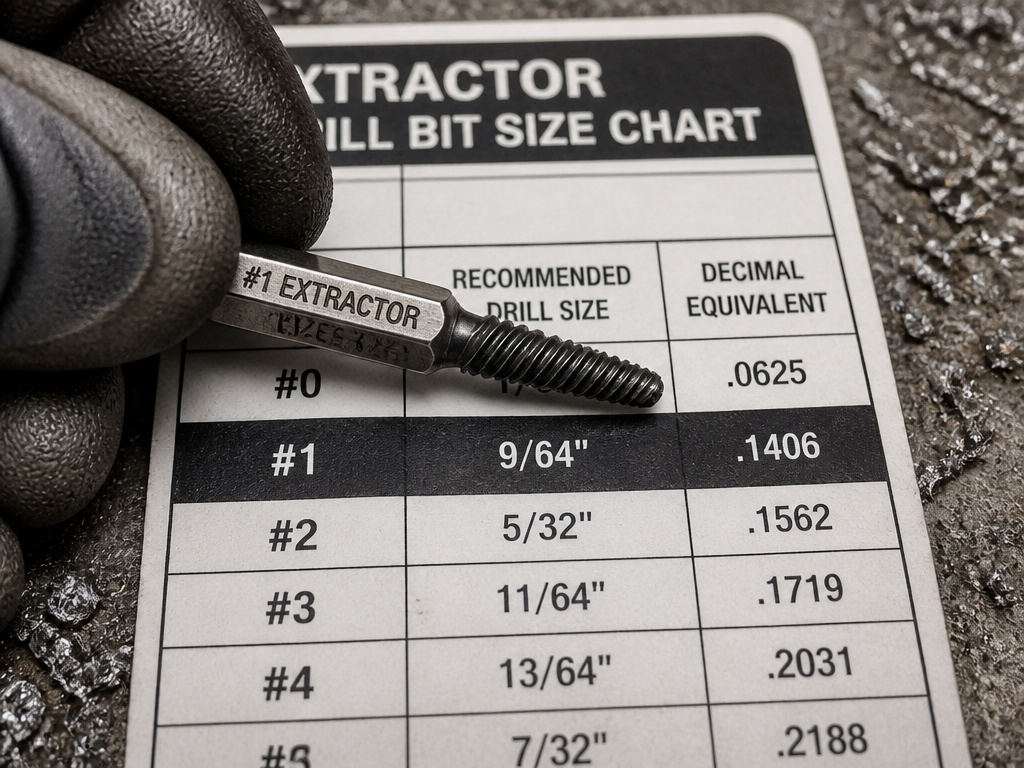
A #2 extractor doesn’t fit every #8 screw. The pilot hole size is the difference between a clean removal and a stripped, useless hole. Manufacturers provide specific charts, and they differ by extractor type.
| Extractor Type | Best For | How It Works | Drive Tool |
|---|---|---|---|
| Straight Flute | Pipes, fittings, left- or right-hand threads | Extracts without expanding the material, ideal for thin-walled pipes | Wrench, tap wrench, locking pliers |
| Spiral Screw | Harder materials, broken screws | Flutes bite deeper with each turn, increasing grip as torque rises | Wrench, socket |
| Multi-Spline | Confined areas, high-torque needs | Low-profile design provides the most torque of any internal extractor | Socket wrench, flat wrench |
For a #1 straight flute extractor (for screws No. 4-7), Irwin’s guide says to use a 9/64” drill bit. For a #1 spiral extractor (for smaller screws No. 3-6), the guide calls for a 5/64” bit.
The takeaway? You can’t guess. If you have an Irwin set, use their chart. If your extractor set’s manual doesn’t specify a drill bit size, start with a bit slightly smaller than the extractor’s tip and test on scrap. The goal is a hole the extractor’s tip can start in, not a loose cavity.
What to Do When the Extractor Won’t Bite

It slips. It spins. The screw laughs at you. This is where the manual’s “helpful hints” become your salvage plan.
First, stop applying power. Continuing just rounds out the hole you made. The Coopers of Stortford manual outlines two escalation paths:
- Re-burnish the hole. Go back to Step 4. Put the “A” end back in the drill and drill the existing pilot hole an additional 1/16” deeper. This creates a fresh, clean surface for the extractor to bite into.
- Move up one extractor size. If re-drilling doesn’t work, switch to the next larger extractor in your set (e.g., from a #2 to a #3) and repeat the entire process from the beginning with a larger pilot hole.
Common mistake: Forcing the extractor with side-to-side wiggling. This can break the tip off inside the screw. If the extractor gets stuck, disconnect the drill from power. Wearing gloves, gently pull the screw off or tap it loose. If that fails, you may need to drill out the entire fastener with a standard bit and re-tap the hole.
There are also hard limits. The same manual warns not to extract screws or bolts exceeding 2 inches in length or those with aggressive threads. The torque required can snap the tool. For drywall screws, Coopers of Stortford advises they are not recommended.
Safety, Heat, and the One Tool You Need
This isn’t a dusty, academic process. You’re generating significant friction between two pieces of hardened steel.
The Milwaukee manual has a specific warning in all caps: “Screw, screw extractor bit and drill/driver chuck may be hot.” You’ll feel the heat through the drill’s body quickly. Let the bit cool before handling it bare-handed, or wear mechanics’ gloves.
Gloves are important, but safety glasses are essential. You’re drilling metal, which throws sharp, hot fragments.
The one tool that changes the game isn’t even an extractor, it’s a left-handed drill bit. If you drill your pilot hole with a reverse-threaded bit, it will sometimes grab the screw and back it out before you even switch to the extractor. For a stubborn bolt, pairing a left-handed drill bit with your extractor kit is the professional’s move.
How to use penetrating oil with a screw extractor
Applying a penetrating oil or lubricant before you start can help loosen a stuck screw. While the fact sheets do not specify a product or timing, the principle is universal: let the oil soak into the threads to break down rust and corrosion. After you finish the job and the screw is out, it is good practice to clean any metal chips off your extractor bit and lubricate it with a light oil before storage. This prevents rust and keeps the tool ready for its next use.
When to use a screw extractor instead of pliers or a drill
A screw extractor is the right tool when the head of a screw is stripped, broken, or damaged beyond what a standard driver can grip. While locking pliers can sometimes grab a protruding head, an extractor bites into a hole you drill in the screw’s center, providing direct reverse torque. For a screw that spins freely without backing out, you can use the extractor in your drill while gently pulling the tool away from the threads. After removal, if a screw is stuck on the extractor bit, you can tap it on a hard surface or use pliers to pull it off.
Frequently Asked Questions
Do you drill in reverse for a screw extractor?
Yes, absolutely. You must set your drill to reverse (counter-clockwise rotation) for both the initial pilot hole drilling and the extraction step. Drilling in reverse with the extractor creates the bite that allows it to unscrew the fastener.
What if the extractor breaks inside the screw?
Stop immediately. Do not try to drill it out with another extractor. You’ll need a carbide drill bit sized for the screw’s shank (not the head) to drill out the entire remainder, including the broken extractor. This often means destroying the threads, so be prepared to use a thread insert or helicoil afterward.
Can I use a screw extractor on a broken bolt?
Yes, the process is identical. The key is drilling your pilot hole as centered as possible on the broken bolt’s surface. Using a center punch to make a small dimple before drilling is crucial for keeping the bit from wandering.
Why did my extractor slip and not grip?
The two most likely causes are an incorrect pilot hole size (too large or too ragged) or excessive drill speed during extraction. Go back and re-drill the pilot hole 1/16″ deeper at low speed to create a fresh surface, or move up to the next larger extractor size.
Do I need a special drill?
Coopers of Stortford recommends a 3/8” variable speed, reversible drill. The variable speed is critical for the low-speed extraction step.
Before You Go
One rule cuts through all the charts and steps: if your first attempt with the correctly sized extractor fails, re-drill the pilot hole before you do anything else. That fresh metal is usually all the grip the tool needs. Everything above assumes you’re working on a screw that’s still intact enough to bite, a fastener that’s already sheared flush or is made of cheese-soft alloy may need a different approach.
The shop-floor truth is that a set of left-handed drill bits will solve more problems than a drawer full of extractors. Start in reverse with the left-hand bit; if it doesn’t catch, you’ve already made the perfect pilot hole for your extractor. That’s how you turn a frustrating hour into a five-minute fix.
