
How to Set Jointer Outfeed Table Height: Step-by-Step
This post contains affiliate links. As an Amazon Associate, we earn from qualifying purchases.
To set your jointer outfeed table height, you must align it with the highest point of the cutterhead knives or carbide inserts. The universal tool for this is a metal straightedge. Place it on the outfeed table, rotate the cutterhead by hand, and adjust the table until the cutting edge just touches, but does not lift, the straightedge. This prevents the workpiece from dipping or ramping as it leaves the cut, which is the root cause of snipe and tapered boards.
That “just contacts” clause is where every manual and every woodworker has a slightly different interpretation. Some say the blade should barely scrape the straightedge. Others insist it should lift it a specific fraction of an inch. Your jointer’s brand, its age, and even the type of cutterhead you have all tilt the answer one way or another. A common point of confusion is how to set jointer outfeed table height.
What follows is the integrated procedure for how to set jointer outfeed table height: how to safely get the tables coplanar first, the straightedge method in detail, the brand-specific nuances that change the game, and how to diagnose the cuts your machine actually makes to fine-tune from there.
Key Takeaways
- The outfeed table must be coplanar with the infeed table before you touch its height; a misaligned base guarantees bad cuts.
- Use a metal straightedge, not a wooden one; wood flexes and lies to you.
- For traditional knife heads, Oliver Machinery says the knife should just scrape the straightedge. For spiral carbide heads, Grizzly says the insert should just touch it at top-dead-center, but also states all height measurements must be made from the cutterhead body, not the inserts.
- Excessive snipe means your table is too low; a tapered or bowed cut means it’s too high.
- Ryobi states its tables are factory-set and shouldn’t need adjustment, but every other manufacturer provides explicit user-adjustment steps, especially after knife changes.
Why Outfeed Table Height is Non-Negotiable
A jointer has one job: make one face of a board flat. It does this by presenting the uneven board to a spinning cutterhead, supported by the infeed table. The freshly cut section then transfers its support to the outfeed table. If that table is even a few thousandths of an inch off, the transfer fails.
Think of it like handing off a baton in a relay race. If the receiving runner is ahead or behind, the handoff is clumsy, slow, and can drop the baton. With a low outfeed table, the tail of the board dips, allowing the cutter to take an extra bite, which is snipe. A high table acts like a ramp, lifting the board’s leading edge so the cutter takes more off the end, a taper or bow.
The manuals are blunt about the consequence. The Oliver 4230 manual states: “Failure to adjust the outfeed table will result in either a curved or sniped workpiece.” The Grizzly G0495X manual is equally direct: a low table tapers the work, a high one increases kickback risk.
Pre-Flight Checklist: Safety and Foundation
Before you touch an adjustment wheel, you have to secure the machine and yourself. This isn’t bureaucratic box-ticking; it’s how you keep your fingers.
Before you start: Disconnect the jointer from power. The cutterhead is unforgivingly sharp, and an accidental start during adjustment is a life-altering event. Wear safety goggles marked ANSI Z87.1 (or CSA Z94.3-99 in Canada) to protect against any metal fragments or wood chips dislodged during the process.
Your jointer must be on a solid, flat floor. The unspecified brand manual (likely Rikon/Shop Fox) is explicit: “This machine should be installed and operated only on a solid, flat and stable floor that is able to support the weight of the jointer and the operator.” A typical 8-inch jointer can weigh over 200 pounds; it will find any weakness in your floor and turn it into vibration in your cut.
Also, connect your dust collector. The Grizzly G0495X mandates a system moving 400 CFM at the port and warns against operating without an adequate dust collection system. This isn’t just about shop cleanliness; fine dust around moving parts can interfere with precise adjustments.
The Essential First Step: Making the Tables Coplanar
You cannot set an accurate height on a crooked foundation. The infeed and outfeed tables must be parallel to each other in the same plane, coplanar. Skipping this is like leveling a cabinet on an uneven floor; every adjustment after is compromised.
Start with the infeed table. Lower it completely. Place a long, reliable straightedge (a precision-ground metal one is best) across both tables. There should be no gap, no rocking. If there is, your infeed table needs adjustment. On many jointers, this involves loosening gib screws or adjusting eccentric bushings under the table until the straightedge sits flush.
The Grizzly G0495X specifies that after this alignment, the outfeed table should be parallel to the cutterhead within 0.010″-0.012″. This precision matters. A table that twists away from the cutterhead will give you a cut that’s mysteriously out of square, even if the height is perfect.
Once the tables are coplanar, you have a true baseline. Now you can adjust the outfeed table height relative to the cutterhead, knowing the plane is already correct.
The Straightedge Method (Step-by-Step)
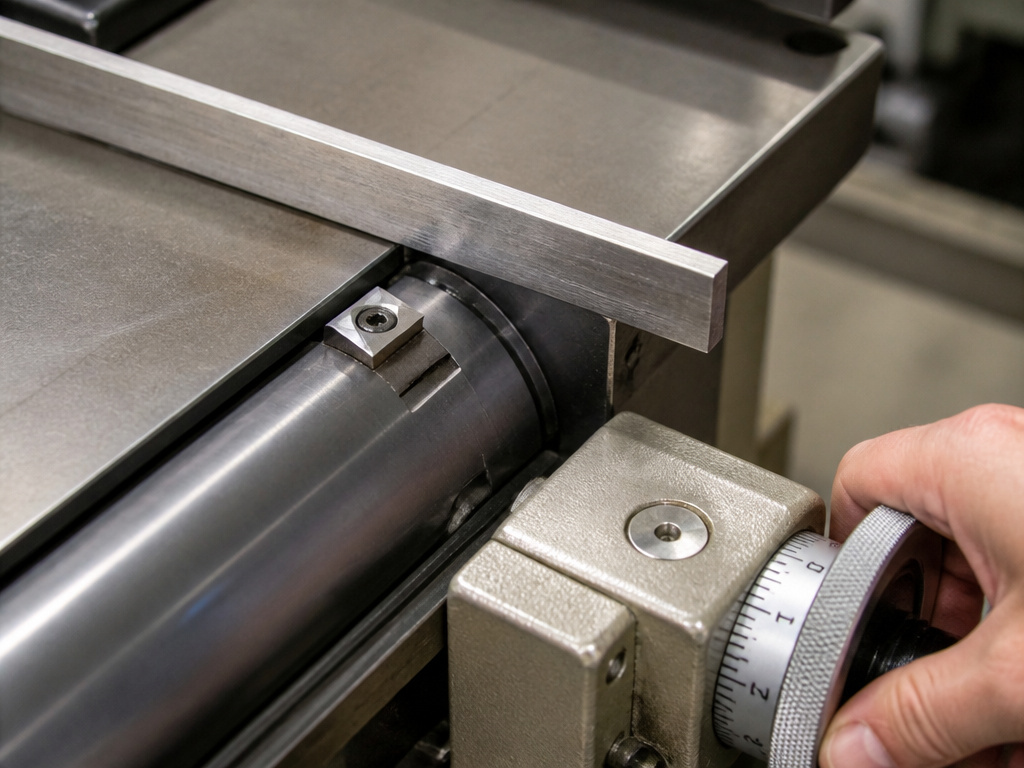
This is the core procedure every manual describes. The goal is simple: make the highest point of the cutter’s arc match the outfeed table’s surface. The devil, as always, is in the details and the disagreements.
- Disconnect the machine from power. Remove the blade guard and any belt guards for clear access.
- Place your straightedge on the outfeed table so it extends squarely over the cutterhead.
- Rotate the cutterhead by hand until a knife or insert is at its highest point of rotation. This is often called top-dead-center (TDC).
- Observe the gap (or contact) between the straightedge and the cutter.
- Adjust the outfeed table height using its handwheel. Adjust while gently rocking the cutterhead back and forth over its highest point.
- Aim for the correct contact. This is the contentious bit, and it depends on your machine.
Here is where the manufacturer splits live. I’ve laid them out side-by-side because choosing the wrong standard for your machine guarantees problems.
| Brand / Model | Cutterhead Type | Target Setting (Per Manual) | Key Nuance |
|---|---|---|---|
| Oliver 4230 | Traditional 3-Knife | Knife “just scrapes the bottom of the straight edge.” | Implies a faint scraping sound and feel, with minimal to no movement of the straightedge. |
| Delta 37-071 | Traditional 3-Knife | Knife causes straightedge to “move forward slightly, no more than 1/8”.” | Allows for a tiny, defined movement (up to 1/8 inch). |
| Grizzly G0495X | Spiral Carbide Insert | Carbide insert “will just touch the straightedge.” | Measured at TDC. Manual later stresses all height measurements must be from the cutterhead body, not the inserts. |
| Ryobi | Traditional Knife | Blades “should just touch the straightedge.” | Also states table is factory-set and “should not require adjustment,” contradicting its own provided instructions. |
The “cutterhead body” note from Grizzly is critical. Inserts can wear or sit slightly proud of their pockets. Measuring from the solid metal body ensures consistency, especially if you’re using feeler gauges.
Once you achieve the specified contact, lock the table height. Most jointers have a lock knob or set screw on the side of the outfeed table. Tighten it firmly.
Diagnosing Problems: Snipe vs. Taper
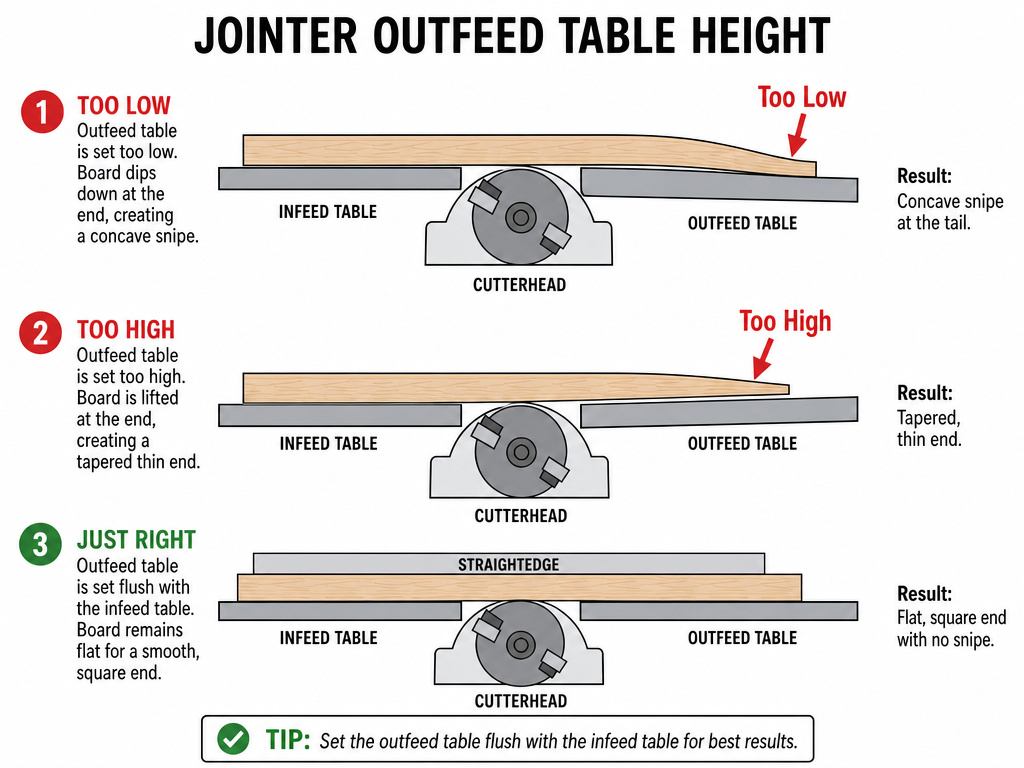
Your test cuts tell the truth. Make a pass on a scrap board. Don’t force-feed it; use steady, even pressure and proper push blocks. Once you have a fresh cut, inspect it.
The Problem: Snipe
- What you see: A deeper, concave groove at the very tail end of the board.
- What it feels like: Your straightedge will rock when placed over the snipe.
- The Cause: The outfeed table is too low. The board’s tail drops after losing infeed support, and the cutter takes a final, unintended bite.
- The Fix: Raise the outfeed table a tiny fraction of a turn. Recheck with the straightedge, aiming for firmer contact, and test-cut again.
The Problem: Taper or Bow
- What you see: The board is not flat along its entire length. It’s thinner at the end that exited the machine.
- What it feels like: The straightedge will show a gap at the middle or end of the board.
- The Cause: The outfeed table is too high. It acts as a ramp, lifting the board’s leading edge so the cutter removes more material as the pass finishes.
- The Fix: Lower the outfeed table a hair. Recheck and test-cut.
Where this goes sideways: Chasing one problem by over-correcting. If you keep raising the table to fight snipe, you’ll eventually create a taper. The adjustments at this stage are minuscule. Patience is the real tool here.
The Advanced Move: The Grizzly Snipe-Killer Tip
Sometimes, even a “perfect” straightedge setting leaves a hint of snipe. The Grizzly G0495X manual has a fascinating, counterintuitive tip from “advanced woodworkers.” It inverts the standard logic to attack the problem at its root.
The procedure: After setting the table so the insert just touches the straightedge, lower the table slightly so the insert now lifts the straightedge off the table. Measure the lift. Adjust the outfeed table until the straightedge only moves 5⁄32″ (about 4mm) when the insert pulls it up.
It’s a fine-tuning step for when the standard method leaves you at 99% but you need 100%. I wouldn’t start here, but it’s a powerful option when you’re stuck.
When Should You Check or Adjust?
This isn’t a set-it-and-forget-it setting. You should verify your outfeed table height:
- After any knife sharpening or replacement: After any knife sharpening or replacement, the cutting circle may change, demanding a re-set. This changes the “highest point” and demands a re-set.
- If you notice a change in cut quality: The sudden appearance of snipe or taper is your machine telling you something has shifted.
- After moving the jointer: Even rolling it across the shop floor can jostle the precise adjustments.
- As part of annual maintenance: Check all critical alignments once a year.
The Ryobi manual’s claim that the table “should not require adjustment” is a factory ideal. In the real world of shop vibration, wood resin buildup, and metal stress, things drift. Knowing how to correct that drift is what separates a usable tool from a precise one.
The ‘ruler trick’ as a setup method
The straightedge method is the core technique for how to set jointer outfeed table height. Place a reliable straightedge on the outfeed table, spanning the cutterhead. Rotate the cutterhead by hand until a knife or carbide insert is at its highest point. Adjust the outfeed table up or down until the cutting edge just scrapes or touches the bottom of the straightedge. This contact point is the reference. Rock the cutterhead slightly to find the true highest point of the cutting circle. The goal is for the straightedge to sit flat on the outfeed table, interrupted only by that precise, feather-light contact with the cutting tool.
Specific height measurements (e.g., .001″ – .003″)
Precision is critical, but specific measurements like .001 inch are not provided in the manuals for the initial height setting. The target is a geometric relationship: the outfeed table must be level with the highest point of the cutterhead’s cutting circle. For machines with carbide inserts, the table must be level with the inserts at top-dead-center. The manuals warn that being off by even a small amount causes problems. A table set too low tapers the workpiece and causes excessive snipe. A table set too high makes the workpiece hit the table edge, risking kickback. The adjustment is about achieving that exact flush plane.
Relationship to knife setting (chicken & egg problem)
Setting knives and the outfeed table are interdependent. The outfeed table height is referenced from the knives or inserts when they are at their peak. Therefore, the knives must be correctly positioned in the cutterhead first. If you change or sharpen your knives, you must reset the outfeed table to match their new cutting circle. Some manufacturers specify that all measurements for table parallelism must be made from the cutterhead body itself, not the cutting edges, which adds a step. The sequence is clear: secure the knives, then set the outfeed table height to match their highest arc of travel.
Frequently Asked Questions
My jointer has a spiral cutterhead. Does that change the process?
Yes, in the specifics. The goal is the same, align the table with the highest cutting point. However, with individual carbide inserts, you must ensure you’re checking an insert that’s seated correctly and not worn. The Grizzly manual emphasizes measuring from the cutterhead body, not the inserts, for the height setting to avoid inconsistencies from insert wear or seating.
What if I don’t have a metal straightedge?
You can use a known-flat piece of hardwood or a machinist’s level, but be cautious. Wood can warp with humidity, and levels have thick edges that reduce sensitivity. A metal straightedge is a one-time investment that pays off across every machine in your shop, from your table saw fence adjustment to your drill press table alignment.
Can I use a dial indicator instead of a straightedge?
Absolutely. A dial indicator on a magnetic base is the most precise method. Mount it on the outfeed table, zero it on the table surface, then rotate the cutterhead and note the highest reading on a knife tip. Adjust the table until that reading is zero. It removes all the “just touch” guesswork and gives you a numeric truth.
Why does my board still have a slight bow even after setting the height?
The outfeed table height is only one variable. Ensure your tables are coplanar (as in the first step), your fence is square to the tables, and you’re not applying downward pressure that twists the board. Also, double-check that you’re feeding against the cutterhead’s rotation and using sharp knives. A dull cutter can deflect, creating a cut that isn’t truly flat.
Is this process similar for all jointers, like the ones in your best jointers guide?
The fundamental principle is universal across all jointers, from a 6-inch benchtop model to a 12-inch floor-standing beast. The adjustment mechanisms (handwheels, lock knobs, gib screws) will differ, and the manufacturer’s specified “touch” may vary, but the goal, perfect alignment between the cut and the outfeed support, never changes. Whether you’re mastering jointer basics or choosing between a jointer vs planer, this skill is core.
The Bottom Line
Setting your jointer outfeed table height isn’t abstract woodworking theory. It’s a mechanical procedure with a clear, testable outcome: a board that comes off the machine flat. Forget the myths and the “secrets.” The real method is in your machine’s manual.
The straightedge is your judge. The test cut is your jury. Start with the tables coplanar. Follow your brand’s specific “touch” guideline, scrape, move 1/8 inch, or just contact. Diagnose snipe or taper and correct with tiny adjustments. If you’re still fighting snipe on a spiral-head machine, try the Grizzly 5/32-inch lift trick.
This precision is what turns a jointer from a noisy, chip-making machine into a reliable foundation for everything you build. It’s the difference between wrestling with your stock and commanding it. And honestly, that control is the whole point of having a power tool in the first place.
