
How to Use a Jointer: A Step-by-Step Guide
This post contains affiliate links. As an Amazon Associate, we earn from qualifying purchases.
To use a jointer, you flatten one face and square one edge of rough lumber. The machine has an infeed table set lower than a spinning cutterhead and an outfeed table level with the cutterhead’s peak. You feed the board across, the knives shave off the high spots, and the newly cut surface rides on the outfeed table. Safety is critical: wear eye protection, use push blocks, and never joint pieces shorter than 14 inches.
That 14-inch rule isn’t a suggestion. It’s printed in the South Bend Tools manual because a board shorter than that can tip into the cutterhead gap, causing a violent kickback. The jointer doesn’t ask for permission; it follows physics. Your job is to match its rules, which is a fundamental part of how to use a jointer safely.
What follows is the manual-first approach. We’ll walk through what the machine does, the safety specs that aren’t up for debate, and the step-by-step techniques for how to use a jointer for face and edge jointing. You’ll also see where the major manufacturers disagree on specifics like depth of cut, so you can make an informed choice for your shop.
Key Takeaways
- Never joint wood shorter than 14 inches—this South Bend Tools rule prevents the board from tipping into the cutterhead and kicking back.
- Wear approved eye protection every time. Oliver Machinery specifies safety shields or goggles; regular glasses aren’t enough.
- Use push blocks or hold-downs religiously, especially on stock narrower than 3 inches or thinner than 3 inches.
- A jointer creates a reference face and edge; you need a thickness planer and table saw to complete the board.
How a Jointer Actually Works (The Physics)
Forget the “flatten and square” mantra for a second. A jointer is a precision referencing machine. Its only job is to create two perfectly related surfaces: one flat face, and one edge square to that face. Everything else in your project builds from those two references.
The mechanism for how to use a jointer is simple but unforgiving. A cylindrical cutterhead holding two, three, or four knives spins at high speed. The outfeed table is set exactly level with the highest point of the knives’ rotation. The infeed table is set slightly lower. The difference between the two tables is your depth of cut.
When facing the width of a board (as opposed to the edge of a board), NEVER attempt to take off more than 1/64″ with each pass. Oliver Machinery 8″ Jointer Manual
As you push a board across the infeed table, the high spots meet the spinning knives and are sheared off. The newly cut section then rests on the outfeed table. If you keep downward pressure on the outfeed side, the board continues across on a perfectly level plane, taking a consistent cut. The fence, when set to 90 degrees, guides the board to create a square edge. This is why checking your outfeed table height is the most critical setup task.
The 3 Non-Negotiable Safety Rules (From the Manuals)
Safety around a jointer isn’t about being careful. It’s about following the specific, tested rules written by the engineers who built it. These aren’t tips; they are the conditions under which the tool is designed to operate safely.
- Eye and Hand Protection: Every manual mandates it. Oliver Machinery is explicit: “Wear an approved safety shield, goggles, or glasses to protect eyes. Common eyeglasses are only impact-resistant, they are not safety glasses.” They also state: “Do not wear gloves.” Gloves can get caught and pull your hand in. Use push blocks instead.
- Minimum Board Length: The South Bend Tools manual draws a hard line: “Never perform jointing, planing, or rabbeting cuts on pieces shorter than 14″ in length.” A short board can bridge the gap between tables, dip into the cutterhead, and be launched back at you. It’s the most common cause of jointer kickback.
- Guard and Block Use: “Always keep cutterhead and drive guards in place,” states South Bend. If you remove the guard for rabbeting, replace it immediately after. For material under 3″ wide or thin, they add: “Always use hold-down or push blocks.” Oliver simply says, “Always use push blocks.”
Initial Setup & Adjustments You Can’t Skip
A jointer must be tuned before it can be trusted. An out-of-whack machine will give you out-of-whack boards, no matter how perfect your technique.
Install it on a solid, flat, stable floor within an environment of 41°–104°F and 20–95% relative humidity. The Oliver Machinery manual specifies installing it “on a solid, flat and stable floor that is able to support the weight of the Jointer (366 lbs) and the operator.” The South Bend Tools manual adds environmental limits: operate in temperatures between 41°–104°F and relative humidity of 20–95%. A damp, cold garage might be outside the machine’s designed parameters.
Next, clean off the factory protectant. Manufacturers disagree on proper solvents: King Industrial suggests kerosene, mineral spirits, or paint thinner, while Oliver Machinery warns against acetone, gasoline, lacquer thinner, or flammable solvents. Once clean, wax the tables for smooth feeding.
Now, the critical adjustments:
- Outfeed Table Height: Use a straightedge. Place it on the outfeed table and slowly rotate the cutterhead by hand. A knife should just kiss the straightedge at its highest point. This is what your adjusting the outfeed table guide covers in detail.
- Fence Squareness: Lock the fence at 90°. Check it with a reliable engineer’s square along the outfeed table. Even a half-degree error compounds across the length of a board.
- Belt Tension: For models with V-belts, Oliver recommends adjusting for “approximately ½” deflection midway along the belts using finger pressure.” Re-check this after the first 20 hours of operation.
Step-by-Step: Face Jointing (Flattening a Board)
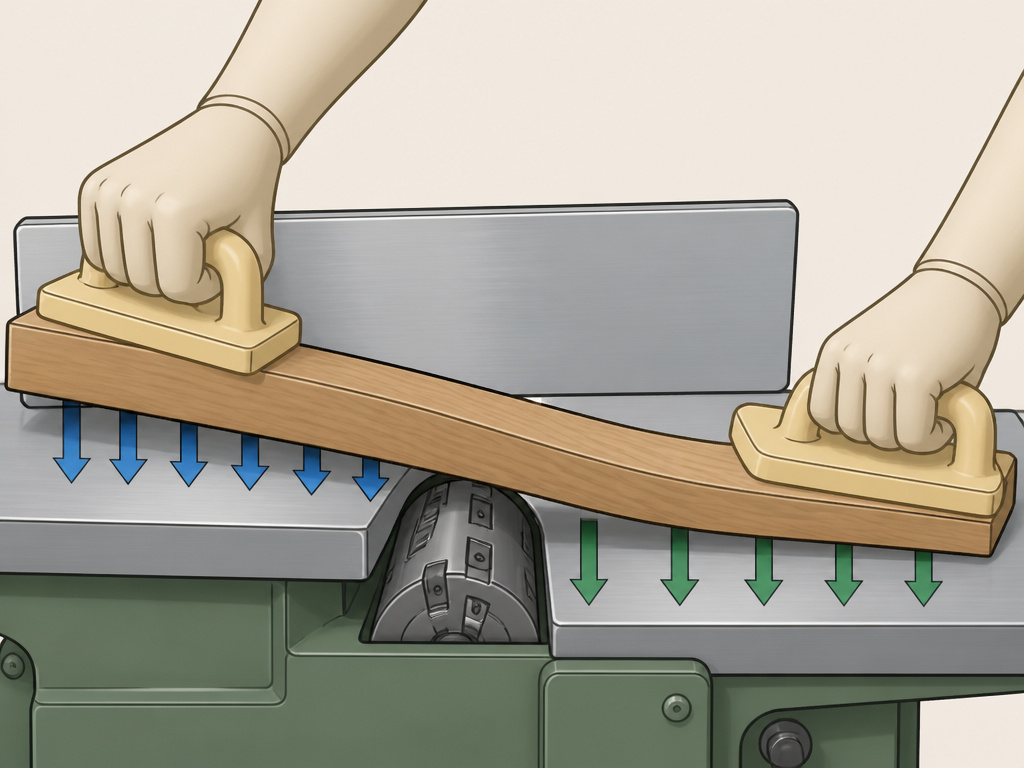
Face jointing is where you turn a twisted, cupped slab of rough lumber into a flat, stable reference surface. The goal isn’t to make the entire board thin; it’s to make one face perfectly flat.
1. Inspect and Mark the Board
Identify the face with the least severe twist or cup. This will be your starting face. Identify the high corners or crowns. A simple trick is to place the board on a known flat surface and see where it rocks. Mark these high spots with chalk or a pencil.
2. Set the Depth of Cut
Here’s where you must choose a rule. The FACT SHEET shows a direct conflict:
- South Bend Tools: “Never make cuts deeper than 1/8″ per pass.”
- Oliver Machinery: “When facing the width of a board… NEVER attempt to take off more than 1/64″ with each pass.”
For face jointing, especially on wide or twisted boards, a very shallow cut, such as Oliver’s 1/64-inch rule, is advisable. A heavier cut creates more stress and can actually exaggerate twist. Start with a shallow cut—about the thickness of a playing card.
3. The Pass: Pressure and Coordination
- Start Position: Place the board on the infeed table, crowned side up, with your dominant hand on a push block over the board and your other hand ready with a second push block or stick at the rear.
- Initial Feed: Apply firm downward pressure on the infeed table side, right over the leading high spot. Start feeding at a steady, slow pace. You’ll hear the cutterhead engage—a steady, slicing sound.
- The Transition: The moment the leading 6 inches of the board is fully on the outfeed table, shift all your downward pressure to that section. Your front hand now pushes down and forward on the outfeed table. Your rear hand continues to push the board forward from behind.
- Exit: Keep pressure on the outfeed table until the entire board has passed over the cutterhead. Do not let up at the very end.
4. Check and Repeat
After the first pass, inspect the board. Your chalk marks will show where material was removed. You’ll likely see a series of flat patches separated by untouched high areas. Make another pass, focusing pressure on any remaining high spots. Repeat until the entire face shows a consistent, full-width cut.
Where this goes sideways: Rushing the transition of pressure from infeed to outfeed table. If you lift pressure off the board as it bridges the tables, the trailing end can dip, creating a scoop or “snipe” at the end of the board. That flaw transfers to every subsequent step.
Step-by-Step: Edge Jointing (Squaring an Edge)
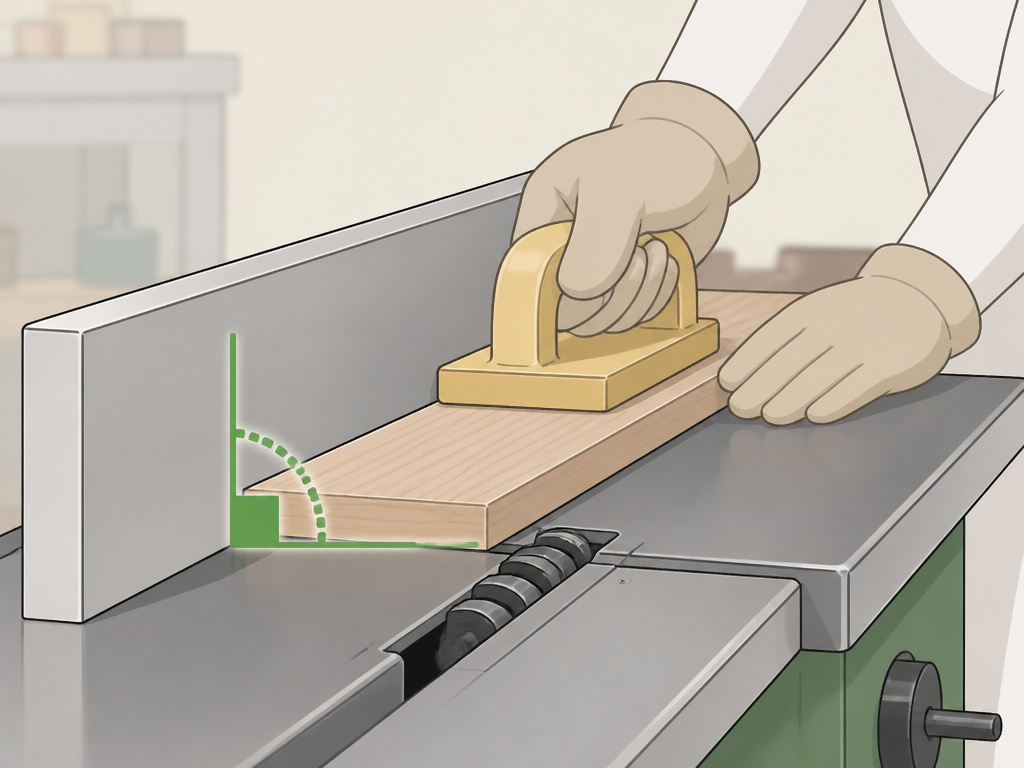
Once you have a flat face, you can create an edge perfectly perpendicular to it. This edge and face become the gospel for every measurement that follows.
1. Register the Flat Face
Place the freshly jointed flat face against the jointer’s fence. The fence must be confirmed at 90°. The weight of the board should hold it firmly against the fence.
2. Set for a Light Cut
Edge jointing typically requires less material removal. A light depth of cut is sufficient for edge jointing. You’re not trying to remove all the roughness; you’re establishing a straight, square line.
3. The Feeding Technique
Use a push block to hold the board down and against the fence at the front. Your other hand can guide from the side or use a push stick at the rear. The key is maintaining constant contact with the fence. Feed the board through using the same pressure-transition principle: pressure on the infeed side until the board is supported by the outfeed table, then shift pressure forward.
4. Check for Square
After one pass, use a square to check the edge against your jointed face. Don’t trust the fence alone. If you see light under the square, adjust your hand pressure to favor the high side on the next pass, or double-check the fence’s squareness. Often, a slight bow in the edge requires two or three passes to become perfectly straight.
Handling Problem Boards & Troubleshooting
The textbook methods break down with real wood. Here’s how to handle the common problems that aren’t in the manual.
| Problem | Likely Cause | Fix |
|---|---|---|
| End of the board dips down (Snipe) | Downward pressure released too early as board exits. | Maintain firm downward pressure on the outfeed table until the entire board is past the cutterhead. Use a push block that spans the cut. |
| Tear-out or Chipping | Cutting against the grain. | Identify grain direction. The fibers should be angled down toward the outfeed table (cutting “downhill”). Reverse the board if you see tear-out. |
| Board isn’t flat after multiple passes | Outfeed table is too low. The board rocks on the cut. | Re-check and set the outfeed table height so it is exactly level with the cutterhead knives. |
| Bow remains in an edge | Applying uneven pressure against the fence. | For a bowed edge, apply extra pressure to the concave side (the hollow) against the fence. This steers the high spots into the cut. |
What about very short pieces?
The 14-inch rule exists for a reason. For smaller parts, you must use a dedicated jig, like a jointing sled for your planer, or learn to edge joint without a jointer using a hand plane or table saw sled. Feeding a short piece freehand is an invitation for disaster.
Maintenance: Keeping Your Cuts Clean
A dull jointer doesn’t cut; it tears. It requires more force to feed, increases kickback risk, and yields a surface that looks fuzzy even after the cut.
Helical Cutterheads (Indexable Inserts): Modern jointers like the South Bend SB1113 use a helical head with dozens of small, square carbide inserts. The Oliver manual explains the process: “When dull, simply remove each insert, rotate it 90° for a fresh edge, and re-install it.” The key is to rotate all inserts at the same time to maintain balance. A single nicked insert can be rotated individually.
Traditional Knife Sharpening: For straight knives, Oliver outlines a “jointing” sharpening method. Using a fine oilstone with the machine running, you lower the outfeed table 0.003” to touch up all knives evenly. The manual warns: “SET THE KNIFE NO MORE THAN 0.06” ABOVE CUTTERHEAD TO MINIMISE THE DANGER OF KICKBACK.”
Storage: If you’re putting the machine away, especially in a humid space, prepare it. South Bend recommends protecting surfaces to prevent rust. Oliver advises cleaning with a commercial solvent and applying WD-40 or 20W oil. This prevents the rust that will ruin your tables’ flatness.
Jointer vs. Planer: What Comes Next?
This is the most common point of confusion. A jointer makes a face flat. A thickness planer makes the opposite face parallel to the first. You cannot thickness a board without a flat reference face, which is why the jointer almost always comes first in the milling process.
- Jointer: Flatten Face A. Square Edge A.
- Planer: Place Face A down. Plane Face B to make it parallel, creating uniform thickness.
- Table Saw: With Face A against the fence and Edge A against the table, rip Edge B parallel.
If you only have a planer, you’ll struggle with twisted stock. If you only have a jointer, you can’t achieve consistent thickness. They are a team. Understanding this workflow also helps you avoid planer snipe, as a well-jointed, stable board feeds into the planer evenly.
Choosing the Right Jointer for Your Shop
Your technique is limited by your machine’s capability. A 6-inch benchtop model is a fine start for small projects, but its short tables struggle with long boards. An 8-inch floor-standing model offers more stability and capacity.
When buying a jointer, the debate between a traditional straight-knife head and a helical carbide head is real. Straight knives are louder, require careful setup, and can chip on knots. Helical heads are quieter, handle difficult grain better, and have simpler maintenance (just rotate the inserts). They are also more expensive. For a hobbyist, a well-tuned straight-knife jointer is perfectly capable. For a production shop, the helical head’s performance and downtime reduction are worth the cost.
Consider the physical space, too. A floor standing jointer needs a permanent, leveled home and proper dust collection. A benchtop model offers flexibility but less mass and shorter tables, which can affect results on longer stock.
Do I need a jointer as a beginner?
A jointer is a foundational tool for creating flat, square stock, but it is not the first machine a beginner should buy. Its function is specific: to create one flat face and one edge square to it. For many early projects, you can achieve similar results with careful hand-planing, a well-tuned table saw, or by purchasing pre-surfaced lumber. If your work regularly involves rough, warped boards, a jointer becomes essential. Before purchasing, understand that it is a powerful tool with strict safety rules. You must always use push blocks and guards, wear eye protection, and never joint pieces that are too short, too narrow, or contain loose knots or nails.
Frequently Asked Questions
What is the number one mistake beginners make on a jointer?
Releasing downward pressure too soon. The instant you let the board pivot over the cutterhead gap, you lose control. The back end dips, the knives grab it, and the board either kicks back or you get a gouged, uneven cut. Keep pressure on the outfeed table until the board is completely clear.
Do I really need a jointer if I have a planer?
You can work around it, but it’s harder. A planer can only make the top face parallel to the bottom face. If your bottom face is twisted, the planer just copies that twist. You can use sleds and shims to flatten a board on a planer, but it’s a slow, fussy process. A jointer is the right tool for creating that first flat reference.
How do I know which way to feed the wood (with the grain)?
Look at the edge of the board. The wood fibers look like lines. You want those lines to angle down toward the outfeed table, as if you’re slicing down a slope. If they angle up, you’re trying to cut “uphill” and will likely get tear-out. If you’re unsure, make a very light test pass. Clean cut? You’re good. Fuzzy tear-out? Reverse the board.
Can I joint the edge of a board that’s thinner than 1/2 inch?
It’s risky. The South Bend manual states a minimum workpiece thickness for planing of 3 inches, but does not specify a minimum thickness for jointing in the provided fact sheet. Thinner stock lacks the rigidity to stay flat against the tables and fence, increasing the chance of chatter, inaccurate cuts, or it being pulled into the cutterhead. For thin stock, use a planer sled or hand tools.
Why does my jointer leave a scalloped or grooved pattern on the wood?
This is usually caused by a nicked or chipped knife on the cutterhead. On a traditional head, one damaged spot on a knife hits the wood with every revolution, creating a repeating pattern. You need to sharpen or replace the knives. On a helical head, simply identify and rotate the single damaged carbide insert.
The Bottom Line
The jointer is a truth machine. It reveals the shape hidden in the rough wood and gives you the geometric foundation for everything else. Respect its rules—the 14-inch minimum, the push blocks, the shallow passes—and it will reward you with dead-flat, square stock. Ignore them, and it will remind you, forcefully.
Start with the most conservative numbers in the manuals. Let the 1/64-inch depth-of-cut rule be your guide for face jointing. That patience upfront saves you from tear-out, snipe, and the frustration of a board that’s still not flat after five passes. Your first project with perfectly milled lumber will feel different. The pieces will fit, the glue-ups will stay flat, and you’ll understand why this machine, more than any other, separates rough lumber from ready-to-build wood.
