
How to Sharpen Tools on a Bench Grinder: Step-by-Step
This post contains affiliate links. As an Amazon Associate, we earn from qualifying purchases.
Sharpening tools on a bench grinder requires matching three things: the correct wheel grit, precise tool-rest positioning, and a light, controlled hand to avoid burning the steel. This turns a coarse, fast-cutting machine into a precise sharpening station.
That 1/16-inch gap between tool rest and wheel is a critical safety margin that separates a controlled grind from a dangerous catch. The rest of this guide walks you through setting that up, choosing the right wheel, and applying techniques from OEM manuals for chisels, drill bits, and knives. You’ll also learn when a bench grinder is the right tool for the job and when it’s better to reach for something else, including how to sharpen tools on a bench grinder.
Key Takeaways
- Set the tool rest within 1/16 inch of the wheel and at the correct angle for your tool before you even turn the grinder on.
- Use a 60-grit or finer wheel and dress it to a slight curve for better control; a dull, loaded wheel burns steel instead of cutting it.
- Dip the tool in water constantly to prevent overheating, which ruins the steel’s temper, never cool the wheel itself.
- Let the wheel do the work with light pressure; forcing the tool creates a wire edge, overheats the tip, and wears the wheel unevenly.
- A bench grinder is for coarse shaping and sharpening; finish the edge on a honing stone or strop for a truly sharp, polished result.
The Non-Negotiable Safety Setup
You cannot sharpen effectively if you’re working unsafely. The grinder is a brute-force tool that doesn’t forgive mistakes. Start here.
Before you even plug it in, mount the grinder to a solid, heavy bench. Sherline’s guide states a bench grinder should be mounted to something heavy enough so it will not move while being used. That’s your first rule. A wobbling grinder is an unpredictable one.
Next, personal protection. The Sears Craftsman manual is absolute: ALWAYS WEAR EYE PROTECTION. It specifies safety goggles that comply with ANSI standard Z87.1. A dust mask is also essential for the fine metallic dust you’ll create. Loose clothing, gloves, and jewelry are banned at the wheel, they catch.
Before you start: The wheel on a variable-speed model like the Harbor Freight 8″ grinder can spin at 2,000–3,400 RPM. It can throw broken fragments or grab loose material. Wear ANSI Z87.1 safety glasses, secure all clothing, and ensure the work area is clear and dry. Never use the tool in a damp environment or near flammables.
Electrical safety is just as concrete. If your grinder has a three-prong plug, use a three-contact receptacle. DO NOT remove the 3rd prong. And the universal rule from every manual: ALWAYS UNPLUG THE TOOL when making adjustments, changing parts, or performing any maintenance. That includes swapping wheels or adjusting the tool rest.
Finally, know your physical limits. The Harbor Freight manual warns that pregnant women or people with impaired circulation, past hand injuries, nervous system disorders, diabetes, or Raynaud’s Disease should not use this tool. If you feel tingling, numbness, or see white fingers during use, stop and seek medical advice.
Grinding Wheel Setup and Dressing
Your grinding wheel is your cutting tool. A dull or poorly shaped wheel makes sharpening impossible. This is where most beginners get their first real lesson in how to sharpen tools on a bench grinder.
Start with the wheel itself. Sherline’s advice is blunt: try to find a source for grinding wheels from an industrial supplier. Sixty grit is a good place to start. The white aluminum oxide wheels that come on many grinders are a decent start for general tool steel. Avoid the gray silicon carbide wheels meant for carbide, they’re too hard for HSS tools and will glaze over.
A wheel dresser is a necessity. You can’t sharpen tools with a dull wheel. Dressing does two things: it trues the wheel (makes it round) and opens up the abrasive surface, making it cut cooler and more aggressively. A dull wheel produces a “rapping” sound and generates excessive heat.
Here’s where sources offer different techniques. Sources offer different techniques for dressing: the JET manual says to back off the tool rest to hook the dresser over its edge, while Sherline’s guide implies setting the dresser on the tool support without backing it off.
More important than the flat-vs-curved debate is the outcome. You want a wheel that cuts smoothly without grabbing. After dressing, JET says to readjust the tool rest to within 1/16 inch of the newly dressed wheel. That gap is critical for control and safety.
| Wheel Condition | Sound | Result on Tool | Fix |
|---|---|---|---|
| Sharp & Dressed | Hissing, smooth | Clean, cool cut | Maintain with light dressing |
| Loaded (Dull) | Rapping, chattering | Burns steel, creates blue temper | Dress aggressively |
| Grooved or Uneven | Vibration, uneven sound | Uneven bevel, poor edge | Dress or replace wheel |
| Out of Round | Visible wobble, vibration | Impossible to control angle | True with dresser |
Tool Rest and Angle Fundamentals
The tool rest is an essential guide and depth stop. Using the wheel freehand is a guaranteed way to ruin tools and invite injury.
The first setting is distance. The JET manual is specific: tool rests and spark guards must be kept within 1/16″ of the grinding wheel. That’s not a rough guideline, it’s to prevent the tool from being pulled between the rest and the wheel, which can cause a violent catch. Check this gap every time you set up.
The second setting is angle. This is where you match the rest to the bevel you want to grind. Sherline provides two numbers in its lathe tool guide: the tool support should be set at approximately 7°, and the initial grinding angle for a lathe tool is 10°. You set this by placing the tool on the rest, holding it at your desired angle, and adjusting the rest until it supports the tool fully.
I used to think the rest was just for safety. Then I ruined a chisel by grinding a convex bevel because the rest was too far away. The 1/16-inch gap is the difference between a flat, repeatable angle and a rounded mess.
If you’re serious about sharpening, consider upgrading the stock tool rest. The ones that come on most consumer grinders are small, rough, and hard to adjust precisely. An aftermarket rest can offer larger, smoother surfaces and micro-adjustment. It’s one of the best upgrades you can make for consistent results, especially if you’re exploring bench grinder basics.
Sharpening Chisels and Plane Irons
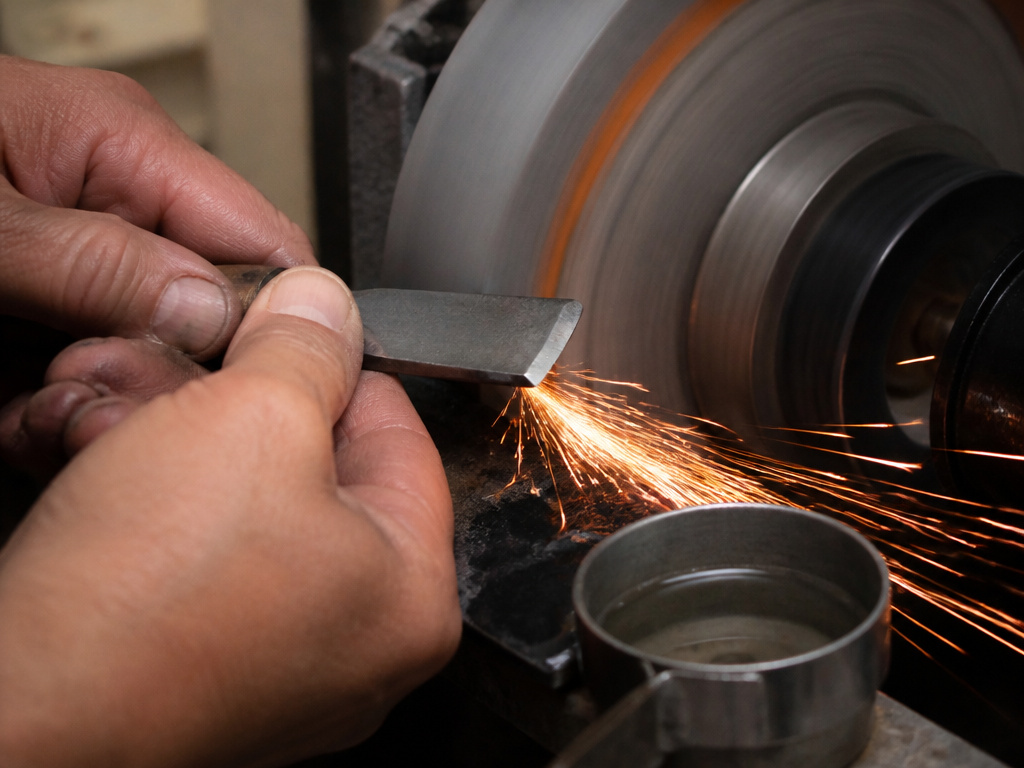
For woodworking tools, the bench grinder’s job is to re-establish a damaged edge or reshape a badly worn bevel quickly. It is not for final sharpening.
Start with a dressed wheel and a correctly angled tool rest. Place the chisel on the rest, bevel-down. The goal is to grind the entire bevel evenly. Look for the point where the wheel just kisses the very edge of the bevel. If you see a spark pattern only at the heel or the tip, adjust the rest angle.
Now, the motion. Use two hands: one to guide the tool, the other to apply gentle pressure. Slide the chisel side-to-side across the full width of the wheel. This prevents grooving the wheel and ensures an even grind. The JET manual explicitly says narrow workpieces should be slid laterally across the full width of the wheel.
The moment you see the metal start to discolor, a straw, blue, or purple hue, you’ve overheated it. Stop immediately. Dip the tool in a cup of water. The rule from multiple manuals is to dip the workpiece regularly to prevent overheating, but water should not be applied directly to the grinding wheel. Do this every few seconds once you’re close to a sharp edge.
You’ll know you’re done grinding when you’ve created a small, consistent burr (or wire edge) along the entire back of the tool. You can feel it with your fingernail. This burr is your signal to stop grinding and move to your honing stones to refine the edge. The grinder’s work is complete.
The 4-Step Drill Bit Sharpening (That Forum Guides Miss)
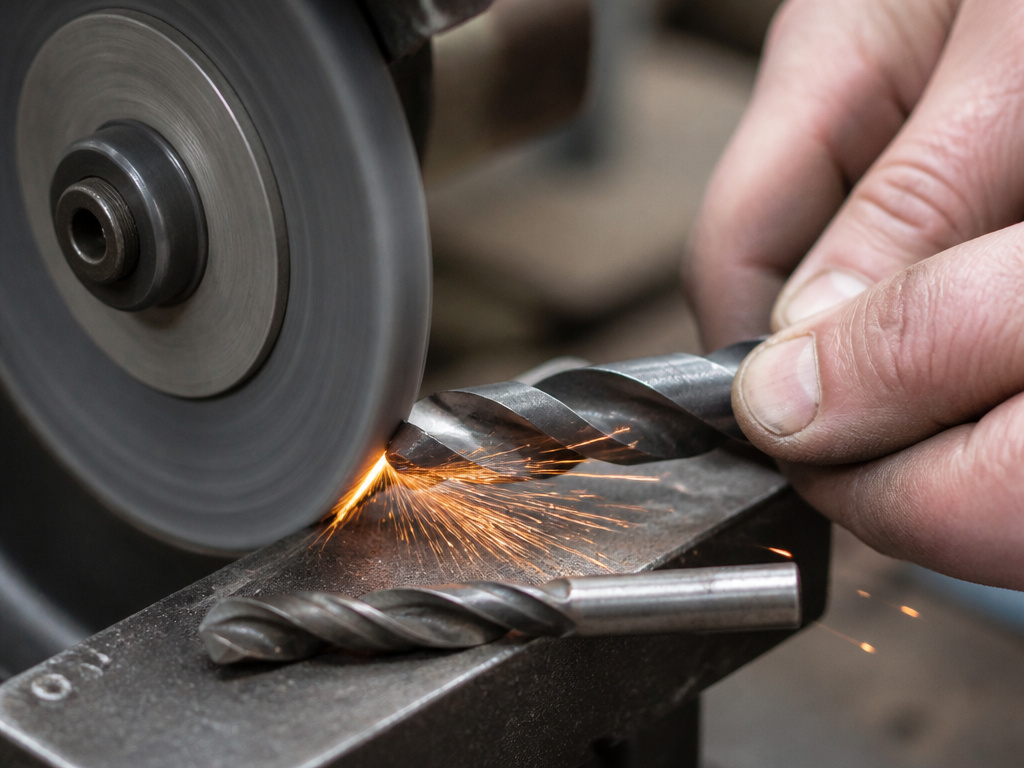
Drill bits confuse people. The geometry seems complex, but the grinder simplifies it if you follow a method. This is the most common unmet need in search results for how to sharpen tools on a bench grinder.
First, understand the goal: you are sharpening the two cutting lips on the tip of the bit. They must be equal in angle and length, and they must meet at a point in the center.
Step 1: Prepare and Observe. Clean the bit. Look at the existing cutting lips. Identify the dull or chipped area. This is your target.
Step 2: Set the Angle. Hold the drill bit in your dominant hand. Rest it on the tool rest so the cutting lip you are sharpening is horizontal. The bit itself should be angled down to match the existing point angle on the drill bit. Don’t overthink the geometry, match the existing angle.
Step 3: The Grinding Pass. With the grinder on, gently bring the cutting lip into contact with the wheel. Your non-dominant hand can steady the bit near the tip. Use a light, rolling wrist motion to follow the curve of the lip from the outer edge towards the center. Do not push hard. This pass should be brief and controlled.
Step 4: Check and Repeat. Dip the bit in water. Inspect the lip. You should see a new, shiny facet along the edge. Now, rotate the bit 180 degrees and repeat the exact same motion on the opposite cutting lip. The goal is to remove equal amounts of metal from both sides.
Common mistake: Grinding only one lip because it looks more damaged. This makes the bit drill oversized, off-center holes. Always grind both lips, even if you only do a single light pass on the good side.
The test is in the cut. A properly sharpened bit will produce tight, curly chips in wood or metal, not fine dust. If it wanders or makes an oval hole, the lips are uneven. Go back and take another light pass on the shorter lip. For more detail on the nuances, our guide on sharpening drill bits covers jigs and specialty angles.
Sharpening Knives: A Coarse Option with Caveats
To be honest. A bench grinder is not the preferred tool for sharpening a fine kitchen knife. But for lawn mower blades, axes, or heavily damaged knives, it’s the fastest way to remove material.
The YouTube transcripts highlight the core tension: “this is not the correct way to sharpen knives. They should be sharpened on a whetstone, but this is the quickest way.” That’s the honest trade-off. Speed for risk.
If you proceed, use the finer of your two wheels. The process is similar to a chisel but with more attention to angle consistency. Hold the knife firmly, with the edge facing away from the wheel’s rotation. Rest the blade on the tool rest and present the bevel to the wheel. Use a very light touch and keep the blade moving constantly along the length of the edge to avoid creating a single hot spot.
You are listening and looking for two warning signs. The first is color change, any blueing means you’ve destroyed the temper locally. The second is the formation of a large, ragged burr. A small burr is expected; a thick, wire-like one means you’re using too much pressure.
Once a slight burr forms along the entire edge, stop grinding. Remove the burr by stropping the knife on a piece of soft wood or leather. The final edge will be toothy and aggressive, suitable for rough work, not for slicing tomatoes. For that, you must follow up with progressive honing stones.
Troubleshooting Common Results
You’ve followed the steps, but the outcome isn’t right. Here’s what probably happened.
Problem: The tool edge turned blue or purple.
Cause: Overheating. You held it in one spot too long or used excessive pressure. Fix: Dip the tool in water constantly to prevent overheating. If the damage is done, you must grind past the discolored metal to reach good steel again.
Problem: The edge has a large, flexible burr (wire edge).
Cause: Too much pressure or a wheel that’s too fine/glazed. The metal deforms instead of being cleanly cut. Fix: Use a sharp, properly dressed wheel and lighter pressure. Remove the existing burr by gently drawing the tool’s edge across a piece of soft wood or the corner of the tool rest.
Problem: The bevel is rounded, not flat.
Cause: The tool rest was too far from the wheel (beyond 1/16 inch), allowing the tool to rock during grinding. Fix: Reset the tool rest gap. You will need to regrind the bevel to flatten it.
Problem: The wheel seems to burn the steel instantly, even with a light touch.
Cause: A loaded, glazed, or dull wheel. It’s rubbing, not cutting. Fix: Dress the wheel. A sharp wheel cuts with a hissing sound; a dull one rumbles and sparks excessively.
Problem: The grinder vibrates badly.
Cause: An out-of-round wheel, unbalanced wheel, or poor mounting. Fix: Unplug the grinder. Check that the wheel is mounted correctly with flanges and that the wheel itself is not cracked. Dress the wheel to true it. Ensure the grinder is bolted to a solid surface.
When to Use a Bench Grinder (And When Not To)
A bench grinder is a specialized tool. It excels at jobs that require fast metal removal. It fails at jobs requiring precision or fine finishes.
Use a bench grinder for:
- Reshaping badly damaged or nicked edges (chisels, plane irons, lawn mower blades).
- Rough-sharpening drill bits (the primary method covered here).
- Grinding lathe tools to basic shapes (following Sherline’s 7–10 degree guidelines).
- Removing large amounts of material quickly, like re-profiling a tool.
Do NOT use a bench grinder for:
- Final sharpening of any edge. It’s a coarse preparation tool.
- Sharpening expensive kitchen knives or straight razors. The risk of overheating and ruining the temper is too high.
- Working with carbide-tipped tools. You need a dedicated diamond wheel.
- Any grinding on the side of the wheel. This can crack the wheel. It’s explicitly warned against in the JET and Northern Tool manuals.
For the other half of the grinder conversation, understanding the difference between a bench grinder and an angle grinder is crucial. They are different tools for different purposes.
What to look for in a bench grinder
Focus on features that enable control and safety. A variable speed model, like the Harbor Freight unit with a 2000-3400 RPM range, allows you to match speed to the tool steel. Look for a grinder with adjustable tool rests; proper setup keeps them within 1/16″ of the wheel. A wheel dresser is a necessity, so factor that into your purchase. Sherline suggests trying to find grinding wheels from an industrial supplier, with sixty grit as a good starting point. Ensure the machine has functional spark guards and a solid base for secure mounting.
Frequently Asked Questions
Can you sharpen any tool on a bench grinder?
No. Bench grinders are for tools made of high-speed steel (HSS) or similar tool steels. They are not for carbide, ceramic, or very thin, fine-edged tools like scalpels. Always check the tool material and its maximum tempering temperature before grinding.
What is the best wheel grit for general tool sharpening?
60-grit aluminum oxide wheel is the best starting point for general workshop sharpening, as recommended by Sherline. It removes material quickly without excessive heat.
How do I know when my grinding wheel needs dressing?
You’ll hear and feel it. A sharp wheel cuts with a smooth hissing sound and light pressure. A dull, loaded wheel requires more pressure, creates a rapping or chattering sound, and immediately overheats the steel, turning it blue.
Is it safe to use the side of the grinding wheel?
Absolutely not. Every manufacturer manual (JET, Northern Tool) explicitly warns against side grinding. It puts dangerous lateral stress on the wheel, which can cause cracking and catastrophic failure. Always grind on the wheel’s peripheral face.
Why does my sharpened tool not cut well even after grinding?
You likely stopped at the grinder. The bench grinder leaves a coarse, microscopically serrated edge with a burr. For a tool to cut well, you must remove that burr and polish the edge on a honing stone or strop. The grinder does the heavy lifting; the stone does the finishing.
Before You Go
One rule applies to all the technique: if you can’t hold your finger on the tool’s edge within two seconds of pulling it from the wheel, you’re going too fast. Heat is the enemy, and patience is the only guard against it.
Your first step this week shouldn’t be to sharpen a tool. It should be to unplug your grinder, check that tool rest gap with a 1/16-inch drill bit shank, and dress your wheel if you’ve never done it. A poorly set-up grinder teaches bad habits and ruins tools. A well-set-up one becomes the fastest, most reliable way to get back to work.
Most of the advice here comes straight from the people who build and certify these tools, the JET, Sherline, and Craftsman manuals. That’s the advantage over a forum summary. Those specs, like the 1/16-inch rest gap or the 7-degree support angle, are tested margins that keep the process safe and effective. Stick to them, and you’ll find that bench grinder use becomes a predictable skill, not a guessing game.
