
How to Strip Paint With a Heat Gun: The Core Technique
This post contains affiliate links. As an Amazon Associate, we earn from qualifying purchases.
To strip paint with a heat gun, you heat the surface until the paint softens and bubbles, then immediately scrape it away. The critical variables are temperature setting (always start low), maintaining a steady, sweeping motion with the gun, and scraping just behind the heat stream. Never linger in one spot—scorching the wood or creating toxic fumes can happen quickly.
That “scrape just behind” timing is where most DIYers fail first. They heat, then reach for the scraper, then the paint has already cooled and hardened again. The job becomes a fight. This is why it’s crucial to understand how to strip paint with a heat gun correctly.
What follows is the rhythm that makes it work when you compare a how to strip paint with a heat gun: the specific safety gear you cannot skip, the exact temperature settings from four major manufacturer manuals (they disagree, and that matters), and the fix for when the paint stubbornly refuses to lift. By the end, you’ll know whether your project is a candidate for heat or if you need to reach for a chemical stripper.
Key Takeaways
- Start on the lowest temperature setting—manufacturers like Steinel specify a “LOW” setting (around dial 3) for paint to avoid scorching wood and generating excessive fumes.
- Lead-based paint requires professional removal. Every manual reviewed states LEAD-BASED PAINT SHOULD NOT BE REMOVED WITH A HEAT GUN due to the risk of creating inhalable toxic dust and vapors.
- Keep the heat gun moving constantly in a back-and-forth motion. Pausing to scrape or look closer can ignite hidden materials in walls or ceilings within seconds.
- Use a soft wire brush for intricate surfaces like moulding or carved details, as recommended in the Lowe’s and HomeRight manuals—a scraper will gouge the wood.
- Dispose of waste properly by wet-mopping debris into double plastic bags, per Harbor Freight’s guidelines. Never dry sweep or vacuum lead-contaminated dust.
The Non-Negotiable Safety Kit
You cannot start without this. A heat gun isn’t a hair dryer; it produces a focused stream of air that can reach up to 1200°F on some models, like the Harbor Freight 57988, while others have lower maximums. The manuals are unanimous on the hazards, and your gear list is short but absolute.
First, respiratory protection. If the paint is old, it may contain lead. The Harbor Freight manual is brutally clear: “DISPOSABLE PAPER MASKS ARE NOT ADEQUATE.” You need a dual-filter (dust and fume) respirator mask approved by OSHA or NIOSH. Beard? It breaks the seal. Get a hood or accept that you’re not protected.
Before you start: The metal nozzle requires approximately 20 minutes to cool to where it can be touched (per the Steinel HL1800E manual). Set the gun on a level, non-flammable surface, nozzle pointing up, after use. A fully charged fire extinguisher must be within reach. The heat can ignite flammables hidden inside walls, and that fire won’t be visible until it’s too late.
Leather gloves protect from accidental contact with the nozzle or hot scrapings. Safety glasses stop a popped paint chip from hitting an eye. Wear long sleeves of natural fiber—synthetics can melt. Finally, set up your work area. Move the piece outdoors if possible. If indoors, seal the room with plastic sheeting, open windows, and use a fan exhausting out. Cover everything with drop cloths you can bag and discard.
Decoding Your Heat Gun’s Settings
Not all heat guns are the same, and the manuals prove it. If you just turn a dial to “High,” you’re gambling with the material underneath.
| Model | Wattage | Advertised Temperature Range | Recommended Setting for Paint |
|---|---|---|---|
| Lowe’s Digital Temperature | 1500 Watts | 120°F – 1020°F | Not specified (start low) |
| Steinel HL1800E | 1500W | 212°F to 1100°F | LOW (approx. Dial setting 3) |
| Harbor Freight (57988) | 1700W | 120°F – 1200°F | Not specified (start low) |
| HomeRight LED | 1500 Watts | 0°F – 1022°F | “Low” for paint/varnish |
The Steinel and HomeRight manuals are the only ones that give a concrete instruction for the how to strip paint with a heat gun question: use the Low setting. Why? Higher heat doesn’t strip paint faster; it burns it. Burning paint creates thicker, more toxic fumes and risks scorching the wood substrate, which stains it black. The goal is to soften, not incinerate.
The “temperature range” listed on the box is almost useless for this task. What matters is the air temperature at the workpiece, which changes with distance, nozzle, and ambient air. Start low. If the paint isn’t softening after a few seconds in one spot, inch the gun slightly closer or nudge the dial up one notch. Never start high.
The Core Technique: Heat, Scrape, Move
This is the physical rhythm that separates a clean strip from a disaster. It’s a one-two punch between your hands.
- Position the gun. Hold it at a shallow angle, close to the surface, nozzle pointing in the direction you’ll move. Don’t point it straight down.
- Begin a slow, steady sweep. Move the gun back and forth over a small section. You’re looking for the paint to blister and shine with moisture.
- Scrape immediately, right behind the heat. As the paint bubbles, your other hand should already be following with a wide putty knife or a dedicated paint scraper. Scrape in the direction of your sweep, staying just outside the direct hot air stream. If you wait, the paint cools and re-adheres.
- Keep both hands moving. The gun never stops its sweep, even while you’re scraping. It’s a dance: heat, scrape a stroke, heat the next patch, scrape that. The moment you pause the gun to focus on scraping is the moment you overheat the substrate.
The best method to remove paint is to move the Heat Gun slowly and steadily forward at an angle to the surface, pointing the nozzle in the direction of motion. This allows you to scrape safely outside the hot air stream and keeps the scraper and the scraped surface cooler. — Lowe’s Digital Temperature Heat Gun Manual
For layers of paint, heat a larger area more thoroughly to soften all the layers at once. A common mistake is skimming the top layer off, then having to go back over the same spot for the bottom layer. You waste time and overheat the wood.
Troubleshooting: When the Paint Won’t Cooperate
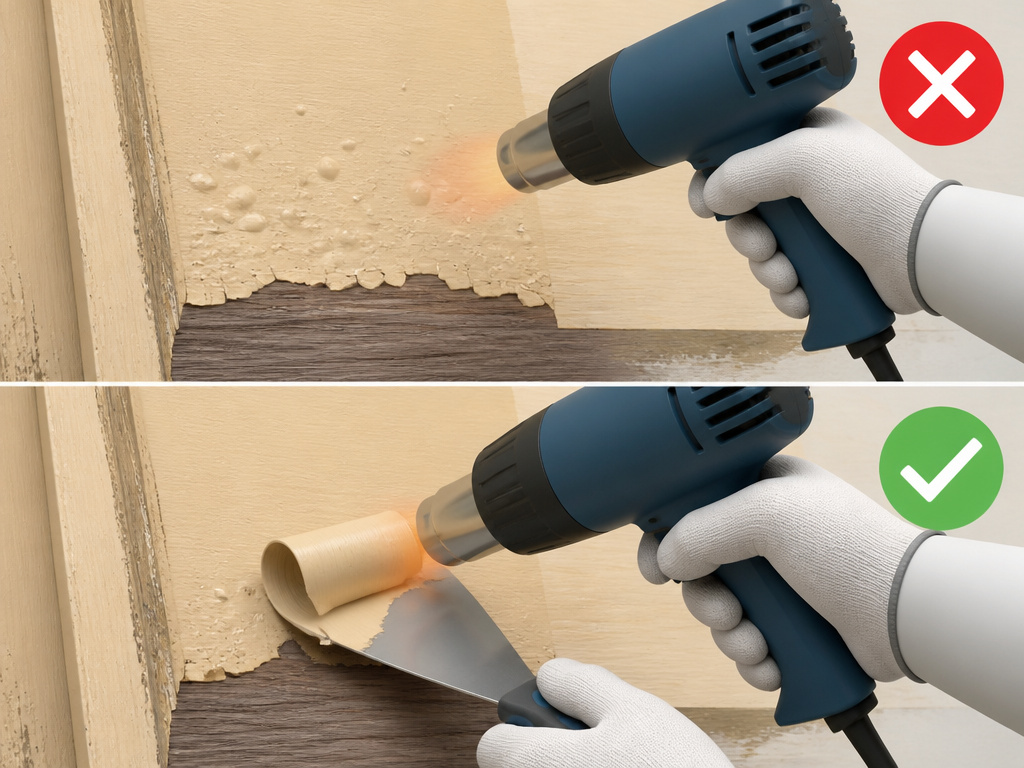
Sometimes, you do everything by the book and the paint just sits there, laughing at you. Don’t crank the heat to “Inferno.” Diagnose first.
Problem: Paint bubbles, then hardens again before I can scrape.
Cause: You’re too far away or on too low a setting. The surface layer softens, but the heat isn’t penetrating to the bond layer.
Fix: Move the gun half an inch closer. Keep the same slow motion. If that doesn’t work after 30 seconds, increase the temperature one incremental step.
Problem: Paint turns gummy or rubbery, smearing instead of scraping.
Cause: This is common with certain synthetic paints or varnishes. The heat is melting the binder, not breaking the bond.
Fix: Switch to a chemical stripper for that specific paint type. Heat guns have a hard limit here. According to both the Lowe’s and HomeRight manuals, mineral paints and finishes, such as cement paint and porcelain, do not soften and cannot be removed with a heat gun.
Problem: I’m leaving deep gouges in the wood with my scraper.
Cause: Dull scraper or too much force. You’re using the scraper like a chisel.
Fix: Sharpen your scraper blade or use a fresh one. Let the heat do the work. The scraper should glide under the paint with minimal pressure. For detailed moulding, ditch the scraper. The manual suggests a soft wire brush may be the best tool for very intricate surfaces.
If you hit a wall, stop. Forcing a heat gun to do a job it’s not suited for is how fires start and projects get ruined. Our guide to heat gun alternatives for DIY projects walks through the other options.
Surface-Specific Strategies
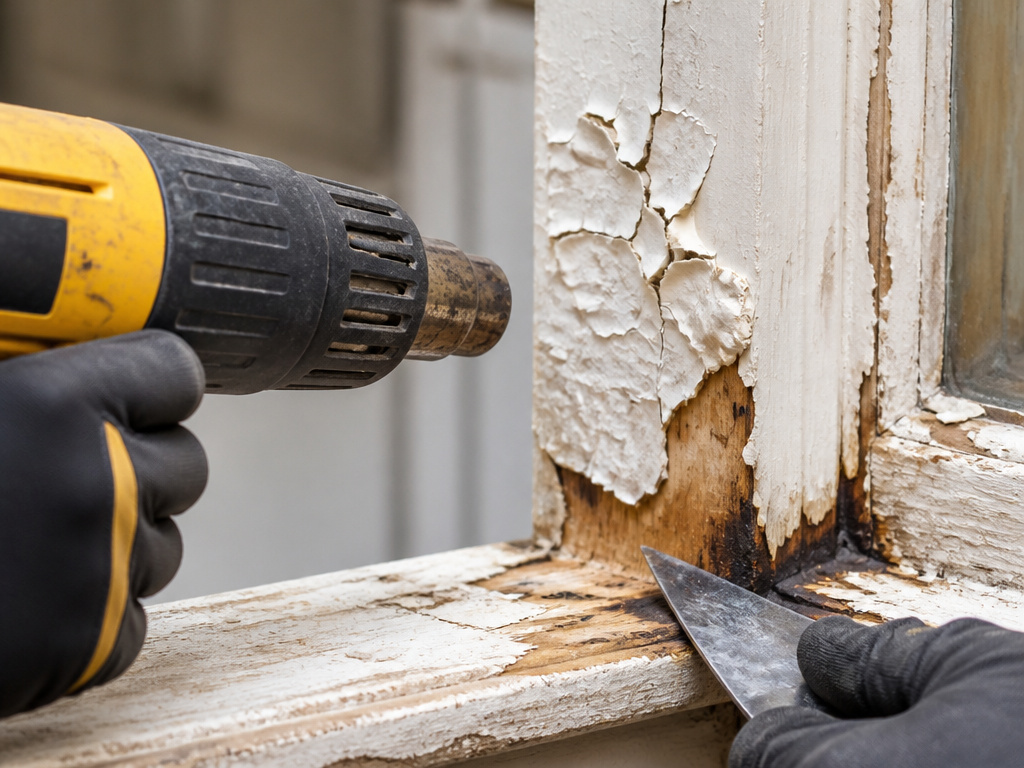
Wood and metal are the primary candidates, but they behave differently under heat. Your technique needs to adapt.
On Wood: Wood is an insulator. It takes time for heat to penetrate the paint layer and reach the wood glue bond. Be patient with the initial warm-up. The major risk is scorching. If you see the wood darkening to a brown or black color, you’re too hot, too close, or too slow. Back off immediately. Sanding out a scorch mark is a deep, tedious job.
On Metal: Metal conducts heat rapidly. This is good and bad. It heats up fast, so paint may bubble quicker. However, the heat also dissipates quickly, so you need to maintain a tighter, more consistent pattern to keep the area hot. Metal doesn’t scorch, but you can overheat it enough to warp thin sheet metal. Keep the gun moving.
Brick and concrete are generally poor candidates. They’re porous and hold moisture, which turns to steam under heat and can cause the surface to spall or pop. The sheer mass also soaks up heat, making the process incredibly inefficient.
The Critical Cleanup & Disposal Protocol
The job isn’t done when the paint is off. The waste is toxic, especially if lead is suspected. The Harbor Freight manual provides the definitive, step-by-step guide that most DIY articles gloss over.
- Wet-clean everything. DO NOT SWEEP, DRY DUST, OR VACUUM. This aerosolizes fine lead dust. Wet-mop the floor. Wipe all surfaces with a wet cloth.
- Use TSP. Wash and mop with a high-phosphate detergent or trisodium phosphate (TSP) to neutralize and capture residues.
- Double-bag waste. Place all paint chips, used drop cloths, and cleaning rags into a heavy-duty plastic bag. Seal it, then place that bag into a second bag. Seal again with tape.
- Dispose as hazardous waste. Contact your local waste authority for instructions on disposing of lead-contaminated debris. Do not put it in your regular trash.
This process is essential for protecting your household. It’s the difference between a successful renovation and contaminating your living space.
Heat Gun vs. Chemical Stripper: Picking Your Tool
This isn’t just a preference; it’s a match-to-material decision. A quick comparison shows where each tool wins and fails.
| Factor | Heat Gun | Chemical Stripper |
|---|---|---|
| Speed | Fast on flat, simple surfaces. | Slow, requires dwell time. |
| Toxicity | Risk from fumes & lead dust. | Risk from chemical fumes and skin contact. |
| Mess | Dry chips and dust. | Wet, gooey sludge. |
| Detail Work | Poor for intricate carvings. | Excellent; gels cling to details. |
| Substrate Risk | High (scorching, fire). | Low (but can raise wood grain). |
| Cost per Project | Low (electricity). | High (product cost). |
Choose a heat gun when: You have large, flat areas of wood or metal, you have good ventilation, you are confident the paint is lead-free, and you want no chemical residue.
Choose a chemical stripper when: You have detailed furniture, curved surfaces, suspect lead paint (some gels encapsulate it better), or are working indoors with limited ventilation.
For many, the final touch after stripping is smoothing the surface. That’s where knowing the right grit sandpaper to remove paint becomes essential, or for larger jobs, selecting from the best sanders for removing paint.
Frequently Asked Questions
Can you use a heat gun to strip paint indoors?
You can, but it’s the last-choice option. It requires extreme precautions: sealing off the room with plastic, using a window fan to create negative pressure (exhausting air out), wearing a respirator, and having a fire extinguisher ready. Outdoors is always safer.
What is the quickest way to strip paint?
For large, simple surfaces like a flat door or siding, a heat gun with a wide nozzle, used with the proper rhythm, is often faster than applying, waiting, and scraping chemical stripper. For all-around speed on unknown paint, a professional-grade heat gun with adjustable temperature is the most controllable tool.
What is better for stripping paint, a heat gun or chemical paint remover?
Neither is universally better. A heat gun is a physical, heat-based tool great for speed on suitable surfaces. Chemical remover is a chemical reaction that works on almost any paint, including lead-based, when used with appropriate safety gear. Your project’s surface, paint type, and workspace decide.
Can a hair dryer work instead of a heat gun?
No. A hair dryer maxes out around 140°F. A heat gun’s temperature range varies by model, with some starting as low as 120°F or 0°F and going up to 1200°F. A hair dryer lacks the focused airflow and intensity to break the bond between paint and wood. It will only warm the surface. For a detailed look at the differences, see our breakdown of the heat gun vs hair dryer comparison.
Before You Go
The one rule that overrides all others: if your house was built before 1978, assume the paint contains lead until proven otherwise. Test kits are available at hardware stores. A positive test means you stop. LEAD-BASED PAINT SHOULD ONLY BE REMOVED BY A PROFESSIONAL. This isn’t scare talk; it’s the direct, capitalized warning from the Steinel HL1800E heat gun manual and every other manufacturer’s guide.
For everything else, success hinges on low heat, constant motion, and respecting the tool’s power. Start on a small, inconspicuous area to find your rhythm. Once you feel that paint release with a soft scraping sound, you’ve got it. The rest is just patience and keeping your scraper sharp.
