
How to Tension a Band Saw Blade: Step-by-Step
This post contains affiliate links. As an Amazon Associate, we earn from qualifying purchases.
To tension a band saw blade correctly, you must match the blade to the saw and apply enough tension to stop sideways flutter, then add a slight extra turn for rigidity. Use the flutter method (tension until vibration stops, then add 1/8 to 1/4 turn) or the deflection method (push the blade to achieve a specific sideways movement). The exact deflection target varies by manufacturer, some say 1/4 inch, others specify 0.004 inches. For most 14-inch woodworking saws, the flutter method is the most reliable starting point for how to tension a band saw blade.
That 0.004-inch spec from Baileigh is the first clue that this isn’t one-size-fits-all. A thousandth of an inch is a measurement for a dial indicator, not your thumb. That discrepancy between manuals is where most guides stop, leaving you to guess the specifics of how to tension a band saw blade. The real job is finding the sweet spot on your specific saw where the blade is tight enough to track straight but not so tight it fatigues the steel or strains the saw’s frame.
What follows: a breakdown of the two core tensioning methods, the numbers from the manuals that disagree, a diagnostic chart for cuts that go wrong, and the one habit, releasing tension, that adds years to your blade’s life.
Key Takeaways
- The flutter method with an additional 1/8 to 1/4 turn is specified by South Bend Tools, while JET recommends a different method for high tension (an additional 1-3/4 to 2 turns after removing sag).
- Manufacturer deflection specs vary wildly, from 1/4 inch (WEN, South Bend) to 0.004 inches (Baileigh), know which method your manual recommends.
- A built-in tension scale is for reference only; blade length variations make it inaccurate for final tension setting.
- Release blade tension after every use if your saw has a quick-release lever to prevent unnecessary stretching and component wear.
- Incorrect tension shows up as wandering cuts, premature blade dulling, or a blade that twists and breaks.
The Two Core Tensioning Methods
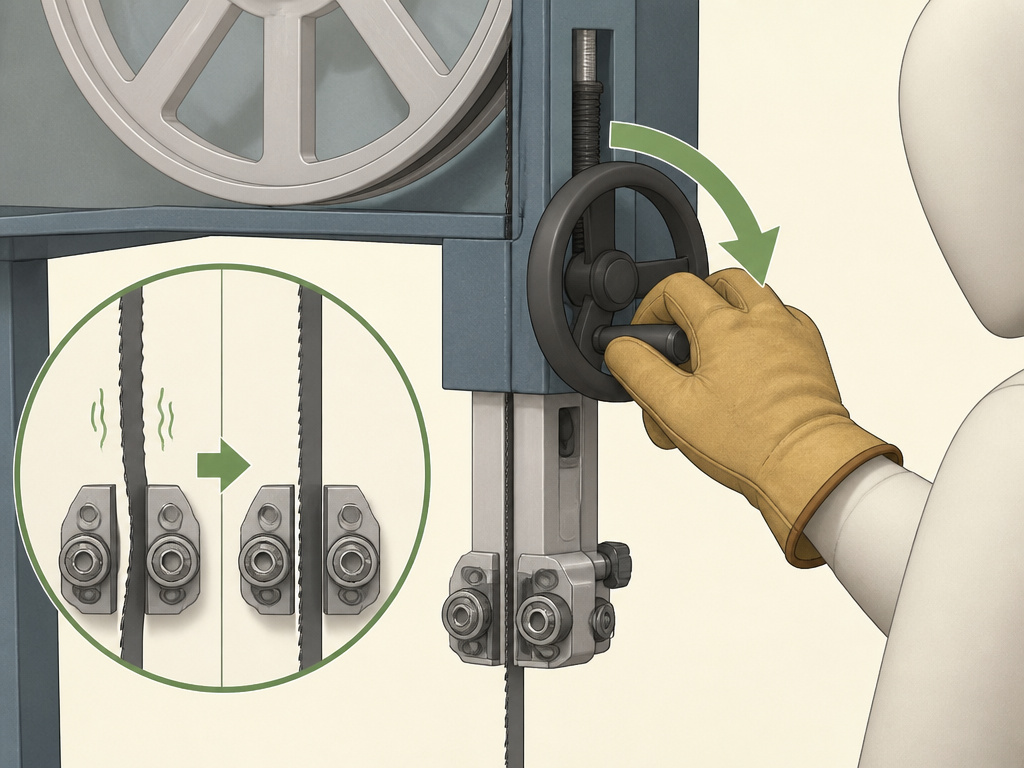
You have two proven paths to set tension without a dedicated gauge: the flutter method and the deflection method. The flutter method uses the blade’s own vibration as a guide, while the deflection method relies on measuring sideways movement. Most owner’s manuals present one or the other, but understanding both allows you to cross-check your work.
The goal is the same for both: apply enough tensile force to the blade so it acts like a rigid, straight cutting tool between the guides, a core principle of how to tension a band saw blade, but not so much that you overstress the weld or the saw’s frame.
The Flutter Method (The Vibration Guide)
This is the method I reach for first on any saw. It’s dynamic, using the blade’s own behavior under power as the indicator.
Here’s the step-by-step, drawn directly from the South Bend Tools manual:
- DISCONNECT THE SAW FROM POWER. Move the upper and lower blade guides completely away from the blade, and raise the upper guide assembly as high as it will go.
- Apply partial tension just to keep the blade seated on the wheels.
- Reconnect power and turn the saw on.
- Slowly increase tension using the tensioning handwheel or knob while watching the blade between the guides. You will see a visible sideways vibration or “flutter.”
- Continue tightening until that flutter completely stops.
- Once the blade runs smooth, give the tension knob an additional 1/8 to 1/4 of a turn clockwise. This is the critical step that adds working tension.
- Turn the saw off, disconnect power, and reset your blade guides to their proper position (about the thickness of a dollar bill from the blade).
Where this goes sideways: Stopping at the exact moment the flutter disappears. That only removes slack; the extra quarter-turn is what provides the stiffness needed for a straight cut under load. Skip it, and your blade will wander in thicker stock.
The sound changes, too. A blade with slack has a low, wobbly hum. At the flutter point, it’s a higher, unstable buzz. When you add that final fraction of a turn, the pitch settles into a clean, steady whir. That’s the sound you want.
The Deflection Method (The Push Test)
The deflection method is a static test. You push the blade sideways with your finger and measure how far it moves. The problem? The manuals don’t agree on how far it should move.
| Manufacturer | Deflection Spec | Notes |
|---|---|---|
| WEN | Approximately 1/4 inch | For a general-purpose, moderate-pressure push. |
| South Bend Tools | Approximately 1/4 inch | Calls this “properly tensioned.” |
| Baileigh Industrial | Approximately 0.004 inch | Measured with finger pressure; notes a gauge is needed for precision. |
That’s not a minor discrepancy. A quarter-inch is something you can easily see and estimate. Four thousandths of an inch is virtually imperceptible, it’s the thickness of a piece of printer paper. The Baileigh method is essentially saying “tension it until it barely moves at all,” which aligns more with a high-tension setup for metal or heavy resawing.
For a woodworking bandsaw, the 1/4-inch guideline is the practical one. Adjust tension until you can push the blade sideways (midway between the guides) about a quarter of an inch with moderate thumb pressure. The blade should spring back directly to center. If it feels mushy and doesn’t return, it’s too loose. If you can’t budge it, it’s too tight.
When to Trust (and Ignore) Your Saw’s Tension Scale
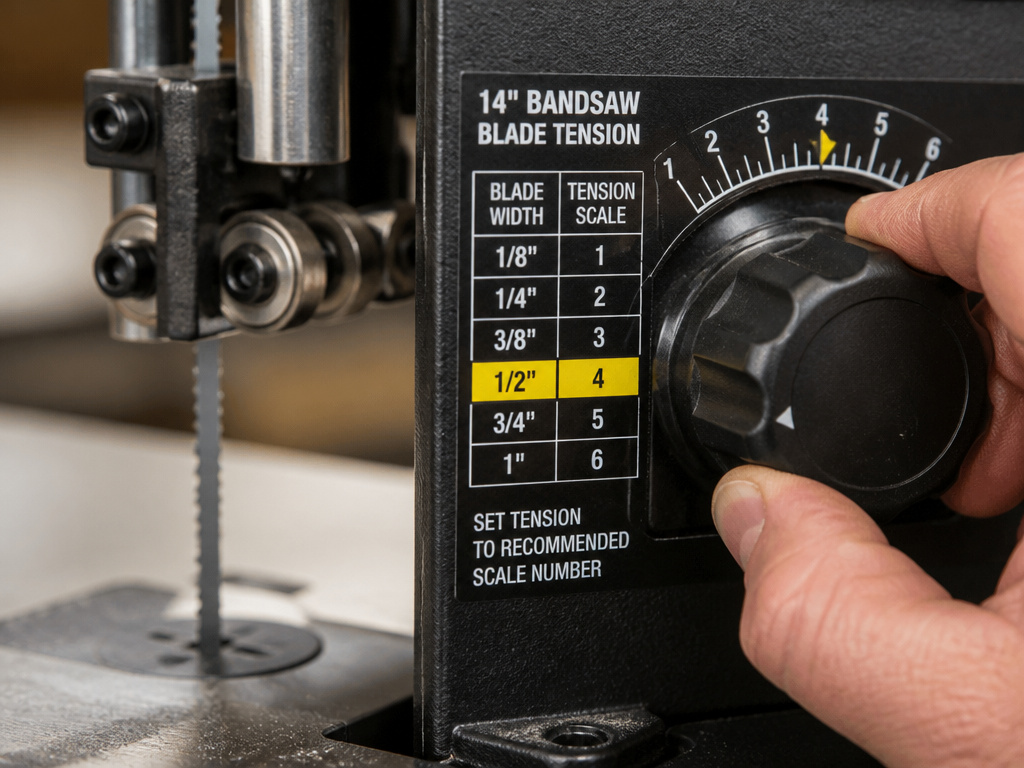
Most bandsaws, especially 14-inch models, have a numbered tension scale next to the adjustment knob, often correlated to blade width. The South Bend Tools manual is blunt about it: this scale displays numbers 0-38 “for reference purposes only, after you have found the proper tension for the blade installed.”
Here’s why it’s untrustworthy. The scale assumes every blade of a given width has the exact same length and metallurgy. If your 93-1/2 inch blade is even 1/8 inch longer or shorter than the saw’s ideal, the scale reading is meaningless. Use the scale to get you into the right ballpark, a 1/2-inch blade setting for a 1/2-inch blade, then fine-tune using the flutter or deflection method. The scale is a starting point, not a finish line.
How a Tension Gauge Gives You the Real Number
For repeatable, precise tension, especially on industrial saws or for critical resawing, a blade tension gauge is the only tool that removes the guesswork. The JET manual references a “Dynametric Tension Band” setting, and Baileigh explicitly states a gauge is needed for more precise measurement.
A blade tension gauge clamps onto the blade, typically between the upper guide and the wheel. As you increase tension, the gauge measures the force in pounds per square inch (PSI) or kilograms. The JET manual specifies a “High Tension” range of about 2,300 PSI.
Using one is straightforward but methodical. First, back off all guides. Clamp the gauge onto the blade, ensuring it’s square and not touching anything. Zero the gauge. Slowly increase tension while watching the readout. For precise tension, consult your blade manufacturer’s recommendation or use a gauge to achieve the desired setting. The gauge allows you to set the same precise tension every time you change the blade, which is crucial for consistency in a production shop.
Diagnosing Tension Problems During a Cut
Tension isn’t a set-and-forget abstraction. It reveals itself in the quality of your cut. If you’re having issues, this table helps isolate tension as the likely culprit.
| Symptom | Possible Cause | Quick Fix |
|---|---|---|
| Blade wanders, cuts curves | Insufficient tension for the cut (especially in thick stock). | Increase tension slightly (1/8-turn increments) and test. |
| Cut has a rough, torn surface | Dull blade or too much feed pressure. Could also be low tension allowing vibration. | First, check if you have a dull blade. If blade is sharp, increase tension. |
| Premature blade dulling | Insufficient tension (per JET manual). The blade flexes, wearing teeth unevenly. | Increase tension to proper setting. Ensure you’re using the right blade for the material. |
| Blade twists or breaks suddenly | Too much tension, causing metal fatigue, or side pressure during a cut. | Decrease tension immediately. Review proper band saw technique to avoid forcing the workpiece. |
| Excessive vibration & noise | Improper tracking or severely incorrect tension. | Check tracking first. If tracking is good, re-set tension from scratch using the flutter method. |
Vibration is the most common giveaway. A well-tensioned saw has a smooth, resonant hum. If you feel a buzzy chatter in the table or hear a rhythmic slapping sound, tension is almost always involved. Before you adjust it, however, make sure your blade is tracking correctly on the wheel crowns, a mistracked blade can’t be properly tensioned.
Special Cases: Resawing, Metal Cutting, and Blade Storage
The baseline tension you set for general work might not be ideal for every task. Your approach should change with the job.
Tensioning for Resawing: When performing a resawing operation, you need maximum blade stability. A wider blade (1/2-inch or 3/4-inch) is mandatory, and it needs to be at the higher end of its tension range. This is where a tension gauge pays for itself. The goal is to eliminate any chance of the blade bowing in the middle of a deep, thick cut. If you’re getting a bowed cut face, check your blade tension and alignment.
Metal-Cutting Bandsaws: The rules are different. The RIDGID manual is absolute: “NEVER use this band saw to cut metals.” Dedicated metal-cutting bandsaws, like the JET horizontal model cited, run at much higher tensions, like the 2,300 PSI spec. They also use a different, harder blade material. Never use a woodworking blade or wood saw tension for metal.
The Golden Rule: Release Tension After Use. This is the single most overlooked maintenance step. The South Bend Tools manual promotes its quick-release lever to “prevent unnecessary stretching of blade and wear on saw components when not in use.” Tension left on for weeks or months slowly stretches the blade, fatigues the spring or frame, and can flat-spot the rubber tires on the wheels. If you don’t have a quick-release, just back off the tension knob a dozen turns when you finish for the day. Your best band saw blades will last significantly longer.
Safety and Setup: The Non-Negotiables
Tensioning happens during setup, and setup demands a specific safety mindset. The steps are simple, but skipping them has consequences.
Before you start: Always disconnect the saw from power before any adjustment. Wear safety goggles complying with ANSI Z87.1 (or CSA Z94-3-M88 in Canada). For dusty operations, wear a dust mask along with safety goggles.
- Power Off & Unplugged: Every manual’s first step is in all caps for a reason. Your hands are near the wheels and blade.
- Open Guides: You cannot track or tension a blade with the guide blocks or bearings touching it. They must be fully retracted.
- Check Belt Tension (Monthly): The WEN manual notes belt tension should be checked at least every month, more often with daily use. A loose belt saps power and causes slippage; a belt with about 1/4 inch of deflection is properly tensioned. This ensures the motor effectively transmits power to the wheels, which affects how the blade behaves under load.
- Secure Electrical: The Baileigh manual recommends connecting the saw to a dedicated 15-amp circuit. This ensures consistent power, which matters for the motor’s ability to maintain speed under load, indirectly supporting consistent blade tension.
Once your tension is set and guides are adjusted, make a few test cuts in scrap wood. Listen and feel. A perfect cut should require minimal steering effort and leave a relatively smooth surface. If you have to fight the saw to keep a straight line, revisit your tension. It’s the foundation of every other adjustment.
How Do I Adjust Blade Tension for Resawing?
Resawing and other demanding cuts require higher tension to prevent blade deflection and ensure straight cuts. Inadequate tension is a common cause of crooked cuts and can lead to premature blade dulling. For these tasks, aim for the higher end of your saw’s safe tension range. You can use the flutter method: slowly increase tension while the blade spins until the side-to-side flutter stops, then give the adjustment knob an additional small fraction of a turn. Be cautious, as too much tension can cause the blade to twist or damage saw components. Always release tension using the quick-release lever when the saw is not in use to prevent unnecessary stretching and wear.
Frequently Asked Questions
How tight should a bandsaw blade be?
It should be tight enough that all sideways flutter disappears when running, plus an additional 1/8 to 1/4 turn. Using the deflection method, a common spec is about 1/4 inch of sideways movement with moderate finger pressure. The blade must feel rigid but not immovable.
Why is my bandsaw blade wiggling back and forth?
This is “flutter,” the primary indicator of insufficient tension. With the saw off and unplugged, retract the blade guides, then turn the saw on and slowly increase tension until the wiggling stops completely. Then add a slight extra turn. Also, ensure the blade is tracking correctly on the center of the wheel crowns.
Should you release tension on a bandsaw blade when not in use?
Yes, absolutely. Releasing tension prevents the blade from stretching, reduces stress on the saw’s frame and spring, and prevents flat spots on the rubber tires. Use the quick-release lever if your saw has one, or back off the tension knob significantly.
Can over-tensioning break a blade?
Yes. The JET manual lists “too much blade tension” as a direct cause of the blade twisting. Excessive tension fatigues the metal, particularly at the weld, leading to sudden, dangerous breaks. More tension is not always better; find the sweet spot for your blade width and saw.
Before You Go
Tension is the linchpin. Get it wrong, and even the best band saw blades will perform poorly and die young. Start with the flutter method, it’s the most reliable for the widest range of saws. Remember that built-in gauge is a suggestion, not a command. If your cuts wander, nudge the tension up in tiny increments. If you hear a new vibration or the blade snaps, you’ve gone too far.
The one habit that pays off more than any other: release the tension when you’re done. It takes five seconds and it’s the cheapest form of preventive maintenance there is. It keeps your blade fresh for the next project and your saw ready for the next time you need to make a precise cut. That’s how you build a saw that lasts, and a shop that works.
