
How to Use a Power Trowel: Step-by-Step (With Safety)
This post contains affiliate links. As an Amazon Associate, we earn from qualifying purchases.
Using a power trowel requires matching three things: concrete readiness, blade pitch, and machine control. You start floating when the slab supports your weight without sinking (about a 1/4-inch footprint), begin with low blade pitch, and increase it for successive finishing passes. Never operate without disconnecting the spark-plug wire for maintenance, and always wear safety glasses and hearing protection.
That last point isn’t optional decoration. A power trowel’s guard ring spins hardened steel blades at 50 to 130 RPM, and the machine itself is heavy (e.g., the Marshalltown M4611 weighs 288 lbs). The difference between a flawless finish and a trip to the emergency room is a set of essential rules printed in every OEM manual, which detail how to use a power trowel.
What follows is the sequence the manuals agree on, the specs they don’t, and the field-tested moves that bridge the gap between the book and the slab and the precise instructions for how to use a power trowel. By the end, you’ll know the three concrete-readiness tests, the blade-pitch ranges that actually work, and the one maintenance check that prevents a $500 gearbox failure.
Key Takeaways
- Start floating only when the concrete passes the footprint test (a 1/4-inch deep print) to avoid gouging the slab.
- Adjust blade pitch from 5–10° for floating up to a steeper angle for finishing; excessive pitch wears blades out in hours.
- Disconnect the spark-plug wire before any blade or belt maintenance – it’s the first step in every OEM manual.
- Check gearbox oil level per your model’s spec: halfway up the sight glass (Flextool) or below the engraved line (Marshalltown).
- Overlap each pass by half the trowel’s width and use crossover finishing (90° to the previous pass) for the smoothest result.
Power Trowel Safety: The Non-Negotiables
The manuals are unanimous here. This isn’t about being careful; it’s about following printed procedures that exist because someone, somewhere, learned the hard way.
Before you touch the starter rope to learn how to use a power trowel, you need safety glasses and hearing protection. The Marshalltown manual states this explicitly. The machine throws fine concrete slurry and runs at noise levels that damage hearing over time. Next, scan for trip hazards like electrical cords or hose lines. A stumble while guiding a 250-pound machine is a disaster.
Before you start: The spinning guard ring will remove fingers. Never reach into it while the trowel is running. Never let go of the handlebars or walk away from the machine while it’s operating. Always operate on a level surface—avoid extreme inclines.
The single most important safety habit is locking out the engine before any hands-on work. The Toro manual is blunt: “Before performing any maintenance on the engine, belts, or blades, disconnect the spark-plug wire.” This isn’t a suggestion. It’s the step that prevents the engine from accidentally starting while you’re adjusting blade pitch or checking a belt.
Here’s a quick reference for the universal safety rules from the major brands:
| Safety Rule | Reason | Source |
|---|---|---|
| Disconnect spark-plug wire before maintenance | Prevents accidental engine start | Toro |
| Wear safety glasses & hearing protection | Protects from slurry and noise | Marshalltown |
| Never reach into guard ring while running | Eliminates amputation risk | Marshalltown |
| Never let go or walk away while running | Maintains positive control | Marshalltown |
| Wear gloves when changing blades | Blades are sharp enough to cut | Flextool |
When Is the Concrete Ready? The 3 Tests
Getting on the slab too early is the most common beginner mistake. You’ll gouge the surface, pull up aggregate, and create a repair job. Too late, and the blades will skate over hardened concrete, burning and glazing the surface without flattening it. The Menegotti manual warns: “NEVER use the trowel on surfaces that are already dry/cured.”
So how do you know? The concrete must be firm enough to support the machine’s weight without sinking, but still plastic enough for the blades to cut and smooth. Use these three field tests in combination.
- The Footprint Test. Step onto the slab in a clean area. Your boot should leave a footprint about 1/4 inch (6 mm) deep. If you sink in past your sole, wait. If you leave no impression, you might already be late for the initial float.
- The Thumb Test. Press your thumb into the surface. It should meet firm resistance but still depress slightly. If your thumb sinks easily, wait. If it doesn’t budge, move quickly.
- The Sheen Test. Watch for the water sheen to disappear from the surface. Once the bleed water has evaporated and the slab has a matte appearance, it’s usually ready for the first pass.
Ambient temperature dictates your timeline, which begins with properly mixing concrete. On a hot, dry day, your window for troweling will be shorter. On a cool, humid day, it could be hours. Check every 15 minutes after the bull float is done.
Machine Setup: Pre-Operation Checks
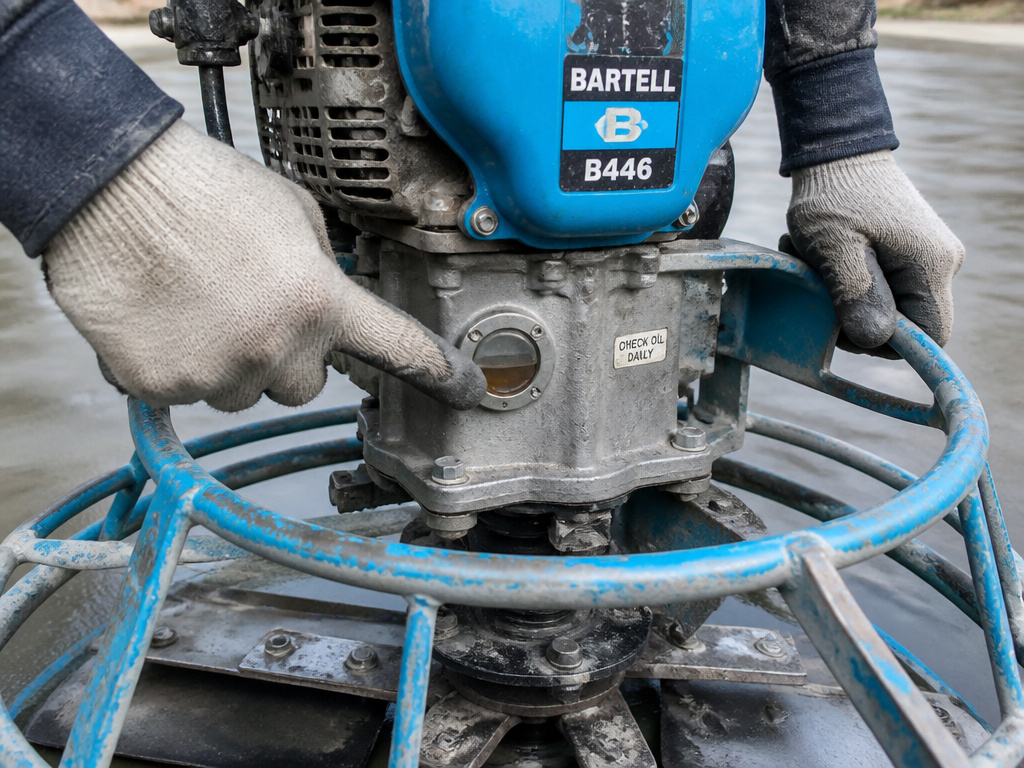
You don’t want to discover a problem when you’re 20 feet from the edge of the slab. This pre-operation checklist helps prevent common field failures.
- Fuel & Oil: Fill the fuel tank with fresh, unleaded gasoline (87 octane minimum, per the LD6 Trowel manual). Check the engine oil level on the dipstick.
- Gearbox Oil: This is critical. Check the sight glass. Here’s where manufacturers disagree, so you must know your machine:
- Flextool states the correct level is to the halfway point on the sight glass.
- Marshalltown says for serial numbers 9107 and higher, oil should be visible but below the engraved line. A low gearbox runs dry in minutes under load, destroying bearings. An overfilled one can foam and overheat.
- Blades: Inspect all blades for cracks, bends, or extreme wear. Inspect all blades for cracks, bends, or extreme wear and replace any that are damaged. Ensure they are securely fastened.
- Controls: Operate the throttle and blade pitch controls to ensure they move smoothly and return properly. Operate the throttle and blade pitch controls to ensure they move smoothly and return properly before starting.
- Guards: Verify all guard rings and panels are securely in place. Never operate with a guard removed.
The Step-by-Step Floating & Finishing Process
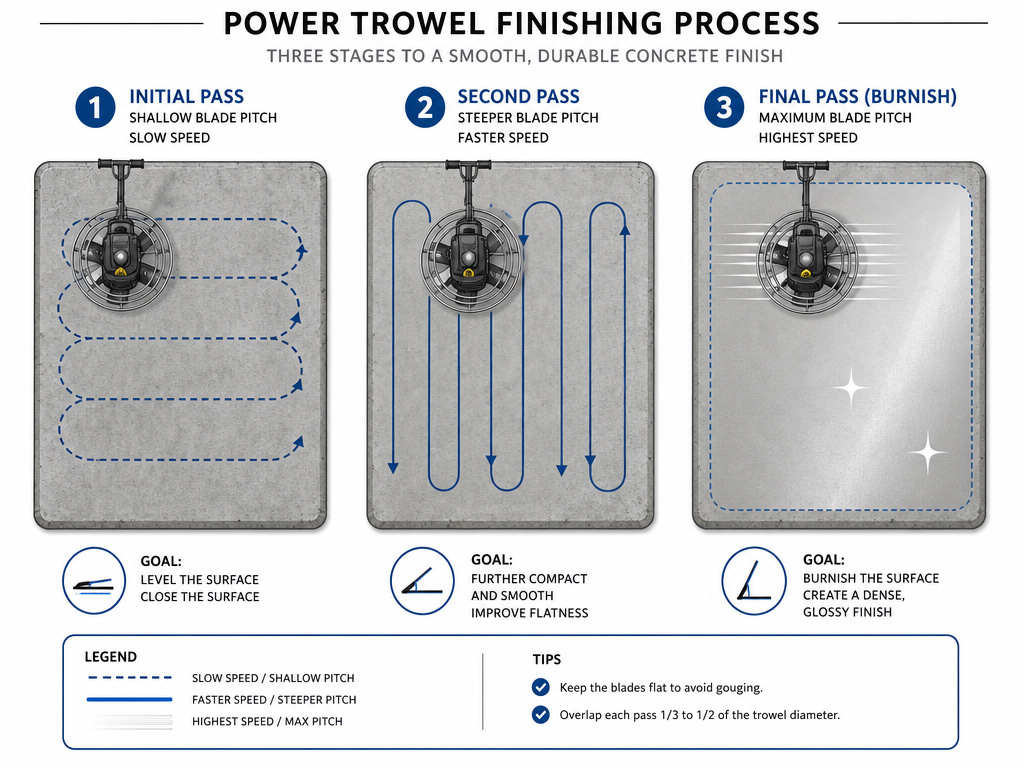
This is the core of the job. The goal is to progressively smooth the surface, driving aggregate down (which should have been settled using a concrete vibrator) and bringing a fine paste to the top, over a series of passes.
1. Starting the Machine & Initial Float
- Set the blade pitch to a low angle for the initial float. The Toro PT-36/46 manual specifies a blade pitch for finishing of approximately 6 to 9 mm (1/4 to 3/8 inches), or 5 to 10°. Start at the low end.
- Start the engine and let it warm up. Manuals disagree on time: Flextool says 1-2 minutes; Menegotti says 3-5 minutes. Err on the side of a fully warmed engine.
- Engage the clutch or move the throttle to begin blade rotation. For the initial “float” or “pan” pass, use a low to medium engine speed.
- Guide the machine onto the slab, walking backwards. Use a steady, side-to-side steering motion. Don’t force it; let the weight of the machine and the rotation of the blades do the work.
- Overlap each pass by half the trowel’s width, as instructed in the Flextool manual. This ensures complete coverage.
2. Progressive Finishing Passes
As the concrete stiffens, you’ll make several more passes, each with incremental adjustments.
- Increase Blade Pitch. After the first or second pass, slightly increase the blade angle. A greater pitch produces a smoother finish. The Flextool manual clarifies: “As a rule, the greater the blade pitch, the smoother the finish. However, excessive blade pitch will cause the blades to wear rapidly.”
- Increase Engine Speed. You can run the machine faster as the surface hardens. The Flextool manual states that during the final finishing passes, the trowel can be operated at maximum speed.
- Change Direction. For the best finish, employ crossover finishing. After a series of passes in one direction, make your next series at a 90-degree angle to the previous ones. This knocks down any ridges left by the blades.
3. The Final Burnish
For a hard, glossy finish, wait until the concrete is quite firm. Make a final pass with the blades at a steeper pitch (in the 6-10mm range noted by Menegotti) and at high speed. The blades should almost skate across the surface, creating heat through friction that densifies the top layer. This is the burnishing pass.
Troubleshooting Common Power Trowel Problems
Even with perfect timing, things can go sideways. Here’s how to diagnose and fix the most common issues.
| Problem | Likely Cause | Fix |
|---|---|---|
| Blades digging in, gouging slab | Concrete too soft / blade pitch too high. | Stop. Wait 15-30 minutes. Reduce blade pitch for next pass. |
| Blades skating, burning surface | Concrete too hard / blade pitch too low. | Increase blade pitch significantly. If no cutting occurs, you’re too late; hand-trowel edges only. |
| Uneven finish, ridges | Passes not overlapping enough / inconsistent speed. | Ensure 50% overlap. Maintain steady walking speed. Use crossover finishing. |
| Machine is hard to steer | Blade pitch is too aggressive for concrete state. | Reduce pitch. Let concrete stiffen slightly. |
| Excessive blade wear | Operating on very hard concrete or with excessive pitch. | Use proper pitch for the pass. Replace blades as a set when worn. |
Where this goes sideways: Trying to fix a digging blade by forcing the machine forward. This only gouges deeper. Stop, step back, and give the concrete more time. Patience is cheaper than a ripped-up slab.
Blade Types, Pitch, and Maintenance
Not all blades are the same. Float pans (large, flat discs) are for the initial pass to embed aggregate. Finishing blades (typically 3 or 4 per arm) are for the smoothing and burnishing passes. Always use blades matched to your machine’s model.
Blade pitch adjustment is your primary control for finish quality. It’s typically a lever or crank that changes the angle of the entire blade assembly relative to the concrete. A 5° pitch cuts gently; a 10° pitch cuts more aggressively and smooths finer.
After use, clean all concrete slurry from the blades, arms, and underside of the machine. Slurry hardens like rock. Lubricate the blade arm pivot points as per your manual—Lubricate the blade arm pivot points as per your machine’s manual.
Gearbox maintenance is mandatory. Perform gearbox oil changes according to your machine’s manual. Change the hydraulic filter according to your LD6 Trowel manual. This is the maintenance most often skipped, and it leads to the most expensive repairs.
Finishing Edges and Corners
The power trowel can’t reach within about 6-8 inches of a wall or obstruction. This border must be finished by hand using other essential concrete finishing tools.
Time your handwork to coincide with the machine’s final burnishing pass. The concrete should be at the same stiffness. Use a standard steel concrete trowel, keeping it as flat as possible to match the machine’s finish. A margin trowel is essential for tight inside corners. The goal is to blend the hand-finished edge with the machine-finished field so no line is visible. Any delay means you’ll be working against harder concrete, leaving a visible line.
Basic Operation Steps for Walk-Behind Trowels
Begin with a pre-operation check, including the gearbox oil level. Check your manual for the correct method; for example, Flextool states the level should be halfway up the sight glass, while Marshalltown (for serial numbers 9107 and higher) states it should be visible but below the engraved line. Start the engine and allow it to warm up. Set the blade pitch for finishing; a typical range is approximately 6 to 10mm. Begin moving the trowel across the concrete, ensuring each pass overlaps the previous pass by half the width of the trowel. For the final finishing passes, you can operate the trowel at maximum speed. A method called crossover finishing, operating at 90 degrees to the previous pass, is also recommended for best results.
Steering and Control Techniques
Steering a walk-behind power trowel requires constant, firm control. Never let go of the handles or walk away from the machine while it is running. The best method for finishing concrete is to slowly maneuver the trowel backwards, swiveling the blades from side to side. This technique helps achieve a smooth, uniform finish. Always maintain a secure grip and be prepared to guide the machine’s path. Avoid operating on extreme inclines, as this can lead to loss of control. Your focus should be on a steady, overlapping pattern to work the surface evenly.
Is a Power Trowel Necessary?
A power trowel is essential for achieving a professional, dense, and flat finish on medium to large concrete slabs. Hand troweling a large area is impractical and cannot match the efficiency or consistency of a powered machine. The rotating blades of a power trowel apply significant pressure to embed aggregate and close the surface, creating a durable finish that resists dusting and wear. For any project beyond a small patio or walkway, a power trowel is the standard tool. It saves immense labor and time while producing a superior result that meets commercial and industrial standards.
Frequently Asked Questions
How many passes does a power trowel need?
You’ll typically make 3-5 passes per direction, increasing blade pitch and often speed with each pass. The exact number depends on the concrete mix, weather, and desired finish. The final burnish is the last pass.
Can you use a power trowel on dry concrete?
No. The Menegotti manual is explicit: “NEVER use the trowel on surfaces that are already dry/cured, as this may damage the blades.” The blades need to cut into a plastic surface. On dry concrete, they just glaze and burn the top.
What’s the difference between a walk-behind and a ride-on trowel?
Walk-behind trowels (like the Toro PT-36 or Marshalltown M4611) are for smaller slabs, edges, and areas around obstacles. Ride-on trowels (like the LD6) are for large, open industrial floors and are vastly more efficient for big areas, but they require more skill to operate and can’t get as close to edges.
Do I need to wax power trowel blades?
Waxing blades (with a dedicated concrete blade wax or even silicone spray) is a common pro trick to reduce drag and prevent concrete from sticking, especially during the initial wet passes. It’s not in the manuals, but it works.
The Bottom Line
Using a power trowel is a dance between the concrete’s clock and your control of pitch and speed. The manuals give you the steps, but your eyes and hands execute them. Remember the two thresholds: if your footprint is deeper than 1/4 inch, wait. If the blades skate and burn, you’ve waited too long, and fixing the hardened surface may later require a concrete grinder.
For many residential slabs, a walk-behind power trowel is a common choice. Your success hinges on the pre-op checklist—especially that gearbox oil level. That one sight-glass check is cheaper than a new gearbox.
Finally, respect the machine’s perimeter. The hand-troweled edge is what people see up close. Blend it well, and the difference between the field and the edge disappears. That’s the mark of a job done right.
