
How to Use a Regenerative Blower for Pond Aeration
This post contains affiliate links. As an Amazon Associate, we earn from qualifying purchases.
To use a regenerative blower for pond aeration, you match three things: a low-pressure, high-volume blower sized for your pond’s depth and volume, a distribution pipe system with small-bubble diffusers, and a clean, dry installation site. The Global Seafood Alliance notes these blowers work best in ponds less than 3 meters deep, while an Aquascape 4-Outlet kit is rated for 9.2 feet (approx. 2.8 meters). Skipping the metal heat-dissipation pipe before your PVC will melt the fittings within a season.
That depth limit from the GSA, about 10 feet, is where the physics of low-pressure air meets reality. Go deeper, and the water pressure overcomes the blower’s push, starving your diffusers. This isn’t about buying the biggest unit; it’s about matching flow rate and pressure to your specific pond dimensions and fish load.
What follows: the step-by-step setup to avoid melted pipes and burnt-out motors, the real math behind sizing (not guesswork), and the maintenance that turns a decade of service from a promise into a reality. You’ll know how to read a spec sheet, when to upsize your pipe, and why a quiet, cool location matters more than any brand name.
Key Takeaways
- Regenerative blowers are low-pressure, high-volume aerators ideal for ponds shallower than 3 meters (10 feet), per the Global Seafood Alliance.
- Never connect PVC pipe directly to the blower outlet; install a metal heat-dissipation pipe first or the PVC will denature from the exhaust heat.
- Size your blower slightly larger than calculated and use a bleed valve to divert excess flow; restricting airflow is what overheats and kills the motor.
- Install the unit above flood level in a cool, dry, ventilated enclosure; moisture and heat are the two fastest ways to shorten a blower’s lifespan from a decade to a season.
- For every 300 meters (984 feet) of elevation above sea level, deduct 4% from the blower’s rated airflow and pressure.
How a Regenerative Blower Works (It’s Not Magic, It’s Impellers)
A regenerative blower is an air mover, not a compressor. An electric motor spins a multi-vane impeller inside a ring-shaped housing. Air gets scooped in, flung outward by centrifugal force, and then, here’s the trick, some of it slips past the impeller blade and gets caught by the next blade for another acceleration. This “regenerative” cycle happens dozens of times per revolution, building pressure in small steps.
The result is a continuous stream of oil-free air. Since the motor bearings are permanently sealed, there’s no lubricant to contaminate your pond water. The air exiting the outlet is exactly what entered the inlet, just moving faster. It’s this clean, high-volume, low-pressure delivery that makes it perfect for pushing air through a network of tubing to small-bubble diffusers at the bottom of a pond, which is central to how to use a regenerative blower for pond aeration.
You’ll find the principles are straightforward once you see them. For a deeper look at the mechanics, our article on regenerative blower mechanics breaks it down.
A regenerative blower draws air in using impeller blades. The air moves into a compression space between the impeller tips and housing walls. The rotating impeller moves the air radially outward by centrifugal force. Air slips past each blade and returns to the base of a succeeding blade for reacceleration, building pressure through multiple cycles before exiting at the outlet stripper opening.
The Regenerative Blower Advantage for Ponds
Why choose this over a piston pump or a roots blower? Three reasons: cleanliness, efficiency, and noise, or lack thereof.
Oil-free operation is essential for aquatic life. A regenerative blower delivers that inherently. They’re also energy-efficient for their airflow, often using totally enclosed fan-cooled (TEFC) motors rated for continuous duty. At about the level of a noisy restaurant, 75 decibels is far quieter than the deep-throated roar of a roots blower, which matters if your pond is near a house.
Their low-pressure design pairs perfectly with small-bubble diffusers, a key principle in how to use a regenerative blower for pond aeration. These diffusers maximize the surface area between air and water, boosting oxygen transfer as the bubbles rise. The University of Florida IFAS Extension calls out this combination as the core of a maintenance aeration system, which prevents low oxygen crises instead of just responding to them.
Sizing Your Blower: Flow, Pressure, and Depth
This is where most plans go wrong. Undersizing burns up the motor. Oversizing wastes money and electricity. You need two numbers from the spec sheet: flow rate (cfm or m³/hour) and pressure (psi or mbar).
First, depth determines your required pressure. Water pressure increases with depth; your blower’s pressure must overcome the pressure at the diffuser’s depth. To push air out of a diffuser at the bottom, your blower must overcome that. The Global Seafood Alliance states regenerative blowers have pressure capabilities up to about 10 psi (700 mbar), making them suitable for ponds less than 3 meters deep. An Aquascape 4-Outlet kit is rated for 9.2 feet.
Second, pond volume and fish load determine your required flow. Pond volume and fish load determine your required flow rate; heavily stocked ponds need more. This is where a dedicated blower sizing guide provides the calculation frameworks.
Two corrections most people forget:
- Altitude: For every 300 meters above sea level, deduct 4% from rated flow and pressure.
- Power Frequency: A unit running on 50 Hz power instead of 60 Hz will see about a 16% drop in both flow and pressure.
| Sizing Factor | What to Check | Consequence of Ignoring It |
|---|---|---|
| Pond Depth | Blower’s max pressure rating (e.g., 10 psi/700 mbar) | If depth > rating, diffusers get little to no air. |
| Required Flow | Total pond volume, fish stock density | Undersized flow won’t maintain oxygen levels. |
| Operating Altitude | Elevation above sea level (in meters) | |
| Electrical Supply | 50 Hz vs. 60 Hz power at your location | Using a 60Hz blower on 50Hz power cuts output by ~16%. |
Where this goes sideways: Buying a blower based on horsepower alone. A 1 HP regenerative blower moves vastly more air at lower pressure than a 1 HP piston pump. Compare the actual cfm and psi numbers on the spec sheet, not the motor label.
The 7-Step Installation Checklist (And the One Step Nobody Skips)
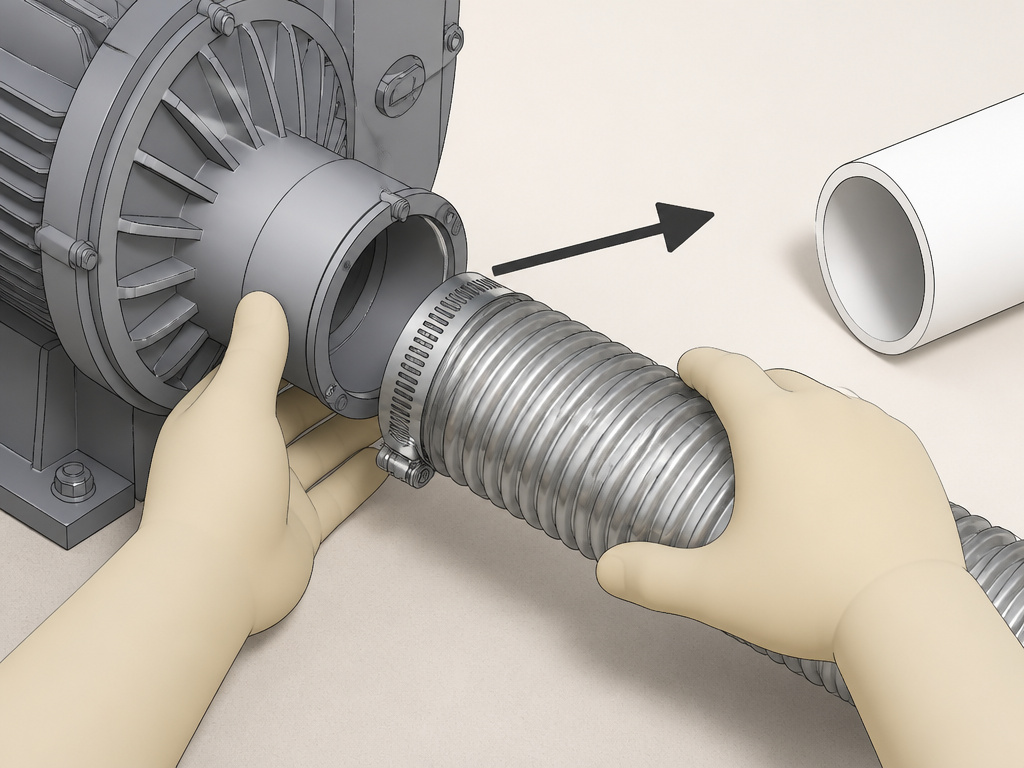
Installation is straightforward if you follow the order. The single most-skipped step is the heat-dissipation pipe, and it’s the one that causes the most dramatic failure.
- Site the Blower. Place it in a cool, well-ventilated, moisture-free location, above any potential flood level. If outdoors, use a ventilated enclosure. The Aquatic Education guide stresses this: heat and moisture are the primary enemies.
- Provide Clean Power. Use a GFCI-protected outlet on a dedicated circuit. Ensure the voltage matches the motor (115V or 230V). For 3-phase motors, verify the rotation direction per the manual before final connection.
- Install the Metal Heat-Dissipation Pipe. Connect a 5-foot (1.5-meter) section of metal pipe to the blower outlet. This step is required. The Aquatic Education source warns that exhaust air can be hot enough to denature and melt Schedule 40 or 80 PVC, while the GSA advises considering heat-dissipating pipe if the exit air is too hot for plastic.
- Run the Main Distribution Line. From the metal pipe, transition to your PVC or polyethylene pipe. The pipe diameter should be at least the same size as the blower outlet, or one size larger. Never downsize the pipe right at the outlet.
- Lay the Pond Loop. Run the main line around the pond perimeter. Use sweep elbows, not sharp 90-degree fittings, to minimize friction loss. Secure it to the pond bank.
- Install Diffusers and Drop Lines. Attach small-bubble diffusers to drop lines and place them evenly across the pond bottom. Secure them with weights.
- Pressure-Test and Start. Before submerging diffusers, turn on the blower. Feel for strong airflow at each open drop line. Then connect the diffusers, submerge them, and start the system.
Components and Accessories You Can’t Skip
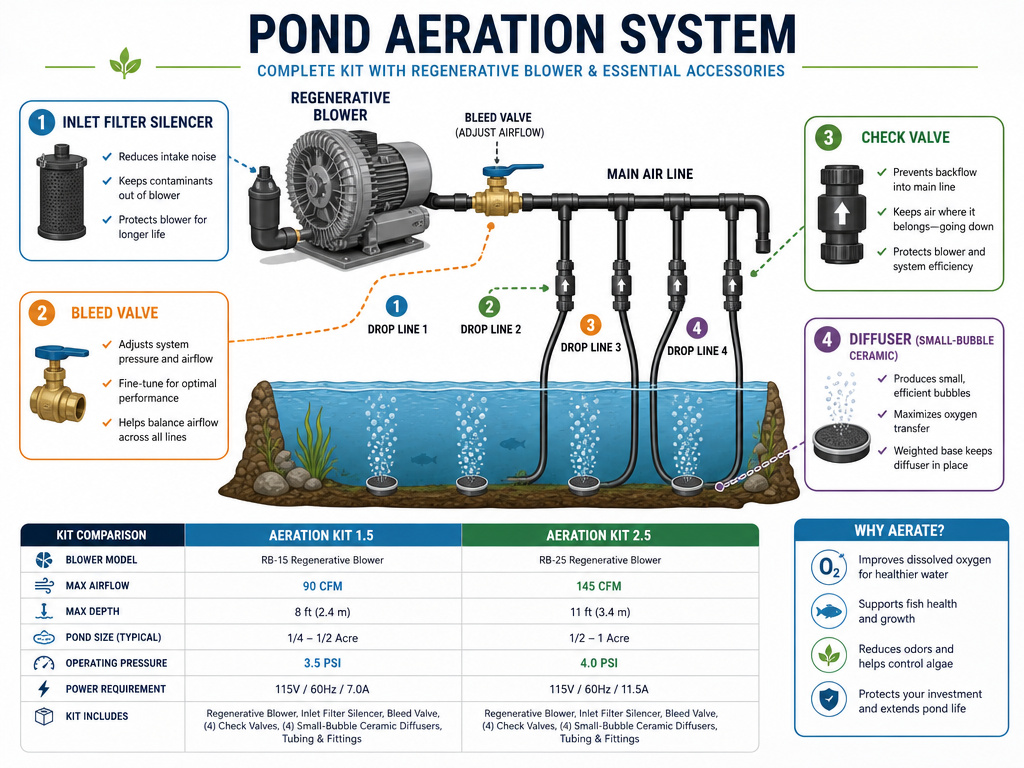
Your blower is just the start. The system lives or dies by the parts you connect to it.
- Inlet Filter Silencer: This is a combined filter and muffler. It keeps dust out of the impeller and cuts down the inlet noise. Clean it monthly, a clogged filter starves the blower, making it work harder and run hotter.
- Bleed Valve: This is your best friend for fine-tuning. You install it on the main distribution line after the blower to vent excess air from an oversized blower. It’s far better than choking the airflow at the diffusers.
- Check Valves: Install one on each drop line, just above the diffuser. They prevent water from siphoning back up the tube if the blower stops or if a line leaks.
- Diffusers: Small-bubble ceramic or membrane diffusers are the standard. They create tiny bubbles that rise slowly, maximizing oxygen transfer. Don’t use large-bubble stones; they’re for decorative fountains, not efficient aeration.
A quick comparison of two common packaged options shows how specs translate to real use:
| Kit Model | Max Flow Rate | Max Air Depth | Wattage | Best For |
|---|---|---|---|---|
| Aquascape 2-Outlet (75000) | 4000 cc/min x 2 | 8.5 ft (~2.6 m) | 6W | Small ornamental ponds, water gardens. |
| Aquascape 4-Outlet (75001) | 3500 cc/min x 4 | 9.2 ft (~2.8 m) | 11W | Larger koi ponds, medium-sized fish ponds. |
Maintenance That Actually Extends Lifespan
A correctly sized and installed regenerative blower can run for over a decade. Maintenance isn’t about fixing things; it’s about never letting them break.
- Daily/Weekly: Listen. The sound should be a consistent, smooth hum. A new grinding, whining, or clicking noise means stop and investigate.
- Monthly: Check and clean the inlet filter. A dirty filter is the number one cause of reduced airflow and increased operating temperature.
- Seasonally (Spring/Fall): Inspect all above-ground piping and connections for cracks, especially at the PVC-to-metal transition. Check diffusers for clogging or biofilm buildup.
- Annually: Inspect the motor housing and enclosure for signs of moisture ingress or pest nests. Verify all electrical connections are tight and corrosion-free.
This routine aligns with a broader guide to regenerative blower maintenance, which covers tasks like bearing inspections.
Common mistake: Running the blower non-stop through a dry, dusty summer without ever checking the filter. By the time you notice weaker bubbles, the impeller may already be coated in grit, throwing it off balance and straining the bearings.
Regenerative Blower vs. Other Aerator Types
It’s not the only tool for the job. Knowing when it wins, and when it doesn’t, saves you money and grief.
- Vs. Piston Pump: Piston pumps deliver higher pressure, suited for deeper tanks or long, vertical pipe runs. But they’re oil-lubricated (risk of contamination), louder, and require more maintenance. For a shallow pond, the regenerative blower’s oil-free, low-maintenance operation wins.
- Vs. Roots Blower: Roots blowers also deliver oil-free air but at much higher pressures and volumes, for much larger-scale aquaculture. They are significantly louder, more expensive, and less energy-efficient at the lower pressures a typical pond needs. The regenerative blower is the quieter, more efficient choice for the sub-10-psi range.
- Vs. Surface Aerator (Fountain/Paddlewheel): Surface aerators mix water and splash air at the surface. They’re good for emergency aeration but poor at circulating the entire water column and removing bottom gases like hydrogen sulfide. A bottom-up diffused system from a regenerative blower provides better overall pond health.
The debate between regenerative and centrifugal blowers is another common crossroad, centering on pressure capabilities and efficiency curves.
Troubleshooting Common Problems
Your bubbles have slowed to a trickle. The motor is hotter than usual. Don’t panic, run through this list.
| Symptom | Likely Cause | Immediate Action |
|---|---|---|
| Reduced or no airflow | Clogged inlet filter, kinked or leaking distribution line, clogged diffuser, failed check valve. | 1. Check/clean filter. 2. Feel along lines for kinks/leaks. 3. Isolate and clean diffusers. |
| Blower overheats | Restricted airflow (clogged filter, pinched line), undersized blower, insufficient ventilation around unit. | Turn off immediately. Let cool, then check for airflow restrictions and clear them. |
| Excessive noise/vibration | Foreign object in impeller, worn motor bearings, loose mounting bolts, improper 3-phase motor rotation. | Inspect inlet and impeller housing for debris. Check mounting. Verify 3-phase rotation. |
| Water in air lines | Diffuser or check valve below water level when blower off, leak in pond loop. | Elevate check valves, inspect and repair pond loop. |
| GFCI outlet trips | Moisture in electrical connections, faulty motor, overloaded circuit. | Ensure all connections are dry and tight. Try a different GFCI outlet. Consult an electrician if problem persists. |
The 3-Phase Rotation Check: If you have a 3-phase motor and it’s vibrating violently with little airflow, the rotation is backwards. Swap any two power leads at the connection point.
Seasonal and Electrical Safety Guidelines
Aeration isn’t a set-and-forget proposition. Seasons change, and your system should adapt.
Summer: Run the system continuously, especially on hot, still nights when oxygen demand is highest and natural replenishment is lowest. This is maintenance aeration.
Winter: In freezing climates, you often run the aerator not for oxygen, but to keep a hole open in the ice. This allows harmful gases like hydrogen sulfide to escape. You may need to move the diffuser to a shallower area to prevent super-cooling the entire pond. The Aquascape manual notes this specific winter application.
Shoulder Seasons (Spring/Fall): Use a timer to run the system 12-16 hours per day, often at night when plants aren’t producing oxygen.
Electrical Safety is Non-Negotiable:
- GFCI Protection: Every outlet serving an outdoor blower must be GFCI-protected. It’s a lifesaver, literally.
- Weatherproof Enclosure: All connections, including the plug if used outdoors, must be in a UL-listed weatherproof enclosure.
- Proper Grounding: The blower itself and any metal enclosures must be properly grounded according to local electrical code.
Single-stage vs. Dual-stage blowers
For pond aeration, you’ll typically use a low-pressure, high-volume blower, which is the starting point for how to use a regenerative blower for pond aeration. The key factor is your pond’s depth. These blowers have pressure capabilities up to a certain limit, making them particularly suited for ponds with depths of less than 3 meters. A single-stage unit is often sufficient for most recreational ponds within this range. The choice hinges on matching the required air volume and pressure to your pond’s specific depth and volume to ensure effective aeration without overworking the motor.
Sample sizing calculations/examples
Sizing starts with your pond’s depth and volume. Blowers offer a wide range of air flow rates. You must account for system losses. For every 300 meters of elevation above sea level, deduct 4 percent of the blower’s volume and pressure. If your electrical supply runs at 50 Hz, expect both pressure and volume to be roughly 16 percent less than the standard 60 Hz ratings. It is better to choose a slightly larger blower, rather than a smaller one. The excess flow can be diverted using a bleed valve for fine-tuning.
Brand/model recommendations or selection
Focus on specifications, not brand names. Select a blower whose maximum pressure rating exceeds your pond’s water depth and whose flow rate meets your pond’s oxygen demand. Ensure the unit is designed for continuous duty in a freshwater environment without corrosive chemicals. The blower should be installed in a cool, well-ventilated, and moisture-free area. A correctly sized regenerative blower could last over a decade with minimal maintenance, provided you clean the inlet filter frequently and follow proper installation guidelines for piping and heat management.
Frequently Asked Questions
How many hours a day should you aerate a pond?
For maintenance aeration in a stocked pond, run the system 24/7 during warm months. The University of Florida IFAS Extension describes this as a continuous operation to prevent low oxygen and improve the environment. In cooler months or for lightly stocked ornamental ponds, 12-16 hours overnight may be sufficient.
How does a regenerative blower work?
It uses a rotating multi-vane impeller inside a ring-shaped housing. Air is drawn in and accelerated centrifugally. Some air slips past each blade and is re-accelerated by the next blade in a regenerative cycle, building pressure in small increments before being discharged as a high-volume, low-pressure stream of oil-free air.
What is the easiest way to aerate a pond?
For a small pond, a packaged kit like the Aquascape models is the easiest. It includes the blower, tubing, and diffusers. For larger ponds, designing a system with a correctly sized regenerative blower, proper piping, and multiple diffusers is the most effective and energy-efficient “easy” way for long-term health.
Can a pond be too aerated?
For fish, practically no. It’s very difficult to supersaturate water with oxygen using a low-pressure diffused air system. However, in winter, excessive aeration in very cold water can super-cool the pond, which may stress fish. The goal is to maintain an open hole for gas exchange, not to create a bubbling Jacuzzi.
The Bottom Line
A regenerative blower system is an investment in prevention. The upfront cost of a proper setup, blower, metal heat pipe, oversized PVC, good diffusers, pays back over years in avoided fish kills, lower energy bills, and a decade of reliable service.
Don’t get lost in the spec sheet wars. The real work happens before you buy: measuring your pond’s depth, calculating its volume, and reading the manuals from the GSA and Aquatic Education that spell out the altitude and heat rules everyone else glosses over.
If you take away one action, make it this: never, ever connect PVC directly to the blower outlet. That single five-foot section of metal pipe is the difference between a system that melts down in a year and one that quietly hums along for ten. Everything else, the sizing, the bleeding valve, the filter cleaning, flows from getting that first physical connection right.
Your pond is a complete ecosystem. A regenerative blower gives it the steady, clean breath it needs to thrive.
