
How to Use a Rotary Hammer: Step-by-Step (Without Damage)
This post contains affiliate links. As an Amazon Associate, we earn from qualifying purchases.
Using a rotary hammer correctly means matching three things: the tool’s mode (rotation-only, rotary hammer, or hammer-only), the correct SDS bit for your material, and firm, straight pressure. Never force it. Let the tool’s hammering action do the work, and wear ear and eye protection, the noise and dust are no joke.
That last point about pressure is where most first-timers go wrong. Pushing too hard doesn’t make the hole faster; it overheats the bit, glazes the concrete, and can burn out the tool’s motor. The tool needs a certain amount of backward force to engage its internal hammering piston. Too little, and it just spins. Too much, and you’re fighting it.
What follows is the bench-talk version of how to use a rotary hammer: the safety gear you cannot skip, a walkthrough of the three settings on the collar, the step-by-step drill and chisel process, and how to fix the common problems you’ll absolutely run into.
Key Takeaways
- Always engage the auxiliary handle and wear impact-rated safety glasses and ear muffs; concrete dust and high noise levels cause permanent damage.
- Select the correct SDS bit type (SDS-Plus for lighter-duty holes, SDS-Max for larger, heavier-duty holes) and use the hammer-only mode for setting anchors or light chiseling.
- For smooth operation, apply firm, straight pressure and let the tool’s weight and hammer action do the work, forcing it causes immediate bit wear and motor strain.
- If the bit gets stuck, do not twist or yank; switch to rotation-only mode and gently pull while running the tool to back it out.
- Manage silica dust with a HEPA vacuum attachment or water misting. OSHA requires it, and it prevents the lung damage known as silicosis.
Gear Up: The Non-Negotiable Safety Kit
Skip this section and you’re not just being risky; you’re ignoring the manufacturer’s legal warnings printed in every manual. The Milwaukee 2717-20 and DeWalt DCH263 manuals are identical on the big points: this tool creates hazardous noise and carcinogenic dust.
Hearing loss is cumulative and permanent. The DeWalt DCH263 has a declared sound power level (LWA) of 96.7 dB for hammerdrill mode. That’s in the “damage occurs within hours of exposure” range. Muffs are mandatory.
Wear ear protectors. Exposure to noise can cause hearing loss.
Some dust created by power sanding, sawing, grinding, drilling, and other construction activities contains chemicals known to cause cancer, birth defects or other reproductive harm… Crystalline silica from bricks and cement and other masonry products… To reduce your exposure to these chemicals: work in a well ventilated area, and work with approved safety equipment.
. Milwaukee 2717-20 Operator’s Manual
Your kit list is short but absolute:
- Impact-rated safety glasses: Not sunglasses. Debris flies.
- Ear muffs or plugs: With an appropriate Noise Reduction Rating (NRR).
- NIOSH-approved respirator (N95 or better): For silica dust. A cloth mask does nothing.
The auxiliary handle isn’t an optional accessory. It’s a primary control. The manual states its purpose bluntly: “Loss of control can cause personal injury.” Thread it onto the front of the tool and adjust it so you can hold the tool comfortably with both hands, elbows slightly bent.
Know Your Tool: Bits, Chucks, and Specs
A key part of how to use a rotary hammer is understanding the SDS chuck system. It’s not a standard drill chuck. SDS (Slotted Drive System) bits have grooves that lock into the tool, allowing for a hammering action while letting the bit slide back and forth slightly. This absorbs impact and transfers more energy to the work.
There are two main types, and using the wrong one will damage your tool or result in poor performance.
| Chuck Type | Shank Size | Typical Capacity | Best For |
|---|---|---|---|
| SDS-Plus | 10 mm | Holes up to 7/8″ diameter (concrete) | Anchors, small cores, light chiseling. Common on models like the Milwaukee 2605-20. |
| SDS-Max | 18 mm | Larger capacities (e.g., twist bit up to 1-9/16″, core bit up to 4″) | Heavy-duty coring, deep drilling, sustained demolition. Found on tools like the Milwaukee 2717-20. |
The “capacity” listed on the spec sheet is the maximum under ideal conditions. The DeWalt DCH263, an SDS-Plus tool, lists a maximum drilling range in concrete of 1-1/8″. Its manual states an optimal drilling range of 1/4″ to 3/4″. Pushing any tool to its maximum capacity on every hole can shorten its life. For bigger holes, you may need a tool with a larger capacity.
Bits are also material-specific. A standard masonry percussion bit has a carbide tip for concrete and brick. A chisel or point bit has a flat or spade end for demolition work. A core bit (with a diamond or carbide rim) is for drilling large-diameter holes. Using a wood spade bit in a rotary hammer will destroy the bit and likely the tool.
The 3 Rotary Hammer Modes and When to Use Them
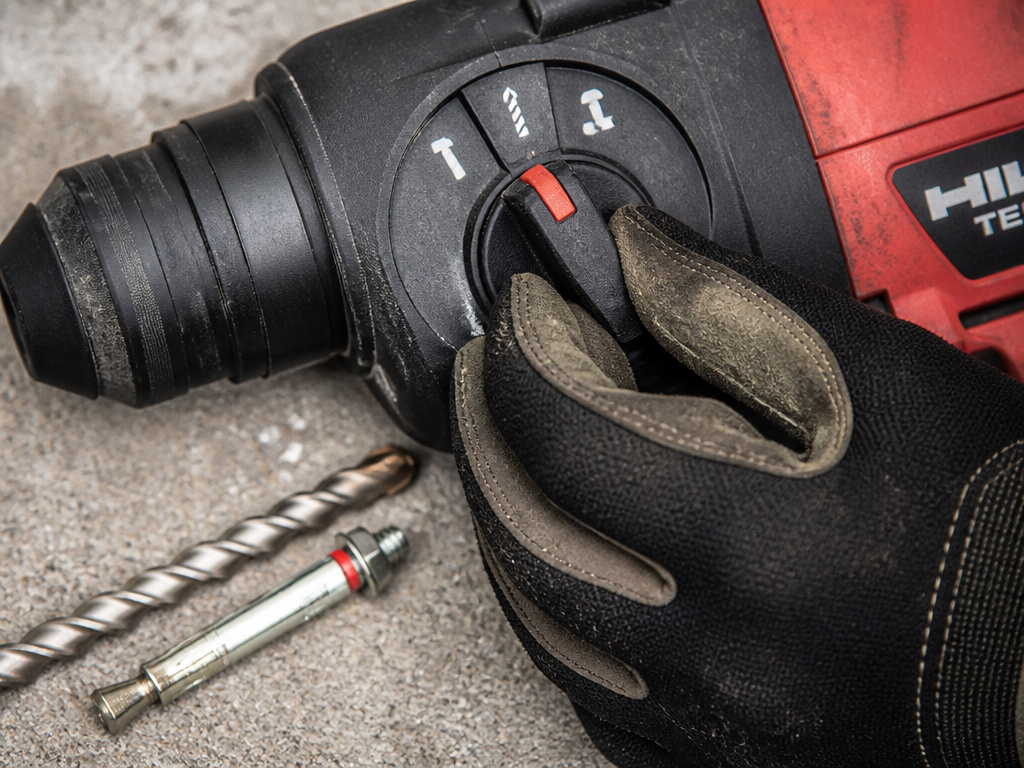
The selector collar is the brain of the operation. Turning it changes the internal mechanism. Always let the motor come to a complete stop before switching modes, grinding the gears is a quick way to a repair bill.
-
Hammer-Only (Chisel Icon): The tool hammers in and out with no rotation. Use this for:
- Setting mechanical anchors. The Milwaukee manual is explicit: “Always use the ‘hammering-only’ setting to set the anchor. Never use the ‘hammering-with-rotation’ setting to set the anchor.”
- Light demolition. This is your setting for using it as a chisel to break up tile, chip away old mortar, or split brick.
- Chipping concrete. With a point or scaling chisel.
-
Rotary-Hammer (Hammer + Drill Icon): This is the primary drilling mode. The tool hammers and rotates simultaneously. Use this for:
- Drilling into concrete, brick, or stone. This is the mode for 90% of your work when you need a hole.
- Using core bits. The rotation is needed to grind away material.
-
Rotation-Only (Drill Icon): The tool rotates without hammering. Use this for:
- Drilling into wood or steel (with the appropriate non-SDS adapter and bit).
- Driving screws (with a clutch adapter, not common, but possible).
- Backing out a stuck bit. If a bit jams in a hole, switching to rotation-only can help unscrew it from the compacted debris.
Where this goes sideways: Using rotary-hammer mode to set an anchor. The rotation will grind the anchor’s threads against the concrete, weakening the hold and often getting the anchor stuck before it’s fully set. The anchor won’t bite, and you’ll have to drill it out.
The 7-Step Drilling Process (From Mark to Cleanup)
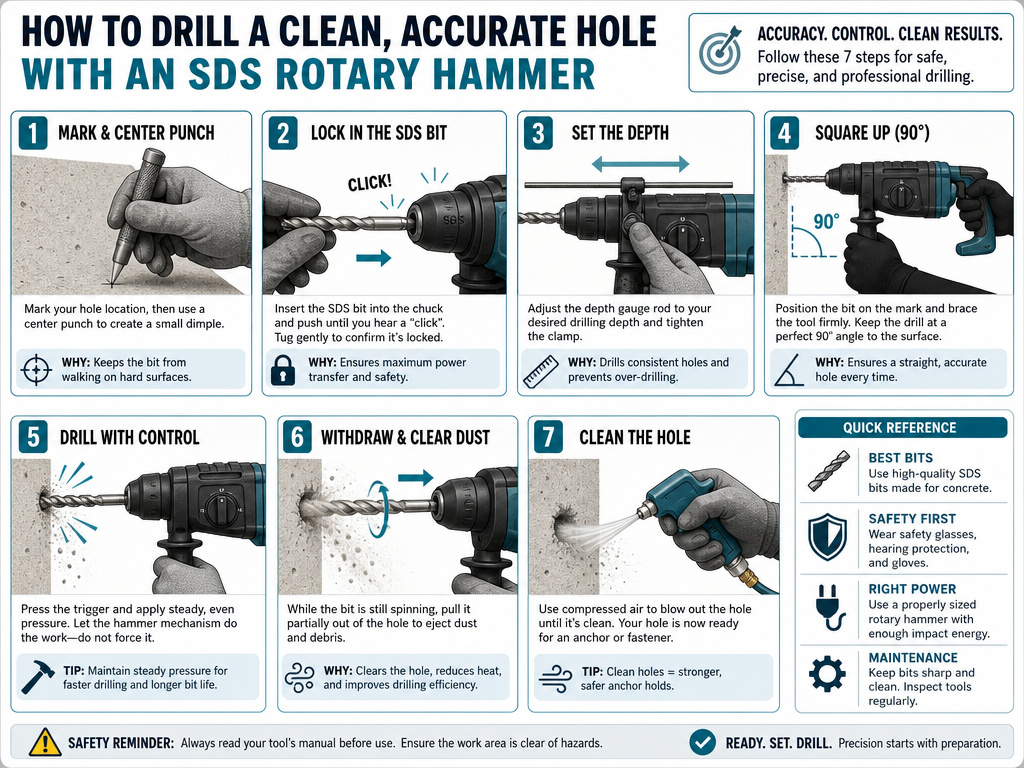
This is the core rhythm. Miss a step and you’ll waste time, ruin bits, or create a hazard.
1. Mark and Punch Your Hole.
Use a permanent marker and a center punch or old nail set. A solid dimple keeps the bit from “walking” across the concrete surface when you start.
2. Insert and Lock the Bit.
Pull the chuck sleeve forward, insert the SDS bit until it clicks, and release the sleeve. Give the bit a gentle tug to confirm it’s locked. Never use a bit that’s loose in the chuck.
3. Set the Depth Gauge.
Loosen the knob on the side of the auxiliary handle, slide the metal rod until the desired depth lines up with the back of the chuck, and retighten. This prevents you from drilling too deep and jamming the bit.
4. Position and Brace.
Stand with your feet shoulder-width apart. Hold the main handle with your dominant hand and the auxiliary handle with your other hand. Position the bit at a 90-degree angle to the work surface. Any angle and the bit will try to deflect, causing a ragged hole and extra wear.
5. Start Drilling.
Squeeze the trigger and apply steady, firm pressure. You should feel and hear the hammering action engage, a rapid thud-thud-thud. If you don’t, increase pressure slightly. Let the tool do the work.
6. Clear the Hole.
Every 10-15 seconds, pull the bit partially out of the hole while it’s still running to eject dust. A clogged hole creates friction, overheats the bit, and can seize it solid.
7. Finish and Extract.
Once you hit the depth gauge, release the trigger. Wait for the bit to stop, then pull it straight out. Blow out the hole with compressed air or a vacuum before inserting your anchor.
How to Use a Rotary Hammer for Chiseling and Demolition
Switching from drilling to breaking stuff is mostly about changing the bit and the mode. The principle is the same: let the tool’s action do the work.
For tile removal or breaking up a small slab:
- Install a flat chisel or point bit.
- Set the mode selector to Hammer-Only.
- Hold the tool at a shallow angle (15-30 degrees) to the surface.
- Use short, controlled bursts on the trigger, working the chisel under the material to pry it up. Don’t just pound straight down.
The key difference between a demolition hammer vs rotary hammer is energy and stamina. A dedicated demolition hammer delivers more impact force and is built for continuous, heavy pounding. A rotary hammer in chisel mode is for shorter, lighter tasks. For a bathroom floor, it’s perfect. For breaking a 12-inch foundation wall, rent the bigger tool.
Troubleshooting Common Rotary Hammer Problems
Here’s what happens when the process breaks down, and how to fix it without causing more damage.
| Problem | Likely Cause | The Fix |
|---|---|---|
| Bit won’t hammer | 1. Tool is in rotation-only mode. 2. Not enough pressure to engage piston. 3. Tool is cold (from storage). |
Check mode. Increase firm, straight pressure. For a cold tool, lock a bit in and run it against scrap wood for 30 seconds to warm the grease. |
| Bit is stuck in hole | Hole clogged with dust, bit wedged on rebar or aggregate. | Do not force it. Switch to rotation-only mode, gently pull and wiggle while running the tool. If stuck on rebar, you may need to sacrifice the bit. |
| Tool overheats | Forcing the drill, dull bit, clogged dust vents. | Let it cool completely. Check and clean air vents. Sharpen or replace the bit. Use less pressure. |
| Poor drilling speed | Dull bit, wrong bit type, bad technique. | Use a new, sharp carbide-tipped masonry bit. Ensure you’re in rotary-hammer mode. Apply steady (not heavy) pressure. |
| Excessive vibration | Worn bit, loose auxiliary handle, internal wear. | Tighten the side handle. Try a different bit. If problem persists, the tool’s hammer mechanism may need service. |
Easy to miss: The variable speed trigger. It’s there, but the DeWalt DCH263 manual warns: “For maximum tool life, use variable speed only for starting holes or fasteners. Continuous use in variable speed range is not recommended.” Running the tool at half-trigger for minutes on end burns out the switch. Use full trigger for drilling.
Drilling into Reinforced Concrete and Managing Dust
Hitting rebar is a “when,” not an “if.” The manuals have a specific, cautious rule: “Cut embedded rebar only if this operation does not affect the integrity of the building. If in doubt, consult a structural engineer.”
In practice, for a simple anchor hole, you can drill through it. Use a sharp, high-quality bit and expect it to dull quickly. You’ll hear the sound change from a gritty crunch to a high-pitched screech. Slow down, use steady pressure, and be prepared to discard the bit afterward.
Dust management is a health mandate, not a cleanliness tip. Crystalline silica dust causes silicosis, an incurable lung disease. OSHA requires dust control.
Your best options:
- Tool-Integrated Vacuum: Attach a HEPA-rated dust extractor like the DeWalt DWH205 (made for the DCH263) directly to the tool. It captures dust at the source.
- Water Drilling: Use a bit with a water feed or mist the area with a spray bottle to keep dust down. Not always practical indoors.
- Ventilation and Respirator: At a minimum, work in a well-ventilated area with a fan pushing air out a window, and always wear that N95 respirator.
Rotary Hammer Internal Mechanism
Inside a rotary hammer, two main systems work together to deliver the hammering force. A piston mechanism is what creates the powerful impact. It uses a crank or similar assembly to drive a piston back and forth within a cylinder. This action compresses air, which then drives a striker forward to hit the back of the bit. This pneumatic design is what generates the high-impact energy needed for breaking concrete. A separate clutch mechanism is often part of the rotation system. Its job is to protect the motor and gears if the bit binds or jams in the material. When excessive torque is detected, the clutch disengages, preventing damage to the tool’s internal components and reducing the risk of kickback.
Frequently Asked Questions
How does a rotary hammer work?
Rotary hammer uses an internal piston mechanism. When you apply pressure, the piston drives a striker forward, which hits the back of the bit, creating a hammering action. This happens thousands of times per minute (BPM) while the bit rotates, grinding away material. It’s fundamentally different from a hammer drill, which uses a mechanical clutch to create a simpler, less powerful bumping action.
What is the difference between SDS-Plus and SDS-Max?
It’s about size and power. SDS Plus vs SDS Max refers to the chuck system. SDS-Plus is for lighter-duty tools and bits (up to about 1” holes). SDS-Max is for heavier tools and larger bits (1” to 2”+). The shanks are incompatible. SDS-Max delivers more impact energy for bigger jobs.
Can I use a rotary hammer as a regular drill?
Yes, but not optimally. In rotation-only mode, with a keyed or keyless chuck adapter, you can drill wood or metal. However, it’s a heavy, bulky tool for that job. It’s better to own a separate drill/driver for everyday tasks and reserve the rotary hammer for masonry.
What is a rotary hammer good for?
Its primary job is drilling into concrete for anchors, sleeves, and bolts. Secondary uses include light demolition, tile removal, and chipping. For extensive concrete work, it’s the go-to tool, which is why we have guides on the best rotary hammers for concrete.
How do I choose the best rotary hammer?
Start with your most common hole size. For anchors up to 1/2”, a compact SDS-Plus model is fine. For 1/2” to 1” holes, a full-size SDS-Plus like the DeWalt DCH263 or Milwaukee M18 Fuel. For anything over 1”, you need SDS-Max. Consider cordless rotary hammers for convenience, but corded for all-day power. Our best rotary hammers breakdown goes deeper.
Before You Go
The one spec that matters more than any other is the single impact energy, measured in joules (J). The DeWalt DCH263 hits with 3.0 J. More joules generally mean faster drilling in tough material.
If you only take away one technique, make it this: pull the bit out to clear dust every few seconds. That single habit doubles bit life, prevents 80% of jams, and keeps the tool from overheating. Everything else, the modes, the chuck types, the safety gear, supports that basic rhythm.
And when you’re done, blow the dust out of the tool’s vents with compressed air. Concrete dust is abrasive and will eat the seals. A clean tool is a tool that lasts for the next project, not just the next hole.
