
How to Drill Into Concrete: Step-by-Step (Without Damage)
This post contains affiliate links. As an Amazon Associate, we earn from qualifying purchases.
To drill into concrete, you need a hammer drill or rotary hammer, a carbide-tipped masonry bit, and a method to control dust. Mark the spot, drill a shallow pilot hole at low speed, then increase speed with steady pressure, pulling out occasionally to clear debris. Drill the hole 1/4 inch deeper than your anchor and clean it thoroughly before inserting the fastener.
That 1/4-inch depth rule is the part most guides mention but few explain. It’s not just extra space; it’s a dust trap. Concrete dust packs down under an anchor’s pressure, and if the hole is exactly anchor-depth, the fastener lifts out as you tighten it. The extra quarter-inch gives the dust somewhere to go so the anchor seats against solid material. This is a key detail to understand when learning how to drill into concrete.
What follows: the real difference between a hammer drill and a rotary hammer, the one water rule that cools the bit without killing it, and the step-by-step that works for a patio slab or a basement wall. By the last section, you’ll know which tool you actually need for how to drill into concrete and how to use it without burning out the motor or your patience.
Key Takeaways
. Use a hammer drill or rotary hammer for any hole deeper than 1/2 inch; a regular drill will burn out its motor or your patience. . Drill the hole 1/4 inch deeper than your anchor’s length to create a pocket for compacted dust, ensuring a tight fit. . For large-diameter holes, you need a dedicated core drill, as a hammer drill’s hammering action will shatter a large diamond core bit. . Always use a carbide-tipped masonry bit; a standard twist bit will dull in seconds and overheat the steel. . Clean the hole twice, once after drilling and again just before inserting the anchor. Residual dust is the number one cause of loose fixtures.
The Right Tool for the Job
This is a matter of physics, not preference. Concrete is an aggregate, sand and stone held together by cement. A standard drill bit just spins against it, creating friction and heat. A hammering mechanism chips the aggregate away so the bit’s cutting edges can clear the debris.
You have three real options, and the choice dictates your success.
Hammer Drill
A hammer drill (often a “hammer drill function” on a combo drill) uses a pair of toothed gears that ratchet against each other to create a rapid, percussive forward motion along with the rotation. It’s effective for smaller holes in standard concrete.
The DeWalt D25263 is a typical heavy-duty model. Its specs tell the story: a 900W motor, a no-load speed of 0–1450 RPM, and a single impact energy of 3.0 Joules. That 3.0 J is the key, it’s the force of each tiny hammer blow. For a maximum drilling range in concrete of 28mm (just over an inch), that energy is sufficient. The tool’s vibration emission value for drilling into concrete is 9.8 m/s², a number that quantifies the kickback you’ll feel in your hands and arms.
A hammer drill’s impact mechanism is a mechanical jackhammer in miniature. Two interlocking cogged plates slide in and out of mesh as the tool spins, delivering thousands of small blows per minute directly behind the drill bit.
Where this goes sideways: using the hammer function on a standard twist bit. The hammering action will snap the flutes off a non-masonry bit within seconds. You must pair the hammer function with a masonry drill bit designed to withstand the impact.
Rotary Hammer
Step up to a rotary hammer for larger holes or for more than a few holes in a day. The mechanism is different, it uses a piston driven by a crankshaft or wobble plate to deliver a true hammer blow. It’s more powerful and less fatiguing.
The Makita 8406 is a diamond-core drill intended for drilling in brick and concrete with a diamond core bit. Its no-load speed is 0-1,500 min⁻¹ and it delivers 0-22,500 blows per minute. Notice the manual’s strict warning: “Never use ‘rotation with hammering’ action when drilling with a diamond core drill.” The hammering function is for tungsten-carbide bits only. For larger holes made with a diamond-tipped core bit, you use rotation only.
For the biggest handheld work, the Husqvarna DM 200 core drill sets the limits. Its manual states the max. Drill diameter in concrete (handheld) is 80mm / 3.1 inches. Go larger than that, and the rotational torque if the bit binds can wrench the tool from your grip. This is why professional core drilling for large holes uses a rig anchored to the surface.
Regular Drill (The “Can I?” Question)
Can you use a regular drill? Yes, for a very shallow, small-diameter hole in soft concrete block or old, crumbly mortar. You’ll need to lean into it with nearly all your weight, and the process will be slow and hard on the drill’s motor.
The hammer drill vs regular drill difference isn’t minor, it’s about force multiplication. A regular drill relies on your downward pressure to keep the bit’s carbide tip engaged. A hammer drill adds its own mechanical pressure, thousands of times a minute. If you’re installing a single small anchor for a shelf, you can muscle through with a standard drill. For a deck ledger board needing a dozen 1/2-inch holes, you’ll burn out the drill’s brushes before you’re halfway done.
| Tool Type | Best For | Max Practical Hole Diameter | Mechanism |
|---|---|---|---|
| Regular Drill | 1-2 shallow holes in soft brick or block | Small diameters (e.g., under 1/4 inch) | Rotational force only |
| Hammer Drill | Multiple holes in standard concrete | Up to tool capacity (e.g., 28mm for DeWalt D25263) | Rotation + geared impact |
| Rotary Hammer | Many holes in reinforced concrete | Larger diameters (e.g., up to 80mm handheld for Husqvarna DM 200) | Rotation + piston-driven hammer action |
| Core Drill (Rig) | Large-diameter holes (2″+) for plumbing, electrical | 14+ inches | Rotation only (diamond bit) |
The Bit That Actually Cuts
The drill provides the action. The bit does the cutting. Get this wrong and nothing else matters.
A carbide-tipped masonry bit is the only bit for hammer and rotary hammer drilling. The tip is a wedge of tungsten carbide brazed onto the steel shaft. Carbide is harder than the sand and stone in concrete, so it grinds the aggregate away instead of being ground down itself.
Bits come in two common shank types for hammer tools: SDS Plus and SDS Max. SDS stands for Slotted Drive System. The shank has grooves that lock into the tool’s chuck, allowing for movement back-and-forth (for the hammer blow) while transferring rotational torque. An SDS Plus bit in a standard keyed chuck won’t work, and a standard round-shank bit in an SDS chuck will slip and ruin both.
Common mistake: Using a worn-out bit to “save money.” A dull carbide tip glazes over, creating massive friction. The concrete dust turns from gray to brown as the bit overheats, and you risk tempering the steel shaft behind the tip, making it brittle. A brittle shaft snaps under hammer force, leaving the tip embedded in your wall.
Diamond core bits are for core drilling, not hammer drilling. These are hollow cylinders with diamond segments bonded to their working end. They grind away a cylindrical plug of material. The CS Unitec bulletin notes that popular core bits range in size from 3/8” to 14” diameter, and most drill 12” deep. For these, you use a dedicated core drill motor or a core drill rig, never a hammering action.
The 7-Step Process for a Clean Hole
Speed breaks bits. Patience makes holes. Follow this sequence to avoid the two most common failures: a wandering starter hole and a clogged, overheated bit.
- Mark and Punch. Use a pencil or marker, then create a small divot with a center punch or an old nail and hammer. This gives the bit’s tip a place to sit so it doesn’t “walk” across the hard surface when you start.
- Don the Gear. Safety glasses are essential. Concrete dust is abrasive and will scratch your corneas. A dust mask prevents silicate inhalation. Hearing protection cuts the 90+ dB whine of the drill.
- Set the Depth. Slide the drill’s depth-stop collar onto the bit, or wrap a piece of tape around it at the desired depth. Remember: hole depth = anchor length + 1/4 inch.
- Start the Pilot. Position the bit in your punch mark. Hold the drill perfectly perpendicular. Start at the lowest speed with no hammer function (if your tool allows it). Apply light, steady pressure until you’ve drilled about 1/4 inch deep. This creates a guide that keeps the hole straight.
- Engage and Drill. Switch to hammer mode (or confirm it’s on). Increase to a medium speed. Let the tool do the work, apply firm, consistent pressure, but don’t lean on it. You’ll hear the pitch change from a high whine to a lower chug as the bit engages properly.
- Clear the Debris. Every 10-15 seconds, pull the bit completely out of the hole. Blow out the dust or use a vacuum attachment. This keeps the flutes clear so the bit can cut instead of rub.
- Finish and Clean. Once you reach depth, run the bit in and out of the hole a few times without spinning to loosen remaining dust. Then, vacuum the hole thoroughly. A clean, dust-free hole is the only way an anchor gets a full grip.
The step everyone skips when learning how to drill into concrete is number 6. The flutes on a masonry bit are designed to eject dust, but in a deep hole, the dust compacts. A clogged bit spins inside a sleeve of its own debris, creating intense heat. You’ll smell a sharp, acrid odor, that’s the carbide tip overheating and the steel behind it turning blue. At that point, the bit is already damaged.
When Water Is the Answer (And When It Isn’t)
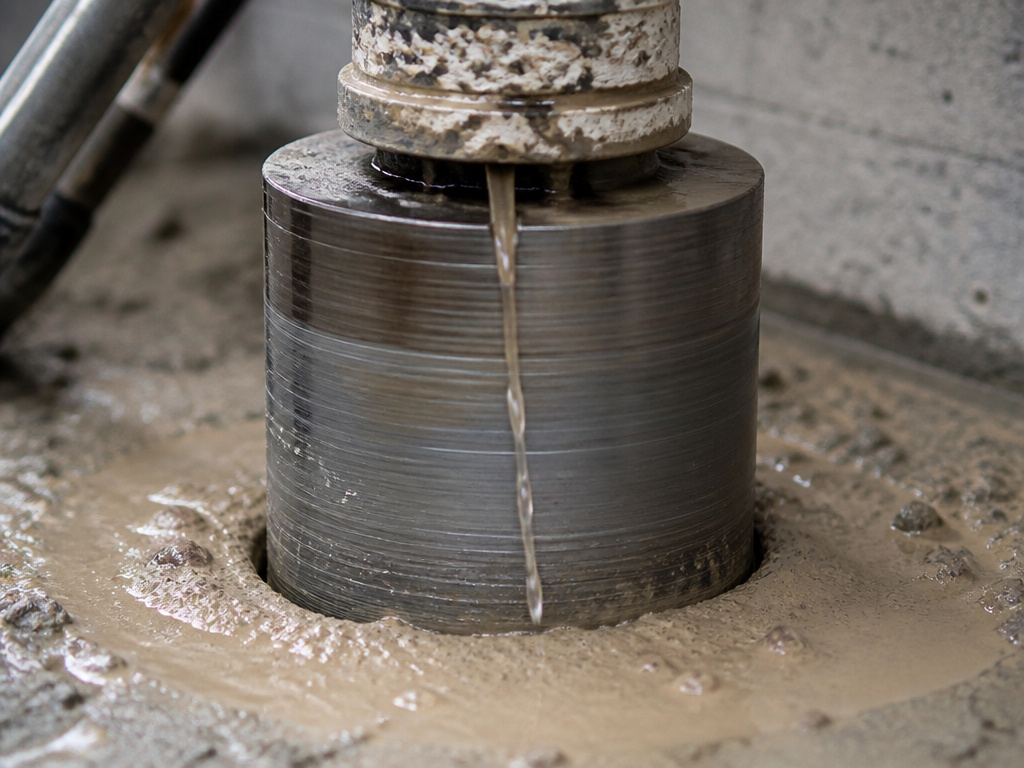
Dry drilling creates silica dust, a health hazard and a mess. Wet drilling cools the bit and suppresses dust. But you can’t just spray a hose at your drill.
For professional wet diamond core drilling, the CS Unitec bulletin has a specific rule: “When drilling with a wet diamond core bit, it is better to use less water than more water.” The goal is to create a slurry that helps the grinding process. “For the best results, apply water until the slurry resembles a heavily creamed coffee.”
Too much water pressure washes away the concrete grit before the diamonds can grind it, actually slowing progress. Different machines have different flow specs. The Husqvarna DM 200 recommends 1.7-2.4 liters per minute for Gear 1, while the Hakken SPJ-122Hi suggests about 2L per minute.
Where this goes sideways: Using water with a standard hammer drill and a carbide bit. Most consumer hammer drills are not water-resistant. Pouring water into the tool’s air vents or chuck will short the motor and ruin the bearings. Water cooling is strictly for dedicated, sealed core drills or rigs with a water feed system.
For the DIYer, the solution is a vacuum. Use a shop vacuum with a dust collection bag rated for fine particles. Hold the hose nozzle next to the hole as you drill. It’s not as effective as water, but it captures most of the dust and keeps the work area, and your lungs, clean.
Drilling Into Specific Concrete Types
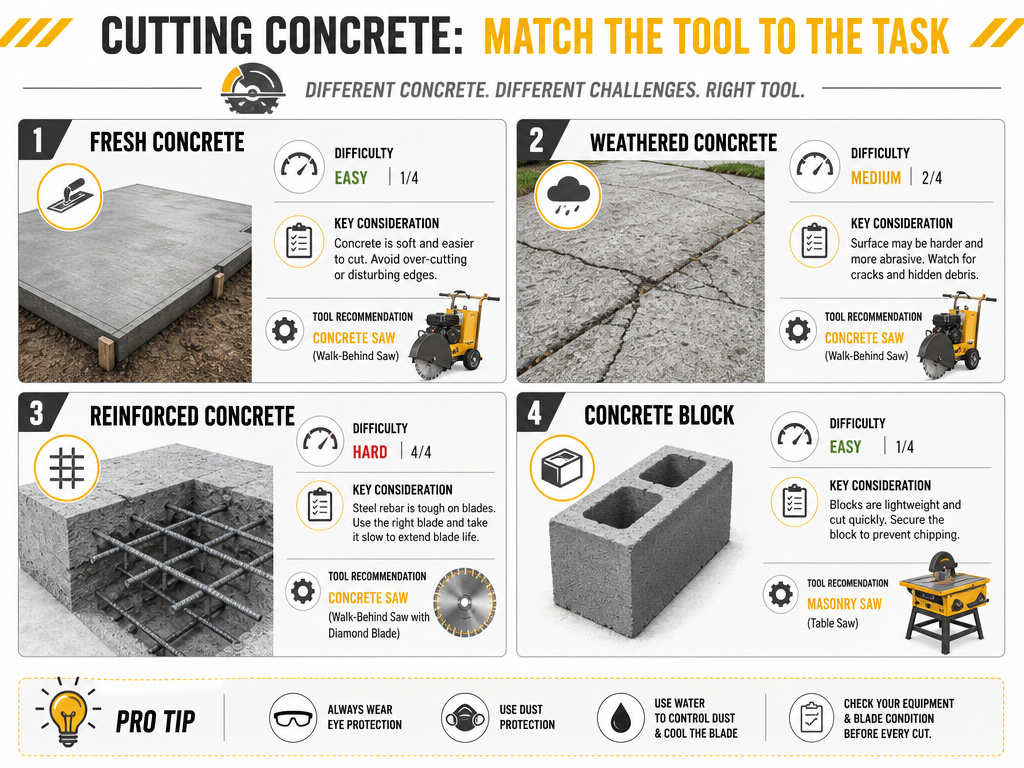
Not all concrete is the same. The mix, age, and reinforcement change the game.
- New Slabs (Less than 28 days old): The cement hasn’t fully cured. It’s softer but also more abrasive. Drilling is easier, but bits wear faster. Use a sharp, new bit and expect a finer, paste-like dust.
- Old Patio or Driveway: Fully cured and often surface-hardened from weathering. It’s extremely hard on the surface but may be softer underneath. Start slow and let the hammer action break through the hard crust.
- Reinforced Concrete (Footings, Beams): Contains rebar, steel reinforcing bars. Your carbide bit will cut through concrete but will dull instantly on steel. You’ll know you hit rebar by a sudden high-pitched squeal, sparks, and no progress. You need a rotary hammer with a concrete drill bit rated for rebar penetration (often with a different carbide grade) or a dedicated rebar-cutting drill bit.
- Concrete Block (CMU): Much softer than poured concrete. A hammer drill makes quick work of it. Be careful of blow-out on the back side if the block is hollow. Use low pressure as you near breakthrough.
| Concrete Type | Difficulty | Key Consideration | Tool Recommendation |
|---|---|---|---|
| New Slab (<28 days) | Medium | Highly abrasive, wears bits quickly | Hammer drill with new bits |
| Old Patio/Driveway | High | Hardened surface crust | Rotary hammer, steady pressure |
| Reinforced Concrete | Very High | Risk of hitting steel rebar | Rotary hammer, rebar-rated bit |
| Concrete Block (CMU) | Low | Soft, risk of back-side blow-out in hollow cells | Hammer drill, light pressure |
Safety: The Non-Negotiable Layer
This is a high-vibration, high-noise, dust-creating operation. The manuals are unanimous on the basics.
The Hakken SPJ-122Hi manual lists them plainly: “Wear ear protector such as earplug or ear muffs.“, “Wear safety glasses.“, and “Use power source equipped with earth leakage breaker.” An RCD/GFCI outlet or plug can prevent a fatal shock if the tool is damaged.
The Husqvarna DM 200 adds a critical situational rule: “Do not perform drilling from a ladder.” The rotational force if an 80mm bit binds could throw you off balance. Always work from a stable platform or scaffold.
Before you start: Scan the drilling area with a stud/metal detector to avoid electrical conduit, plumbing, or rebar. Secure long hair and loose clothing. Ensure your workpiece is secured and won’t shift during drilling.
Vibration is a long-term hazard. The Makita 8406 manual reports a vibration emission (ah,DD) of 9.5 m/s² for drilling concrete. That’s the measured value transferred to your hands. Taking regular breaks during a long drilling session is a preventive safety measure.
Troubleshooting: When the Bit Won’t Bite
You’re doing everything by the book, but the drill just spins and smokes.
-
Problem: Bit spins, makes no progress, overheats.
- Cause: Dull bit or incorrect bit type (using a standard twist bit).
- Fix: Stop immediately. Insert a new, sharp masonry bits. Let the tool and bit cool completely before resuming.
-
Problem: Hole is crooked or off-mark.
- Cause: Failed to create a starter divot, or applied uneven pressure when starting.
- Fix: Stop. You can’t straighten a crooked hole in concrete. Fill the bad hole with a concrete patching compound, let it cure fully (24 hours), and start over at the correct mark, using a punch.
-
Problem: Sudden screeching sound, sparks.
- Cause: Bit has encountered steel rebar.
- Fix: Stop drilling. You cannot drill through rebar with a masonry bit. You have two options: use a dedicated rebar-drilling bit (a different tooling), or relocate your hole at least 2 inches away from the obstruction.
-
Problem: Drill motor hums but chuck doesn’t turn.
- Cause: Worn-out brushes (in brushed motor tools) or a damaged gear in the hammer mechanism.
- Fix: This is a tool repair issue. For DIY, learn how to change a drill bit and perform basic maintenance. For motor or gear issues, seek professional service.
Frequently Asked Questions
Can a regular drill be used to drill into concrete?
Yes, but with severe limitations. It will only work for very small diameters (under 1/4 inch) in soft material like concrete block or old mortar. The process will be slow, require extreme downward pressure, and risk overheating the drill’s motor. For any substantive job, a hammer drill is the correct starting tool.
What is the easiest way to drill into concrete?
The easiest way is to use the correct powerful tool, a rotary hammer, with a sharp, carbide-tipped masonry bit. This combination reduces physical effort, increases speed, and minimizes frustration. Letting the tool’s hammer mechanism do the breaking work is what makes it “easy.”
Why won’t my drill bit go through concrete?
Three likely reasons: the bit is dull and needs replacing, you are using a standard twist bit instead of a carbide-tipped masonry bit, or you are attempting to drill into steel rebar embedded in the concrete. Inspect the bit’s tip for wear, confirm the bit type, and check for metal in the drilling path.
Can I screw directly into concrete?
No. You must first drill a pilot hole, then insert a concrete anchor, a plastic sleeve, lead shield, or expansion bolt, into that hole. The screw or bolt then threads into or expands the anchor, which grips the sides of the concrete hole. Screwing directly into concrete will fail to engage and strip the screw’s threads.
Before You Go
One rule that reframes everything: concrete drilling is about debris management, not brute force. The tool’s job is to break the aggregate. Your job is to remove the broken pieces so the bit’s cutting edges stay engaged on fresh material. Every problem, overheating, slow progress, bit walking, traces back to clogged flutes or a worn tip.
If your project calls for more than four holes over 1/4 inch, rent a hammer drill for concrete. The day-rate is cheaper than a burned-out motor on your own drill, and the right tool turns a grueling task into a straightforward one. For a single small anchor, you can muscle through with a standard drill and a masonry bit. Just know the limits, of the tool, the bit, and your patience.
