
How to Use an Oscillating Spindle Sander: Step-by-Step
This post contains affiliate links. As an Amazon Associate, we earn from qualifying purchases.
To use an oscillating spindle sander, you match three things: the spindle size to your curve, the correct table insert to minimize gap, and your feed direction to the machine’s specific rotation. You must connect a dust collector before starting, allow the spindle to reach full speed before contacting your workpiece, and always keep the piece moving against the spindle with light, even pressure.
That last point about feed direction isn’t a suggestion, it’s a hard rule that changes depending on whose name is on the machine. Get it wrong, and the work gets snatched out of your hands or thrown across the shop. The manuals from Woodfast and Rikon give opposite instructions because their motors spin in opposite directions, a key detail when learning how to use an oscillating spindle sander.
What follows is the procedure pulled directly from the service manuals of five major brands: JET, Powermatic, Grizzly, Woodfast, and Rikon. We’ll walk through setup, the essential safety steps every manual emphasizes, the technique that actually works for how to use an oscillating spindle sander, and how to fix the chatter and burn marks that convince most people they’re doing it wrong.
Key Takeaways
- Never start the machine with the workpiece touching the spindle. Every manual states this. Contact on startup can grab and throw the piece instantly.
- Connect and run a dust collector before operation; some models, like the Powermatic OSS10, require a minimum of 300 CFM. The Grizzly manual is explicit: never operate without an adequate dust collection system.
- Match your feed direction to the spindle’s rotation. For clockwise motors (Woodfast), feed against the rotation. For counterclockwise (Rikon), feed with it.
- Use the table insert that fits closest to your sanding drum. A larger gap is a pinch hazard and offers no support, as the Grizzly manual warns.
- Let the spindle reach full speed before sanding. Applying work to a spinning-up motor bogs it down and increases the risk of grabbing.
Before You Start: The Non-Negotiables
This isn’t a random orbital sander. An oscillating spindle sander has a vertically rotating drum that also moves up and down. That combination generates significant torque and throws a spectacular amount of fine dust. The safety rules aren’t just good practice; they’re the difference between a finished curve and a trip to the emergency room.
Before you start: Disconnect the machine from power before any spindle change or adjustment. Wear approved safety glasses, secure loose clothing and hair, and never wear gloves, they can catch and pull your hand into the spindle. According to the Powermatic OSS10 manual, you must also remove rings, watches, and jewelry.
The dust rule is absolute. The Delta manual strongly recommends connecting to a dust collector via the 4-inch port, and the Grizzly manual says to never operate without an adequate system running. If your shop vac can’t move that much air, you need a real collector. That fine dust isn’t just messy; it’s a long-term respiratory hazard.
You’ll also need to decide on extension cords. Here the manuals disagree. Powermatic provides a table for proper cord gauge based on length and amperage. Woodfast, however, does not recommend using an extension cord at all, stating it may decrease the life of electrical components. If you must use one, follow the guidance for your specific machine: Powermatic provides a table for proper cord gauge, while Woodfast does not recommend using an extension cord at all.
Machine Setup and Spindle Changes
Your first task is getting the right sanding sleeve on the machine. This seems simple, but one brand has a specific sequence that, if skipped, makes the job ten times harder.
For most machines, you disconnect power before changing the spindle, but the Powermatic OSS10 requires a specific sequence: turn on the oscillating motor, then turn it off when the spindle is at its highest position before disconnecting power. The JET manual emphasizes cleaning the tapered area on the spindle and main shaft before installation to ensure a solid seat.
The Powermatic OSS10 has a special requirement. Its manual states you must first turn on the oscillating motor, then turn it off when the spindle main shaft is at its highest position in the oscillation cycle. Only then do you disconnect power. This positions an internal mechanism to allow the spindle to detach easily. Skip this step, and you’ll be fighting the spindle with a mallet.
Select a spindle that is slightly smaller than the curve you intend to sand. Use the table insert that has the smallest opening possible without contacting the sanding sleeve. . JET JOSS-S User Manual
That last part about the table insert is critical. A gap larger than necessary is a prime spot for a small workpiece, or your finger, to get pinched by the oscillating drum. The Grizzly manual calls this out as a specific pinch hazard. The insert should hug the sleeve as closely as possible while still allowing free movement.
The Core Technique: Feed, Pressure, and Motion
With the machine set up and dust collection roaring, you’re ready to sand. Here’s where technique separates a clean finish from a ruined piece.
First, start the sander and let it reach full speed. The JET, Grizzly, and Rikon manuals all specify this. Applying the workpiece to a motor that’s still spinning up can bog it down and cause it to grab.
Now, feed direction. This is the most common point of confusion because it’s not universal.
| Brand | Spindle Rotation (Viewed from Front) | Feed Direction | Source |
|---|---|---|---|
| Woodfast OS-140 | Clockwise | Against rotation | Woodfast Manual |
| Rikon 50-310 | Counterclockwise | With rotation | Rikon Manual |
| Grizzly T26417 | Not Specified | Not Specified | Grizzly Manual |
The Rikon 50-310 manual is clear: “Feed the work across and with the direction of the spindle rotation.” The Woodfast manual is equally clear but opposite: “Always feed the work across the spindle, against the direction of spindle rotation.”
How do you know which rule to follow? Look up your motor’s rotation in your manual. If it’s not listed, do a quick test with the power off: mark the spindle and rotate it by hand in the direction it spins when on. Then feed against that direction. When in doubt, consult your manual; Woodfast advises feeding against rotation, while Rikon advises feeding with rotation.
Hold the workpiece firmly with both hands, keeping it flat against the table. The Grizzly manual explicitly says to use both hands for control. Apply light, even pressure. The Grizzly manual warns to never jam the workpiece, and the Woodfast manual says to apply firm pressure without forcing the material. Let the abrasive do the work.
Keep the workpiece moving. If you hold it in one spot, you’ll create a flat spot on your curve and quickly wear out that section of the sleeve. The JET manual states that for best results, you should keep the workpiece moving against the spindle.
Sanding Curves vs. Straight Edges
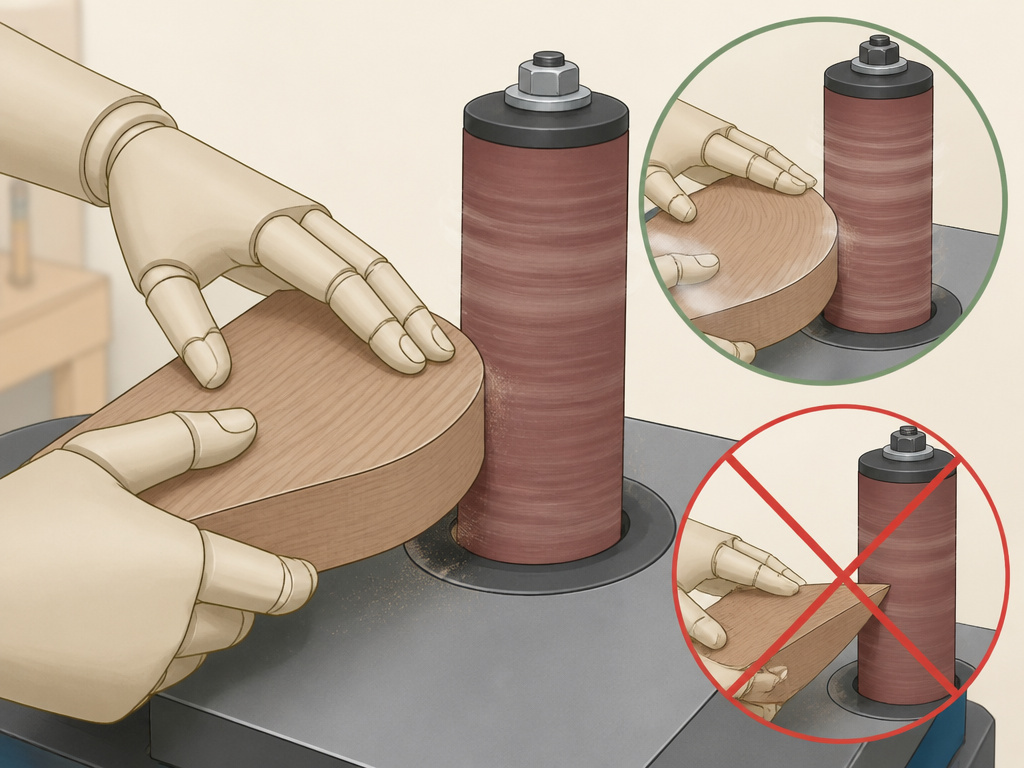
The oscillating spindle sander excels at inside curves. For a tight radius, you step down through spindle sizes. Start with a spindle slightly smaller than your curve, sand, then move to a larger spindle that fits the curve more closely to refine the shape. This is faster and gives you more control than trying to force a large drum into a small space.
For outside curves, you can use the side of the spindle. Tilt the table if you need to match a bevel. The JET manual notes that when the table is tilted, you should use the table area in front of the spindle for support. When the table is at 90 degrees, you can approach from any side.
Sanding a straight edge is trickier but possible with a fence or a jig. Clamp a straight board to the table, parallel to the spindle, and use it as a guide to run your workpiece along. This turns the spindle into a stationary drum sander for that edge. Without a fence, keeping a perfectly straight edge freehand is nearly impossible.
Common mistake: Trying to sand a pointed workpiece with the point leading into the spindle. The Grizzly manual specifically warns against this, as the point can dig in and cause the piece to rotate violently and eject.
Very small items are also a no-go. The Woodfast manual directly says not to attempt to sand very small items, as they are difficult to hold safely and can be pulled from your grip. If you must sand small parts, attach them to a larger backing board with double-sided tape.
Troubleshooting Chatter, Burn Marks, and Uneven Wear
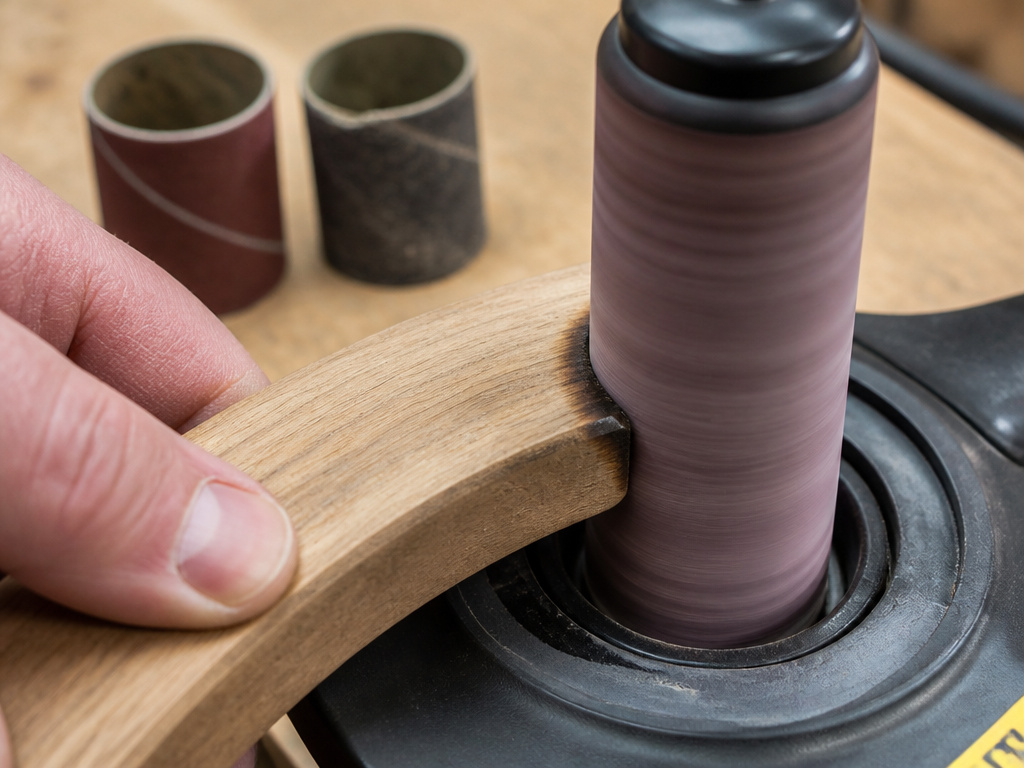
You’re following the steps, but the finish is rough, the wood is burning, or the sleeve is wearing out in one band. Here’s what’s going wrong.
| Problem | Likely Cause | Fix |
|---|---|---|
| Chatter (visible ridges) | Dull sanding sleeve, excessive pressure, or spindle runout. | Replace the sleeve. Use lighter pressure. Check spindle for damage. |
| Burn Marks | Holding workpiece still, using too fine a grit for material removal, or a loaded sleeve. | Keep the workpiece moving. Use a coarser grit for shaping. Clean or replace the sleeve. |
| Uneven Sleeve Wear (one band) | Not using the oscillation feature, or sanding the same spot repeatedly. | Ensure oscillation is functioning. Move the workpiece across the full height of the sleeve. |
| Workpiece Grabs/Throws | Feeding with the rotation on a clockwise-spinning machine, or starting with work in contact. | Verify motor rotation and correct feed direction. Always start spindle before contacting work. |
Burn marks mean friction is generating too much heat. This happens when you let the abrasive clog with wood pitch (a “loaded” sleeve) or when you stop moving the piece. A sleeve loaded with pine pitch feels smooth and glossy; it’s not cutting, it’s burning. Switch to a fresh sleeve.
If the sleeve is wearing out only in the middle, you’re not using the oscillation. The whole point of the machine’s up-and-down movement is to distribute wear across the entire sleeve length. The Rikon manual suggests a simple trick: if the lower portion is worn, turn the sleeve over on the spindle to use the fresh upper section.
And you cannot sand metal on these machines. The Woodfast manual explicitly states “Do not sand metal.” The abrasive sleeves are for wood only. Metal filings can clog the sleeve instantly and pose a fire risk with the heat generated.
Sleeve Management and Grit Progression
Don’t try to make one sleeve last forever. The Grizzly manual says to promptly replace sleeves that become worn or damaged. A torn sleeve can unravel at high speed. Inspect them before each use for cracks or tears.
Sleeve life can be extended. The JET manual notes that sleeve life may be prolonged by reversing it on the spindle to use the opposite end. This is a useful trick when one end gets loaded with pitch or wears down.
For grit progression, think in steps. If you’re removing saw marks with an 80-grit sleeve, your next step should be 120, then 180, then maybe 220 for a final pass before switching to a random orbital sander or hand sanding. Jumping from 80 to 220 will only embed the deeper 80-grit scratches under a smoother surface, making them visible when you apply a finish. For a detailed sequence, our guide on sanding wood between grits walks through the entire process.
The goal with the spindle sander is to get the shape right and remove the major imperfections. It’s your shaping and smoothing tool. The final surface finishing is better left to a tool like a detail sander or a fine-grit hand block.
Benchtop vs Floor Oscillating Spindle Sanders
Your choice between a benchtop and a floor-standing model comes down to workspace and workflow when learning how to use an oscillating spindle sander. Benchtop units are compact, designed to be bolted to a solid, level workbench to avoid any movement during use. They are ideal for smaller shops or occasional use. Floor models are larger, more powerful machines that occupy permanent floor space. They often feature more robust motors and may require a higher minimum extraction volume from your dust collection system. Regardless of type, the core safety and operational rules are identical: always connect to a dust collector before operation, and never operate the sander without an adequate dust collection system in place and running.
Frequently Asked Questions
What do you use an oscillating spindle sander for?
You use it primarily for sanding smooth, consistent interior curves in wood, like the inside of a chair leg, a cutout in a shelf, or the arc of a rocking chair rocker. It’s the right tool when a belt sander is too aggressive and a hand sanding block is too slow for a curved surface.
Can it sand straight edges?
Yes, but not efficiently without a fence. The spindle sander’s strength is curves.
Why does my workpiece keep burning?
You’re either using a clogged (loaded) sanding sleeve, holding the workpiece still against the spindle, or using too fine a grit for aggressive material removal. Keep the piece moving, use a coarser, fresh sleeve for shaping, and step up grits gradually.
How do I choose the right spindle sander?
Consider your shop space and project size. Benchtop models like the Rikon 50-310 are great for small shops. Floor models like the Powermatic OSS10 offer more power and table space.
The Bottom Line
An oscillating spindle sander is a one-trick pony, but it’s the best trick in the shop for curves. Respect its rules: dust collection is mandatory, feed direction depends on your motor, and you must keep the piece moving.
If you sand curves regularly, it’s an indispensable time-saver. But for that one perfect, smooth interior curve, nothing else comes close.
