
PANCAKE Air Compressor Accessories Guide
This post contains affiliate links. As an Amazon Associate, we earn from qualifying purchases.
Pancake air compressor accessories must match the machine’s limited air delivery, as specified on its nameplate (e.g., 2.6 SCFM for the CPO model, 2.8 SCFM for Harbor Freight and Husky 6-gallon models), or the tool will stall and the compressor will overheat. The key is a short, flexible air hose, an inline moisture filter for humid work, and a commitment to check accessory tool requirements against your compressor’s spec sheet. Manuals recommend different duty cycles; for example, the S3GCOMP manual recommends a 50% duty cycle (30 minutes run time per hour), while the Porter-Cable C2002 manual recommends a 50%-75% average duty cycle (30-45 minutes run time per hour). All forbid plastic air lines.
I want to clear something up. A pancake compressor’s specs are not a mystery. They’re printed on the side of the tank and in the manual. Your accessory choices are either confirmed or disqualified by those numbers, specifically the SCFM at 90 PSI and the duty cycle. A pancake air compressor accessories guide will always tell you to check the SCFM at 90 PSI and the duty cycle first. Gloss over those two specs and you’re buying tools that will disappoint you on the first job.
What follows: the non‑negotiable safety gear, the hose and fitting decision that impacts every tool, a hard look at which pneumatic tools a pancake can actually run, and the moisture trap that saves your tools from rust. We’ll also walk through a real‑world budget starter kit.
Key Takeaways
- Choose accessories rated for the minimum working pressure specified in your manual; for example, the Harbor Freight manual requires a rating of 150 PSI or 150% of the maximum system pressure (whichever is greater), while the 5-Gallon Pancake manual requires 150% of the maximum system pressure.
- Match your air hose length and diameter to your compressor’s specific SCFM output; consult your manual for guidance, as excessive length or small diameter can cause pressure drop.
- Run nailers and staplers, but avoid framing nailers and die grinders; their CFM demands exceed a pancake’s sustained output.
- Wear ANSI Z87.1 eye protection and ANSI S12.6 hearing protection; compressor manuals list these certifications, not as suggestions but as required gear.
The Mandatory Safety Layer You Can’t Skip
You need certified gear before you connect a single hose. Manuals are unanimous on this point.
Before you start: The CPO Power Tools manual specifies ANSI Z87.1 eye protection (CAN/CSA Z94.3) with side shields. The same source mandates ANSI S12.6 (S3.19) hearing protection. An air chuck can blow off, a hose can whip, and the pump noise can be significant (e.g., 83 dBA for the Harbor Freight model), enough to cause hearing damage over time.
The eye protection standard isn’t just about stopping chips. It’s about impact resistance from a 150 PSI air blast. The hearing standard certifies the decibel reduction you’re actually getting. Don’t buy generic safety glasses or foam earplugs from a bin. Look for the ANSI Z87.1 marks on the packaging.
Your electrical setup matters just as much. The Husky 6‑Gallon manual says to only use 50 ft. Or less round jacketed cords listed by Underwriter’s Laboratories (UL) if you must use an extension cord. More importantly, if your circuit is protected by fuses, use time‑delay fuses. A compressor’s motor draws a high startup current that can blow a standard fuse. This is one of those details you discover only after the third trip to the basement breaker box.
This foundational guide to air compressor safety covers these electrical and PPE rules in more depth, complementing a thorough pancake air compressor accessories guide. It’s not a lecture; it’s the pre‑flight checklist for a machine that stores explosive energy.
The Budget Starter Kit: What to Buy First
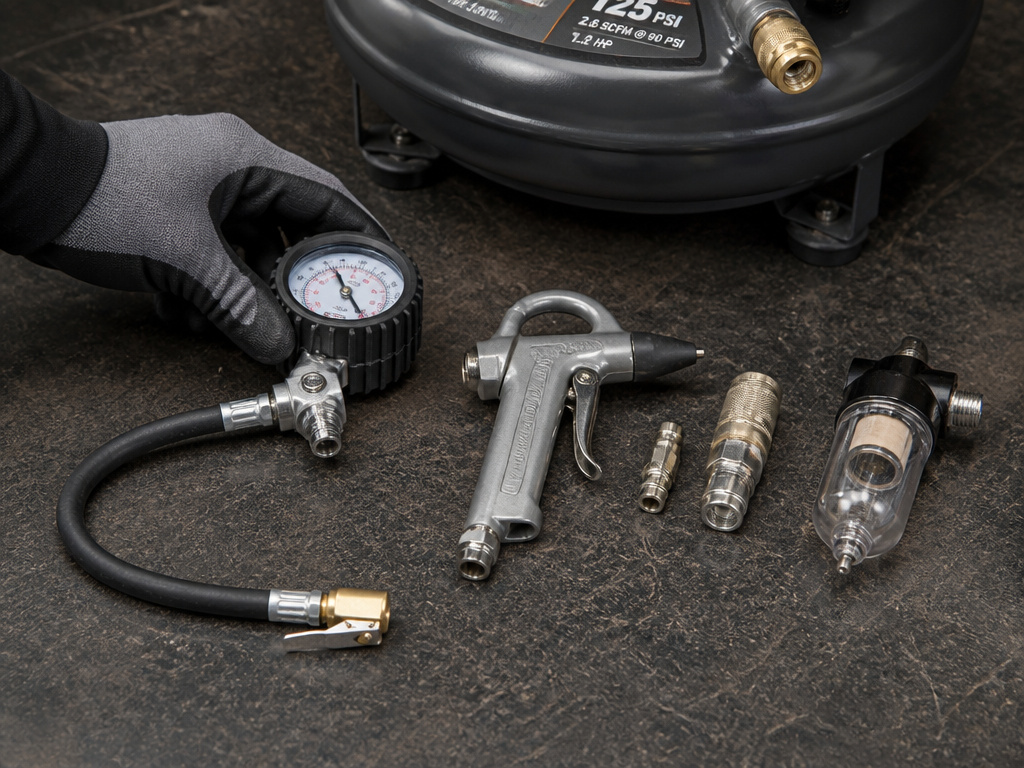
You don’t need a garage full of gadgets. A focused starter kit gets you inflating, blowing, and fastening. The goal is to cover 90% of basic jobs without overspending on tools your compressor can’t power.
Here’s a prioritized shopping list, grounded in what actually comes in manufacturer kits. The CPO Power Tools 6 Gallon Pancake manual lists these included accessories with part numbers: Tire chuck, Inflation needle, Blow gun adaptor, Tapered nozzle, and Plumber’s tape.
- A Tire Chuck with Gauge. The single most‑used accessory. The cheap pencil gauges are unreliable. Spend a little more on a chuck with an integrated, easy‑to‑read dial gauge.
- A Blow Gun. Not for cleaning your clothes. Use it for clearing sawdust from a drill press table, dusting out a computer case, or drying a freshly washed bike chain. Get one with a rubber‑coated nozzle.
- A Quick‑Connect Set. One female connector stays on the compressor outlet. Male plugs go on your hose and tools. This saves minutes of threading and re‑threading every time you switch tasks. I prefer the Milton style for its widespread compatibility.
- A Basic Inline Moisture Filter. If you see condensation in your tank drain (and you will), this is non‑negotiable. A simple filter/regulator combo mounted near your tool keeps water out of your nailer or paint gun. It’s the cheapest insurance for your other tools.
Where to look? Start with a pre‑assembled accessory kit. They bundle these core items, often for less than buying them individually. The key, as noted in any pancake air compressor accessories guide, is to verify the pressure ratings match your compressor. Don’t buy a kit rated for 100 PSI if your compressor cuts out at 150.
The Hose & Fittings Decision That Changes Everything
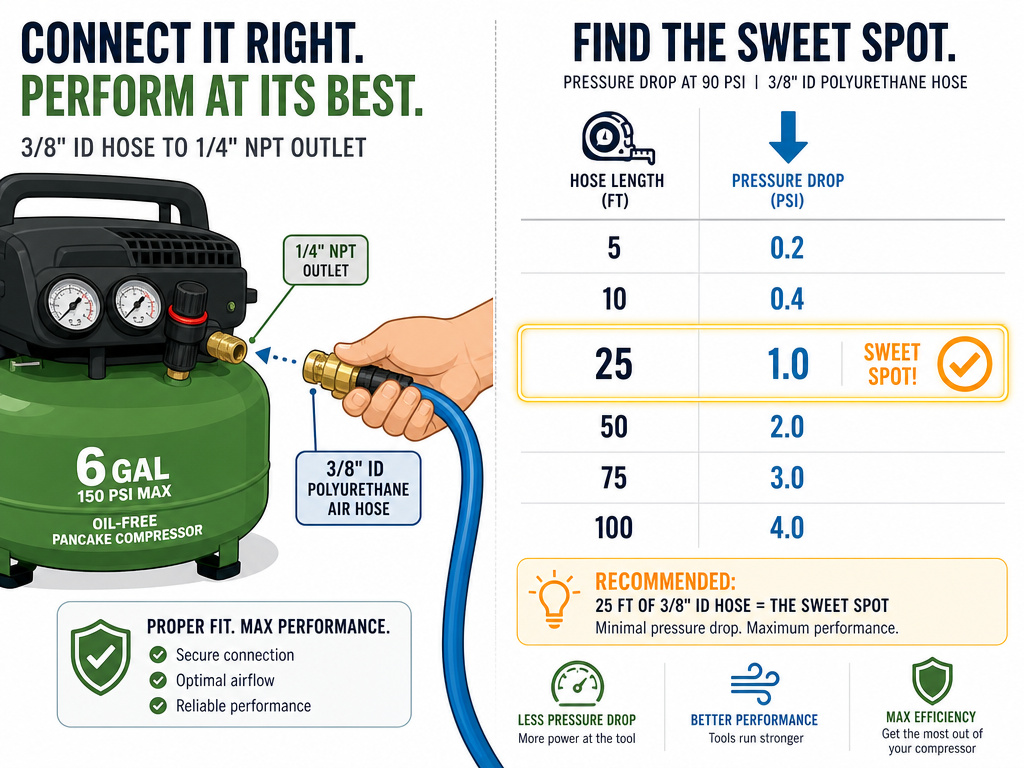
Your hose is the lifeline. Get this wrong and no tool will perform well.
Pancake compressors have a 1/4″–18 NPT outlet, as specified in the Harbor Freight 6 Gallon manual. All your fittings must start there. The big choice is between rubber‑covered and polyurethane hose. I reach for Flexzilla or similar flexible polyurethane. It stays manageable in cold weather, resists kinks, and is much lighter than traditional rubber. That matters when you’re coiling and moving it every time you use the compressor.
Hose length and internal diameter directly impact pressure. A longer, narrower hose creates more friction, which drops the pressure and volume reaching your tool.
| Hose Length & Diameter | Best For | Pressure Drop Reality |
|---|---|---|
| 25 ft, 1/4″ ID | Very short runs, inflating | Minimal drop, keeps SCFM high. |
| 25 ft, 3/8″ ID | Most shop work, nailers | Acceptable drop for 2–3 SCFM compressors. |
| 50 ft, 3/8″ ID | Larger garage, need for reach | Noticeable drop; may stall higher‑demand tools. |
| 50 ft, 1/4″ ID | Avoid this combo | Severe drop; tools will run weakly if at all. |
A 25‑foot, 3/8″ ID hose is the sweet spot for most pancake setups. It gives you room to move without strangling the air flow. Your next step is choosing the right air hose for your specific workspace layout.
Common mistake: Overtightening brass fittings into aluminum compressor ports. You feel one more quarter‑turn will seal the leak. That’s the turn that strips the soft aluminum threads. Hand‑tight plus a gentle nudge with a wrench is enough. If it still leaks, the threads need tape or sealant, not more force.
The CFM/PSI Reality Check for Common Tools
This is the heart of the guide.
Most accessory and tool ratings assume a larger compressor. The CPO Power Tools manual states a critical fact: most accessories are rated at 25% of actual SCFM while running continuously. If a tool says it needs 4 SCFM, that’s at 25% duty. For continuous use, it actually wants 16 SCFM, far beyond any pancake.
We can match real pancake specs to real tools. The Husky 6‑Gallon delivers 2.8 SCFM at 90 PSI. The Harbor Freight 6 Gallon matches that at 2.8 SCFM. This table uses those numbers.
| Tool | Typical CFM @ 90 PSI Demand | Pancake Compressor Viable? | Why It Works (Or Doesn’t) |
|---|---|---|---|
| Brad Nailer (18‑ga) | 0.3 – 0.5 SCFM | Yes, easily. | Very low air demand, short bursts. |
| Finish Nailer (16‑ga) | 0.5 – 0.8 SCFM | Yes. | Moderate demand, compressor keeps up. |
| Framing Nailer | 2.0 – 4.0+ SCFM | No. | Demand equals or exceeds total output; compressor will run constantly and overheat. |
| Stapler | 0.3 – 0.6 SCFM | Yes. | Similar to brad nailers. |
| Impact Wrench (1/2″) | 4.0 – 7.0+ SCFM | No. | Requires 2–3x the air a pancake can provide; will stall. |
| Die Grinder | 4.0 – 8.0 SCFM | No. | Continuous, high‑demand tool; pancake cannot sustain it. |
| Tire Inflation | 1.0 – 2.0 SCFM | Yes, slowly. | Compressor will cycle on/off but gets the job done. |
The framing nailer question comes up constantly. The answer is no. You might get a single nail off, but the compressor will run non‑stop trying to refill the tank, triggering thermal overload. For the full rundown on what you can and can’t power, our list of the best air tools for small compressors is built on this exact compatibility matrix.
Moisture Management is Non‑Optional
Water is the enemy. It rusts your tank from the inside and ruins paint jobs or wood finishes. Manuals are alarmingly specific about this.
The S3GCOMP 3‑gallon manual states that condensation forms in the tank with humidity and recommends draining the condensate daily and/or every hour depending on environmental conditions. The Harbor Freight manual is more blunt: “Drain Tank daily and after use. Internal corrosion causes tank failure and explosion.”
The process is simple but critical:
- Shut off the compressor and unplug it.
- Wait for the tank pressure to drop below 10 PSI. The 3GAL. PORTABLE PANCAKE manual warns: Never attempt to open the drain valve when the tank pressure is more than 10 PSI.
- Open the drain valve (usually a small petcock at the bottom) fully and let it hiss until all moisture is out. Close it.
Where this goes sideways: Draining only after you’re done for the day. In a humid garage on a summer afternoon, enough water can condense during an hour of cycling to start coating the tank interior. Drain it at the start of your session, then again halfway through if you’re running it hard.
For paint or sandblasting, an inline filter isn’t enough. You need a coalescing filter that removes oil vapor and a refrigerated dryer for truly dry air. That’s a significant investment and moves you into dedicated compressor territory. For a pancake, diligent draining and a basic filter protect your nailers and inflatables.
Duty Cycles, Storage, and Edge Cases
Your compressor has limits. Pushing past them shortens its life.
Manufacturers disagree on the exact duty cycle. The Porter‑Cable C2002 manual recommends a 50%‑75% average duty cycle (30‑45 minutes run time per hour). The S3GCOMP manual is more conservative at a 50% average duty cycle (not more than 30 minutes run time). Treat 30 minutes of runtime per hour as the safe ceiling. If your project requires more, stop and let the compressor cool down.
Cold climates present a specific edge case. A general compressor manual advises: store portable compressors in a heated building when not in use to prevent motor‑start issues and freezing of condensation. Bringing a cold compressor into a warm shop also causes internal condensation. Let it acclimate for an hour before you plug it in.
Finally, understand the pros and cons of pancake compressors. Their portability and price come with these hard limits. Knowing them keeps your expectations, and your compressor, healthy. For the hands‑on steps to get going,
What accessories should I buy for my pancake compressor?
Your compressor likely came with a few basic items like a coiled hose, a tire chuck, and inflation needles. Some manuals list specific part numbers for these accessories. Manufacturers warn against using accessories they have not tested, as incompatible parts can create hazards. When selecting additional hoses, couplers, or fittings, always verify they are compatible with your compressor’s air outlet size and plug style. For compressed air distribution lines, do not use plastic or PVC pipe. Use only galvanized steel pipe and fittings rated for the high pressure of your system.
How should I store and organize my compressor accessories?
Store your compressor in a heated building when not in use, especially in cold climates. For proper ventilation, consult your manual; for example, the 3GAL. PORTABLE PANCAKE manual states the unit must be kept a minimum of 12 in. From the nearest wall. Protect the air hose and electric cord from damage and puncture. Inspect them weekly for weak or worn spots and replace if necessary. A simple toolbox or wall-mounted pegboard can keep small accessories like chucks, nozzles, and tape organized and prevent loss. Always drain the tank’s condensate after use and before storage to prevent internal corrosion, which can lead to tank failure.
Frequently Asked Questions
What can I do with a pancake air compressor?
You can confidently run finish nailers (brad and 16‑gauge), staplers, inflate tires and sports equipment, and use a blow gun for cleaning. It’s perfect for trim work, light upholstery, and garage tasks. It cannot run framing nailers, impact wrenches, die grinders, or sandblasters.
What accessories do I need for my air compressor first?
Buy these four items first: a tire chuck with gauge, a blow gun, a set of quick‑connect fittings, and a basic inline moisture filter. This kit, often found as a bundle, handles inflation, cleaning, tool changes, and basic moisture protection for under $50.
Is a pancake compressor enough to run a framing nailer?
No. A typical framing nailer demands 2–4+ SCFM at 90 PSI, which matches or exceeds the total output of a 6‑gallon pancake compressor. The compressor would run continuously, overheat, and likely trigger its thermal overload protection before you finished a single row of siding.
Can you run air tools off a pancake compressor?
Yes, but only specific low‑consumption tools. Brad nailers, finish nailers, staplers, and small tire inflators work well. Any tool with a continuous CFM requirement above 3 SCFM at 90 PSI, like most impacts, grinders, or sanders, will not function properly and risks damaging the compressor motor from overload.
The Bottom Line
Your pancake compressor is a capable tool, but it’s not a powerhouse. Accessory choices are a filter, not a funnel. Start with the safety gear, buy a hose that matches its 2.8 SCFM reality, and stick to tools on the “yes” side of the compatibility chart. Drain the tank every single time you use it, no exceptions.
The one spec to memorize is your compressor’s SCFM at 90 PSI. That number, found on its nameplate, is the final word on what will work and what will waste your money. Everything else, hose length, duty cycle, moisture control, exists to serve that limit. Work within it, and you’ll get years of reliable service. Push past it, and you’ll be shopping for a new compressor by next season.
